
DIY Video Studio is supported by its readers. Please assume links on this site are affiliate links or ads, and that I get commissions for purchases made through these links. As an Amazon Associate, I earn from qualifying purchases. Thank you if you use any of the links.
If you want to record better videos on your iPhone and do it more quickly, the secret is to set up your FiLMiC Pro Presets in advance. Of course, there’s more to recording better videos than just setting up your presets. But being prepared is a vital step that will enable you to react quickly to every video recording opportunity.
What are FiLMiC Pro presets
Think of your FiLMiC Pro Presets as a collection of ready-made basic camera settings for various shooting situations and styles, any one of which can be loaded quickly. For instance, you can create and later recall presets for…
- Economy mode shooting when you are low on storage
- Any resolution you want to shoot, such as SD, HD, FHD, 2k, 3k, or 4k
- Shooting videos for social media in a 1:1 aspect ratio (square video)
- Widescreen cinematic shots
- Slow or fast motion effects
- Time-lapse video
The FiLMiC Pro Preset controls allow you to configure, save and update presets for most of FiLMiC Pro’s settings. So, you can have a preset ready for whatever shooting style you want.
FiLMiC Pro Presets menu
Open FiLMiC Pro and tap the gear wheel in the bottom right corner of the screen to get to
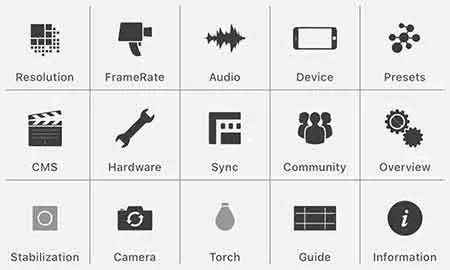
Now tap Resolution, the upper left box. You will see the following FiLMiC Pro Presets screen that allows the selection of your video’s aspect ratio, resolution and recording quality.
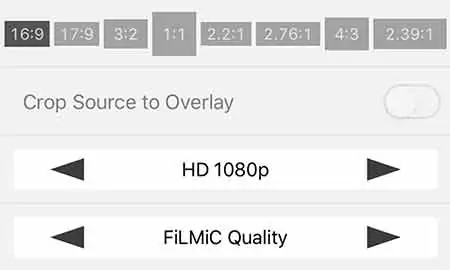
Aspect ratio preset
The top row allows you to change the framing or your aspect ratio.
By default, it’s 16:9, the Standard Widescreen aspect ratio for HD TV and video. But you can choose any of the others, depending on where you will be uploading or delivering your video.
If you choose any of aspect ratios, other than 16:9, the “Crop Source to Overlay” becomes enabled. This will display black over the parts of the screen that will be cropped. If you want to crop your footage on your desktop editor disable the overlay by sliding the switch to the “off” position.
You will now see the full 16:9 frame with a thin border displayed showing your target aspect ratio. However, the full 16:9 frame will be recorded for you to crop later.
Perhaps you are recording a video for social media? Then the 1:1 square aspect ratio might be a choice to go for instead of the standard 16:9. The square video will allow you to use more display space on mobile phones since most people will hold their phones vertically.
Want to have a kind of retro look? You could choose 4:3. All the other options are cinematic. But in most
Setting the frame size
The next setting you will want to change is your frame size (resolution). You’ll find this on the third row down.
Depending on your iPhone model, you will have a choice of SD 540p, HD 720p, HD 1080p, 2K 1152p, 3K 1836p, and 4K 2160p.
Again, for most of your filming, you will probably want HD 1080p or 4K 2160p.
Selecting your framerate
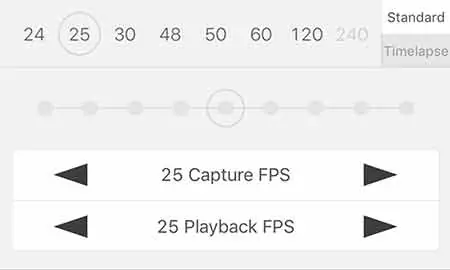
The second choice in the filmic pro presets control window is FrameRate. On the top row, you will see several frame rates and in the top right corner the frame rate modes of Standard and Timelapse.
Standard Mode
In Standard mode, and depending on your resolution, you will have a choice of several standard frame rates. These are 24fps, 25fps, 30fps, 48fps, 50fps, 60fps, 120fps and 240fps. The lowest, 24fps, is for recording video that is meant to have a filmic look (24fps the frame rate of sound films).
To select the frame rate you want, tap on the required frame rate and the gray circle will surround your choice. That rate will also appear in the Capture and Playback windows.
Your choice really depends on where you live in the world, or at least where you will be filming. It comes down to the frequency of AC electricity in your location. However other issues can also determine your choice.
Basically, in North America and parts of South American, plus some countries in the Far East, you would use 30fps. While in Europe and much of the rest of the world you would use 25fps. This matches your local TV frame rate.
As a rule of thumb, choose 25fps if your local power supply is 50Hz or 30fps if your power supply is 60Hz. This means you will avoid flicker problems with mains powered lights. To be honest, I’ve only ever noticed flickering when shooting under fluorescent tube lighting. In practice, the flicker may only become apparent at fast shutter speeds, so you may not even notice any flickering.
If you are after a more filmic or cinematic look you should choose 24fps.
The frame rates above the standard 24, 25 and 30fps are for slow-motion effects. The higher the frame rate you shoot, the slower the action when played back at your normal rate. So if you shoot at 240fps and playback at 24fps your footage will play at
Timelapse
If you want to compress time, or speed up the action, you can use timelapse mode.
Instead of the numbers meaning that number of frames per second you are dealing with taking a video image every few seconds. The options are an image every 1, 2, 3, 5, 10, 30, 40, 60 seconds.
When recording in time-lapse mode the timecode counter will display ‘ TL’. The first pair of digits will indicate the length of the final clip in minutes and seconds, while the last two digits (in red) show the number of frames (up to your playback frame rate before resetting to zero).
Data rate
The bottom row allows you to change the target data rate.
Filmic Extreme uses up the most space. It uses 100mbps for 2, 3, and 4K, or 50mbps for 1080p. Use this data rate if you are doing something that requires the highest quality. Possibly when shooting FiLMiC Pro green screen footage or you intend to do some serious FiLMic pro color grading. If you don’t need this highest quality, you could go a little lower.
Filmic Quality is 32mbps for 1080p and gives you good quality without going over the top. So, if you are recording videos for an online course or YouTube tutorials you could choose FiLMiC Quality.
Apple Standard is your next choice and gives you the same data rate as you would get with the native camera app. This is OK for basic editing, but you might want a higher data rate if you are going to be more ambitious in post-production.
Audio
The third choice in the preset control window is Audio.
Microphone selection
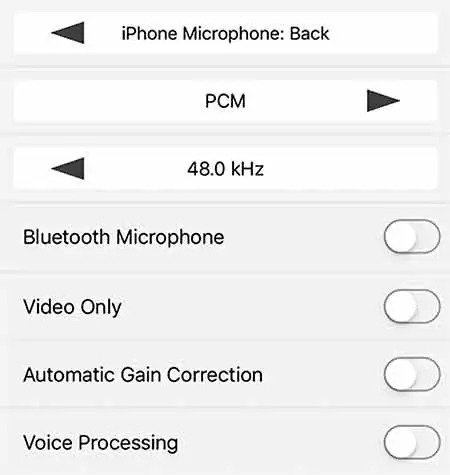
The top row allows you to choose the microphone you want to use, the choices being…
- iPhone Microphone: Bottom
- iPhone Microphone: Front
- iPhone Microphone: Back
In addition, if you have an external microphone plugged into your iPhone this will automatically be selected as your primary microphone. Whichever microphone is selected, this should be the one nearest to the person speaking or sound source you are recording.
Encoding
The type of encoding is chosen in the second row. You can choose between PCM, AIFF or ACC.
- AIFF and ACC are mostly used by Apple products.
- AIFF and PCM (WAV) produce lossless audio recordings, so retain all the audio information at the expense of producing larger files. They are better suited for editing.
- ACC is a lossy audio codec, producing smaller audio recordings, at the expense of degraded if repeatedly resaved during editing.
For smaller video files choose ACC. If storage on your iPhone is not an issue and you intend to do a lot of audio processing in post-production, choose either AIFF or PCM.
Sample rate
The third row is where you would change the sample rate between 44.1kHz, 48.0kHz, and 96.0kHz. The latter sample rate is only available when using a digital microphone with a lightning connector (such as the Sennheiser ClipMic).
Video creators have been using 48kHz as the standard sampling rate for audio in video production but there has been some migration to higher sampling rates like 96.0kHz. I would stick to 48kHz audio sampling rates, especially since the higher rate will double your file sizes.
Video only
As the name suggests, turning on this feature produces video files without any sound. I would only use this if the audio were unnecessary (e.g., I was shooting b-roll) and I needed to maximize storage on my iPhone.
Automatic Gain Correction
According to FiLMiC, this is for use when using the iPhone’s microphone or an external microphone without gain level adjustment. By activating Automatic Gain Correction the gain control slider and setting on the app will be enabled. If you are using an external microphone FiLMic Pro will assume the microphone has its own gain control.
Voice Processing
Activating the Voice Processing setting will make FiLMiC Pro apply audio equalization to the recording to help “bring out human voice better”.
Voice processing is fine if you want a quick and easy workflow, but the effect will be baked into your audio.
If you intend to edit your audio and video on your computer, I would leave voice processing unchecked. You will then have the audio in its original form and can do any necessary voice processing during post-production on your computer.
Bluetooth Audio Monitoring
When recording myself I have found Bluetooth Audio Monitoring to be a waste of time in live monitoring. On my iPhone SE the audio plays back with a delay that makes it difficult, although very funny, to speak at the same time. Of course, the delay may be less pronounced with more recent iPhone models that have faster processors.
I would, however, use Bluetooth Audio Monitoring when recording someone else or just to check that the audio is recording correctly.
Device
This is where you can set some of the default actions in FiLMiC Pro, such as where your clips are saved.
Save To Camera Roll
By default, your video clips will be saved to the FiLMiC library. But if you want to save to the Camera Roll slide across the first button in the list.
Although this will make getting your footage off your iPhone easier there are several disadvantages. For instance, if you save to the FiLMiC library your clip file names will remain intact. By saving to the Camera Roll the file names will become a random string of characters.
FiLMiC also warns against saving to the Camera Roll if you use iCloud Photo Library, shoot 4k video with 1.33 Anamorphic (Moondog) footage, or shoot at frame rates greater than 60fps.
Orientation lock
Enable this option if you want to lock the current orientation of the camera app. So if the app is in landscape or vertical mode when you enable this feature, FiLMiC Pro will retain that orientation.
Saving your FiLMiC Pro Presets
Now that you have chosen your settings it is time to same your FiLMiC Pro presets. In the Presets Control window tap the top right square called Presets. Scroll down to the bottom where you will see, Save Current Settings as Preset. Tap on this and you can type in a meaningful name for your preset, such as 1080p HD30 Extreme. This would tell me that it is my high-quality HD preset with a framerate of 30fps. Alternatively, Filmic Pro Slow Motion 10x would tell me the preset would reduce the speed ten times, or to one-tenth of
If you wish to rename or delete a preset swipe to the left and tape on the option, you want.
The following video walks you through saving custom presets.
FiLMiC Pro manual
If you would like the FiLMiC Pro manual (v6) you will find it here![]() . To see my article on reducing FiLMiC Pro battery drain click here
. To see my article on reducing FiLMiC Pro battery drain click here![]() . You may also like to read my article on easily transferring video clips from the FiLMiC Pro library to your computer.
. You may also like to read my article on easily transferring video clips from the FiLMiC Pro library to your computer.
Now that you know your way around the FiLMiC Pro presets it’s time to start making movies. For a list of 16 types of videos you can easily make, check out my article here![]() . Or to read my article, “How to film yourself with a phone”, in which I give five methods to help you get the framing right, click here.
. Or to read my article, “How to film yourself with a phone”, in which I give five methods to help you get the framing right, click here.
People also asked
Can you edit in FiLMiC pro?
You can trim the start and end of any clip in the filmic library.
1. Open the library and tap on the clip you wish to trim.
2. Tap on the scissor icon to reveal a “timeline” view of the clip.
3. Tap and hold the handle at the start of the video clip and drag it to the position you want the clip to start.
4. Do the same for the end of the clip.
5. Tap the check-mark to save the trimmed clip as a new video clip or tap the cross to cancel.
Is FiLMiC Pro free?
No, Filmic Pro Video Camera is not free. It can be downloaded from the Apple App Store for $14.99. However, it can be purchased along with Filmic Remote as the FiLMiC Pro Camera Kit for $19.99
What does filmic Pro do?
Filmic Pro is a video camera app used by professional and enthusiast videographers. Filmic Pro gives users access to features that the native camera app does not. In addition, the app enables manual control over the camera, such as changing the frame rate, shutter speed, resolution, and encoding.
How do you transfer filmic pro videos?
You can transfer your video clips to your computer in several ways. If you have saved your clips to the Filmic library, you will need to connect your iPhone/iPad to your computer with the lightning to USB cable and then use the file-sharing feature in iTunes. But if you saved your clips to your iPhone’s Camera Roll connect your iOS device to your computer by a cable and copy and paste the video clips.
What gimbal works with FiLMiC pro?
FiLMiC Pro supports the following smartphone gimbals. The Zhiyun Smooth 4, Freefly Movi Cinema Robot, DJI’s Osmo Mobile 2, and Osmo Mobile 1. It does not currently support the Osmo Mobile 3.
What is FiLMiC remote?
FiLMiC Remote is a remote control and monitor for Filmic Pro. It allows you to connect to another device running Filmic Pro by WiFi or Bluetooth. Remote enables you to control focus, exposure, white balance, torch, zoom, and record operations on a few devices running Filmic Pro, thus enabling you to operate multicam recordings.
Tosh Lubek runs an audio and video production business in the UK and has been using the Canon EOS R since it was released in the Autumn of 2018 and the Canon EOS R6 in 2020. He has used both cameras to shoot TV commercials broadcast on Sky TV, promotional business videos, videos of events and functions, and YouTube creator content. He has also won several international awards for his advertising and promotional work. You can meet him by visiting his “video booth” at HashTag Business Events across the country.
Recent Posts
Most people use sandbags the wrong way. Here’s how to hang them properly on a light stand for maximum stability and safety — plus what to fill them with.
You're Using the Canon RF 50mm f/1.8 WRONG! Here’s How to Fix It
If you’ve recently picked up the Canon RF 50mm f/1.8 STM—affectionately known as the Nifty Fifty—you might be confused by that strange switch on the side of the lens. It doesn’t say AF/MF...