DIY Video Studio is supported by its readers. Please assume links on this site are affiliate links or ads, and that I get commissions for purchases made through these links. As an Amazon Associate, I earn from qualifying purchases. Thank you if you use any of the links.
Want to know a secret? I used to hate it when I had to transfer video from iPhone to PC. From a Windows 10 user perspective, it feels like Apple has made this way too complicated, especially if you didn’t use the iPhone’s native camera app.
Apple’s camera app saves video clips to the camera roll, which makes sense. But more sophisticated video camera apps, like FiLMiC Pro and Mavis
, don’t automatically save to the camera roll or photos.
In this article, I will explain how to…
- Transfer your FiLMiC Pro video clips from iPhone to PC using iTunes
- Move video clips from iPhone to PC without iTunes
- Transfer video from iPhone to iPad using Airdrop
- Delete your FiLMiC Pro clips using iTunes
- Delete videos from FiLMiC Pro, from within the FiLMiC Pro library
Where does FiLMiC Pro store videos
FiLMiC Pro normally saves your video clips to its own media library, called the FiLMiC Library. Although you can go into the FiLMiC Pro settings to enable saving to the camera roll. However, this is not recommended, as I’ll explain later.
Don’t let this put you off. The benefits FiLMiC Pro offers completely out-weight not having access to your clips through the camera roll.
The answer to how do I get the videos off my iPhone is to connect your iPhone to a PC with the lightning to USB cable and then use File Sharing in iTunes.
Although it complicates the procedure, it does protect your video clips and their meaningful file names (especially if you enabled the Content Management System or CMS).
Saving to your camera roll will result in the file names becoming a random mix of characters.
How do you transfer FiLMiC Pro videos?
Method 1: Transfer video from iPhone to PC with iTunes
Step One: Connect your iPhone
Use the lightning/USB cable to connect your iPhone to your computer. You should hear the three-note Windows sound that indicates a USB device has been connected.
Windows Explorer will probably also open, showing your iPhone’s Internal Storage. This is your normal camera roll and does not contain your FiLMiC Pro video clips.
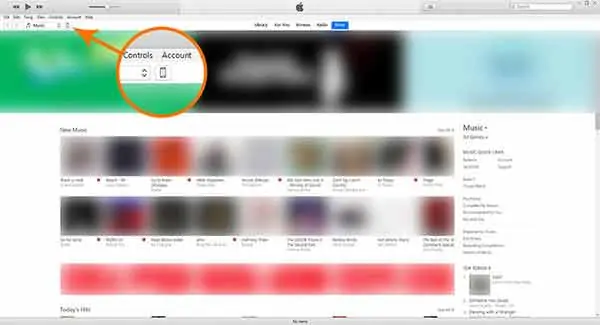
Step Two: Launch iTunes
Once iTunes has opened you will see an icon representing your iPhone along the top bar. Click the iPhone icon to reveal your iPhone’s summary. Now click on File Sharing.
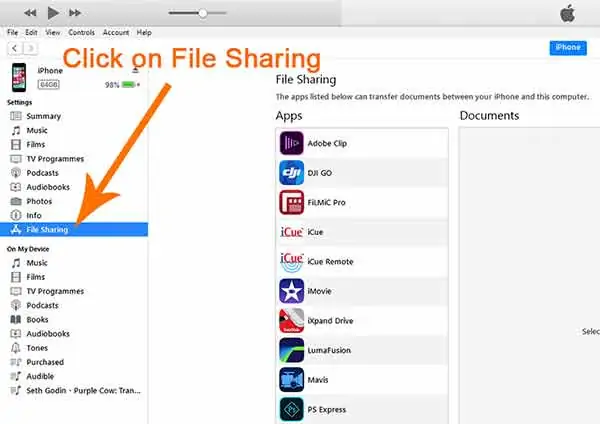
Step Three: Select FiLMiC Pro
In the list of Apps click on the red and white FiLMiC Pro icon to reveal the clips in the document window
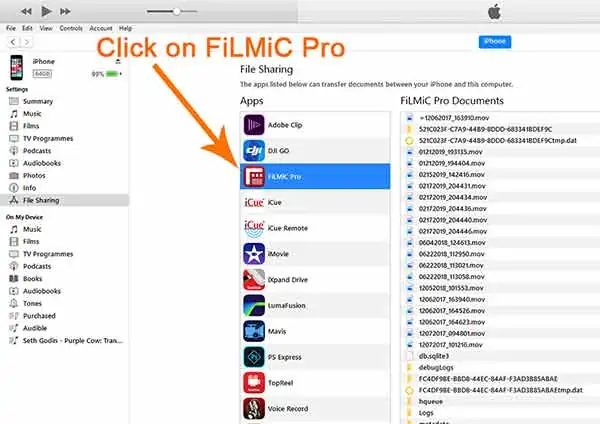
The video clips in the FiLMiC library will appear in the column of FiLMiC Pro Documents.
EXAMPLE: A clip recorded on the 17th Feb 2019 at 8.44pm would be 02172019_204434.MOV.
If CMS is enabled the file name structure would be PRODUCTION NAME_SCENE #_TAKE #.MOV. The TAKE number incrementing by one with each new take.
EXAMPLE: The first take of the first scene of a production called “iTunes” would be iTunes_1_1.MOV.
Both can be helpful in identifying what each clip is. If the clips had been saved to the camera roll the file name would be something like AONZ5347.MOV.
Step Four: Select the video clips to transfer
Now highlight the files you wish to copy. To select several clips, click on the first then Shift+click on the last of several files you wish to copy to your PC.
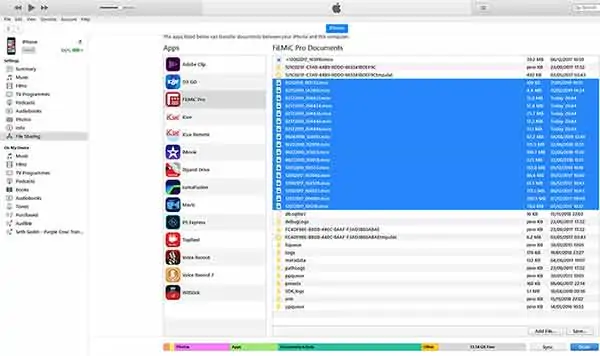
Now click on Save… and navigate to where you want to save your video clips. Then click Done.
If you check the progress bar at the top of the iTunes’ interface, you’ll see the files being copied over to the destination on the computer.

Once the transfer is complete, navigate to the folder on your PC where you saved the video clips and check that they are indeed there.
Getting your FiLMiC Pro clips off your iPhone is a bit more involved
Method 2: Transfer video from iPhone to PC without iTunes
To transfer video from iPhone to the computer without iTunes, your clips will need to be in your iPhone’s camera roll.
As mentioned above, your video clips are not saved to your camera roll by default since it is not considered best practice.
However, they can be saved to the camera roll by enabling Save To Camera Roll under Device in the FiLMiC Pro settings. Or you can copy your clips from the FiLMiC Pro Library.
Copy clips to Camera Roll (Photos)
1. Open the FiLMiC Library.
2. Tap on the multi-clip icon button.
3. Select each of the clips you would like to save to the Camera Roll by tapping on then (the edge of the clip turns green)
4. Tap the Camera Roll icon button.
5. The selected clips will be copied to the Photos app.
6. The transfer is complete once the selected clips have turned back to red.
Once your clips are in the camera roll connect your iPhone to your computer with your lightning to USB cable.
You should hear the three-note Windows sound that indicates a USB device has been connected. Windows Explorer will also open, showing your iPhone’s Internal Storage.
Double-click on Internal Storage to reveal your iPhone’s DCIM folder. You will find your camera roll files within the DCIM folder. Unfortunately, your FiLMiC Pro clips will not be in that folder unless you specifically sent them there.
Method 3: Transfer video from iPhone to iPad
Most people will transfer their FiLMiC Pro video clips to their PC to edit them in software like Premiere Pro or Final Cut. However, there are now several very capable video editing apps available on iOS.
Personally, I have used and like iMovie, Adobe Rush, and Luma Touch. However, editing videos on an iPhone can be a little fiddly. I prefer to shoot on my iPhone but edit on my iPad. The extra screen area makes the experience a whole lot easier.
There’s obviously a problem here. The video clips are on your iPhone but you need them on your iPad. The easiest solution to this problem is to transfer video from iPhone to iPad using AirDrop.
Step One: Copy your FiLMiC Pro video clips to your camera roll.
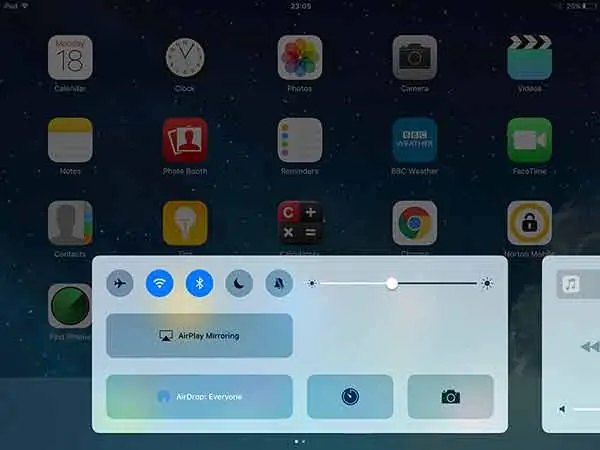
Step Two: On your iPad swipe up from the bottom of the screen. Make sure AirDrop is enabled and set to Everyone. Now do the same on your iPhone so that both of your devices have AirDrop enabled.
Step Three: On your iPhone, locate the video clip you wish to transfer in your camera roll. Now tap the clip’s share icon, that’s the square with the upward pointing arrow.

Step Four: With the clip, or clips, selected tap Next in the top right corner.

Step Five. With your two devices close together, your iPad will appear in share screen on your iPhone. Tap it and the video clip will be shared using AirDrop. You can monitor the progress of the transfer, both on your iPhone and on your iPad.

Once your video clip has transferred to your iPad you can open it in your favorite video editing app.
If instead of sharing your video clips from iPhone to iPad you want to transfer video from iPhone to iPhone, follow the five steps, substituting your second iPhone for the iPad.
Source: Apple
How do I delete videos from FiLMiC Pro?
When you are sure all your clips have been copied to your PC you can delete them off your iPhone.
Method 1: Deleting clips with iTunes
Within iTunes, look at the FiLMiC Pro Documents list and find your video clips. Now highlight the video clips you wish to delete. DO NOT highlight any of the other files or folders.
Once the FiLMic Pro clips have been highlighted in blue, hit delete on your keyboard. Your video clips will now be discarded from
Method 2: Deleting clips within the FiLMiC Pro library
You can delete your video clips within the FiLMiC Pro library on your iPhone. You can delete clips individually or you can select multiple clips and delete them together.
Deleting individual video clips
Open Filmic Pro and tap on the triangle play icon to open the FiLMiC Pro library. You will be able to see all your clips.
To delete individual clips, swipe the clip to the left until a red box with Delete at its center appears.
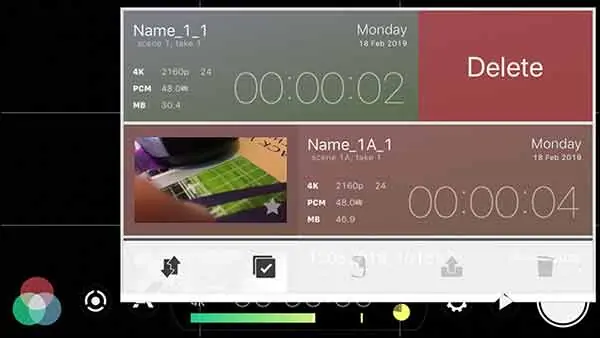
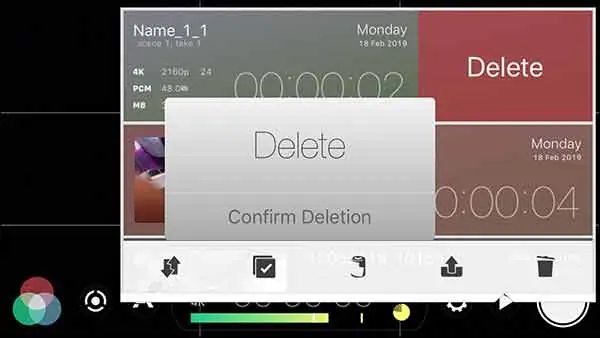
Tap the red delete box and FiLMiC Pro will ask you to confirm the deletion. Tap to confirm and delete the clip.
Deleting multiple video clips
To delete multiple clips, tap the small gray box with a checkmark. You’ll notice your library clips shrink a little and a red bar appears to the left of each clip.
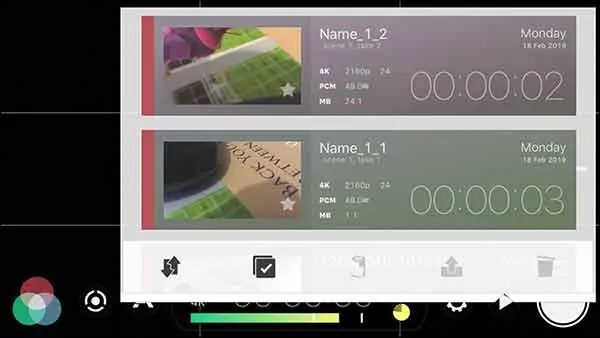
Tap the clips you want to delete and the red bar changes to green.
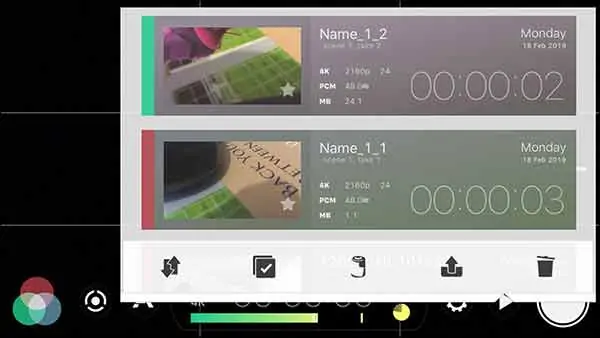
When you have selected all the clips you wish to delete, tap the bin in the bottom right of the window. You will be asked to confirm the deletion. If you want to go ahead tap delete to send the clips to trash.
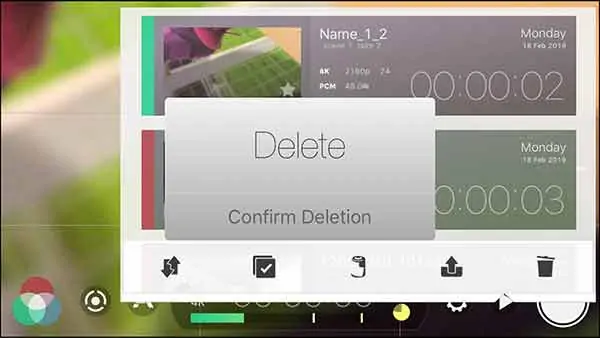
Finally, tap the checkmark again and the red column beside each clip disappears.
You might also like…
How to transfer videos from iPhone to computer FAQ
What is the easiest way to transfer videos from iPhone to computer?
When you connect your iPhone and PC, AutoPlay automatically opens. In the AutoPlay window, select Import pictures and videos. In the Import Settings, choose or create a folder where you want your videos to be saved. Finally, choose the videos.
How do I transfer MOV files from iPhone to computer?
To transfer .mov video files from your iPhone to a computer do the following…
1. Connect your iPhone to your PC using the Lightning to USB cable.
2. Launch iTunes.
3. Click the iPhone icon on the top bar of iTunes to reveal your iPhone’s summary.
4. Click on File Sharing.
5. In the list of Apps click on your video app, for example, the FiLMiC Pro icon, to reveal the clips in the document window.
6. Select the files you wish to copy to your PC.
7. Click Save… and navigate to where you want to save your video clips. Then click Done.
8. Check the progress bar at the top of the iTunes’ interface, to see the files being copied to the computer.
9. When the transfer is complete, navigate to the destination folder on your PC to check the files are there.
How do I edit filmic pro footage?
Simple top’n’tail edits can be performed in the Filmic Pro library.
1. Tap on the clip you wish to edit.
2. In the sidebar menu tap on the scissor icon so the clip timeline appears.
3. Use the beginning and end handles to trim the start and end of the clip. As you drag the handles an interval timer appears above the timeline showing the new start or end time.
4. When you are happy with the new start and endpoints, tap the Check Mark to save the trimmed video as a new clip to the Filmic Pro library.
It is also possible to do simple color grading, including adjusting the Tint, Saturation, White Balance, Contrast, and Exposure.
Can filmic Pro take photos?
No, Filmic Pro cannot take photographs. It is a professional-grade video camera app for both iOS and Android. However, Filmic has released a photo app called Filmic FirstLight-Photo App. It is a free download but includes in-app purchases.
Tosh Lubek runs an audio and video production business in the UK and has been using the Canon EOS R since it was released in the Autumn of 2018 and the Canon EOS R6 in 2020. He has used both cameras to shoot TV commercials broadcast on Sky TV, promotional business videos, videos of events and functions, and YouTube creator content. He has also won several international awards for his advertising and promotional work. You can meet him by visiting his “video booth” at HashTag Business Events across the country.
Recent Posts
Recently, I shot several customer testimonial videos in 4K for a client when the overheating warning on my Canon EOS R6 appeared. In fact, it appeared three times in five sessions during the day of...
Why Every Photographer Should Have a Nifty-Fifty 50mm f/1.8 Lens
If there’s one lens nearly every photographer should own, it’s the 50mm f/1.8 - better known as the “nifty fifty.” This affordable lens provides impressive quality and versatility, making it...


