

DIY Video Studio is supported by its readers. Please assume links on this site are affiliate links or ads, and that I get commissions for purchases made through these links. As an Amazon Associate, I earn from qualifying purchases. Thank you if you use any of the links.
Today I’m going to show you how to reduce wind noise when recording outside using 6 different strategies. These are techniques I’ve learned while working over 30 years in broadcasting and 10 years in my own video production company.
The strategies aren’t complicated, anyone can apply them. So, let’s get started.
How to reduce wind noise when recording outside
It’s always better to make sure you get rid of wind noise when you’re recording than do it in post-production on your computer. So, I use these five strategies I use when recording videos outside on a windy day.
- Choose the right microphone for the conditions.
- Consider activating the wind cut or wind canceling filter on your video camera.
- Turn on the bass cut on your microphone.
- Protect the microphone with a blimp or dead cat.
- Use a different microphone technique.
- If all else fails, use ADR.
Before looking at each of these strategies it’s probably worthwhile to understand what wind noise is.
What is wind noise
Wind noise is that rumbling, slapping, or thumping sound caused by air striking the microphone.
But why can wind noise sound as if your microphone is being clubbed to death?
Well, it has a lot to do with the amount of energy of the air movements. Speech is relatively low energy, but the wind carries a lot of energy.
Because microphones are designed to deal with the lower energies of speech, it becomes overwhelmed by wind blasts.
When recording, the speech will be swamped by the wind. The good news is that we can do something about it.
Watch “Record videos on a windy day”
This video will help you understand how to reduce wind noise when recording outside. But you can skip ahead if you’re in a hurry.

1: Choose the right microphone to reduce wind noise
You might think that since the wind is blowing from a certain direction you should use a microphone that rejects sound from that direction. In other words, use a unidirectional microphone. But you would be wrong.
An omnidirectional microphone usually has one front-facing opening. But unidirectional mics typically have multiple slots (ports) cut into the sides, behind the front of the microphone.
These slots provide many more opportunities for the wind to enter the microphone. Wind blowing past the ports can cause turbulence, resulting in wind noise.
So, in windy conditions, you will be better off with an Omni-directional mic instead of a unidirectional microphone.
2: Activate the camera’s wind noise reduction
A lot of wind noise sounds like a rumble, which is in the lower part of the audio frequency range. So you could try using your video camera’s wind cut filter.
Many domestic camcorders, DSLRs, and some professional microphones use filters to reduce wind noise.
In the image below you can see the audio setup menus from a domestic camcorder and Canon EOS R mirrorless camera.
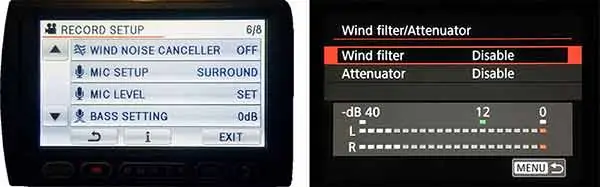
By activating the wind noise canceller (Panasonic) or wind filter (EOS R) some of the wind noise can be eliminated in the recording.
3: Use the microphone’s low cut or high pass switch
Depending on the specification of your microphone, it may have a low-cut switch. This will allow you to roll off or attenuate frequencies lower than 75 or 100Hz.
Some mics may have two filter positions, simply on or off. But others may offer a gentle and a steeper bass roll-off (plus an off position).
An additional bonus of rolling off those low frequencies is that it will help cut other low-frequency vibrations, such as microphone handling noise and background rumble from passing trucks.
If your microphone doesn’t include low-cut circuitry, you can still roll off those bass frequencies in your video editor or DAW.
Apply a low-cut filter in your editor
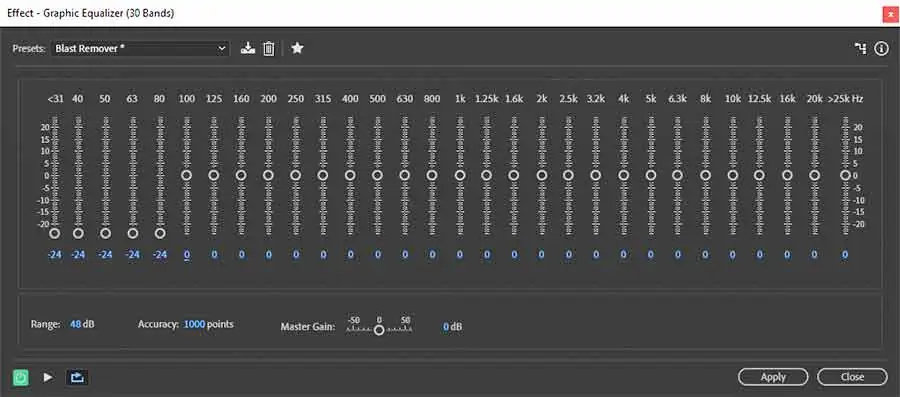
I use Adobe Audition, but you can use the same technique in most video or audio editors.
In your audio editor apply a graphic equalizer and roll off everything up to about 80Hz.
This technique works for slight wind noise, but I have had to go as high as 1kHz to substantially reduce heavy wind noise. Although this does affect the quality of the final audio somewhat unnatural.
4: Wind muffler for camera
Cutting bass frequencies can help with wind noise but not all of that wind energy is in the low-frequency range. You may need to protect the microphone across a broader range of frequencies.
To do that we can use artificial fur. The fur fibers should be about 1 to 4 inches long and are attached to an inner foam core.
The fur helps to dissipate the energy in the wind and can have a dramatic effect in cutting wind blast noise.
This form of professional microphone protection goes by a variety of names. For instance, dead cat![]() , windjammer, and wind muffler
, windjammer, and wind muffler
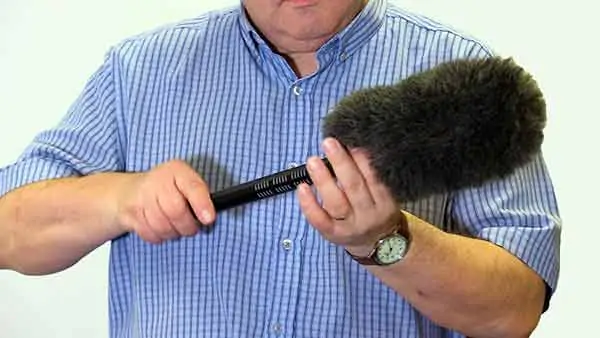
I’ve used the Softie to record on a Scottish hill farmer under quite breezy condition. But windier conditions would require further protection for the microphone.
Plastic mesh zeppelins on boom poles
Under worse conditions, a zeppelin or blimp windshield would be necessary.
These are sausage-like plastic mesh cylinders with hemispherical ends, with a foam inner lining. A shotgun microphone would go inside, suspended in a shock mount. The idea is to encase the microphone in still air.
For further protection, a faux-fur dead cat covering can be added to the blimp.
You are most likely to see these types of windshields used on TV and film sets, where they are mounted on boom poles.
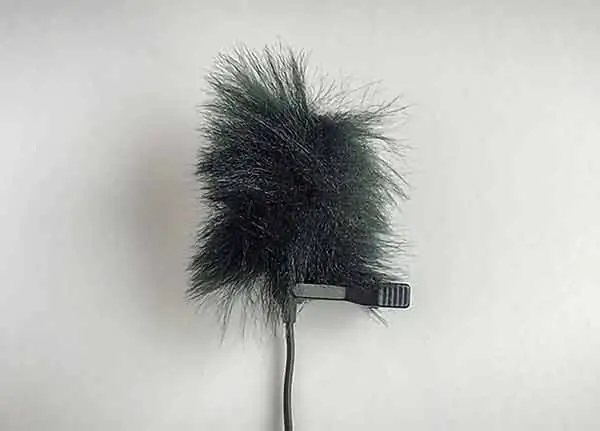
Micro wind muffs for lavalier mics
Dead cats are also available for lavalier or lapel microphones.
The one in the photo is by Rycote and it slips over the microphone capsule.
Under windier conditions larger lavalier dead cats are available that will reduce the wind noise
To make these dead cats a little more discreet, they are generally available in black, grey, and skin tone.
Rycote Overcovers and Undercovers for lavalier mics
Another option to consider for subminiature lavalier microphones is Under and Over Covers.
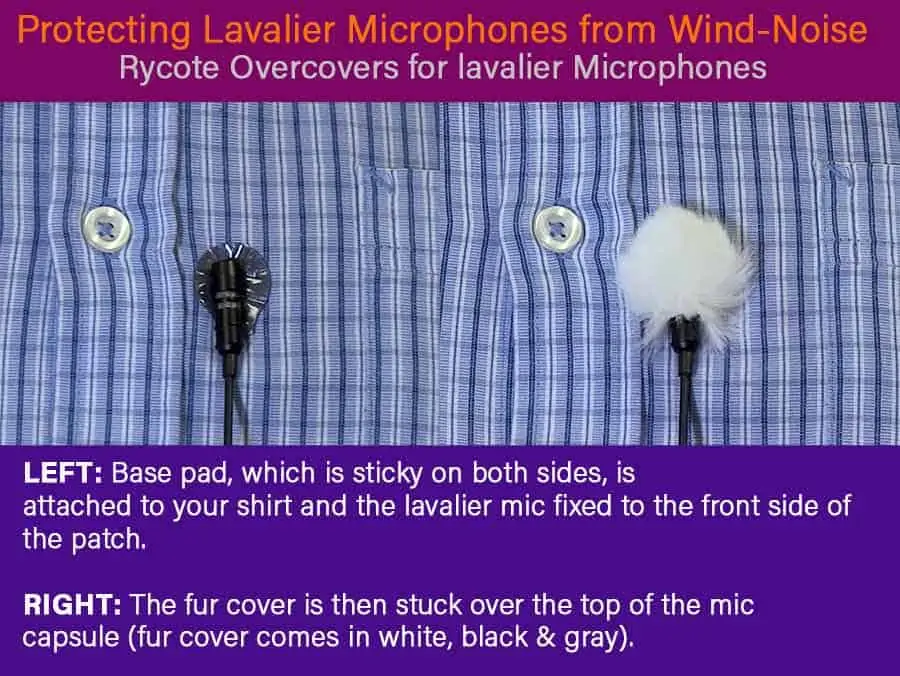
These are double-sided sticky pads that stick to your clothes.
The mic capsule goes on next and is secured in place on the front side of the circular sticky pad.
A disk of synthetic fur goes over the microphone and sticks to the bottom pad, to protect the lav mic and keep it in place.
The furry cover disrupts the impact of the wind, helping to take out the energy that causes those wind blast noises.
A cheap DIY dead cat
If you want to try making your own lavalier DIY dead cat, I have another article and video showing how to make a dead cat![]() for a lavalier microphone in under two minutes.
for a lavalier microphone in under two minutes.
It’s made from toy fur and requires no sewing skills. If you can use a pair of scissors and an office stapler you can make one of these highly effective DIY dead cats,
5: Adapting your microphone technique to reduce wind noise
In an ideal world, you would use a dead cat when recording outdoors.
But you might not have one with you. In such circumstances, what do you do?
Here are a few options that I have used.
Get out of the wind and get into a wind shadow
Remember it’s the wind blowing over, or into, your mic that causes the blasting wind noise, so the first thing you can do is get out of the wind
When you put an object in front of the sun or a light it casts a shadow. Wind does something similar, and you want to get into that wind shadow of a large object.
It could be a fence, a building, a large tree. Essentially, you want to look for something large to shelter behind.
Check which direction the wind is coming from and look around for somewhere that offers a little shelter.
Protect your microphone with your body
The next option applies to both handheld and clip mics.
If the location doesn’t offer up any shelter from the wind perhaps your body can.
Turn so your back is into the wind
If necessary, you could use your other hand in front of the mic, giving it a little extra protection.
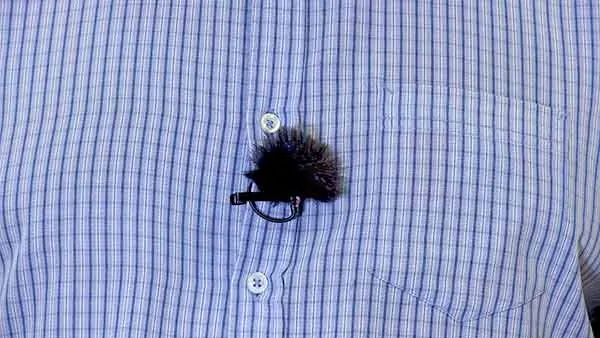
Use your clothing as a windshield

You could try using your clothes to mimic the effect of a dead cat or windjammer.
Fix your lavalier mic somewhere around the chest area beneath one or two layers of clothes.
I used this technique when filming at Trump Turnberry golf course, which frequently experiences breezy conditions.
By mounting the lavalier mic between the presenter’s top and T-shirt the wind noise was eliminated.
6: Use Automatic Dialogue Replacement
When you just can’t get the recording, you want you can always use automatic dialogue replacement.
It’s best explained using a video tutorial. In this video Karl Miller uses Adobe Audition to perfectly match re-recorded dialog, even when the re-recorded timing doesn’t match the original.

Now it’s over to you
So, there you have several strategies you can use when you need to know how to reduce wind noise when recording outside. But which one will you try?
If you would like to have a go at making a simple DIY dead cat have a look at my step-by-step tutorial in my article “What is the fuzzy thing on a microphone“. Not only will you see illustrated instructions, but the article also included a video that takes you through the process of making the DIY dead cat. Plus, here’s a hint, there’s no sewing involved, and you can make the DIY dead cat in a couple of minutes.
Tosh Lubek runs an audio and video production business in the UK and has been using the Canon EOS R since it was released in the Autumn of 2018 and the Canon EOS R6 in 2020. He has used both cameras to shoot TV commercials broadcast on Sky TV, promotional business videos, videos of events and functions, and YouTube creator content. He has also won several international awards for his advertising and promotional work. You can meet him by visiting his “video booth” at HashTag Business Events across the country.
Recent Posts
Most people use sandbags the wrong way. Here’s how to hang them properly on a light stand for maximum stability and safety — plus what to fill them with.
You're Using the Canon RF 50mm f/1.8 WRONG! Here’s How to Fix It
If you’ve recently picked up the Canon RF 50mm f/1.8 STM—affectionately known as the Nifty Fifty—you might be confused by that strange switch on the side of the lens. It doesn’t say AF/MF...