
DIY Video Studio is supported by its readers. Please assume links on this site are affiliate links or ads, and that I get commissions for purchases made through these links. As an Amazon Associate, I earn from qualifying purchases. Thank you if you use any of the links.
Have you ever had the sun’s glare or reflections of nearby lights and objects ruin your shot? I’ll be honest with you, it’s happened to me so I’m pretty sure you have experienced it too. But don’t worry. I’ll explain how to remove sun glare from video shots using a CPL filter.
Picture this…
You’re trying to film someone through a car window or windshield, and all you can see is the light of the sky reflecting off the glass. It’s murder
But wait. Before you move your camera to find a new angle or just wind down the window to remove the glass, here’s a quick fix.
To remove the sun’s glare from glass or other reflective surfaces that are in your video shots, use a polarizing filter, such as a CPL, or circular polarizing filter.
It’s much smarter to fix the problem of glare and reflections during production rather than trying to fix-it-in-post. Using a circular polarizer filter takes much less time and is simple to do.
So what does a circular polarizer filter do?
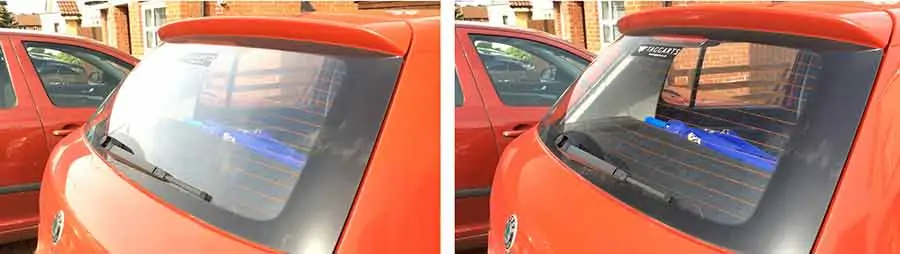
A CPL filter will typically reduce obliquely reflected light, especially sunlight, off shiny non-metallic surfaces such as glass, water, and paint. In our motor car example, the polarizer allows the camera to see through the glass windshield to reveal the interior of the vehicle. You will also notice the CPL also affected glare and reflections from the painted trunk and side panel.

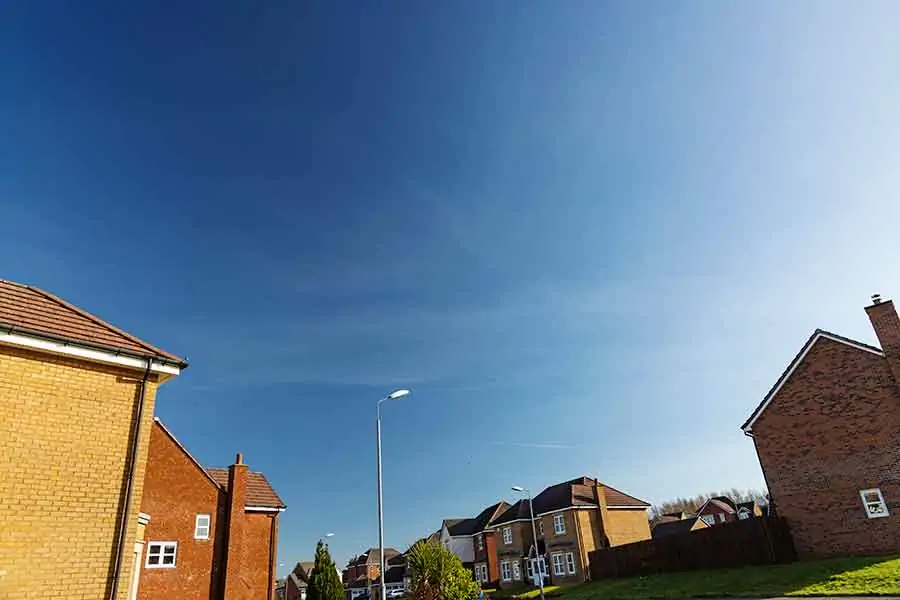
A CPL can also reduce light that is reflected from atmospheric moisture, dust, and pollution. In doing so, polarizers can make skies look more dramatic by making them appear darker and more saturated. Clouds will also seem to ‘pop’ against the darker blue sky. You can see in the example sky image that, to my taste, you can have too much of a good thing. In this case, the full effect darkens the sky too much.
How do you use a polarizer filter on a DSLR or mirrorless camera?
To use your CPL filter you normally attach it to the front of your lens. Once in place, you can vary the amount of the polarizing effect being applied by rotating the filter. There will be an angle at which the effect will be at a maximum and another angle at which the effect is at a minimum. It is for you to judge how much of the effect looks right. As with many creative techniques, a subtle approach can give more pleasing results than going in full-throttle.
I’m not going to explain the science of polarizers, you just need to know that you will get the maximum effect from your polarizer when the angle between the light source, typically the Sun, and your subject is 90 degrees.
When the angle drops to zero, or increases to 180 degrees, the effect will be minimal. So when you shoot in the direction of the Sun or in the opposite direction to the Sun, you’ll see little or no effect.
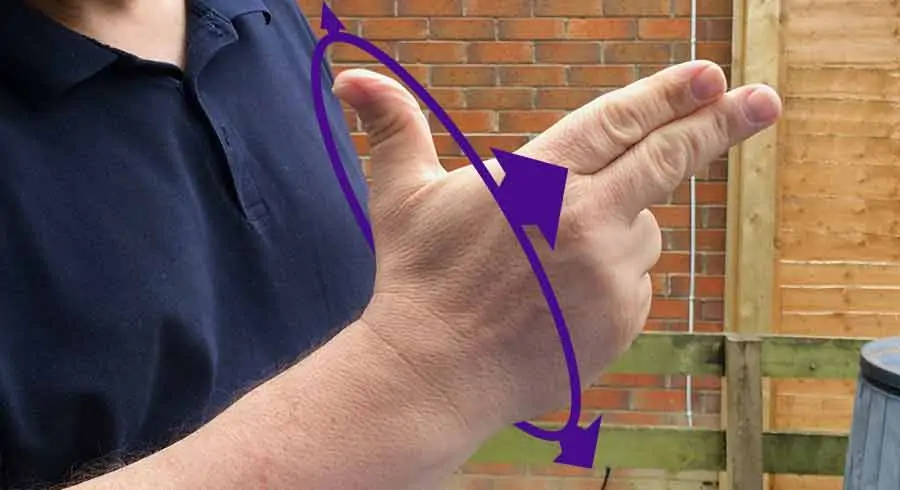
An easy way to work out where you’re going to see the maximum polarizing effect is to make a gun shape with your thumb and index finger. Now point your index finger towards the light source. As you rotate around the long axis of your index finger, anywhere your thumb points will be where you’ll get the maximum polarizing effect.
How do you use a polarizer filter on an iPhone to remove sun glare from video
If you are an iPhone videographer you will not be able to screw your CPL directly onto your iPhone’s lens. Instead, it will screw into a spring-loaded clip mount that keeps the CPL in place over the camera lens. Once attached, visually check that the filter is centered over the camera lens.
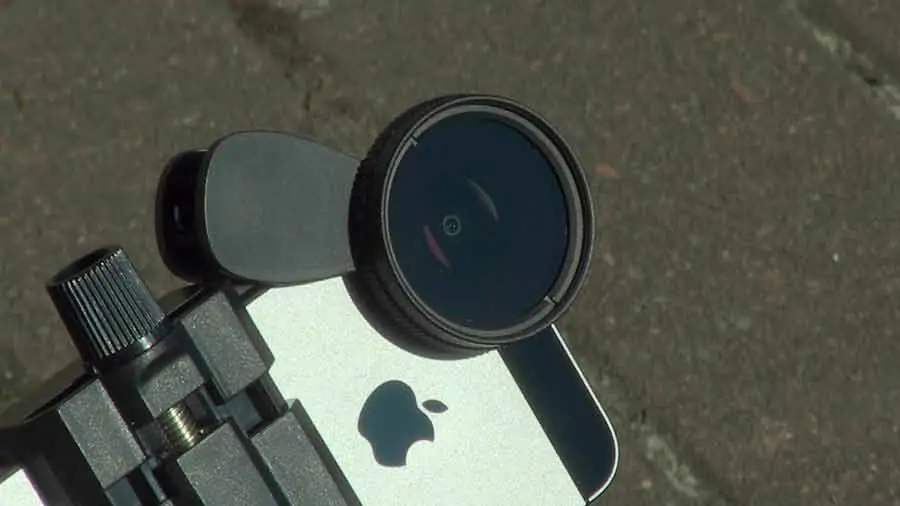
To adjust the polarizing effect rotate the front ring of the CPL filter until you get the desired effect. Do not use the “handles” of the clip mount to try and rotate the filter. You’ll end up moving the filter off center.
Since it is simple to attach and remove the CLP filter with the clip mount, it’s also easy to make an elementary mistake. Don’t set your framing, focus, and exposure and then clip on the polarizer. Remember the CPL is dark and equivalent to closing your aperture by one or two stops, so set your exposure once the filter is in place.
When should I use a circular polarizing filter?
- When you want to remove reflections from a non-metallic surface, such as glass, water or paint.
- Where you effectively want water and glass to appear transparent.
- If you want to a clearer view of the occupants of a motor car or to see through a glass window with reduced glare or reflections.
- To make the sky a darker blue and enhance detail in clouds through increased contrast.
- When you want to remove skin reflections and flatten skin tones. This can be especially useful if your skin has oily patches that catch the light. Most often noticeable on foreheads and noses.
- Reduce some reflections from sunglasses and eye-glasses. Although eye-glasses can have anti-reflective coatings applied they are seldom 100% successful. A CPL filter can help reduce the reflections.
- To remove the reflections of lights from shiny floors and walls during interior video shoots.
- Remove reflections from many types of foliage to make plants and greenery in the scene appear more saturated and verdant.
- To give the illusion that a damp surface is much drier than it really is, such as a road after a rain shower.
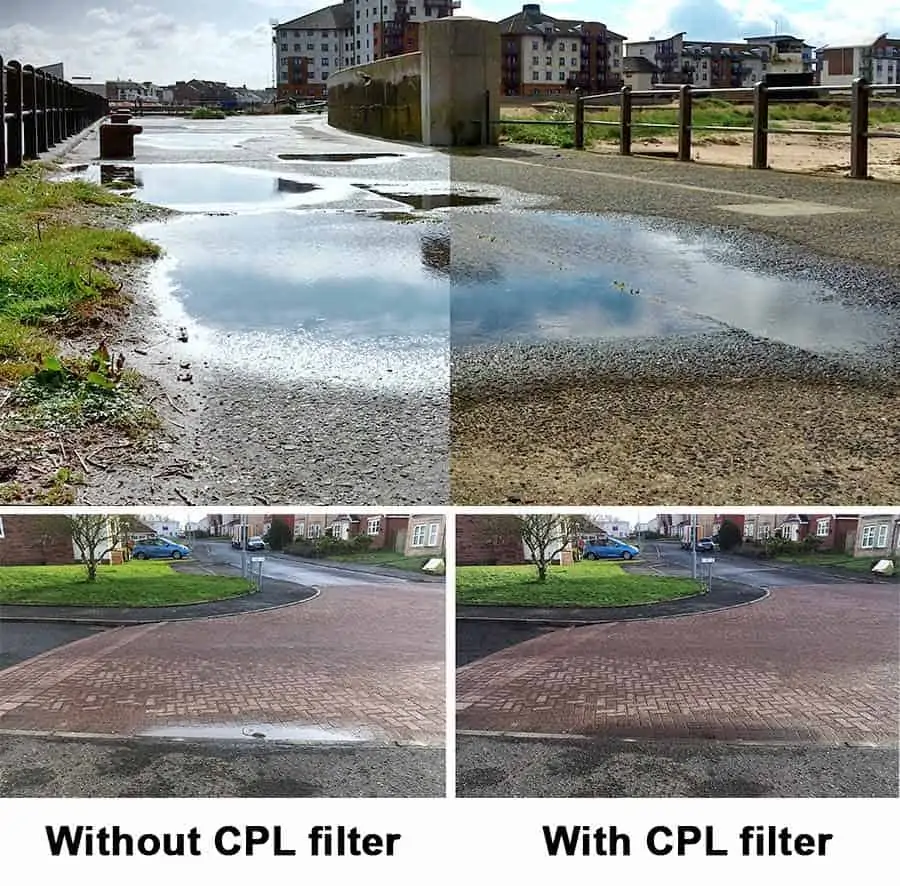
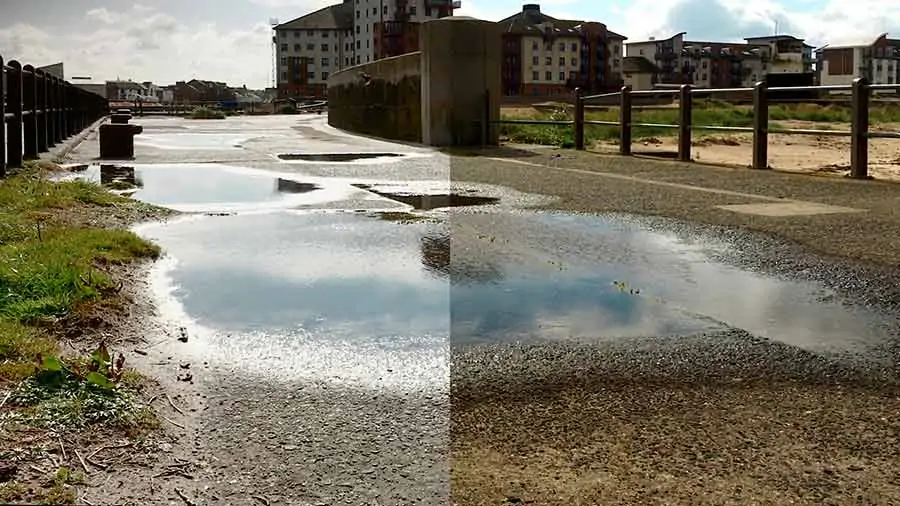
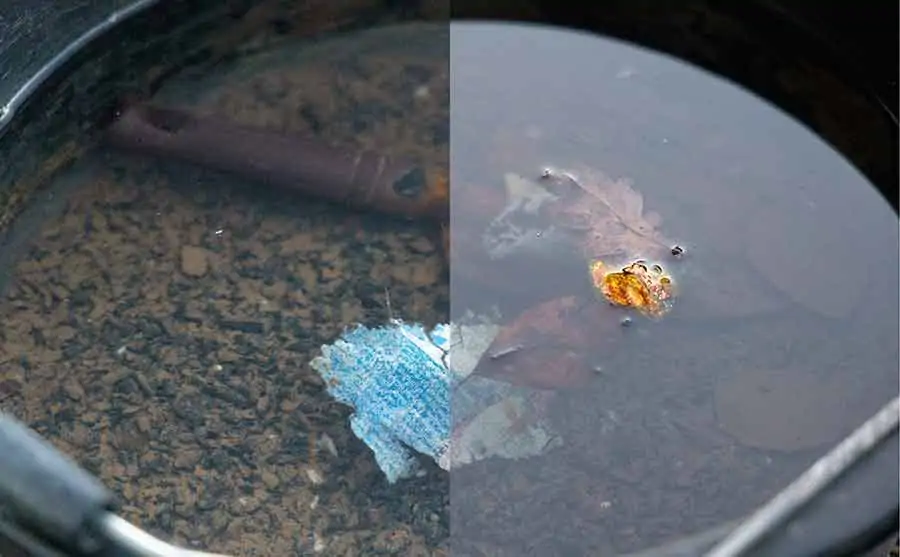
In the images above, you can see that the application of the circular polarizing filter gives damp road surfaces a drier appearance. This is very noticeable in the foreground of the upper pair of images. On the left, the grass verge and concrete road surface clearly look damp after a rain shower, but the CPL has made the damp surface appear dry (right image). Even the edges of the puddles have shrunk a little, and in the nearest puddle, we can see a bit more detail of the ground beneath the water surface. In the lower image pair, the nearest puddle the sun’s glare has been removed entirely, and a lot of the glare has been removed from the road in the
- To turn computer monitors dark to prevent viewers from seeing what is displayed.
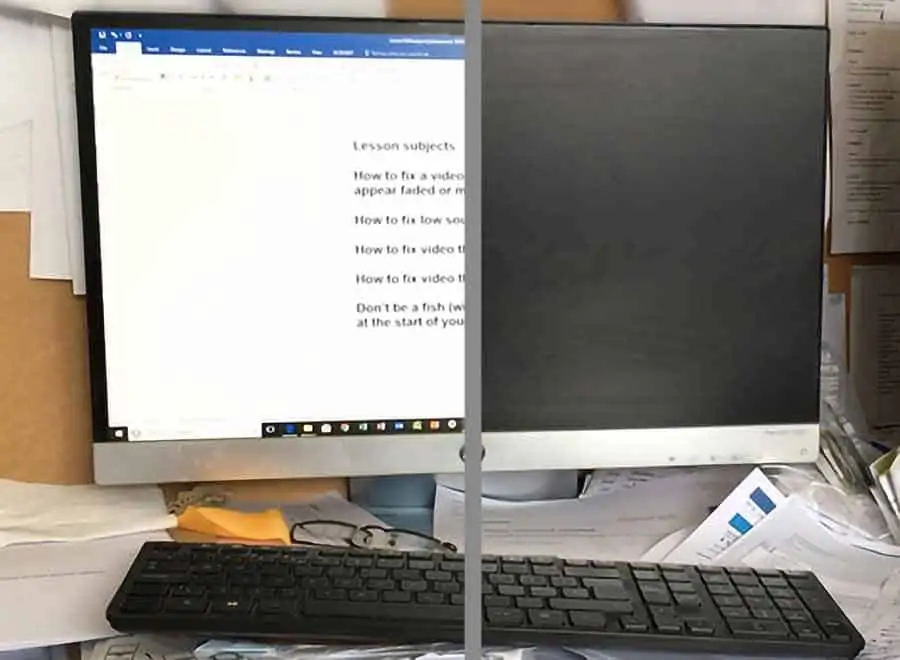
This is something I discovered by accident in my office. A polarizer can turn your LCD monitor black, which may be useful if you are filming in an office where you want to hide any displayed information
Sure, the easiest thing to do is to turn off the monitor. But what if you could display some notes to help in an interview or vlog. By using the circular polarizing filter you can still read the notes on the monitor but your audience can’t see anything being displayed.
When should I not use a circular polarizing filter
- When there isn’t enough light since the polarizer introduces about a 2 stop reduction in the exposure.
-
While recording landscape shots using a wider angle lens (below about 35mm on a full frame camera), since the level of polarization will vary across the sky. Potentially the sky in the center of your clip will appear dark blue but will gradually change to lighter shades to the edges.
- Outdoors if there is a lot of camera movement. Again, this is due to to the fact that the level of polarization will vary across the scene. Remember, maximum polarization occurs when you point the lens at a point that is 90 degrees away from the sun. In the direction of the sun or the opposite direction, the effect is zero. So the camera movement could go from areas of high polarization to low polarization. Potentially an odd look.
- Outdoors when you do want to keep beautiful landscape/cityscape reflections on a water surface, such as the image below.

Even though a polarizer can help darken the blue sky and enhance detail in the clouds, consider the other effects. Remember, polarizers remove reflections from water surfaces. So if you used a CPL filter you would lose the beautiful reflective symmetry of the shot. So, in this case, you might not want to use a polarizer.
What is the difference between a ‘CPL’ and ‘CIR-PL’
There is no difference at all. CPL and CIR-PL are merely shorthand for the same thing, Circular Polarizing Filter![]() . Whatever you call it, the filter will help remove sun glare from
. Whatever you call it, the filter will help remove sun glare from
Although Lightroom and Photoshop have overtaken much of what you used to do “in-camera”, a polarizing filter is perhaps the only filter you still need.
How do I choose a polarizing filter?
Before buying the first polarizer you find on Amazon, you should know one or two details if you want to remove sun glare from video and do it well.
Good polarizers are not cheap, you could spend a few hundred dollars on one. But then, they are not just a simple piece of glass. Normally, they’re comprised of many layers: the polarizer itself, protective glass plus anti-reflective and waterproof coatings. So, if possible, don’t go for the cheapest filter you can find, especially when using lenses of longer focal length
From my own online research, it seems the inexpensive filters tend to be OK on wide angle lenses but any imperfections start to show on higher focal length telephoto lenses.
There are numerous brands available but I can’t claim to have tried them all. However, I can say that I have had good experiences with Hoya and
When buying make sure you get the correct size. The size of the circular polarizer you require will depend on the diameter of your lens. This is normally indicated on the front of the lens.
You can see that the Canon
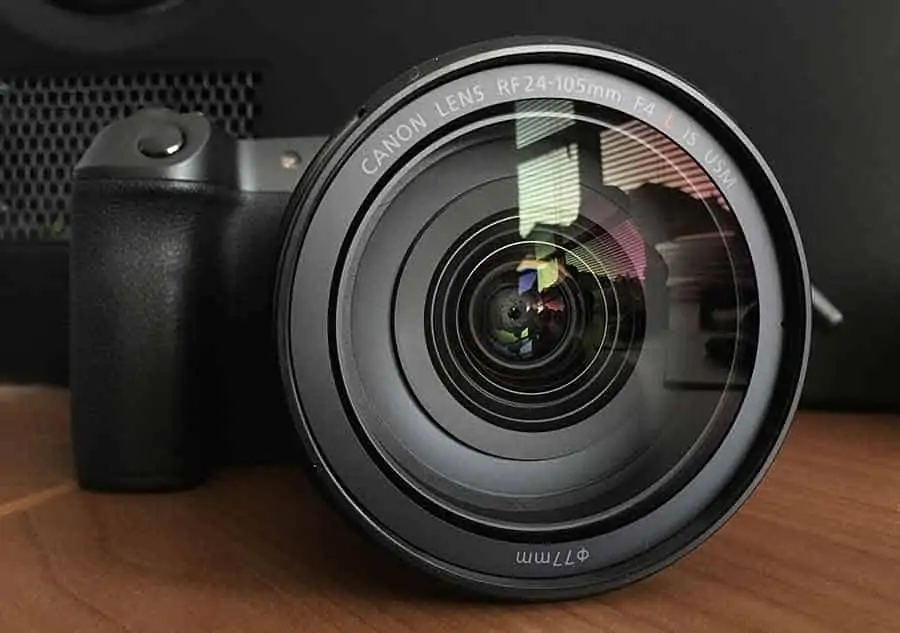
I was once given some really good advice about filters. Essentially, buy the largest size you need, and use it with stepping rings on your smaller diameter lenses. That was great advice that has saved me the considerable cost of getting a separate polarizer for each of my lenses.
How many stops does a circular polarizer reduce my exposure
If you think of a CPL as polaroid sunglasses for your camera it immediately is clear that the filter restricts light entering the lens. But by how much? It really depends on the CPL you are using. Generally, you can assume the circular polarizer filter will reduce the light by about 2 stops.
Under sunny conditions losing that amount of light probably isn’t going to be a worry, but if you are filming in low light conditions it could be a problem.
Can you use a polarizing filter at night
It is not recommended to use a polarizer at night. A mentioned above, a CPL filter effectively reduces your exposure by around 2 stops. So when filming at night it would be like putting sunglasses on your lens and camera. Anyway, our objective was to remove sun glare from video shots and by definition, there’s not a lot of
If you did use a CPL at night you would have to use a faster lens or bump up the gain/ISO. The latter risks introducing additional video noise into the footage, which could ruin your shot or require using a denoiser plugin while editing .
Do I need a UV filter and a polarizing filter?
Like other filters, a UV filter is a thin piece of glass that has a special coating and placed in front of the camera lens. However, the similarity with polarizing filters ends there. The UV filter’s effect on the image is entirely different. The polarizer will reduce glare, remove reflections and enhance color saturation. A UV filter, as the name suggests, prevents the ultraviolet light entering the lens. Think of it as factor 100 for your camera sensor.
But there is a problem here. The digital camera sensor is not sensitive to ultraviolet light, so what’s the point of using a UV filter?
You may think there is no point in buying a UV filter, and that’s a perfectly valid opinion that large numbers of photographers and videographers would agree with you. However, I do have a UV filter on every lens I own. It’s not because I want to cut the ultraviolet light, instead, it’s about protecting the front element of my expensive lenses from accidental bumps, scratches, and environmental dust and spray contamination.
There is a downside though. The UV filter can potentially produce other optical effects. It will absorb a tiny percentage of light. So if you are filming at night you may need to compensate by increasing the sensor gain or ISO. Depending on the quality of the glass there may be a reduction in image sharpness. Finally, if you have any bright light sources in the scene, a UV filter might cause ghosting or optical flares.
If you want to use a UV and polarizing filter together that is easy to do. You can screw the two filters together, since they usually have screw threads on both their front and rear sides. But you may wish to have the CPL filter nearest the front of your lens. This will hopefully help to reduce vignetting at wider focal lengths.
So do you need both a polarizer and a UV filter? No, you don’t. But it depends on your personal preference and the conditions in which you are filming. At least I know I have a little extra protection from my UV filter and that I can easily remove it when required.
Tosh Lubek runs an audio and video production business in the UK and has been using the Canon EOS R since it was released in the Autumn of 2018. He has used the camera to shoot TV commercials for Sky TV, promotional business videos, videos of events and functions, and YouTube creator content. He has also won international awards for his advertising and promotional work. You can meet him by visiting his “video booth” at HashTag business events across the country.
Recent Posts
Most people use sandbags the wrong way. Here’s how to hang them properly on a light stand for maximum stability and safety — plus what to fill them with.
You're Using the Canon RF 50mm f/1.8 WRONG! Here’s How to Fix It
If you’ve recently picked up the Canon RF 50mm f/1.8 STM—affectionately known as the Nifty Fifty—you might be confused by that strange switch on the side of the lens. It doesn’t say AF/MF...