
DIY Video Studio is supported by its readers who use the affiliate links or ads on this site. As an Amazon Associate, I earn from qualifying purchases. Thank your support if you use any of the links.
In this article, I’ll show you how to set up Automatic Exposure Bracketing, or AEB, on a Canon EOS R series mirrorless camera.
When using Automatic Exposure Bracketing, your camera will take 2, 3, 5, or 7 shots at different exposures. This ensures shadows, mid-tones, and highlights are all captured. Later, all the shots can be combined into a single High Dynamic Range image by using image processing software, like Photoshop or Lightroom.
I’ll also show how to save Automatic Exposure Bracketing to a custom shooting mode, so you can quickly recall AEB at any time.
Although I will demonstrate on a Canon EOS R and sometimes on an R6 camera body, you should be able to apply the steps to any of the other Canon EOS R series mirrorless cameras. There may be slight differences in where you’ll find some things in the menus, but you should easily find them.
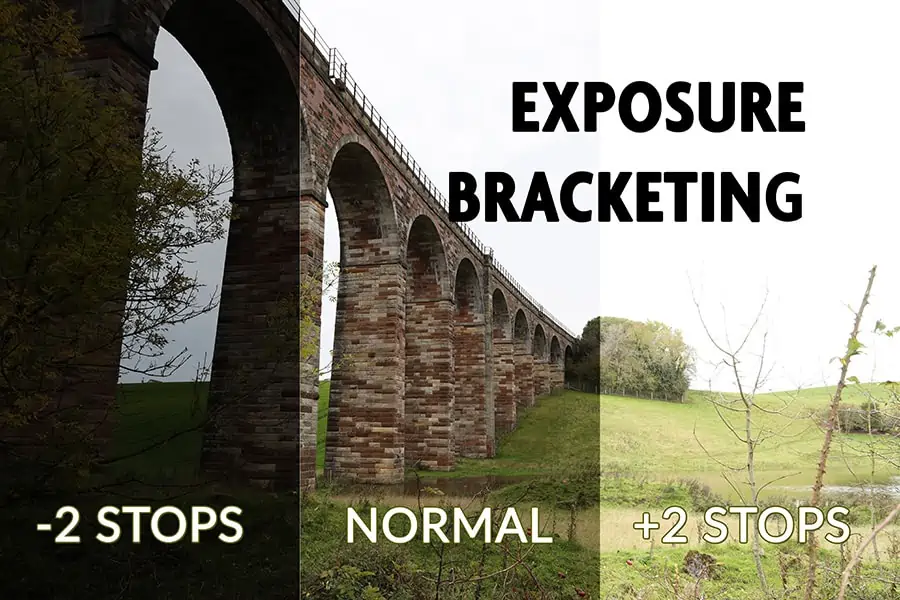
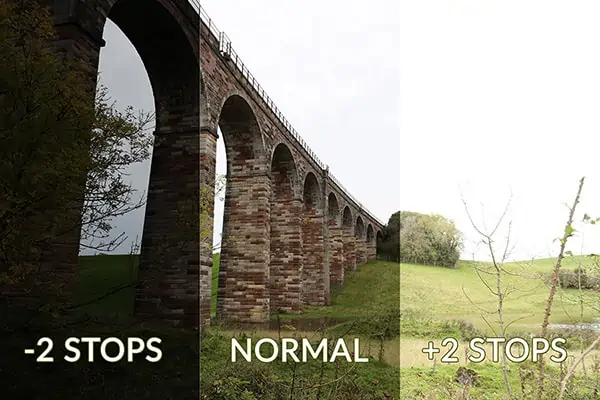
Also, although you can set up AEB with up to 7 shots, I’m going to demonstrate what’s probably the most popular, and that’s Automatic Exposure bracketing with three shots.
That’s a normally exposed shot, bracketed by two further shots, one that is 2 stops under-exposed and the other that is 2 stops over-exposed, as you can see in the example opposite.
Notice how the sky is blown out in the normally exposed shot and little detail is visible under each arch.
All three shots will be taken automatically with one press of the shutter button.
Notice we can now see the detail in the clouds and the underside of the viaduct arches.
So, let’s get into this.
Setting up Automatic Exposure Bracketing on the EOS R
There are two parts to setting up Automatic Exposure Bracketing in your camera. The first is preparing the basic settings in the Custom Functions menu. These include “Bracketing Auto Cancel”, “Bracketing sequence”, and “Number of bracketed shots”. Once set, you will probably leave these unchanged each time you use AEB on the camera.
The second part is related to enabling AEB and using it to shoot, which is obviously what you’ll do more often.
Part 1 – Setting up your AEB basics
Step 1: Open the custom functions menu tab
Turn on the camera and press the menu button, it’s to the left of the Electronic Viewfinder.
With the menu open, you need the orange Custom Functions tab.
Tap the orange camera tab or use the left or right navigation buttons to step through the menu tabs until you’re on page 1 of the orange Custom Functions menu. You will see three settings on this page that you may want to change. They are “Bracketing auto cancel”, “Bracketing sequence”, and “Number of bracketed shots”.
Step 3: Enable Bracketing auto cancel
Select “Bracketing auto cancel” by either tapping on it on the screen or by pressing the down button twice, then pressing the Q/SET button.
Ensure “Enable ON” is selected, then tap SET/OK or press the SET/Q button, the Quick Control Button.
Step 4: Choosing the bracketing sequence
Back on page 1 of the orange Custom Functions menu, select “Bracketing sequence”. Do this by pressing the down button once and then pressing the Q/SET button. Alternatively, just tap on “Bracketing sequence”.
On the screen, you’ll see three options for the order in which the images will be taken. Zero is the normal exposure, minus is the under-exposed image, and plus is the over-exposed image.
Although you can choose the order you want, I will leave it at the default setting of “0, -, +”.
Now press the Q/SET quick control button or tap SET/OK on the screen to return to the previous menu page.
Step 5: Choosing the number of bracketed shots
Use the down button to select “Number of bracketed shots”. To enter that page in the menu, press the Q/SET button or tap “Number of bracketed shots” on the screen.
When the page opens, you’ll see that 3 is the default number of shots, but you can change this. The options are 2, 3, 5, or 7. Although you can choose any of these, I would leave the number of shots at 3 shots.
To confirm your selection tap on SET/OK on the screen or press the Q/SET button.
Finally, press the Menu button once to exit the menu and return to the normal shooting screen.
Part 2 – Enabling Automatic Exposure Bracketing for your shoot
Step 1: Turn on and chose manual mode
First, turn on your camera, and press the MODE button on the top right of the camera.
The shooting mode screen will open with 10 options, but AEB will only work with 5 of them. These are Flexible-priority AE (Fv), Program AE (P), Shutter priority AE (Tv), Aperture priority AE (Av), and Manual exposure (M).
Use the navigation buttons to choose “M”. Then press the SET or MODE button to save the mode. Alternatively, just tap on M on the screen, then tap the return arrow in the bottom right of the display.
Note, you can set AEB first and then change the camera mode to shoot in. But once you have started the AEB sequence, you cannot change the mode.
Step 2: Open the red camera menu
Press the menu button that’s to the left of the EVF. Then use the Left or Right buttons to scroll through to the 3rd page of the red camera menu, or simply tap on the red camera tab on the display.
Step 3: Choose your AEB setting
You want the first item on the page “Expo.comp./AEB”. Either tap on it or press the Q/SET button.
When the next page opens you will see something that looks a little like the Exposure Level Indicator that’s usually near the bottom of your normal shooting screen. There is a row of numbers from -3 to +3, with 0 in the middle and a red and white vertical line below the zero.
The numbers represent the number of stops above or below the normal exposure. The dots between the numbers represent 1/3 of a stop increment.
Roll the vertical scroll wheel to the right with 6 clicks.
After one click, you’ll notice a new version of the Exposure Level Indicator appears on the screen and shows the amount of bracketing you’re dialing in. Each click of the wheel and each division on the exposure level indicator scale is 1/3 of a stop.
By rolling the wheel to the right by 6 clicks you have set two stops between the normal exposure and the over-exposed shot, and two stops between the normal exposure and the under-exposed shot. So, in total, a range of 4 stops of exposure.
Step 4: Save the AEB setting and exit the menu
Tap SET/OK in the bottom right of the screen or press the Q/SET button. Finally, press the Menu button to exit the menu and return to your normal shooting screen.
You’ll see the Exposure Level Indicator at the bottom of the screen with a line below the zero or center arrow, and a line under the -2 and +2 stop points on the scale. This indicates your bracketing.
An alternative way of enabling Automatic Exposure Bracketing for your shoot
Note that you can set Automatic Exposure Bracketing in other ways, especially if you have added AEB as an item to the green star menu or registered it to one of the custom shooting modes.
The most common way, which does not require any customization, is to press the INFO button repeatedly until you see the black screen with camera settings. Once on that screen press the Q/SET button or tap Q on the screen.
You can now select and adjust any of the settings on the screen, so use your navigation buttons to move to the exposure meter on the left of the second row (or just select it by sliding a fingertip across the display to the meter). With the meter highlighted, turn the vertical scroll wheel to the right with 6 clicks. This will move the bracket indicators to plus and minus 2, meaning you are bracketed by 2 stops on either side of your normal exposure.
Finally, tap the return arrow in the bottom left of the display to return to the normal screen display. You’ll see the Exposure Level Indicator at the bottom of the screen with a line below the zero or center arrow, and a line under the -2 and +2 stop points on the scale. This indicates your bracketing.
How to take all your AEB shots with one press of the shutter
If you are in Single shot mode, that’s the single rectangle icon, after enabling Automatic Exposure Bracketing each of the three bracketed shots will need to be taken with a separate press of the shutter button.
If you want all three shots to fire automatically, with one press of the shutter button, you need to one of the following selected.
- Drive mode set to High-speed continuous shooting
- Drive mode set to Low-speed continuous shooting
- Activate the 2sec shutter delay timer
- Activate the 10sec shutter delay timer
To select any of these, press the Q or Quick Control button to open the Quick Control menu. On the left side, one of the items will be your current drive selection. Tap to select or use your navigation buttons to select the icon. From the row of icons that appear at the bottom of the screen, highlight the one you want (any will work except the single shot mode), then press the Q button to make your selection and exit to your shooting screen.
You’re now ready to fire off your shots.
In the two continuous shooting modes keep your finger on the shutter button until all three shots have been taken. When using either of the shutter delays, press the shutter button and let go.
You can also use a remote timer, like this inexpensive camera shutter release from Neewer![]() . I use it with my EOS R and R6 and find it works perfectly well. Use the main button as if it’s the shutter button on your camera.
. I use it with my EOS R and R6 and find it works perfectly well. Use the main button as if it’s the shutter button on your camera.
If you decide to set the drive mode to the 2sec or 10sec delay timer you will get a countdown beep and the AF assist light will flash. Unfortunately, you cannot turn off the flashing light (unless you tape over it) but you can turn off the beep.
To disable the beeping sound, press the Menu button. Then go to the third page of the yellow wrench tab. On the third line down, you will see Beep. Select Beep then press the Q quick select button, or just tap Beep. Once the Beep menu opens select Disable. Finally, press the Menu button twice to exit the menu and return to the normal shooting screen.
How to quickly access Automatic Exposure Bracketing
Possibly the quickest way to enable Automatic Exposure Bracketing is to have it already registered to one of the custom shooting modes, C1, C2, or C3.
Then all you need do on an EOS R, R3, or R5 is press the Mode button, tap on the custom shooting modes you previously registered, then press the Mode or Q button again to get back to your normal shooting screen to take your images.
On a camera with a mode dial, that’s the EOS RP, R6, R7, and R10, you just turn the dial to C1, if that’s the one you registered. It’s that quick.
If you’ve never set up a custom shooting mode before, don’t worry, it’s not as daunting as you might think. This is what you do.
First, go through the steps in parts 1 and 2 above to set up Automatic Exposure Bracketing. Then decide on the drive mode to use, many people stick with the 2sec delay timer because you press the shutter once and don’t need to keep it held down. Once you have everything set up the way you want, the final step is to register your settings to one of the custom shooting modes. I’ll use C1 in these steps. If you want to use C2 or C3 use that instead.
Step 1: Press the Menu button and tap the yellow wrench tab.
Step 2: Tap the 6 to show page six of the wrench menu.
Step 3: Tap “Custom shooting mode (C1-C3)”
Step 4: Tap “Register settings”
Step 5: Select C1 by tapping on “Custom shooting mode: C1”
Step 6: Tap “OK”
Step 7: If you want the custom shooting mode to automatically update the setting with any changes you make while shooting tap “Auto update set.” and tap Enable. Otherwise leave “Auto update set.” set to Disable.
Step 8: Press the Menu button twice to exit the menu and return to the shooting screen.
That’s all there is to it. Now you can go between normal shooting and Automatic Exposure Bracketing with ease.
Why am I seeing a blinking star in the lower left of the screen
If you can see both the Exposure Level Indicator and a star in the lower left of the screen flashing, the camera is indicating that it is waiting for you to take the next in the sequence of bracketed shots.
This can occur under two scenarios. The camera’s drive mode is set to Single shooting, and you need to press the shutter button again for each of the remaining shots. The other possibility is that the drive mode is set to one of the continuous shooting options and you took your finger off the shutter button before all the bracketed shots were taken.
The solution in Single shot mode is to repeatedly press the shutter button until all the shots have been taken. While in Continuous shooting mode, hold down the shutter button until all shots have been taken.
How to cancel Automatic Exposure Bracketing
There are two basic ways to cancel Automatic Exposure Bracketing or AEB. The easiest way is to simply turn off the camera. But this assumes that in the Custom Function menu, ‘Bracketing Auto Cancel’ is set to ‘ON’.
If your camera is stuck in AEB mode, check that ‘Bracketing Auto Cancel’ is set to ‘ON’.
You can do this by pressing the menu button and going to the first page of the orange Custom Function tab. “Bracketing auto cancel” is the third item down, and it should indicate that it is ON. If it is set to OFF, the AEB settings will be retained, even after you have turned off the camera and turned it back on.
The second way of canceling Automatic Exposure Bracketing is to do the reverse of the setup procedure.
Press the menu button and go to the third page of the red camera tab. Select “Expo.comp./AEB” and press the Q Quick Selection button. Roll the vertical scroll wheel to the left until you have a single line at zero on the exposure level indicator and the lower scale disappears. Tap on SET/OK or press the Q button, then press the Menu button to exit back to the shooting screen.
When is Automatic Exposure Bracketing not available?
Automatic Exposure Bracketing cannot be enabled in some situations.
AEB on a Canon EOS R series camera cannot be used with
- Flash
- HDR mode
- Silent/Electronic shutter
- Multi Shot Noise Reduction
- Dual Pixel Raw
If you have any of these selected AEB will be greyed out and unavailable.
Should autofocus be disabled when using Automatic Exposure Bracketing
Although the interval between shots can be short, there is a chance that the AF can shift a little between shots. I have never experienced this problem, but it could be a possibility. Where I have had AF issues it has been when using a Canon RF camera body with a third-party lens.
Therefore, to prevent the lens from refocusing between shots, either set AF to One Shot or switch to manual focus on the lens after initially acquiring focus in autofocus mode.
Why use AEB instead of HDR camera mode?
The goal of using Automatic Exposure Bracketing is to have three or more images that can be merged into a single HDR shot that shows more detail than is possible with a single exposure. So, why not use the HDR mode that is available on the camera?
Of course, you can use the camera’s HDR mode. The camera will take three shots and automatically merge them into a single finished HDR image. However, you will be left with only one image, and you won’t have complete control over the merging process.
Using AEB, or even doing the bracketing manually, gives you options. You will have multiple source images and multiple ways of merging them into a finished HDR image. You’ll also be able to revisit how those images are merged when your software is updated or if new plugins are released.
If you give yourself options, an image you were initially dissatisfied with may turn out to be a stunner.
Source: 1![]()
Tosh Lubek runs an audio and video production business in the UK and has been using the Canon EOS R since it was released in the Autumn of 2018 and the Canon EOS R6 in 2020. He has used both cameras to shoot TV commercials broadcast on Sky TV, promotional business videos, videos of events and functions, and YouTube creator content. He has also won several international awards for his advertising and promotional work. You can meet him by visiting his “video booth” at HashTag Business Events across the country.
Recent Posts
Most people use sandbags the wrong way. Here’s how to hang them properly on a light stand for maximum stability and safety — plus what to fill them with.
You're Using the Canon RF 50mm f/1.8 WRONG! Here’s How to Fix It
If you’ve recently picked up the Canon RF 50mm f/1.8 STM—affectionately known as the Nifty Fifty—you might be confused by that strange switch on the side of the lens. It doesn’t say AF/MF...