
Author: Tosh Lubek Published: 19th February 2024
DIY Video Studio is supported by its readers who use the affiliate links or ads on this site. As an Amazon Associate, I earn from qualifying purchases. Thank your support if you use any of the links.
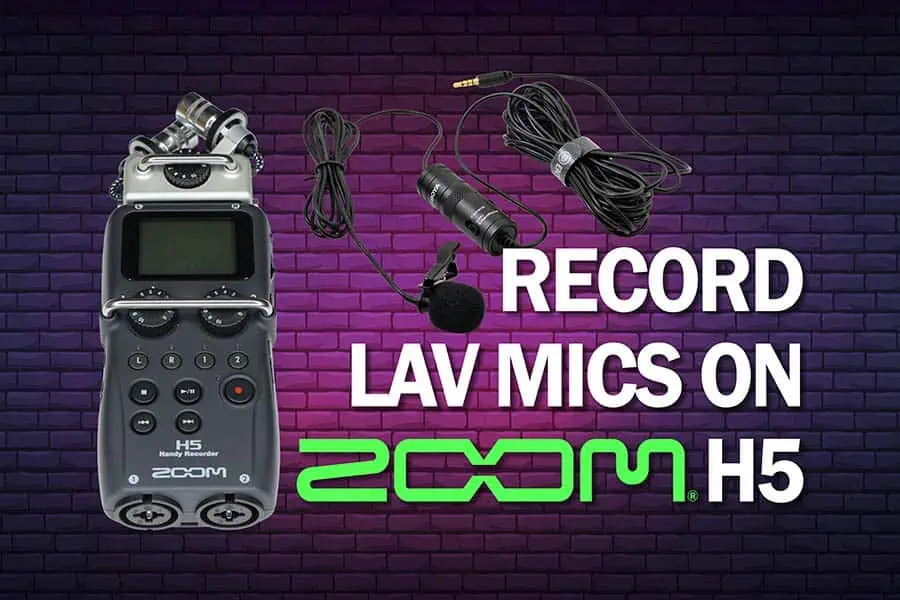
Whether it’s audio for a vlog, interview, podcast, or even ASMR videos, the Zoom H5 has established itself as a recording powerhouse for creators. It’s compact, versatile, and records high-quality audio. But if you don’t want to use bulky XLR mics or the built-in XY mics, what can you do?
I’ll explain how to connect a Lav Mic to a Zoom H5 in this recording with Lavalier Mics tutorial. It unlocks a whole new level of mobile, professional-sounding audio, perfect for capturing your voice in action, wherever inspiration strikes. Whether you’re a videographer, podcaster, interviewer, or simply a content creator passionate about high-quality sound, this guide will help you integrate using Lavalier mics with your Zoom H5 seamlessly. So, grab your H5, and let’s try some lavalier magic!
I cover this in a YouTube video, but I summarize the details in this article and provide links to the adapters and microphones you might need.
Choosing the Right Lavalier Mic for the Zoom H5
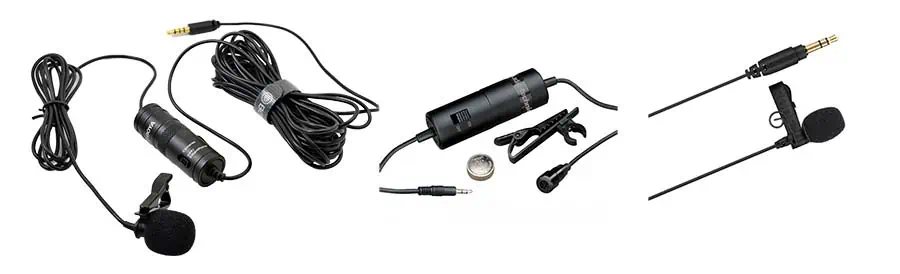
When selecting the best Lavalier Mic for your Zoom H5 you’ll find many options online, ranging from about $15 to $70. Most are mono, with some offering stereo capabilities. The majority are omnidirectional, capturing sound from all directions, while a few are directional with a cardioid polar pattern.
In most cases, a mono omnidirectional lavalier mic is preferred, ensuring consistent sound pickup, even when you turn your head. Additionally, it’s essential to choose a mic with a TRS jack or one with a switchable TRRS jack.
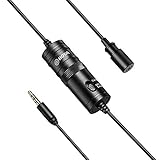
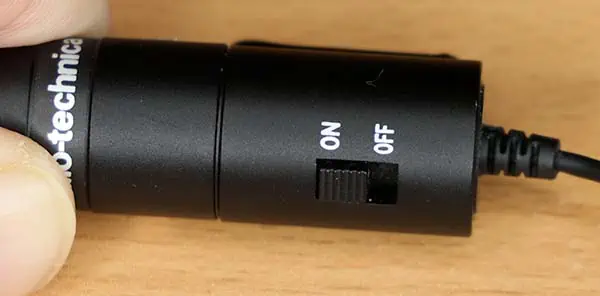
At the budget-friendly end, the BOYA BY-M1 stands out, featuring a TRRS jack with a battery compartment and switch for TRS compatibility and built-in power. However, for slightly higher quality, consider the similar-looking Audio Technica ATR3350. For a premium option, but still within most budgets, consider the the Rode Lavalier GO microphone.


Last update on 2025-10-11 / Affiliate links / Images from Amazon Product Advertising API
Connecting Your Lavalier Mic to the Zoom H5
Lavalier microphones usually have a 3.5mm TRS or TRRS jack. But the 3.5mm mic input socket on the Zoom H5 takes TRS jacks. This isn’t a problem provided Lav Mic with TRRS jacks can be switched between TRRS and TRS modes or can use a TRRS to TRS adapter. The BOYA BY-M1 has a switchable TRRS jack, while the Audio-Technica ATR3350 and Rode Lavalier GO both have TRS jacks.
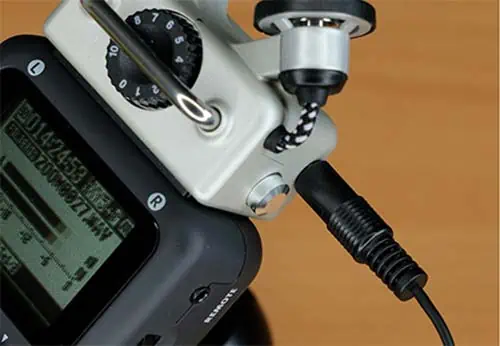
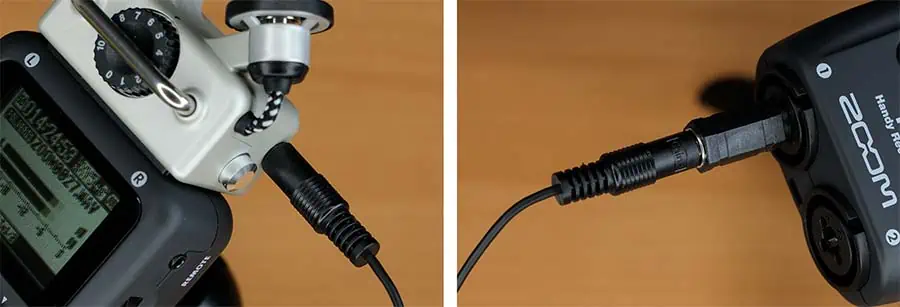
To connect a Lav Mic to a Zoom H5, insert the mic’s 3.5mm jack into the gold-colored socket on the right side of the recorder’s XY mic capsule. The audio will be recorded to the L&R stereo file. If a stereo mic is used the left and right channels will be different, but if the Lav Mic is mono, the same mono signal will be recorded to the left and right channels to create a dual mono file.
Powering the Lavalier microphone to work with the H5 recorder
With the Lavalier mic connected to the Zoom H5, it will need power. Some Lavalier microphones are self-powered, such as the BOYA BY-M1 and Audio Technica ATR3350 mics, which have a battery compartment. When in use, the power switch on the battery compartment needs to be moved to the “On” position.
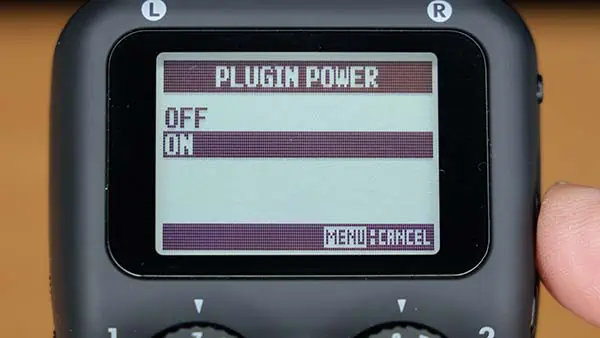
Many other Lav Mics, like the Rode Lavalier GO, are not self-powered and require what’s known as plug-in power from the recorder. Although the Zoom H5 can provide plugin power, it is turned off by default and must be turned on in the menu. Press the Menu button on the side of the H5, then navigate to IN/OUT, and then PLUGIN POWER. Finally, set the plugin power to ON and exit the menu.
Zoom H5 Record Format and Record Mode settings
There are two settings you should change on the H5, and that is the Record Mode and Record Format. The third is optional, and it is Backup Record, which records a “safety recording” 12dB lower than the main recording. This can “rescue” your recording should sudden spikes occur in the level that would be clipped in the main recording.
Record Mode: Assuming you’re only recording with one or two Lav mics to L/R tracks or Inputs 1&2, set the Record Mode to STEREO in the menu. To make this change use this navigation MENU > REC MODE > STEREO FILE. You can use Multi File Mode, but you’ll end up recording silence to the tracks for Inputs 1 & 2. This will take up space on your SD card and waste battery power.
Record Format: Decide what Recording Format you require. In most cases use WAV 44.1kHz/16-bit to record podcasts and WAV 48kHz/16-bit for audio that will be imported into a video sequence. If you need the best audio quality, you can choose WAV 96kHz/24bit in stereo mode or WAV 48kHz/24-bit in multifile (4-track) mode. To make this change use this navigation MENU > REC > REC FORMAT and then choose the format you need.
Backup Record: If you want to create a safety recording turn on Backup Record in the H5 menu. Do this with the following navigation, MENU > REC > In L/R BACKUP, and set In L/R BACK to on.
Recording & Monitoring
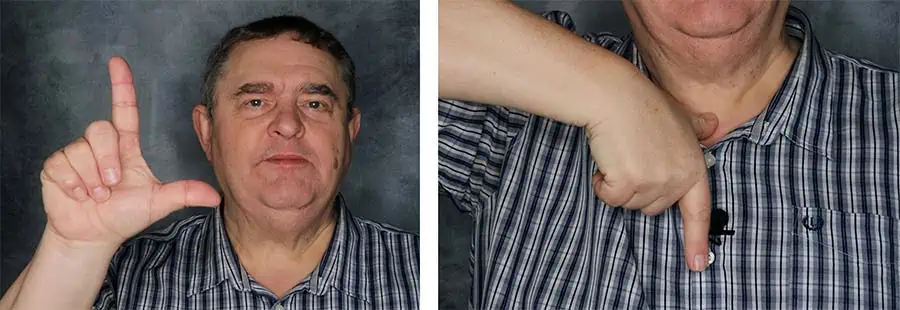
Mic placement: The ideal place to position the Lavalier microphone is in the middle of your chest and about 6 inches (15cm) down from your collarbone or top of your breastbone. Clip it onto your shirt or tie, or the neckline of a T-shirt or dress. If you’re wearing a jacket, you can clip the mic to a lapel. Hide the cable by feeding it under your clothing. Here’s a quick method of judging 6 inches down from your breastbone or collarbone. Make an “L” shape with your thumb and forefinger, place your thumb on your collarbone/breastbone and where your forefinger touches your chest is about 6 inches down – see the images below.
Set your peak level: If the Lavalier microphone is plugged into the 3.5mm mic input, you’ll control the level with the single dial on the XY mic capsule. I let my audio peak at about -6dB, but if you are concerned about clipping and don’t want to push the mic preamps as much, try to peak at about -12.
Setting any effects: You might not have realized that the Zoom H5 comes with some built-in effects. These include:
• Low Cut filter
• Compressor
• Limiter
All of these can be accessed from the INPUT/OUTPUT screen of the Menu. There are several presets to choose from for each of these effects, but the effect will be baked into the recording. For this reason, I would leave the effects turned off since they can be applied in your editing software.
Monitoring on headphones: By monitoring your audio on headphones, even if it’s only at the start of your recording, you’ll ensure everything sounds OK. This is your opportunity to catch mistakes like buzzes, distortion, and obvious room background noise like ticking clocks that in daily life we ignore but are noticeable in recordings.
Advanced Lav Mic Recording Techniques with a H5
You can record with up to four Lav Mics on the Zoom H5 as follows. Two Lav Mics recording to the left & right tracks of a stereo file by using the 3.5mm mic input, or two Lav Mics recording to separate mono files by using Inputs 1 and 2.
Record 2 Lav Mics on tracks L&R: To plug two lavalier mics into the Zoom H5’s single 3.5mm mic input you will need a Y-splitter cable. To keep the audio from the two mics on separate channels you will need a 3.5mm TRS to Dual 3.5mm TSF Stereo Breakout Cable, which can be bought on Amazon![]() .
.
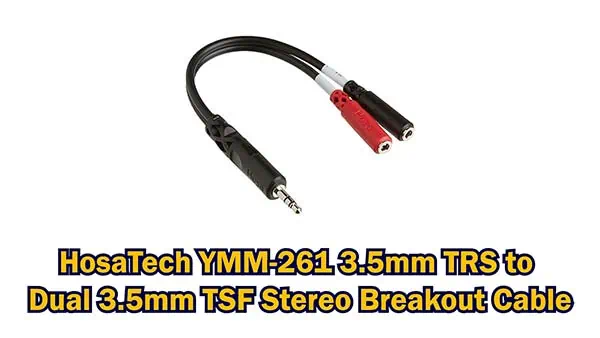
Having the audio from the two microphones on separate channels is important since the input level control dial on the H5 cannot adjust the left and right channels independently. Consequently, set the level for the loudest voice and then normalize the two channels in your editing software so both speakers peak at the same level. Furthermore, set the Recording Format to Stereo File in the menu.
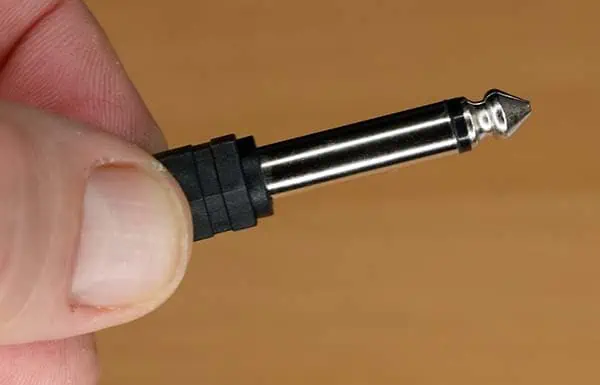
Record 1 or 2 Lav Mics on XLR/TRS Inputs 1 & 2: The H5 has ¼” TRS sockets on Inputs 1 and 2, obviously these are too big for the 3.5mm plugs on most lavalier microphones. You will need a 3.5mm to ¼” jack plug adapter.
However, be careful which adapter you choose. When I tried connecting my BOYA BY-M1 mic to Inputs 1/2 on the H5 a mono (TS) adapter worked but a stereo (TRS) adapter did not work.
A further requirement is that the Lav Mic must be self-powered since the Zoom H5 does not provide plug-in power to Inputs 1 & 2.
To ensure you only record the tracks you need, set the Recording Mode
to Stereo File in the menu.
Recording with four Lav Mics: If you wish to record with the L/R and 1 & 2 tracks simultaneously you will need at least two self-powered Lavalier microphones since the combo XLR/TRS inputs cannot provide plug-in power. Alternatively, you could use wireless Lav Mics and plug the receiver(s) into Inputs 1 or 2 on the Zoom H5. To plug 2 Lav Mics into the 3.5mm mic input socket on the H5, follow the instructions in the Record 2 Lav Mics on tracks L&R section above. To plug Lav Mics into the combo XLR/TRS Inputs follow the instructions in the Record 1 or 2 Lav Mics on XLR/TRS Inputs 1 & 2 section above. Then make sure you change the Recording Mode to Multifile in the menu.
Conclusion
You now know how to use Lavalier Microphones with the Zoom H5 Handy recorder. I normally only use a single Lav Mic with the H5, but it is possible to record with up to 4 Lavalier inputs. So, whether you’re recording a vlog or a panel discussion, this setup can work for you. In terms of audio quality, the main limiting factor will be the quality of your Lavalier microphones. Of course, you could mix things up a little and record with both Lav mics and XLR mics. Perhaps a useful mix if you will be sitting behind a desk or counter but also need the freedom to get up to demonstrate something.

About the author: Tosh Lubek is a multi-award-winning broadcaster, writer, and video producer, with 40 years of experience in professional broadcasting and has been using Canon video and stills cameras since 2010. He has worked with radio and TV broadcasters, advertising agencies, and direct clients on a variety of projects including radio and television advertising, online video production, corporate videos, award ceremony motion graphics, and theme park sound design. Tosh has won numerous awards, including a Radio Academy Awards Gold Sony, a Gold, Silver, and Bronze World Medals in the New York Festivals International Advertising Awards. Since about 2007 he has been creating YouTube videos. Tosh has been a sponsor of the “video booth” at HashTag Business Events across the UK.
Recent Posts
Most people use sandbags the wrong way. Here’s how to hang them properly on a light stand for maximum stability and safety — plus what to fill them with.
You're Using the Canon RF 50mm f/1.8 WRONG! Here’s How to Fix It
If you’ve recently picked up the Canon RF 50mm f/1.8 STM—affectionately known as the Nifty Fifty—you might be confused by that strange switch on the side of the lens. It doesn’t say AF/MF...