

DIY Video Studio is supported by its readers who use the affiliate links or ads on this site. As an Amazon Associate, I earn from qualifying purchases. Thank your support if you use any of the links.
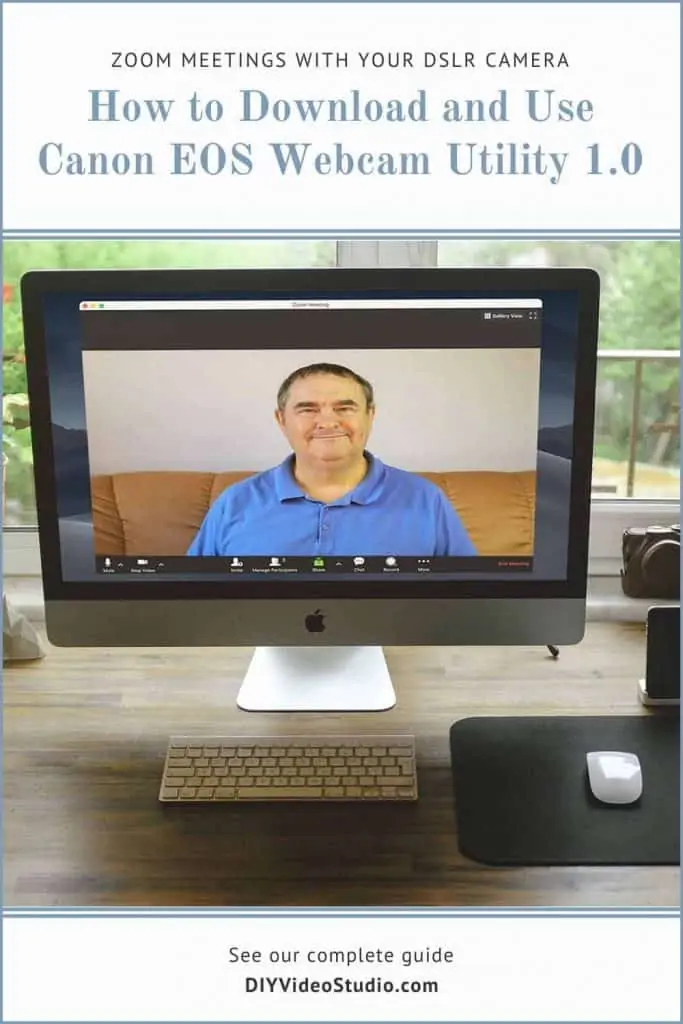
Canon released its EOS Webcam Utility Beta in April 2020, enabling 25 of its EOS and PowerShot cameras to work as high-quality webcams. Allowing the cameras to be used with some of the most popular video conferencing and streaming apps. In mid-September 2020 Canon released EOS Webcam Utility 1.0 for Windows 10. The official release added extra functionality to the software and expanded the list of compatible cameras from 25 to 42.
To use Canon EOS Webcam Utility 1.0 for Windows 10 just follow these steps.
- Download EOS Webcam Utility 1.0 from a Canon website.
- Install the software on a Windows 10 PC.
- Connect your compatible Canon camera to your desktop or laptop using a USB cable.
- Turn on your camera and start your video conferencing, streaming, or video recording software.
- Open the video settings in your video conferencing or streaming software and choose EOS Webcam Utility as your video source.
- Start using your video software for your video meeting, streaming, or recording.
Canon’s webcam utility is simple to use but keep reading for a step-by-step guide on how to download the software, install, and use it.
There are also some things you need to know to make sure your experience goes smoothly, including discovering whether your Canon camera is one of the 42 compatible models and which is the correct USB interface cable you’ll need.


Last update on 2025-10-20 / Affiliate links / Images from Amazon Product Advertising API
What is the Canon EOS Webcam Utility?
EOS Webcam Utility 1.0 is Canon’s official Windows webcam software, that lets you turn your compatible Canon EOS and PowerShot camera into a high-quality webcam using nothing more than a USB cable. Best of all, it’s free.
The software now supports 42 of Canon’s most popular cameras, and it’s compatible with even more video conferencing, streaming, and video recording apps.
An additional improvement on the beta version is that the camera can now record to an internal memory card while also streaming video.
Compatible Video Conferencing and Streaming Apps
Canon EOS Webcam Utility is a substantial improvement on the beta version that was released in April. Although the Beta worked fine with Zoom, there were issues when using the desktop version of Skype. As a workaround, you were forced to use the web version of Skype with the Google Chrome web browser.
The official release of the webcam utility is now compatible with the following apps.
- Discord
- Facebook Live
- Hangouts™
- Meet™
- Messenger
- Open Broadcaster Software®️
- Skype
- Slack
- Streamlabs
- Teams
- Webex®
- Windows Camera App
- YouTube Live
- Zoom
What you will need to use the EOS Webcam Utility software
A compatible camera. Check whether your Canon camera is on the list of compatible cameras further down in this article. If it is, move on to the following additional requirements.
A compatible USB interface cable. You will need a USB cable to connect your camera to a desktop or laptop computer. Not all Canon cameras are bundled with a USB interface cable. You can check the compatible camera list (an asterisk after a camera model indicates no bundled cable). I have also included a chart of compatible USB cables for each camera model, this chart also indicates whether a USB cable was bundled with each camera.
No beta version on your PC. If you have previously installed the EOS Webcam Utility beta, make sure you uninstall it before proceeding. Although I had both the beta and official release installed on my desktop and laptop, I did experience issues with the installation on my desktop. Canon recommends removing the beta from your computer, and I would also reboot.
You need to be connected to the internet. Whether connected using a cable or wifi, you will need to be online to download the software from a Canon website.
A PC that meets these system requirements are:
- Windows 10 (32 or 64-bit)
- Intel Pentium processor (1.6GHz or faster)
- 2 GB or more of RAM
- Monitor with a screen resolution of 1,024×768 pixels or more
- Monitor Screen Colors: Medium (16-bit)
Canon Webcam Utility Download websites
Where can I download the official release of the EOS Webcan Utility software
Unlike the beta version, which was only available on the Canon USA website, the official release of the software is available worldwide. However, it shouldn’t be a problem if you download the software from a Canon site outside of your region. For instance, although the beta was officially only available and supported in the USA anyone could in fact download and use it. If in doubt, contact your local Canon support.
Here are six Canon websites from where you can download the software. You may wish to choose the site in your own region purely because some Canon cameras were released under different names depending on the territory. For instance, the EOS Rebel SL3, EOS 250D, EOS 200D II, and EOS Kiss X10 are all the same camera but the name differs depending on where you bought it.
- Download from the Canon USA site
 .
. - Download from the Canon Canada site.
- Download from the Canon UK site.
- Download from the Canon Europe site.
- Download from the Canon Malaysia site.
- Download from the Canon Australia site.
You will download a compressed zip file (EOSWebcamUtility-WIN1.0.zip) that will probably be in your Downloads folder.
MAC USERS: At present, the official release is only available for Windows. The Mac version will be coming soon, but in the meantime, you can download the beta version 0.9.0 and use it. To download the mac beta and details on system requirements and installation see my article How To Use Canon EOS Webcam Utility mac Software.
Official Canon USA video about EOS Webcam Utility
Installing the Canon EOS Webcam Utility software
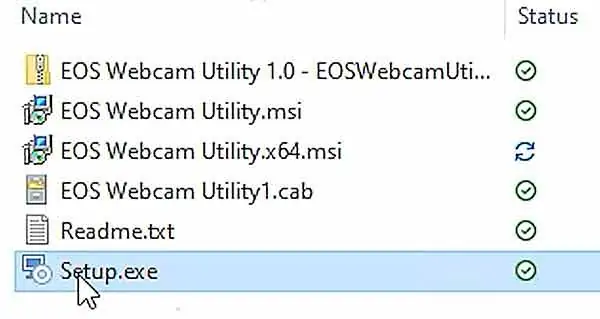
Once the download has completed you should find the zipped software installation package in your Downloads folder; it should be called “EOSWebcamUtility-WIN1.0.zip”.
STEP 1: Extract the EOS Webcam Utility. To extract the installation package, double-click on the .zip file or right click and from the menu that appears, choose “Extract All”. You then will have the choice of deciding where you want the package to be saved.
If you wish, you can check the contents of the Readme.txt file. However, it basically says what I have in Step 2 and indicates how to uninstall the software at some later date.
Step 2: Run the “Setup.exe” file. Start the software installation by double-clicking on the setup executable file.
If you are using Endpoint Protection antivirus software, you might get a warning about the installing the EOS Webcam Utility. Do not worry. The setup executable file is safe to run, so click on “Allow this file” and let the installation continue.
STEP 3: Choose your language on the “Language Selection” screen choose your language from the drop-down menu. Once you’ve chosen your language click the “Next” button.
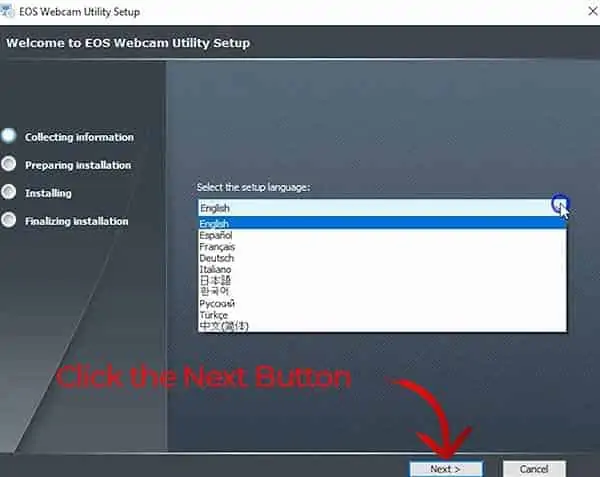
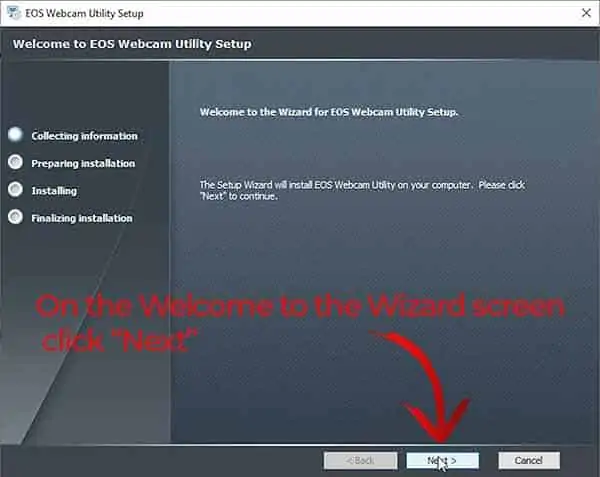
STEP 4: Click the “Next” button on the “Welcome” screen of the installation wizard.
STEP 5: Read and agree to the License Agreement. If you are happy to proceed according to Canon’s licensing terms click the radio button next to, “I accept the terms in the License Agreement”, and then click the “Next” button.

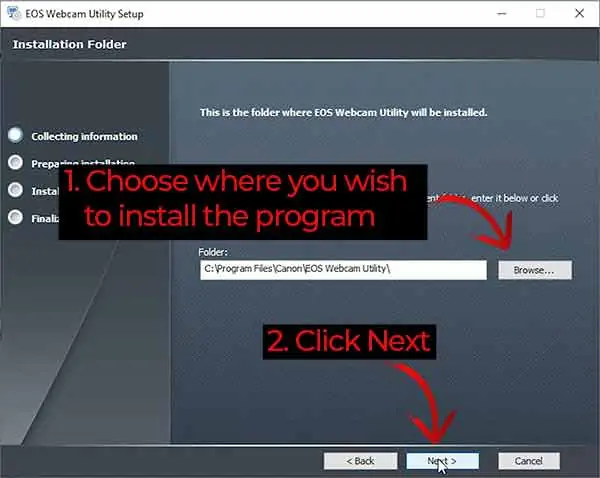
STEP 6: Choose the installation folder. On the Installation Folder screen, you can “browse” to where you want to install the software or leave it at the default destination, then click “Next” to continue.
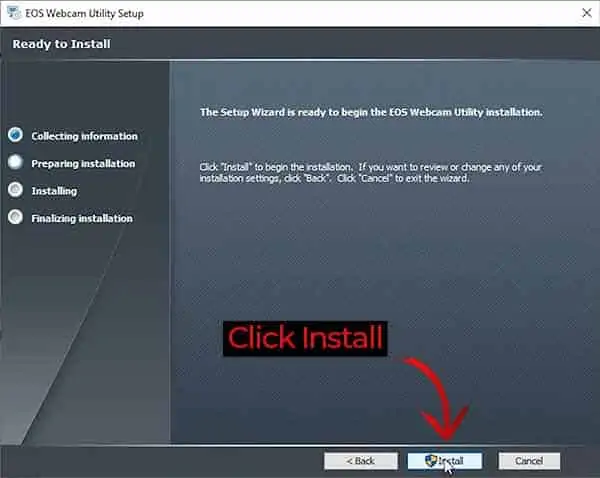
STEP 7: Click the “Install” button. You should be on the “Ready to install screen” with three button options; “Back”, “Install”, and “Cancel”. If you are happy to carry on with the installation click the “Install” button.
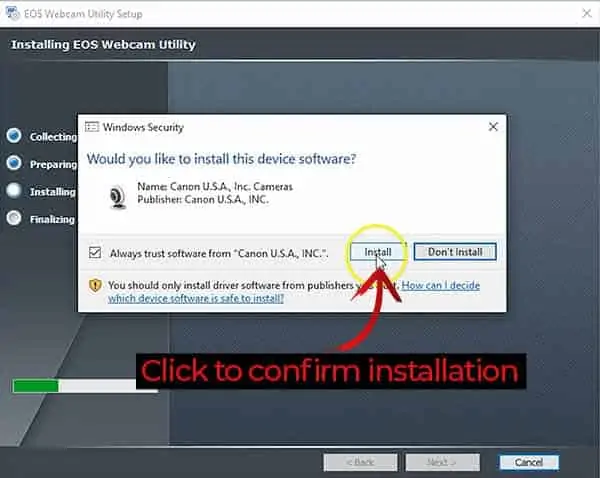
STEP 8: Confirm you wish to proceed. Your computer will ask you “Would you like to install this device software?”. You will need to click the checkbox that is to the left of “Always trust software from Canon…”, then click the “Install” button.
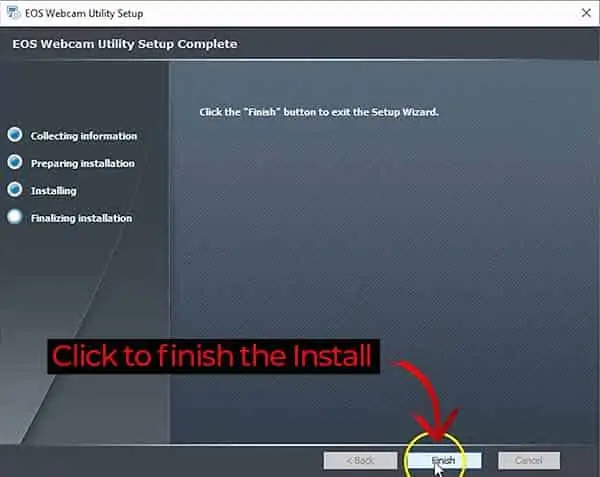
STEP 9: Click “Finish”. Once the installer has completed, you can click the “Finish” button to exit the installation wizard.
STEP 10. Reboot your computer. Canon recommends that you save all your open documents/images/videos that you have been working on and reboot your system. In my experience that’s not always necessary. I needed to reboot my desktop after installing the webcam utility, but on my laptop, the software worked without needing a system reboot.
How to set up your Canon camera to work as a USB webcam
Although you could connect your camera to your PC and turn the power switch to “ON”, you may not get optimal results. So, take a moment to set up everything the way Canon recommend.
Do not make menu setting changes with the camera and computer connected with the USB cable. The other dials and buttons are safe to operate when the camera and PC are connected, even when streaming.
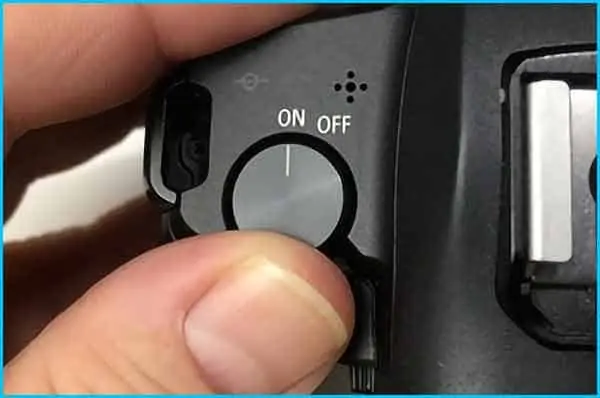
STEP 1: Turn on your camera and change to Movie Mode. You can do this by using the Mode Dial, Mode Switch, or Mode Button interface.
STEP 2: Change your video quality and frame rate.
Set the video quality to Ful HD (FHD).
The frame rate of the video stream is generally up to 30fps but will depend on a combination of factors including the camera model, your PC’s performance, and the speed of the data capability of the USB connection. Generally, set your frame rate to 29.97/30fps.
STEP 3: Frame the shot and adjust the exposure so that the image is to your liking.
STEP 4: Uncover the flap covering the camera’s USB socket and connect the recommended USB cable. Plug the other end of the USB cable into a USB port on your PC.

If you find the USB cable is too short to allow the correct placement of the camera, I’d recommend getting a longer cable rather than using an extender along with the original cable. I’ve tried using 6ft and 10ft single USB cables that have worked fine but using the original 3ft cable plus a 3ft cable extender to be unreliable, with the connection being lost after initially connecting.
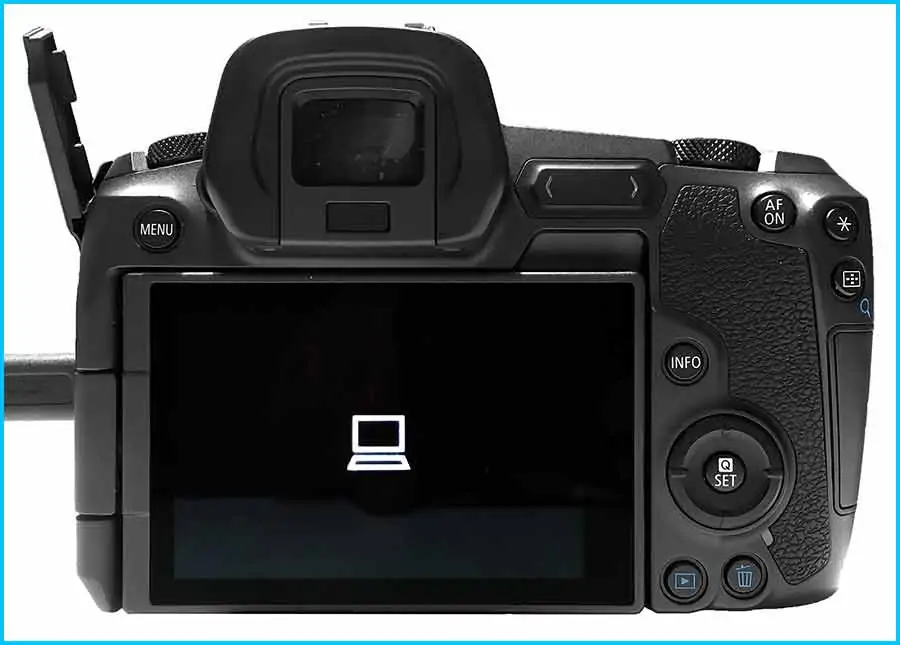
STEP 5: When your computer recognizes the camera as a USB device the camera’s screen will go black and a representation of a computer will appear.
STEP 6: Open your video conferencing, streaming, or recording app. Go to the video settings and choose “EOS Webcam Utility” as your video source. The camera’s display and your video app’s preview screen will change to showing whatever is in front of the camera.
AUDIO: The EOS Webcam Utility does not capture the audio from your camera’s internal microphone. Make sure your computer’s microphone or an external microphone has been selected in the conferencing/streaming/recording app’s audio settings.
Why use a DSLR or Mirrorless camera as a webcam?
The EOS Webcam Utility gives DSLR/Mirrorless owners more value from their camera. Many of these cameras are not cheap, costing hundreds or even thousands of dollars. But they have a big advantage over webcams and smartphones, the video they produce is much better quality.
Here’s an example using my laptop’s built-in webcam (left-side) and my Canon EOS R connected using the EOS Webcam Utility (right-side).
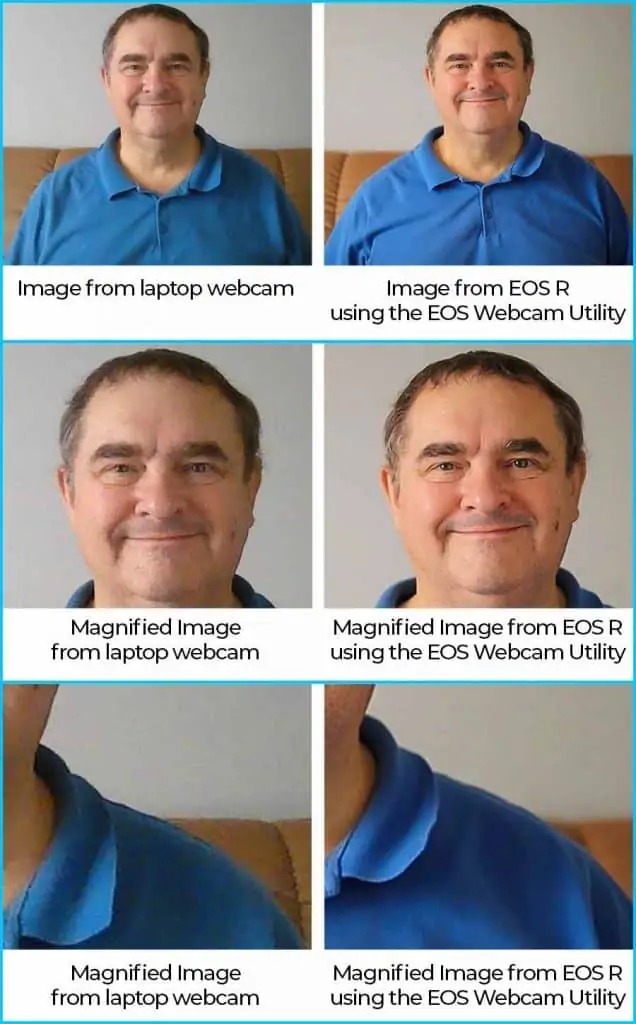
The lighting I used is typical of a home office. So, while it wasn’t as bright as a video studio, it certainly wasn’t dark. Even so, there’s a clear difference in the performance of the webcam and my Canon mirrorless camera.
Because the pair of comparison images at the top are much smaller than how they appeared on my laptop’s screen, I’ve included a couple of magnified selections to make the difference even clearer.
You can see the colors in the video image from my EOS R appear more vibrant and are truer to life than from the webcam. There’s also a lot more video noise in the image from the webcam that appears as grain and pixelation. The seat behind my shoulder also has a lot of blocky color noise.
All this grain (video noise) also emphasizes the fact that the image from the webcam is blurrier than the much sharper and clearer image from the EOS R mirrorless camera. Look at the bottom pair of images. You can see from the EOS R image on the right, the material of my shirt appears smooth and relatively free of noise. But the webcam image clearly shows the noise and lack of detail.
The noise in the webcam video image was there because the webcam’s electronics was artificially boosting the brightness of the image. However, the mirrorless camera didn’t need to do that. Because I was using an f/1.8 lens I was able to compensate for the less than perfect lighting by opening the lens aperture a little to let in more light.
If it had been a dull and cloudy day, I could have opened the lens aperture to its max to let in enough light, before needing to increase the brightness artificially by raising the ISO. The net result is that by using my camera I can still get a good-looking image with natural light, whereas I would have needed to set up a ring light or LED video light for the webcam.
You may have spotted the blurred background in the image from my EOS. This is not a failing of the camera but is in fact deliberate. Unlike the webcam, which has a fixed aperture (the hole in the lens that lets the light through to the camera’s image sensor), the lens on my Mirrorless EOS R has an adjustable aperture. By setting the lens aperture to f/1.8, it’s the maximum size, I was able to create a shallow depth of field and only have me in focus. The chair’s back and wall are both out of focus and the blur looks silky smooth.
If I didn’t have a wall behind me but say a messy office, I could “hide” that background by using that shallow depth of field. Everything behind me would be thrown out of focus and the mess would be far less distracting. You can simulate the effect on skype, but it generally looks very unnatural.
But by using a DSLR, or Mirrorless camera, with a fast lens you have much more control, and the image looks much better. You effectively separate yourself from the background, forcing the viewer to concentrate on and what you’re saying.
The benefits of using the EOS Webcam Utility with a DSLR/Mirrorless camera over a standard webcam:
- The colors look more vibrant.
- There is much less or almost no video noise and grain in the image.
- The image is a lot sharper.
- A fast lens, like the EF 50mm f/1.8, lets you record with less light or even no additional video lights.
- By using faster lenses (those with larger apertures and lower f-numbers) you can blur the background.
- You can record your video footage straight to your camera’s memory card.
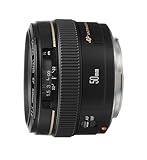
The Canon EF 50mm f/1.8 is often referred to as “the Nifty-Fifty”. The focal length of 50mm produces images that look true to life. So, it’s a standard prime lens in just about everyone’s kit bag. Even pros probably own it because it’s one of the cheapest, if not the cheapest, Canon prime lens you can buy.
Although it’s inexpensive, it’s an excellent standard lens to have. However, it’s not as “fast” as it’s 50mm siblings the f/1.4 and f/1.2 lens. Although they can capture even more light, they are also more expensive.
If you are going to be using a compatible Canon DSLR or Mirrorless camera for your video meetings consider getting the nifty fifty or it’s faster stablemates.


Last update on 2025-10-20 / Affiliate links / Images from Amazon Product Advertising API
How to use EOS Webcam Utility with Zoom
Once you’ve installed the EOS Webcam Utility on your computer and rebooted your system follow the instructions on “How to set up your Canon camera to work as a USB webcam”.
You can choose to set your camera to either fully automatic mode or manual mode. If you chose manual mode you should set your exposure now, it might be a case of trial and error, but it shouldn’t take long.
Of course, auto mode should take care of the exposure for you but watch out if you are in front of a white wall or white backdrop. You might need to use the exposure compensation to make sure the camera exposes properly for you and isn’t fooled by the large amount of white to and causes you to be under-exposed. As with everything video and audio, I recommend doing a test to make sure everything is set correctly.
STEP 1
When you’ve connected your camera and computer and turned on the camera you should hear the Windows Device Connection sound. The screen on your camera should also change to black with an icon of a computer screen and keyboard. You’re now set to start your Zoom meeting.

You can now open any compatible meeting, streaming, or recording software. There are a good number of these that the utility will work with and the setup is similar in most of them. In this case, I’m going to demonstrate the process in Zoom.
STEP 2
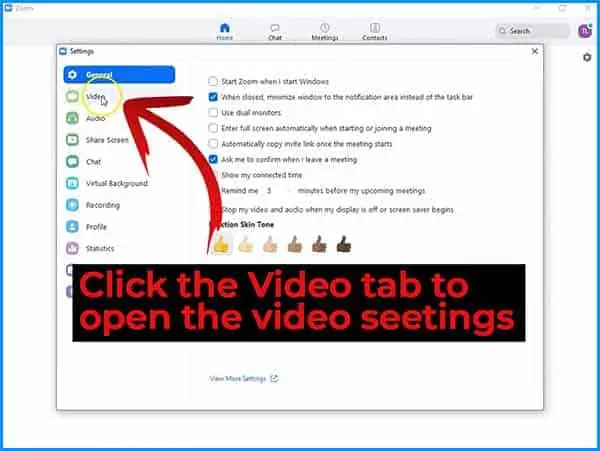
Open and sign-in to Zoom. In the top right corner of the desktop interface, you will see the gearwheel or settings icon. Click on the gearwheel icon.
STEP 3
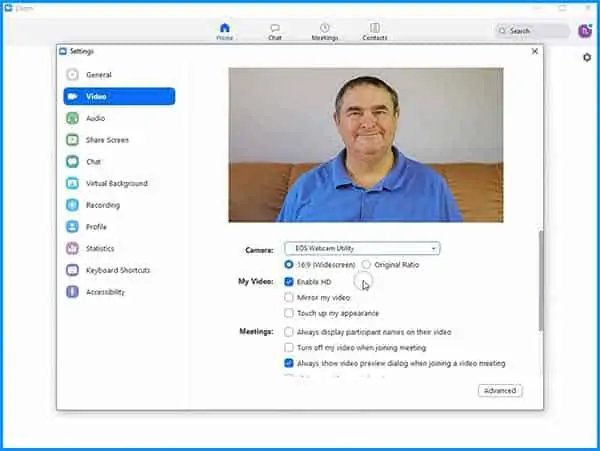
When the settings screen opens click on the “Video” tab on the left.
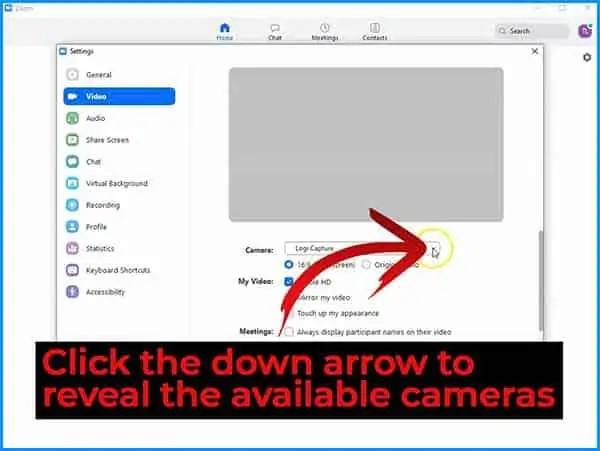
STEP 4
The video preview window will open on the right-hand side of the settings window, with the video controls beneath. The first control in the list is for your choice of camera.
If you have a webcam already installed, you’ll need to click on the down arrow to reveal the list of available cameras.
STEP 5
The drop-down list will include all the available cameras. Click on “EOS Webcam Utility” to select the video output from your Canon camera.
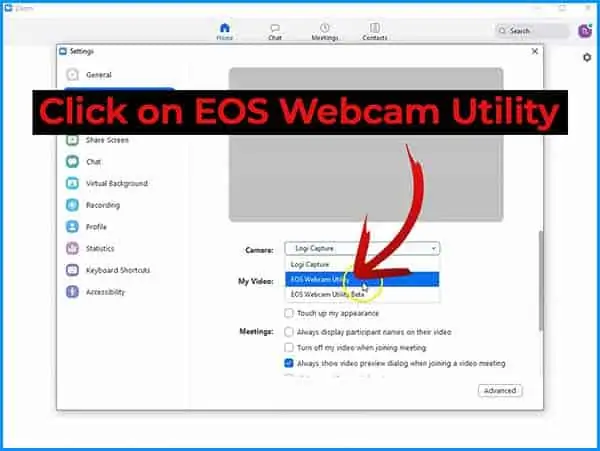
The output from your Canon EOS or PowerShot camera show will now appear in the video preview window. If you wish to change any of the other video settings you can do so now by clicking on the checkboxes.
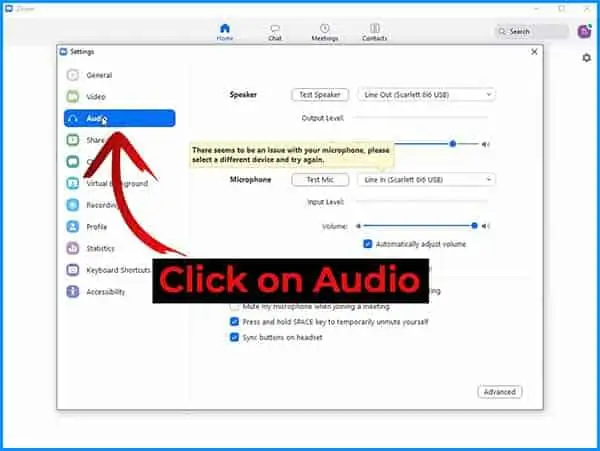
Although your camera may have an internal microphone audio is not transferred over the USB link. This will be addressed in the next step.
STEP 6
In the left-hand menu click on Audio to bring up the audio settings.
STEP 7
Click on the down-arrow beside the currently selected microphone to reveal the different microphones available on your system. When the dropdown list appears, click on either the PCs internal microphone or the USB external microphone (if you have one).
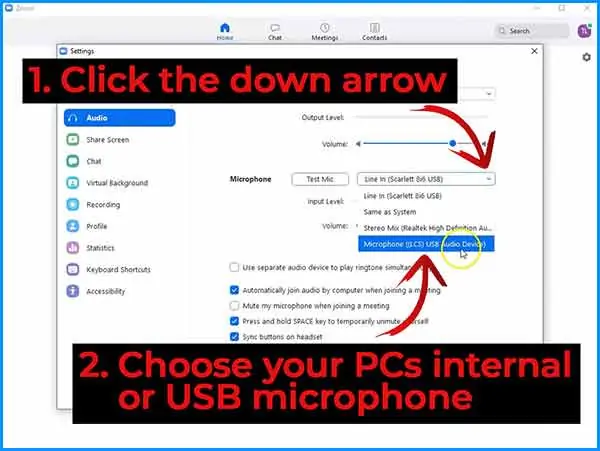
You should check that your microphone is working by clicking on the Test Mic button and speaking at your normal speech level. After a few seconds you should hear a recording of you speaking. If all is well you can close the settings window and either start or join a Zoom meeting.


Last update on 2026-03-01 / Affiliate links / Images from Amazon Product Advertising API
Canon EOS Webcam Utility compatible cameras
Canon has added 17 supported cameras to the initial 25 that worked with the beta software.
Note that not all these cameras come with a bundled USB interface cable. The camera bodies marked with an asterisk (*) do not come with a bundled cable. You will also find this information in the table “USB Interface Cables for Webcam Utility compatible cameras“.
| EOS DSLR Cameras | EOS Mirrorless Cameras | PowerShot Cameras |
| EOS-1D X Mark III | EOS R5 | PowerShot G5X Mark II * |
| EOS-1D X Mark II | EOS R6* | PowerShot G7X Mark III * |
| EOS-1DX | EOS R | PowerShot SX70 HS * |
| EOS-1D C | EOS Ra | |
| EOS 5DS R | EOS RP * | |
| EOS 5DS | EOS M6 Mark II * | |
| EOS 5D Mark IV | EOS M50 * | |
| EOS 5D Mark III | EOS M200 * | |
| EOS 6D Mark II * | ||
| EOS 6D | ||
| EOS 7D Mark II | ||
| EOS 7D | ||
| EOS 90D * | ||
| EOS 80D * | ||
| EOS 77D * | ||
| EOS 70D | ||
| EOS 60D | ||
| EOS 850D/Rebel T8i* | ||
| EOS 800D/Rebel T7i * | ||
| EOS 760D/Rebel T6s | ||
| EOS 750D/Rebel T6i | ||
| EOS 700D/Rebel T5i * | ||
| EOS 600D/Rebel T3i | ||
| EOS 250D/Rebel SL3 * | ||
| EOS 200D/Rebel SL2 * | ||
| EOS 100D/Rebel SL1 | ||
| EOS 2000D/Rebel T7 * | ||
| EOS 1300D/Rebel T6 | ||
| EOS 1200D/Rebel T5 | ||
| EOS 1100D/Rebel T3 | ||
| EOS 4000D/Rebel T100 * |
USB Interface Cables for Webcam Utility compatible cameras
In the following table, I have grouped the cameras by the type of USB interface cable. So if you have more than one camera you can easily tell whether they share the cable.
| Camera Model | Canon Suggested USB Interface Cable | What is the cable really? | Bundled with camera |
| EOS-1D X Mark III | IFC-100U (to USB C) | USB 3.1 Type C to Type C cable | Yes |
| EOS R | IFC-100U (to USB C) | USB 3.1 Type C to Type C cable | Yes |
| EOS Ra | IFC-100U (to USB C) | USB 3.1 Type C to Type C cable | Yes |
| EOS R5 | IFC-100U (to USB C) | USB 3.1 Type C to Type C cable | Yes |
| EOS R6 | IFC-100U (to USB C) | USB 3.1 Type C to Type C cable | No |
| PowerShot G5 X Mark II | IFC-100U (to USB C) | USB 3.1 Type C to Type C cable | No |
| PowerShot G7 X Mark III | IFC-100U (to USB C) | USB 3.1 Type C to Type C cable | No |
| EOS M6 Mark II | IFC-100U (to USB C) | USB 3.1 Type C to Type C cable | No |
| EOS RP | IFC-100U (to USB C) | USB 3.1 Type C to Type C cable | No |
| EOS 70D | IFC-130U | USB 3.0 Type A to Micro B | Yes |
| EOS Rebel T6i | IFC-130U | USB 3.0 Type A to Micro B | Yes |
| EOS Rebel T6 | IFC-130U | USB 3.0 Type A to Micro B | Yes |
| EOS 1200D/Rebel T5 | IFC-130U | USB 3.0 Type A to Micro B | Yes |
| EOS 600D/Rebel T3i | IFC-130U | USB 3.0 Type A to Micro B | Yes |
| EOS 1100D/Rebel T3 | IFC-130U | USB 3.0 Type A to Micro B | Yes |
| EOS-1D X Mark II | IFC-150U II | USB 2.0 Type A to mini Type B | Yes |
| EOS 5DS R | IFC-150U II | USB 2.0 Type A to mini Type B | Yes |
| EOS 5DS | IFC-150U II | USB 2.0 Type A to mini Type B | Yes |
| EOS 5D Mark IV | IFC-150U II | USB 2.0 Type A to mini Type B | Yes |
| EOS 7D Mark II | IFC-150U II | USB 2.0 Type A to mini Type B | Yes |
| EOS 1D X | IFC-200U/500U | USB 2.0 Type A to mini Type B | Yes |
| EOS 1D C | IFC-200U/500U | USB 2.0 Type A to mini Type B | Yes |
| EOS 5D Mark III | IFC-200U/500U | USB 2.0 Type A to mini Type B | Yes |
| EOS 7D | IFC-200U/500U | USB 2.0 Type A to mini Type B | Yes |
| EOS 60D | IFC-200U/500U | USB 2.0 Type A to mini Type B | Yes |
| EOS 100D/Rebel SL1 | IFC-200U/500U | USB 2.0 Type A to mini Type B | Yes |
| EOS 6D | IFC-200U/500U | USB 2.0 Type A to mini Type B | Yes |
| EOS 6D Mark II | IFC-400PCU | USB 2.0 Type A to Mini USB Type B cable | No |
| EOS 80D | IFC-400PCU | USB 2.0 Type A to Mini USB Type B cable | No |
| EOS 77D | IFC-400PCU | USB 2.0 Type A to Mini USB Type B cable | No |
| EOS 700D/Rebel T5i | IFC-400PCU | USB 2.0 Type A to Mini USB Type B cable | No |
| EOS 760D/Rebel T6s | IFC-400PCU | USB 2.0 Type A to Mini USB Type B cable | Yes |
| EOS 750D/Rebel T6i | IFC-400PCU | USB 2.0 Type A to Mini USB Type B cable | Yes |
| EOS 850D/Rebel T8i | IFC-400PCU | USB 2.0 Type A to Mini USB Type B cable | No |
| EOS 800D/Rebel T7i | IFC-400PCU | USB 2.0 Type A to Mini USB Type B cable | No |
| EOS 2000D/Rebel T7 | IFC-400PCU | USB 2.0 Type A to Mini USB Type B cable | No |
| EOS 1300D/Rebel T6 | IFC-400PCU | USB 2.0 Type A to Mini USB Type B cable | Yes |
| EOS 4000D/Rebel T100 | IFC-400PCU | USB 2.0 Type A to Mini USB Type B cable | No |
| EOS 200D/Rebel SL2 | IFC-400PCU | USB 2.0 Type A to Mini USB Type B cable | No |
| EOS 90D | IFC-600PCU | USB 2.0 Type A to Micro USB Type B cable | No |
| EOS 250D/Rebel SL3 | IFC-600PCU | USB 2.0 Type A to Micro USB Type B cable | No |
| EOS M50 | IFC-600PCU | USB 2.0 Type-A to Micro USB Type B cable | No |
| EOS M50 MkII | IFC-600PCU | USB 2.0 Type-A to Micro USB Type B cable | No |
| EOS M200 | IFC-600PCU | USB 2.0 Type A to Micro USB Type B cable | No |
| PowerShot SX70 HS | IFC-600PCU | USB 2.0 Type A to Micro USB Type B cable | No |
Canon EOS Webcam Utility is not working troubleshoot
If you had previously installed the beta version of the software, you should have uninstalled it before installing the official release of the webcam software. If you did not do this uninstall the beta and reboot your system.
If your streaming app is not receiving audio, make sure you choose the computer’s microphone or an external microphone in the streaming app’s audio settings. EOS Webcam Utility does not transmit audio over the USB connection.
If you normally experience heating issues when recording video in the camera, they will also occur if you record internally while streaming. If the camera overheats it will automatically shut down. To prevent shut down while streaming and recording internally, do not set your camera to a higher resolution than 1080p.

If your streaming app shows the EOS Webcam Utility screen with a red cross above a USB plug in your streaming app’s video preview screen there is a problem with the USB connection.
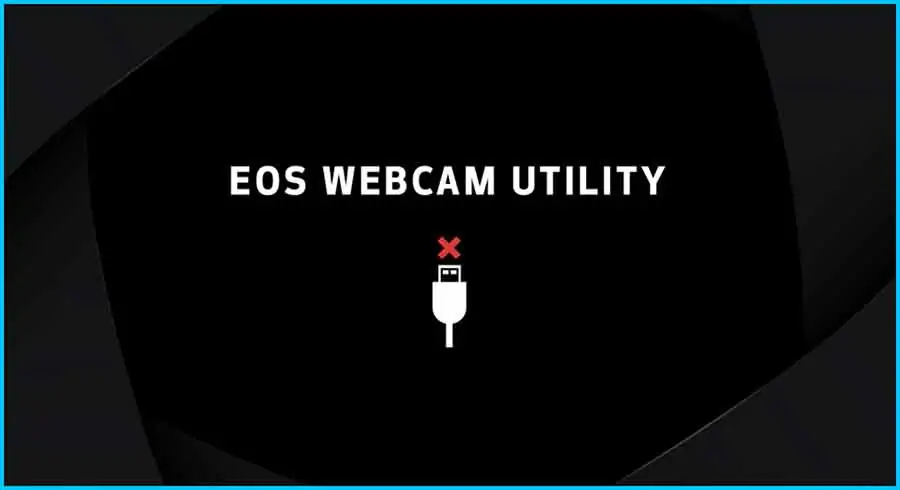
- Check that the USB cable is properly connected to the camera and PC.
- Check that the camera is turned on.
- Check whether the battery or adapter are supplying power to the camera.
If your streaming app shows the EOS Webcam Utility screen with a camera icon and exclamation mark, the LiveView video signal from the camera is being used by something else.
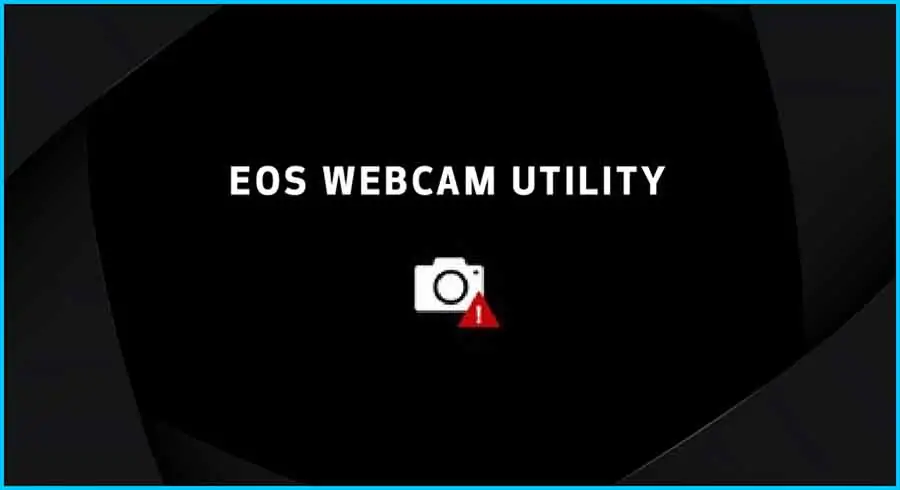
Close the app and any programs that may be using the camera’s LiveView video signal, such as EOS Utility 3. If you have EOS Utility 3 installed and set to automatically open when the camera is connected to your PC with a USB cable, EOS Utility 3 will open and acquire the camera’s LiveView video stream. Close EOS Utility 3 prior to opening your streaming app.
Tosh Lubek runs an audio and video production business in the UK and has been using the Canon EOS R since it was released in the Autumn of 2018. He has used the camera to shoot TV commercials for Sky TV, promotional business videos, videos of events and functions, and YouTube creator content. He has also won international awards for his advertising and promotional work. You can meet him by visiting his “video booth” at HashTag business events across the country.
Recent Posts
Most people use sandbags the wrong way. Here’s how to hang them properly on a light stand for maximum stability and safety — plus what to fill them with.
You're Using the Canon RF 50mm f/1.8 WRONG! Here’s How to Fix It
If you’ve recently picked up the Canon RF 50mm f/1.8 STM—affectionately known as the Nifty Fifty—you might be confused by that strange switch on the side of the lens. It doesn’t say AF/MF...