
DIY Video Studio is supported by its readers who use the affiliate links or ads on this site. As an Amazon Associate, I earn from qualifying purchases. Thank your support if you use any of the links.
You probably already know you can take a screenshot of your iPhone’s display. I’ve done it many times to capture images to help explain aspects of making videos on an iPhone. But since iOS 11 you can go one better. Your iOS device can create a screen recording video of your display. In this article, I will explain how to record your screen on an iPhone.
How to record your iPhone screen.
- Tap on Settings.
- Scroll down and tap on Control Center and then tap on Customize Controls.
- Scroll down to the “More Controls” section and tap the “+” icon next to Screen Recording.
- Exit the Settings app.
- On an older iPhone swipe up from the bottom edge. On an iPhone X and later swipe down from the screen’s top-right corner.
- Tap the gray record icon to start recording after a three-second countdown.
- To stop recording tap the red status bar (or the red timer on newer iPhones) and in the options window that opens tap Stop. Alternatively, open the Control Center and tap the red record button.
Once the recording has stopped, you’ll find your screen recording video in the Photo app. So let’s go a bit more in-depth with images. I’ll show you how to film or record your screen on an iPhone with iOS Screen Recording.
How to take a video of your iPhone screen step-by-step
This video from Apple will take you through the process of recording your screen, so you might like to take a moment to watch it. However, feel free to skip ahead for a more detailed guide.
To record and broadcast what’s being shown on your iPhone or iPad screen this is what to do.
You will need to have the Screen Recording control available in your devices Control Center.
Step 1 – Check whether Screen Recording is in Control Center
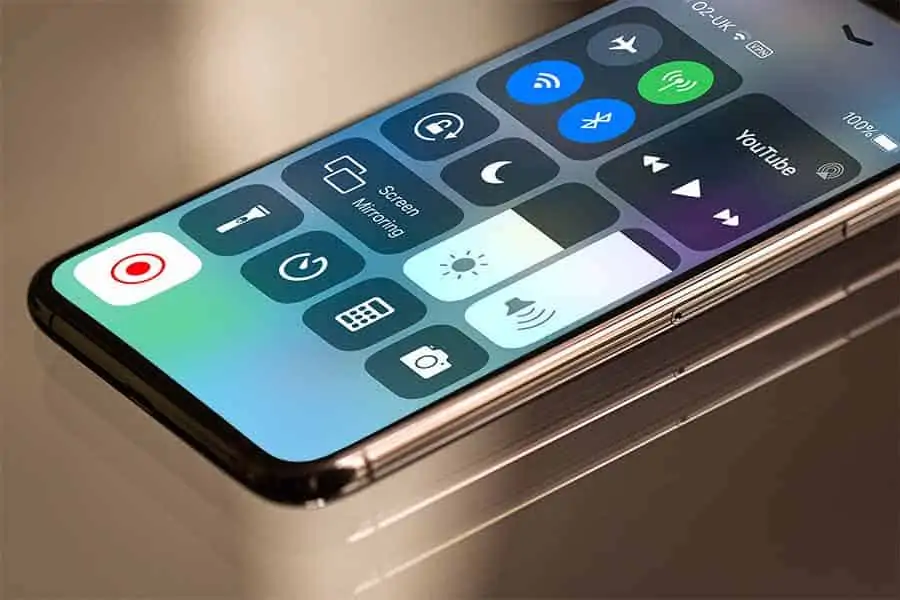
To check whether it’s there, open Control Center. On an older iPhone swipe up from the bottom edge of the screen. On an iPhone X and later, or an iPad with iOS 12 or later, or iPadOS, swipe down from the screen’s top-right corner.
The Screen recording icon is a filled circle surrounded by a circle line. If you don’t see it in Control Center
Step 2 – Add Screen Recording to Control Center
To add the Screen Recording control to the Control Center, tap Settings, scroll down, and tap Control Center.
On the next screen, tap Customize Controls. Scroll down and tap the add (“+”) icon to the left of Screen Recording.
Step 3 – Start recording your screen
Swipe up from the bottom of the screen (or down from the top right) to open Control Center. You’ll see the Screen Recording control is present.
Option 1: If you wish to record audio from the app you will be using (assuming it supports sound recording) tap the Screen Recording control. You will see a 3-second countdown, then the Screen Recording control will pulse red, indicating it is recording your iPhone’s screen.
Option 2: If you want to capture audio from your microphone during the recording, tap and hold the Screen Recording control. Below the Screen Recording control, there is a filled circle containing a microphone. If the circle is a gray-blue color “Microphone Off” will be shown underneath. Tap the circle and it will turn red and the text will change to “Microphone On”. You can now tap Start Recording. You will see the 3-second countdown and then the Screen Recording control will pulse red, and the recording will begin.
When you come out of the Control Center you will see one of two indicators that you are recording your iPhone’s screen. On older phones, the status bar will turn red and initially display “Recording”, before changing back to showing the normal display, although on a red bar. Newer phones will display a red oval showing the recording timer in the top left corner of the screen.
These may disappear when you’re using some apps, however, your screen will still be recorded. If you want to check that you are recording open the Control Center and you should see the red pulsing record control.
Step 4 – End your recording
There are two ways you can end a recording.
Method 1: When you’re ready to stop recording, just tap the red status bar or the red timer oval. If you don’t see the red status bar, you’ll need to use Method 2.
Method 2: Open the Control Center and either tap the pulsing red Screen Recording control in Option 1 above or tap “Stop Recording” in Option 2 above.
When you end the recording a Screen Recording message will appear that will remind you where your video has been saved. In most cases, it will say, “Screen Recording video saved to Photos”. Open Photos and you’ll be able to play your recording, or you can import the recording into a video editing app, and when you’re done editing, share the final cut of your Screen Recording.
Which iOS & iPadOS devices have Screen Recording?
If you have an iPhone, iPad, or iPod Touch that’s capable of running iOS 11, 12, 13, 14, 15, 16 or iPadOS13,14,15,16 you will have access to Screen Recording. Effectively that means any iPhone from the 5s onwards, so that covers pretty much most of the iPhones still in use.
I’ve prepared a table of devices that are compatible with iOS 11. If you have a device that is newer than those listed, you will be able to access Screen Recording.
| iPhone | iPad | iPod touch |
| iPhone 5s | iPad mini 2 | iPod touch (6th generation) |
| iPhone 6, 6 Plus | iPad mini 3 | |
| iPhone 6s, 6s Plus | iPad mini 4 | |
| iPhone SE (first generation) | iPad (5th generation) | |
| iPhone 7, 7 Plus | iPad (6th generation) | |
| iPhone 8, 8 Plus | iPad Air | |
| iPhone X, XS, XS Max, XR | iPad Air 2 | |
| iPhone 11, Pro, Pro Max | iPad Pro (9.7-inch) | |
| iPhone SE (2nd generation) | iPad Pro (10.5-inch) | |
| iPhone 12, Mini, Pro, Pro Max | 12.9-inch iPad Pro (1st generation) | |
| iPhone 13, Mini, Pro, Pro Max | 12.9-inch iPad Pro (2nd generation) | |
| iPhone SE (3rd generation) | ||
| iPhone 14, Pro, Pro Max, Plus |
Will Screen Recording record everything on my iPhone’s screen?
Will it record everything?
Pretty much unless you are using an app with digital rights protection.
You probably can screen capture YouTube videos but that doesn’t mean you should. For a start, capturing YouTube streams is against their terms of service. So, it’s against YouTube’s rules to download or record videos from the platform.
However, there are several legitimate reasons to record your screen, for instance, creating reviews and walk-through tutorials. However, be aware that Screen Recording will record almost everything, that includes notifications. So, before you start recording activate Do No Disturb to prevent phone calls and notifications from popping up during the recording.
If you’re unsure how to activate the “do not disturb” mode tap Settings, then choose Do Not Disturb. In the next window tap the button next to Do Not Disturb, then in the Silence section tap Always.
Will Screen Recording capture sound?
Although some apps won’t allow you to record audio, in most cases you will get the app sound being recorded.
But what if you want the screen recording to include your voiceover instead of the normal app audio? No problem, you can do that. Here’s how.
Swipe to open the Control Center then tap and hold the screen record button until a mini menu opens. Below the mini menu tap on the circular microphone icon to turn on the iPhone’s microphone. The circular icon will turn red, and your microphone audio will be recorded instead of the app sound.
You can record or broadcast your screen
Remember the mini menu that opened when you tapped and held the screen record button?
If you have apps installed that support screen recording, these will show in the mini menu. Photos will be the default choice, but you can also select one of the others in the mini menu.
On my iPhone, I have Photos, Skype, Screencast-O-Matic, and Zoom as available choices. So, if I select Skype, Screencast-O-Matic, or Zoom the text at the bottom of the mini menu changes from “Start Recording” to “Start Broadcast”. When you tape Start Broadcasting your iPhone’s screen will be shared with the app you chose from the menu.
Alternatives to iOS Screen Recording
Although iOS Screen Recording is quick, easy, and free, you might want another way to record your screen. For instance, the red recording bar at the top of the screen (on older iOS devices) or the red timer (on newer iOS devices) will be baked into the recording.
You could of course crop the recording so that viewers won’t be able to see the red bar or timer, but that’s a workaround rather than a proper solution.
This is where screen mirroring can be useful.
My favorite screen mirroring software for the iPhone is Reflector 3 from Air Squirrels. It allows you to wirelessly display your iPhone on your Mac or Windows PC.
Run Reflector 3 on your desktop or laptop. Then on your iPhone, swipe up from the bottom of the screen and tap on Screen Mirroring. In the mini menu that appears tap on the name of your computer and you will see an AirPlay Code displayed on your desktop. Type this code into the box on your iPhone and tap OK. Whatever is displayed on your iPhone will be mirrored to your computer.
You can now either use Reflector 3 to record the mirrored iPhone display or use a screen recording app on your computer to record the mirrored display.
Use this download![]() link to get Reflector 3 from the Airsquirrels website.
link to get Reflector 3 from the Airsquirrels website.
After installation on your desktop, you can try out the app FREE for 7 days. If you’ve already bought a license but need to download the software again, run the software and enter your license key when prompted.
Related questions
Is there a limit to iPhone screen recording?
Although there is no limit to the length of your screen recording, the available space on your iPhone will determine how long you can record. It is a good idea to free up space before you start recording on your iPhone.
Is it illegal to screen record movies?
Since it is against the terms of service to illicitly download or copy a movie from services such as YouTube or Netflix it would be illegal to screen record and store a movie. The streaming apps may also block your attempt to copy material. To copy the movie legally you would need permission and a license.
Why do I not have screen record on my iPhone?
If you have iOS 11 or later running and you don’t see Screen Recorder, tap Settings, scroll down and tap Control Center. On the next screen, tap Customize Controls. Scroll down and tap the“+” icon to the left of Screen Recording. Screen Recorder will now appear in your Control Center.
Tosh Lubek runs an audio and video production business in the UK and has been using the Canon EOS R since it was released in the Autumn of 2018. He has used the camera to shoot TV commercials for Sky TV, promotional business videos, videos of events and functions, and YouTube creator content. He has also won international awards for his advertising and promotional work. You can meet by visiting his “video booth” at HashTag business events across the country.
Recent Posts
Most people use sandbags the wrong way. Here’s how to hang them properly on a light stand for maximum stability and safety — plus what to fill them with.
You're Using the Canon RF 50mm f/1.8 WRONG! Here’s How to Fix It
If you’ve recently picked up the Canon RF 50mm f/1.8 STM—affectionately known as the Nifty Fifty—you might be confused by that strange switch on the side of the lens. It doesn’t say AF/MF...