
DIY Video Studio is supported by its readers. Please assume links on this site are affiliate links or ads, and that I get commissions for purchases made through these links. As an Amazon Associate, I earn from qualifying purchases. Thank you if you use any of the links.
What level should I record at?
You will probably agree with me when I say that the sound quality of your video is as important as the visuals. In fact, many would say that sound is more important. One aspect of recording quality sound is getting the ideal audio levels for video right. To do that, you need to understand a little about audio levels.
What are audio levels
In simple terms, the audio level is the loudness of the audio. It may also be referred to as the gain, although the gain is normally the input level from the microphone.
A visible indicator of the audio level is the peak position of the digital level meter. On a typical meter, a high level would be at or close to 0dB, where 0dB is the loudest level. This is often shown as the red part of the meter. In contrast, a low audio level would be further down, at perhaps -20dB or lower.
Most audio meters on recording equipment and software editors show the peak levels of your audio. They are good at showing the highest parts of your audio level. Thus, helping you to avoid clipping your audio and digital distortion. The meter may also indicate the valleys or lowest levels.
The difference between the peaks and the valleys is known as the dynamic range of the audio. In other words, the range from the lowest to the highest levels.

Three important audio levels for video
When talking about the ideal audio levels for video, we need to consider three types of audio levels in our video production workflow. These levels are different, and it is important to get them right.
The three audio levels for video
- RECORDING LEVELS of your voice or dialogue on your camera or digital audio recorder.
- AUDIO MIXING LEVELS in your editor, or the balance between your dialogue and background audio (e.g., b-roll audio, music, and sound effects).
- AUDIO EXPORT LEVELS of your finished video.
Recording Levels
Setting audio levels for recording
If you look at your recording device, whether it is your video camera or digital audio recorder, it will have some means of adjusting the recording level. It might be a thumb dial, a rocker switch or even a touchscreen. Often the dial will show a set of numbers as a guide, usually 0 to 10.
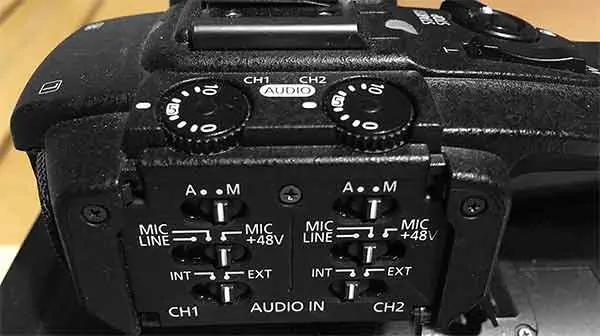
For instance, my Canon XF100 video camera has a pair of thumb dials to adjust the right and left input levels. On my Zoom h4n, the record level switch alters the record level from 0 to 100. In both cases, it is important to realize that those guide numbers do not relate to the peak dB level that will be recorded. Unfortunately, there is no magic number you can dial in to guarantee you have set an exact peak dB level.
Sounds do not come at a fixed standard loudness. The distance between the microphone and the sound source influences how loud it appears. Double the distance and the sound level will fall by -6dB. Plus, if you are recording dialogue or an interview, the reality is that some individuals are more softly spoken than others
A setting of “5” on the thumb dial of my Canon XF100 may record a softly spoken person at -18dB while a loud individual may make the meter peak at -6dB. So, the number on the dial is an entirely arbitrary figure. It does not represent a universal peak level on the recorder. What is important is the meter reading, not the number on the dial. The dial number is just a handy reference.
Always set your levels according to what the meter says on your camera or recorder. Do not assume that a dial setting of “5” that was OK for your last interview will be OK for your next one
Always check and set the audio level each time you start a new session. Do the checks even if you are recording the same person. A level check takes a few seconds, but it could save you a considerable amount of time later in post-production.
What are the proper audio levels for video?
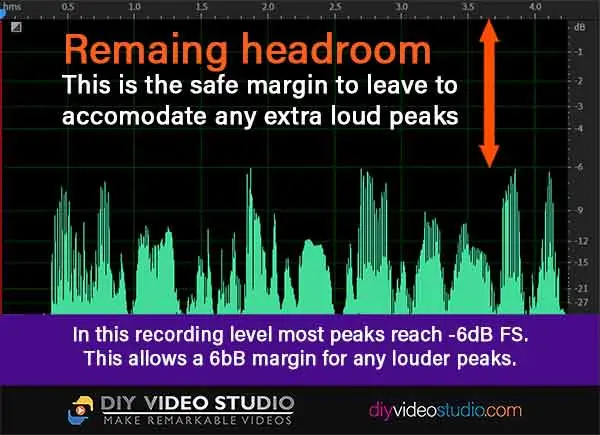
Headroom![]() is the safe zone between digital full scale (0dBFS) and a nominal level. This headroom allows for transient audio peaks to avoid the danger of clipping. For digital broadcasts and ordinary digital recordings, the EBU’s nominal level is -18dBFS.
is the safe zone between digital full scale (0dBFS) and a nominal level. This headroom allows for transient audio peaks to avoid the danger of clipping. For digital broadcasts and ordinary digital recordings, the EBU’s nominal level is -18dBFS.
I use some of this headroom to record a slightly higher signal. Often my average peak levels are -6 to -12 dB below the full scale. Usually, this is enough to minimize the danger of audio clipping.
If you set your levels so that your average peak exceeds -6dB there is a very real danger of clipping your audio.
However well you set the levels before recording commences, it will not take account of the occasional louder-than-normal word/phrase or a laugh.
If the input level exceeds 0dB, the meter will go into the red and the red peak or clipping LED will turn on. If this occurs there is a good chance your audio will be distorted. You should strive to avoid having your audio peaking above 0dB.
Although you can repair audio that has suffered limited clipping it is always better not to have to fix anything in post-production. It costs you time, effort, and a lot of grief. If you do need to repair clipped audio look at my article, How to fix and prevent audio clipping in videos, that will help you with the repair.
To be on the safe side you might think you should lower your levels to have plenty of “headroom” for those occasional louder peaks. But too low a level can also work against you.
Say you set your peak levels to hit -16dB, then your average voice levels will be even lower. If they become too low, you run the risk of having the noise generated by the mic preamps competing with the voice. You will notice the noise when you transfer your footage over to your editing software and boost the audio to the higher levels appropriate for export
How I set my audio levels
As I said, you cannot dial in a number that will guarantee your audio peaks at a set level. This means every time I record an interview or piece-to-camera I go through the same procedure, and it goes like this.
- First, I place my microphone 6 to 12 inches away from the speakers’ mouth. This may be a lavalier microphone (either wireless or wired), a super-cardioid microphone on a boom stand, or a super-cardioid microphone that the speaker holds just out of shot.
- I start recording, either on my camera or digital audio recorder.
- Now I start a conversation with the person who is going to be interviewed or will be speaking. After about 30sec I ask them to “ident” the recording by telling me who they are, the organization they represent, and what their role is. Throughout this phase, I adjust the levels roughly, so they are about right.
- Next, I ask them about what they had for breakfast or would like to have had for breakfast. The point of all this is to get the speaker to relax a little, talk naturally, and maybe even laugh. By this stage, their voice will be pretty much as it will be during the recording, and I can reliably set my levels. I allow their speech to peak between -12dB and -6dB. Because they are speaking naturally, possibly even laughing, I can be confident that most peaks will be below -6dB. This gives me enough “headroom” to catch the occasional higher peak without clipping. If I notice the odd peak exceeding -6dB I will turn down the input level a little more.
- Once I am happy with the audio level I playback the recording and listen on headphones to confirm everything sounds OK. This is also a good opportunity to catch other audio problems, such as any buzzes, crackles, or material noises of lavalier mics on clothing. These may be difficult or impossible to correct in post-production, so it is better to catch them before the interview starts in earnest.
Once I have set my ideal audio levels for the video I start the interview, or piece to camera, in the usual way
However, I always monitor the recording on headphones (the enclosed ear type helps to exclude other sounds). Whilst monitoring the sound on headphones I also keep an eye on the meter on my camera or my Zoom H4n’s screen. If I notice the speaker deviating from their initial speaking level, I can “ride the record level on my camera or digital audio recorder.
Obviously, if I am recording myself, I cannot monitor myself with headphones. When shooting myself for a YouTube video I will set my peak record level slightly closer to -12dB. This will help take account of any parts in my speech where I might become a little more animated than normal.
What about the ideal audio levels for outdoor videos?
I have been asked, what are the ideal audio levels for video when recording outdoors? Also, what are the right audio levels when recording on a windy day?
The people who asked the questions were missing the point. The correct level is the correct level wherever you are shooting your video
Background noise, such as garden birds, traffic, wind blasts, and mic self-noise are entirely separate issues. In such situations, you do not alter your ideal recording level. Nothing has really changed because you are aiming to avoid clipping your audio while also avoiding falling so low that excessive electrical noise becomes an issue.
Instead, you need to change the way you record your audio to minimize the background noise. That may involve changing the type of microphone you use and how you use it
![]() . If you have problems recording good audio due to room echo, I also have an article
. If you have problems recording good audio due to room echo, I also have an article![]() that will help you. I have also written about recording outdoors in the wind.
that will help you. I have also written about recording outdoors in the wind.
Summary of setting my ideal audio levels for video
- Always set your recording level based on meter levels and NOT arbitrary numbers on a dial or record level switch.
- Never exceed a peak level of 0dB. If your input level is higher it will result in audio clipping and the recording may be distorted.
- Get your speaker to talk naturally and then set your recording level.
- Set the audio levels so the peak falls between -12dB and -6dB.
- If possible, listen to the audio and monitor the levels whilst recording.
Audio Mixing Levels
How many dB lower should background music be
I’m sorry to say that the answer is, “it depends”.
There is no magic number you can dial in and forget. The trouble is that the perceived loudness falls into the area of psycho-acoustics and it quite subjective. Perceived loudness depends on the frequency of the sound, the processing that has been done on the audio, on the individual who is listening, and how they are listening
For instance, when I worked in commercial radio, I learned that listening to promos and commercials on headphones made background music appear louder than when listening on loudspeakers
Use studio monitors
Ideally, you should mix your audio using speakers (preferably studio monitors). Monitors are used in recording studios to correctly hear the audio while recording and mixing. They will enable you to hear things that your PC speakers won’t reproduce. A good audio interface will also go a long way in helping you hear the audio correctly.
In my studio/office a Focusrite Scarlet audio interface and M-Audio BX8 studio monitors. Although there are much more expensive interfaces and monitors available, the combination of the Focusrite Scarlet and M-Audio monitors has worked well for me. I’ve used them when mixing YouTube videos, radio commercials, and TV adverts. I have never had my audio rejected by any broadcaster, and I put that down to being able to hear the mix clearly.
If you decide to use headphones for mixing your audio, make sure you use good quality headphones. I’ve been using Beyerdynamic DT100 headphones for over 30 years. They are intended for monitoring, ENG and live applications, so they are perfect when I’m mixing in my studio and when I’m out on a video shoot. As well as being excellent headphones, you can buy spares for every part. The DT100 headphones are available on Amazon![]() .
.
Remember when mixing with headphones you can raise the music level just a little higher than if you were using studio monitors.
Although I recommend using professional studio monitors and headphones, there is a place for smaller speakers. If you can switch between monitors and small speakers, it can be incredibly useful. The studio monitors/headphones will help you hear the fine detail, but a pair of inexpensive speakers will help simulate how most of your viewers will experience your video.
What sounds perfect in the studio can sometimes sound imperfect under real-world conditions. A cheap speaker can alert you to any necessary minor changes in the mix. That is exactly why in my commercial production studio I could switch between large studio monitors and a 3-inch speaker.
20dB rule of thumb
Now that you can hear your audio clearly you can get down to the business of mixing your audio
Ignoring the subjective nature of loudness, a good general rule of thumb for video is to have background music about 20dB lower than that of a voice. This also applies to sound effects and the audio on b-roll footage.
So, if your voice or the contributor’s voice is peaking at about -12dB you should have your music peak at about -32dB. At this difference in level, the voice will be four times louder than the music or background sound effects. That should be a good starting point for your mix.
Once you have set the levels, listen carefully to the mix on the best quality speakers you have, studio monitors if possible. If the mix sounds OK everything’s great. But if the mix is a little off, tweak it until it and listen again. It is an iterative process where you gradually hone the mix until it sounds perfect.
Audio compression and voice style
Should you have to deviate from the 20dB rule of thumb it will probably be due to how the person is speaking and whether you are applying an effect to the voice.
If you intend applying audio compression or limiting to the voice track, you will find that the 20dB rule of thumb will be too much of a difference. With added compression, the voice will appear to be louder. The amount of audio compression will determine how much louder the voice will sound.
Another factor that will determine how loud the voice appears is the
As an example, when mixing the audio on radio commercials I frequently add a multiband compressor to the voice. When the compression combines with the voiceover style, the voice will seem quite loud. In such a situation I might mix the music at 12dB or less beneath the voice.
The type of music will have an influence
The type of music also influences how low you would mix the music compared to the voice.
A gentle classical piece or a folk track can be mixed higher than a pop or rock song. The latter will have had far more audio compression applied during mastering. While the classical or folk recording will have much more dynamic range. Consequently, the rock or pop track will seem louder than the classical or folk track, even when they appear to peak at the same level.
There’s no magic setting
As I said, you cannot assume there is a single setting or a formula you can apply to your audio mix. Instead, I have always found it is best to dial in a “best guess” (based on experience or the 20dB rule of thumb), then listen to the mix and make any necessary adjustments. Then repeat if necessary.
I frequently listen to each part of the mix several times, adjusting it slightly until I’m happy with the result. So don’t worry if your first guess does not sound perfect. It is an approximation that you then improve based on what it sounds like.
Your digital meter is a good guide, but your ears are a much better way of judging whether the mix sounds right.
Audio Export or delivery sound levels
Export audio levels are a little trickier than recording levels. This is because you also have to consider loudness as well as peak levels.
Previously this was not so much of a problem. But producers and studio engineers gradually mixed TV commercials to sound louder than the surrounding program content. Naturally, viewers got fed up of lowering the volume for ad breaks and eventually broadcast standards were developed to keep the loudness of all TV content the same.
So, what have TV standards got to do with your videos that are destined for upload to
Well, it’s like this:
YouTube and many other streaming platforms are following TV to improve the viewer experience.
I found audio normalization had been applied to my YouTube uploads from the latter part of August 2016. However, normalization had been rolled out elsewhere before this. So, whether you are a YouTuber, make adverts destined for YouTube or produce music videos you should know about audio loudness.
If you would like to learn a little more about the YouTube loudness standard and how you can easily check what YouTube has done to the loudness of your uploaded videos, follow this link![]() . The article will open in a separate tab.
. The article will open in a separate tab.
Mastering for YouTube
Most audio meters in DAWs and video editors are fast responding full-scale peak meters. They help you keep track of the highest signal peaks, and that is important to avoid audio clipping and digital distortion.
However, our ears do not focus on those high transients when judging loudness. A better way of representing the way we hear is to consider average sound levels rather than the individual highest peaks. Measure loudness we need is a different kind of meter.
Measure loudness with dpMeter 3
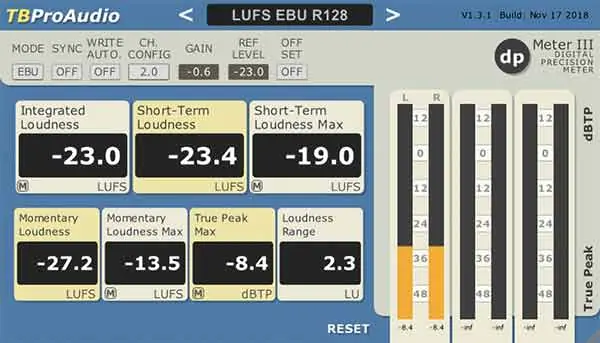
dpMeter 3 is a free VST plugin digital ![]() . It includes RMS, EBU R128, and TruePeak measurement. Not only does it measure the loudness of your audio, but it also lets you adjust the loudness.
. It includes RMS, EBU R128, and TruePeak measurement. Not only does it measure the loudness of your audio, but it also lets you adjust the loudness.
Various presets are available, including the broadcast presets for the US and Europe, but the two that will interest online video creators are the LU-16 and LU-14 presets. This will help you adjust the loudness level of your videos to get close to the YouTube loudness standard.
I have been experimenting for a little while. So far, as far as my videos are concerned, YouTube seems to apply the least amount normalization when I set a target loudness of between -15 and -16 LUFS.
Loudness Radar for Adobe Audition and Premiere Pro
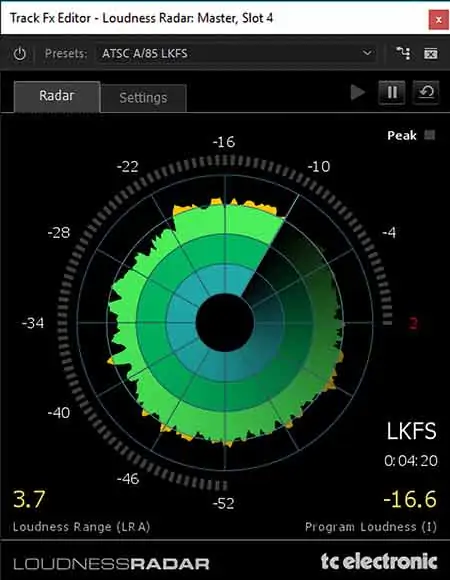
If you use Adobe Premiere Pro CC or Adobe Audition CC you will have access to Loudness Radar by
In essence, once you have set your target loudness, run the Loudness Radar to check your actual loudness. You want your loudness levels to fall close to the second ring. If any parts of your audio
You don’t need everything falling on that second circle since the program loudness or integrated loudness (the average) needs to equal your target loudness.
Auphonic online loudness normalization
If you don’t have access to dpMeter 3, Loudness Radar, or various other similar plugins there is another option.
Auphonic offers an online service![]() where you upload the audio to your video, and they send you a processed file. There is a monthly cost that ranges from free of charge if you only need up to 2 hours of audio processed each month, to $89 for up to 100 hours of audio per month.
where you upload the audio to your video, and they send you a processed file. There is a monthly cost that ranges from free of charge if you only need up to 2 hours of audio processed each month, to $89 for up to 100 hours of audio per month.
The service can offer more than just loudness normalization. When you set up a production in Auphonic you can also activate the Adaptive Leveler, Filtering, and Noise & Hum Reduction. You can choose target loudness levels from -13 (very loud) to -31 (very quiet).
Once your audio has been processed switch it for the original audio in your video editor. However, don’t delete your original audio. Mute it while you export your video. That way you can go back to your original audio at a later time if required.
Auphonic desktop app
You can buy a license for the desktop Auphonic Leveler Batch Processor![]() . It is available for both Mac OS X and Windows and a Personal Non-Commercial license is $89. The Commercial license is $349.
. It is available for both Mac OS X and Windows and a Personal Non-Commercial license is $89. The Commercial license is $349.
Auphonic suggests you download the trial version before purchase. It will work for 7 days and allows you to evaluate whether the software works on your platform.
Adobe Premiere Pro CC and Adobe Audition CC
If you are an Adobe Creative Cloud subscriber, you are in luck. You can use the built-in features to normalize your audio.
In Audition. you can drag your audio clip into the Match Loudness window and choose your required Match Loudness settings. If your video is for YouTube, select ITU-R BS.1770-3 Loudness and change the target loudness to between -16 and -14 (I usually choose between -16 and -15.5). Then hit run and save the processed file. Now use the processed file in your video editor.
If you are editing your video in Adobe Premiere Pro, when you export your video, click on the Effects tab in the Export Setting screen. Scroll down to Loudness Normalization and click the checkbox. Now choose ITU BS.1770-3 and change the Target Loudness to -16 LUFS (or the value you have found works best for you).
Example Loudness targets
| Final Delivery | Target Program Loudness |
| Audio CD | -15 LUFS |
| Online video/Podcasts/Mobile | -16 LUFS |
| ReplayGain Similarit | -18 LUFS |
| Broadcast TV (Europe) | -23 LUFS |
| Broadcast TV (Australia, Japan, US) | -24 LKFS |
| Cinema | -24 LUFS |
Tosh Lubek runs an audio and video production business in the UK and has been using the Canon EOS R since it was released in the Autumn of 2018 and the Canon EOS R6 in 2020. He has used both cameras to shoot TV commercials broadcast on Sky TV, promotional business videos, videos of events and functions, and YouTube creator content. He has also won several international awards for his advertising and promotional work. You can meet him by visiting his “video booth” at HashTag Business Events across the country.
Recent Posts
Most people use sandbags the wrong way. Here’s how to hang them properly on a light stand for maximum stability and safety — plus what to fill them with.
You're Using the Canon RF 50mm f/1.8 WRONG! Here’s How to Fix It
If you’ve recently picked up the Canon RF 50mm f/1.8 STM—affectionately known as the Nifty Fifty—you might be confused by that strange switch on the side of the lens. It doesn’t say AF/MF...