
Author: Tosh Lubek Published: 11th May 2023
DIY Video Studio is supported by its readers who use the affiliate links or ads on this site. As an Amazon Associate, I earn from qualifying purchases. Thank your support if you use any of the links.
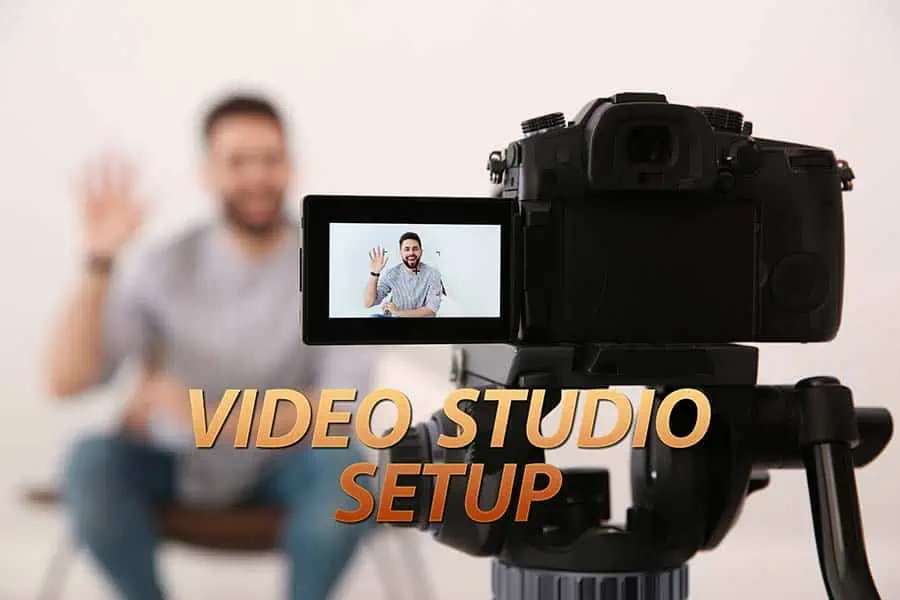
I recently shot thirty short piece-to-camera videos for the annual Working4Business Awards in Glasgow. Because I have limited time to shoot at my client’s premises, my video setup must be simple and quick. Furthermore, it must work well in a typical small office space and produce repeatable results with a minimum amount of color grading in post-production.
Fortunately, my YouTube video setup satisfies all those requirements along with needing a relatively small amount of video equipment that can be packed away in a couple of bags and transported in the trunk (boot) of my car.
In short, the setup works for business client videos, social media videos, and YouTube videos that need to be shot at a business customer’s premises, or even in your living room.
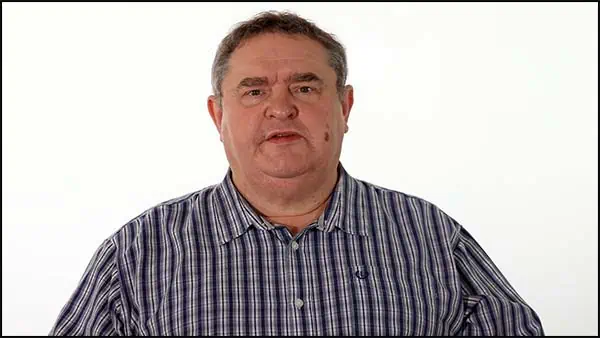
This is the kind of result this setup will produce.
But before going through the setup guide, let’s take a look at my YouTube setup equipment list.
Video equipment I use in my YouTube & client videos setup
Below I’ve included the equipment list I use most of the time. I know this kit works in almost any interior setting, so if you use the same gear and follow my instructions, you should get the same results. However, if you already have some similar items, use them instead, but you may need to make a few slight adjustments.
For instance, I use a Canon EOS R6 full-frame camera with an RF24-105mm f/4 lens. But if I were starting my video business today, I’d get the Canon EOS R8![]() . It has a higher megapixel sensor, and although it doesn’t have IBIS, it would be a better choice for shooting video on a tripod, since it won’t overheat and is cheaper than both the Canon EOS R6 and R6 MkII.
. It has a higher megapixel sensor, and although it doesn’t have IBIS, it would be a better choice for shooting video on a tripod, since it won’t overheat and is cheaper than both the Canon EOS R6 and R6 MkII.
Without further ado, here’s my equipment list for piece-to-camera videos including a teleprompter.
- Canon EOS R6
 camera
 - Canon RF 24-105mm f/4L Lens
- K&F Concept 67-inch Camera Tripod
- Deity V-Mic D3 Pro mini shotgun microphone
- Microphone Stand with boom arm
- 3.5mm TRS microphone cable (at least 10ft/3m)
- 4x YONGNUO YN600L Pro LED Video Lights
- 4x AC adapters for video Lights
- 4x Portable photo/video light stands
- Headphones (optional)
- Teleprompter with tablet (optional)
- Power Bank and cable for the tablet (optional)
- Portable background and support (optional)
Although I earn my living from audio and video production, I didn’t buy all this gear in one go. For instance, it is possible to use 2 LED lights instead of 4, although it’s easier to get better results when you light your subject and background with separate lights. This is especially true if you’re going to leap into the world of green screen production. Furthermore, unless the video is fully scripted you will not need the teleprompter and its accessories. I’ve also indicated in the list that headphones are optional. Strictly speaking, that’s the case, but how unprofessional will you appear if after the shoot you discover the audio is unusable? Yes, you can do without headphones, but I don’t advise doing so.
Setup for YouTube and piece-to-camera videos with a white background
I use this setup to film piece-to-camera videos with several people in a short period of time. It’s also my basic YouTube video studio setup. To copy it, use a measuring tape to help place your video kit. Although with experience you’ll be able to do it by eye. Here’s the plan for the setup
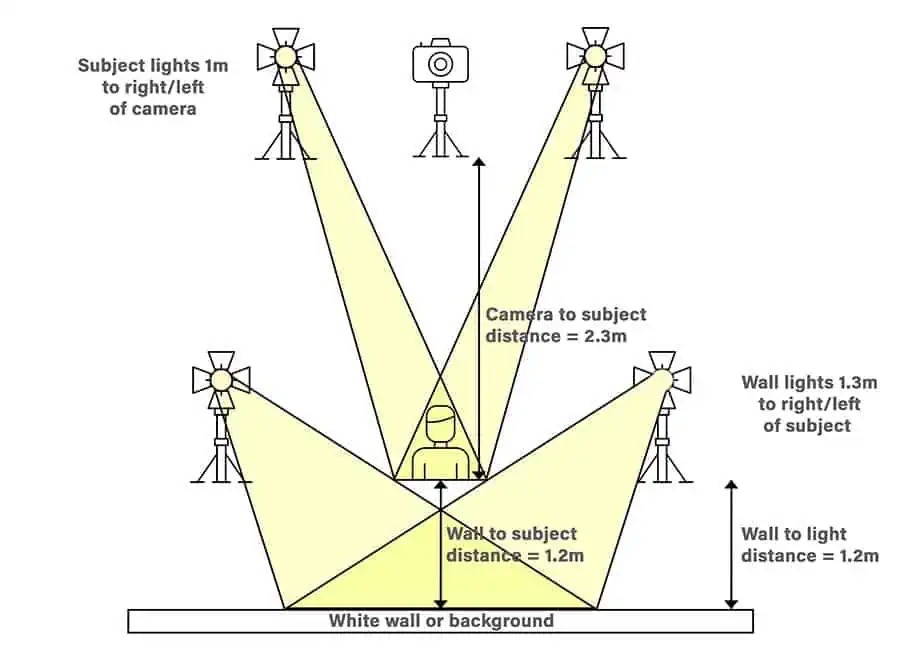
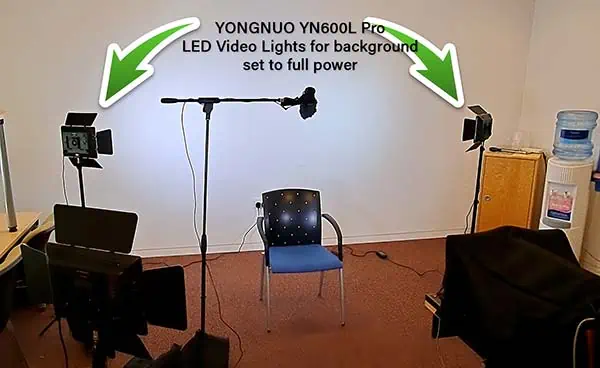
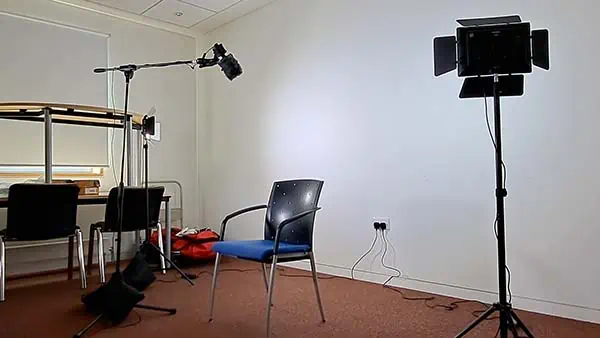
And here is a snapshot of what the video setup looks like in a typical office. Notice that meeting tables and chairs have been moved to the left side to open up the necessary space.
Now, let’s get into the step-by-step guide of what’s required and what you need to do.
1: The amount of office space
You’ll need an office space that is at least 3.5 x 4m (11.5 x 13ft), although a room that is about 4 x 4.5m (13 x 14.7ft) would be better.
2: Video background
Many commercial offices have white-painted walls. If this is the case, I would use the wall as a background. White backgrounds are usually ideal for these types of videos, but if you need or want a different background, a collapsible background can be placed against or in front of a wall.
3: Place a chair in front of the background
Place a chair about 1.2m (4ft) in front of the wall or background. This is for your subject or talent to sit on and ensures they are always in the same spot. Why? Because you won’t need to adjust any of your lights if the subject is always in the same position.
4: Set up the two lights for the background
Attach the LED panel lights to light stands. Use light stands with a ¼” thread on the spigot since the lights can be screwed directly onto the stand.
Place a light, at a distance of 1.3m (4ft 4”), on each side of the seat and 1.2m (4ft) from the background wall. Adjust the stands so that the lights are at or slightly above the head height of your subject.
5: Adjust the LED lights to evenly illuminate the background
Set the LED lights to full power (99%). Turn the two lights so they face the background wall behind the seat. Do not point both lights at the same central spot since this would create a bright hotspot. Instead, point the lights slightly right and left of the middle position. The intention is to illuminate the background behind the subject as evenly as possible. If your camera includes a waveform monitor (WFM), you can use it to check you have an even light level across the frame.
6: Set up the camera tripod
Place your camera tripod 2.3m (7.5ft) directly in front of the seat and attach the camera. Adjust the height so the lens is approximately the same height as your subject’s eyes.
7. Place the second pair of lights beside the camera
Attach the second pair of lights to their light stands and place each 1m (3ft) on either side of the camera. Angle the lights so they both face where your subject will sit, then set them to 30% power.
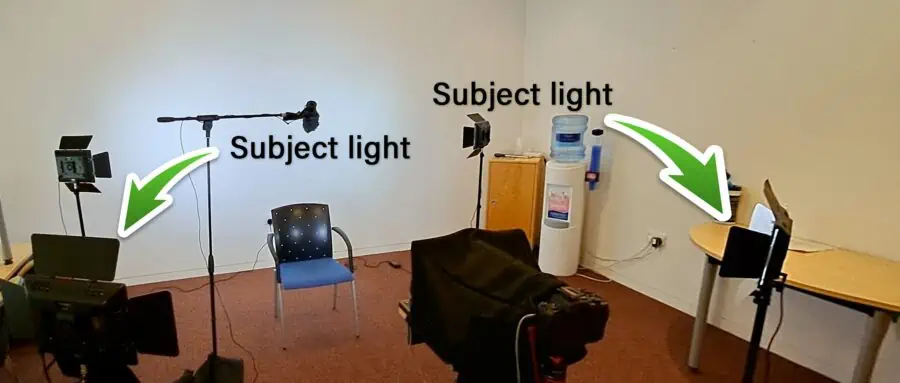
This should produce even lighting across the subject’s face. You can reduce the power on one of the lights if you want a slight shadow on one side of the face.
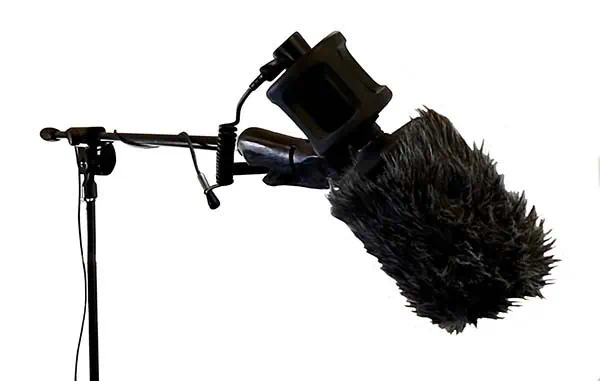
8: Erect the microphone stand and boom arm
Erect the microphone stand in front and to one side of the subject’s seat. There are no set distances for this, but the stand should be far enough to the side so that it does not appear in the shot.
9: Attach your microphone
Attach the microphone to the end of the boom arm and angle it down toward where your subject will be sitting. Loosely wind the microphone cable along the boom arm and plug it into the microphone. Drop the microphone cable down the mic stand and plug the end into the camera.
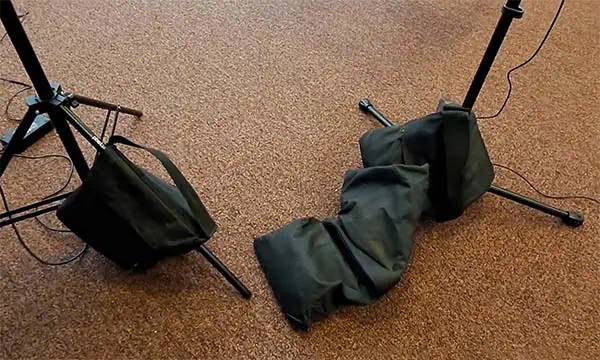
10: Secure the mic and light stands
Add sandbags or weights to the legs of the light stands and the mic stand. This is to secure them in place and prevent any equipment from accidentally toppling over.
11: Prevent mixing color temperatures
You do not want to mix lights of different color temperatures. To prevent this close the wind blinds and turn off the room lights. The only lighting in the room should now be your LED video lights, which should all be the same color temperature.
12: Adjust your camera settings
Use Auto White Balance (AWB). Aperture f/5.6. ISO 500. Shutter speed 1/50sec (PAL)/1/60sec (NTSC). Assuming you shoot with a full-frame camera, set the lens focal length to 100mm for a typical head and shoulder shot. If you wish to show more of the subject’s torso, use a focal length of around 85mm.
You’re now ready to start shooting. Once your subject is seated you can make any final adjustments to the microphone position and set the recording level on the camera. However, if your video is scripted you may need to add one final piece to the setup. That is a teleprompter.
Adding a teleprompter to the setup
For the purposes of this article, I will ignore professional teleprompters, like those you’ll find in TV production studios.
The ones I’d recommend for solo videographers are the type that use an iPad or tablet to display the script. You can get smaller ones designed for smartphones, but they are really for selfie videos where the camera is much closer to the subject/talent.
Teleprompters for tablets that are up to about 11 or 12 inches cost around $200. They are made of press aluminum and incorporate a plate to hold the iPad/tablet, a partially silvered mirror at 45°, and a camera mounting position. The base of the teleprompter includes a tripod mounting point so it can be secured onto a tripod.
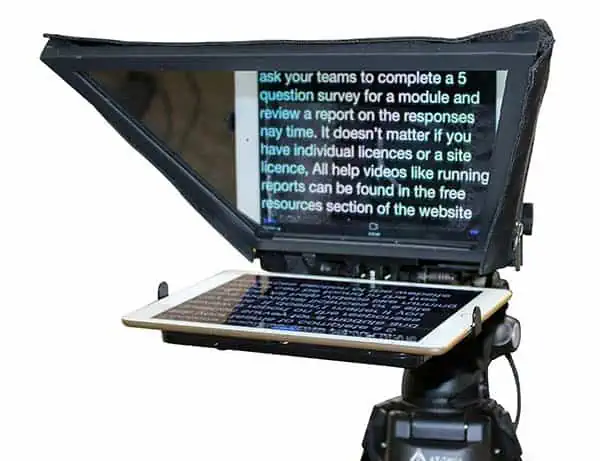
This type of teleprompter is placed where the camera and tripod would be placed in step 6 of the set-up guide.
You could make a DIY teleprompter from a 10-inch photo frame, as I have. The basic version, where I used the glass in the photo frame instead of a partially silvered mirror, cost less than $25. This was screwed onto a tripod, and I mounted the camera on a second tripod, just behind the teleprompter.
There are numerous teleprompter apps you can use on your iPad or Tablet. Some are free while others are not. My recommendation is to try the free teleprompter apps first, since they may provide all the features you need. The ones I use are iCUE for iOS and dvPrompter Plus for Android or iOS.
Keeping your teleprompter iPad/Tablet powered
If you are recording one or two videos yourself, you should have plenty of battery life on your iPad/Tablet. However, if you will be recording for a few hours you need to charge your mobile device while recording.
I connect my iPad to an Anker power bank. It has a 20,000mAh capacity so that is plenty enough for a day or even two of filming.
One problem you might have is where to put the power bank when your camera is on a tripod. Fortunately, the Anker power banks come in a cloth bag with a drawstring. Once connected I use the loop of the drawstring to hang the power bank off a convenient part of the tripod.
Another issue you might experience is having your power bank turn off once the iPad/tablet reaches full charge. Unless you notice the power bank turning off, you could find your device runs out of power later. The solution on my Anker power bank is to press and hold the On butter for a few seconds. This puts the power bank into trickle charge mode, and it won’t turn off as previously described.
Why have the lights at different settings
The lights illuminating the white wall are on full power while the lights on the subject are at 30%. Why? The reason is that we are trying to make the background appear pure white. If the lights illuminating the wall were set to a significantly lower power the background would appear gray rather than white. If that is the look you are after, go ahead and drop the power on the background lights.
Why use lights with the same color temperature
Most people don’t think about room lights as having a color temperature, but they do. That’s why cameras have white balance settings for different light sources, and automatic white balance (AWB) where the camera judges what is true white.
Everything is fine provided the lighting in a room has just one color temperature, usually warm white or cool white. If your camera is in AWB mode it will adjust to that color temperature and white objects will appear white.
Often, room lighting is warm white, which has a yellowish hue. Whereas many video lights are daylight rated, so have a cool white color temperature or bluish hue.
If you don’t use video lights and rely on a mix of natural window light and room lights, you might also have a problem. That’s because daylight, like daylight video lights, has a blue hue compared to room lights. Furthermore, daylight is potentially more complicated because its color temperature will vary according to the time of day and the weather conditions. That’s why I recommend shutting window blinds or curtains, so the lights all have the same color temperature.
Exposure settings and frame rate
I’ve already mentioned in the guide that on my Canon EOS R6 with 24-105mm f/4 lens I use the following settings. An aperture of f/5.6, ISO of 500, a frame rate of 25fps, and a shutter speed of 1/50th sec.
I use a frame rate of 25fps because I work in the UK where we use the PAL video standard. If you are in North America, Japan, and a number of other countries where the NTSC video standard is used then you will need to use a frame rate of 30fps.
Where you need to be careful is in setting your shutter speed. Traditionally you would set this to be twice your frame rate. So, for 25fps the shutter speed would be 1/50th sec, and for 30fps the shutter speed would be 1/60th sec.
Some videographers choose higher frame rates because they claim it produces smoother action. However, in piece-to-camera shots, there is no action plus body or facial movements are usually quite limited. Therefore, there is little advantage in using a higher frame rate that is a multiple of 25 or 30fps.
Simple hack when you need more light
In the previous section, I mentioned that the normal shutter speed is usually double the frame rate. One of the reasons for that is to keep motion blur at an acceptable level.
I would normally stick with applying this shutter speed rule, but there can be exceptions. For instance, if you are using a slower lens or smaller aperture and cannot increase your ISO then you can change your shutter speed from 1/50th to 1/25th sec. This will increase the exposure by one stop, or in other words, double the brightness.
But there is a caveat here. Any fast body or hand movements will have more motion blur than usual. This isn’t really a huge problem unless you have decided to shoot with a green screen background. When you come to pulling the key you’ll find dealing with that motion blur can be difficult. When using a green screen background you would actually be better off using an even faster shutter speed than usual, say 1/100th sec.
Safety in the studio
One final thing that I will say is it’s very tempting when you’re filming at home, not to secure your microphone stand or the light stands. But when working at a customer’s premises you can’t guarantee that someone won’t bump into a light or mic stand and cause it to topple.
If an accident can happen, you must do your best to prevent it. So, to avoid those lights and mic falling over lay a sandbag or other weight over the feet or legs of your equipment.
Also, keep the microphone and power cables away from where people are likely to walk. To be extra safe you can stick them down to the floor with gaff tape or use a rubber floor cable protector, or Willbond floor cable cover![]() that uses a material strip and Velcro to secure cables to commercial office carpet.
that uses a material strip and Velcro to secure cables to commercial office carpet.
Final thoughts
As you can see, setting up a video studio in a customer’s office or even your own living room can be quite simple. Nor do you need a huge amount of very expensive gear. You could even use my suggested guide and switch out the mirrorless camera for a good smartphone. Basically, this guide is a starting point you can build on. But the beauty of following this setup guide is that the results will be repeatable in every office.
You might also like to watch the video
Here’s a big ask from me
If you liked this article, please share it.
It will mean a great deal to me if you share this post because a few seconds of your time will seriously help my blog grow. The share buttons are below the “About Author” section.
Thanks. 🙂

About the author: Tosh Lubek is a multi-award-winning broadcaster, writer, and video producer, with 40 years of experience in professional broadcasting and has been using Canon video and stills cameras since 2010. He has worked with radio and TV broadcasters, advertising agencies, and direct clients on a variety of projects including radio and television advertising, online video production, corporate videos, award ceremony motion graphics, and theme park sound design. Tosh has won numerous awards, including a Radio Academy Awards Gold Sony, a Gold, Silver, and Bronze World Medals in the New York Festivals International Advertising Awards. Since about 2007 he has been creating YouTube videos. Tosh has been a sponsor of the “video booth” at HashTag Business Events across the UK.
Recent Posts
Most people use sandbags the wrong way. Here’s how to hang them properly on a light stand for maximum stability and safety — plus what to fill them with.
You're Using the Canon RF 50mm f/1.8 WRONG! Here’s How to Fix It
If you’ve recently picked up the Canon RF 50mm f/1.8 STM—affectionately known as the Nifty Fifty—you might be confused by that strange switch on the side of the lens. It doesn’t say AF/MF...