
Author: Tosh Lubek Published: 18th September 2023
DIY Video Studio is supported by its readers who use the affiliate links or ads on this site. As an Amazon Associate, I earn from qualifying purchases. Thank your support if you use any of the links.
In this article, I explain what ND filters are, the different types that are available, and how to use them. I also show some comparative shots, showing the scene with and without a neutral density filter. But first, what is an ND Filter?
What is a Neutral Density or ND Filter?
Neutral density filters, or ND filters, are made from dark optical glass or resin and placed in front of a camera’s lens to reduce the amount of light that can reach the image sensor. Ideally, they should reduce the image brightness without affecting the color. They are available in various sizes and strengths.
Neutral Density Filters are indispensable accessories used by photographers and videographers. Not only can they help you get a properly exposed shot in bright conditions, but they can also help you achieve the creative look you want.
The purpose of an ND Filter is to reduce the amount of light that enters the camera lens. The better-quality ND Filters also don’t leave an unwanted color cast, thereby preserving the true colors in the image. However, this is more important if you are shooting with a film camera rather than a digital camera.
What Kinds of Neutral Density Filters are Available and How do they Work?
You will have choices to make when buying neutral-density filters. This includes the Shape, Size, Strength/Rating, Attachment method, and Form. I’ll go into the details next.
ND Filter Shape: Circular vs Square
You have a choice of circular and square ND Filters. Each type has its pros and cons.
Circular filters fit directly onto the lens, like any other filter, and are an excellent choice for beginners or those who only use ND filters occasionally.
The brands I’ve tried and like most (mid-range) are Urth![]() (formerly GOBE) and K&F Concepts
(formerly GOBE) and K&F Concepts![]() . For higher quality ND filters I recommend NiSi
. For higher quality ND filters I recommend NiSi![]() and PolarPro
and PolarPro![]() .
.
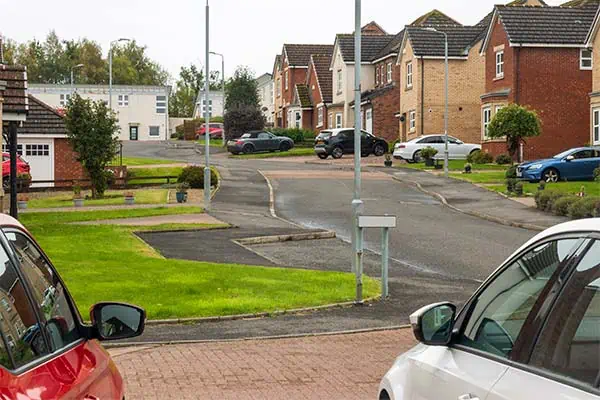
Because circular ND filters are the same diameter as the lens, with wide angle lenses, especially if you stack filters together, the filter ring might become visible as vignetting in the image corners, as you can see in the top corners of this image.
Also, if you use Graduated ND Filters I find it can sometimes be easy to lose track of the position or orientation of the transition from dark to clear glass. This is where square ND filter systems win because of their precision and obvious orientation. The large size of square ND filters (around 100mm) means they are wider than the front of the lens, so vignetting is less of a problem, even when stacking ND filters along with a Circular Polarizer.
The disadvantage of square filters is their cost and complexity. Square filter holders require a filter holder that attaches to the lens filter thread or onto the outside of the lens barrel.
The choice between square and circular ND filters ultimately depends on your specific preferences, needs, and budget. If you don’t regularly use ND Filters and want simplicity, portability, and affordability, go with circular ND filters. But if you’re passionate about landscape photography, and need maximum versatility and precision, square ND Filters would be a better choice.
Neutral Density Filter Sizes
Usually, you can find circular neutral density filters in sizes to match your lens, but some filters in less popular sizes may be difficult to find and be more expensive. For instance, my Sigma 150-600mm Sport lens takes 105mm filters. The filters that I have found are expensive, so I have never used that lens with any kind of filter.
What is worth pointing out is that circular ND filter kits, that contain a set of 4 ND filters, tend only to be available for the more popular filter sizes. So, although you can get 105mm neutral density filters, the higher cost means you’ll only get the filters you need.
Here’s a comparative table that illustrates the point. It includes the availability of some of K&F Concept’s ND filter kits and a variable ND filter in various filter thread sizes. I’ve also included a CPL filter since these are frequently used with ND filters.
| Filter Thread Diameter (mm) | K&F Concept CPL Filter (Nano-D Series) Threaded | K&F Concept ND4, ND8, ND64, ND1000 Filter Kit (Nano-X Series) Threaded | K&F Concept GND8, ND8, ND64, ND1000 Filter kit (Nano-X Series) Magnetic | K&F Concept Variable ND2-400 Filter (Nano-X Series) Threaded |
|---|---|---|---|---|
| 37 | YES | |||
| 40.5 | YES | |||
| 43 | YES | |||
| 46 | YES | |||
| 49 | YES | YES | YES | YES |
| 52 | YES | YES | YES | YES |
| 55 | YES | YES | YES | YES |
| 58 | YES | YES | YES | YES |
| 62 | YES | YES | YES | YES |
| 67 | YES | YES | YES | YES |
| 72 | YES | YES | YES | YES |
| 77 | YES | YES | YES | YES |
| 82 | YES | YES | YES | YES |
| 86 | YES | YES | ||
| 95 | YES | YES | ||
| 105 | YES | |||
If you find that you can’t get an ND filter kit for your size lens, one option is to use step-up rings and buy a larger size filter.
Moving on to square Neutral Density filters, which require a filter holder that attaches to the lens. Here the actual filter size is less of an issue, most will be 100mm square or 100x150mm. However, the way the filter holder attaches to the lens needs to be considered when buying the filter kit. For instance, K&F Concept’s square X-PRO ND filter set![]() uses 100mm ND filters, but the filter holder attaches to the lens using adapter rings in sizes 67mm, 72mm, 77mm, or 82mm.
uses 100mm ND filters, but the filter holder attaches to the lens using adapter rings in sizes 67mm, 72mm, 77mm, or 82mm.
The Strength of Neutral Density Filters
Neutral Density filters are classified according to their strength, or their ability to reduce the amount of light passing through to the camera’s film or sensor. This light-blocking strength is linked to the concept of stops of light, where a 1-stop reduction is equivalent to letting half the amount of light through.
Designing ND Filters to block light in “Stops”, makes them consistent with aperture, shutter speed, and ISO when it comes to adjusting the exposure of an image. Therefore, you can buy ND Filters whose light-blocking power is equivalent to 1, 2, 3, 4, 5, 6, and even 10 stops of light.
Unfortunately, the terminology used to describe the light-blocking strength of an ND Filter is not always the “Stop”.
Fractional System: For neutral density filters that are solid, or have the same strength across their entire area, the terminology used is the fraction of light transmitted by the filter, with the fraction doubling with each stop change. The strength is written as “ND” followed by a number that is the denominator of the fraction of light passing through., i.e. if the fraction is 1/2 , the number is 2.
So, we have…
- ND2 filters let half of the light pass through.
- ND4 filters let one-quarter of the light pass through.
- ND8 filters let one-eighth of the light pass through.
And so on, with the number after the letters doubling, and the fraction of light halving with every additional stop.
Optical Density system: For Graduated Neutral Density Filters, or GND Filters, the optical density of the filter is normally used (although not always). In this system, an optical density of 0.3 is equal to 1-stop of light.
So, we have…
- 0.3 neutral density filters let half of the light pass through.
- 0.6 neutral density filters let one-quarter of the light pass through.
- 0.9 neutral density filters let one-eighth of the light pass through.
And so on, with the number increasing by 0.3, and the fraction of light halving with every additional stop.
The f-stop reduction system: This system, although very useful, tends to be used for only certain ND filters, usually 6-stop, and 10-stop ND Filters. As we have seen earlier, a 1-Stop reduction is equivalent to half the light passing through.
So, we have…
- 1-Stop ND Filters let half of the light pass through.
- 2-Stop ND Filters let one-quarter of the light pass through.
- 3-Stop ND Filters let one-eighth of the light pass through.
And so on, with the Stop value increasing by one, and the fraction of light halving with every additional stop.
The following table shows the equivalence of the different systems.
| Optical Density | ND number | f-stop reduction | The open area of lens, as a fraction of a fully open lens |
|---|---|---|---|
| 0.3 | ND2 | 1 | ½ |
| 0.6 | ND4 | 2 | ¼ |
| 0.9 | ND8 | 3 | 1/8 |
| 1.2 | ND16 | 4 | 1/16 |
| 1.5 | ND32 | 5 | 1/32 |
| 1.8 | ND64 | 6 | 1/64 |
| 2.1 | ND128 | 7 | 1/128 |
| 2.4 | ND256 | 8 | 1/256 |
| 2.7 | ND512 | 9 | 1/512 |
| 3.0 | ND1024 (Often rounded to ND1000) | 10 | 1/1024 |
You can extend the table by increasing the values on in new line according to the pattern followed in each column.
How Neutral Density Filters Attach to Lenses
There are three methods of adding ND filters into the light path to reduce the brightness of the image in the camera. However, if you own a Canon EOS R system camera along with EF or EF-S lenses, there is a fourth method.
Circular ND filters with screw threads simply screw into the filter threading on the front of the lens. The ND filter usually also has threads on the front rim, so you can screw a second filter into it. It’s a simple method of attaching one or more filters to the front of a lens.
Circular magnetic ND filters come in a kit. There is a Magnetic Filter Adapter Ring that must first be screwed onto the front of the lens. The magnetic ND filters can simply be placed on the adapter ring. Magnetism holds the filter in place. It’s a simple and quick system that avoids any fiddly messing around, especially on cold winter mornings.
Square ND Filters are slipped into a filter holder that must be attached to the front of the lens. This is done either by using adapter rings that screw onto the lens or with a collar that goes around the front of the lens barrel. Square filters can enable the use of ND filters with ultra-wide angle and fisheye lenses.
Drop-in ND filters are available when using Canon EF or EF-S lenses that are adapted onto Canon EOS R system cameras. The filters are circular but integrated into a holder. A special EF-EOS R lens adapter is used that can accept the drop-in ND and Variable ND filters. Unlike other ND filters, these drop-in filters sit between the lens and the camera body. There are several advantages in using drop-in filters. A single set of ND filters will work with all lenses. Changing filters is quick and easy. Can be used with extreme wide-angle and fisheye lenses. Finally, there is no risk of cross-threading.
Unfortunately, this seems to be an evolutionary dead-end since the adapter only works with EF and EF-S lenses on Canon EOS R system camera bodies. Although Canon has released many new R system cameras and RF lenses, there haven’t been any new EF lenses.
ND Filter Form – What ND Filter to Use
ND filters are available in a few different forms.
Fixed or Solid ND Filters have the same optical density across their entire area. These are your standard ND filters.
Hard Graduated ND Filters will be clear on one half and optically dense on the other half. The transition edge between clear and dark is “hard” with only a little feathering from one to the other. These are normally used to help prevent clipping in the sky area of a landscape shot.
Soft Graduated ND Filters will be clear on one half and optically dense on the other half. The transition edge between clear and dark is gradual and over a much greater distance than on Hard GND Filters. These are normally used to help prevent clipping in the sky area of a landscape shot.
Variable ND Filters are often two linear polarizers stacked one above the other and able to rotate. When the axis of polarization of both layers matches up, they allow the maximum amount of light transmission. But when the two axes are perpendicular, or crossed, very little or no light will pass through.
Variable ND filters may seem attractive because it seems one filter can replace a set of three or four fixed-strength ND Filters, therefore keeping the cost down. But if you use a full-frame camera along with wide-angle lenses, you might find you cannot use the full range of the filter.
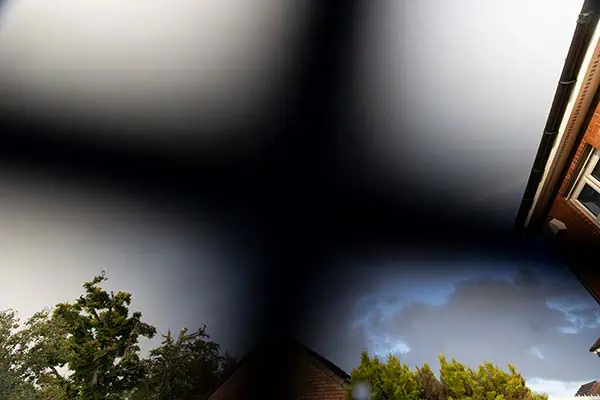
Variable ND Filters can exhibit a dark X pattern and vignetting. When using my GOBE Variable ND filter on my RF14-35mm lens, vignetting appears at a focal length of 35mm and develops into the dreaded X pattern at a focal length of 14mm. You can see the effect in the image to the right.
Unless you are using longer focal lengths, I would spend the extra money and buy a full set of solid or fixed ND filters. Or at least 6 and 10-stop ND filters.
Long Exposure Photography Examples
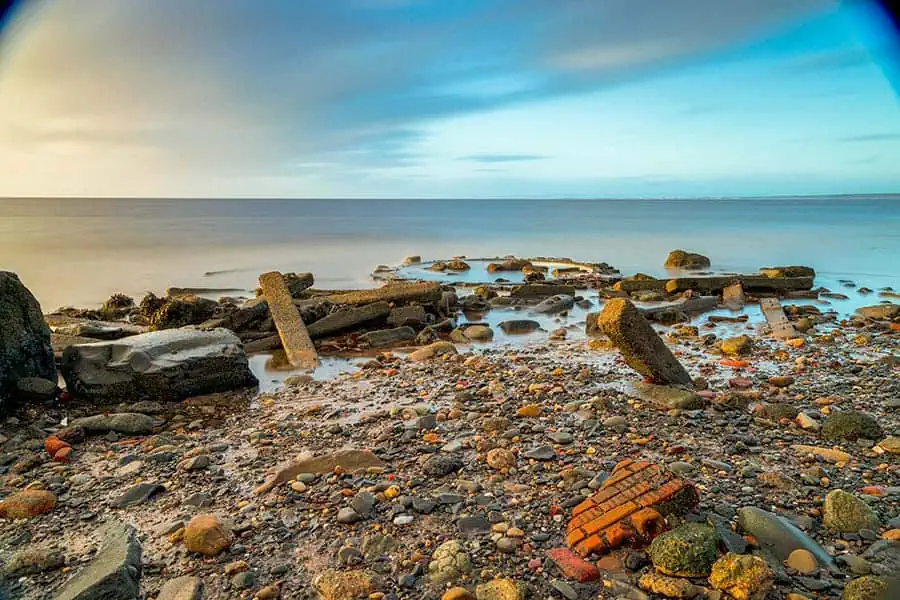
The following set of images were all taken in the area just north of Ayr Harbour in Scotland. There is a set of wooden posts that are quite photogenic, along with the wreck of the MV Karrir. During a good low tide, it is possible to get close to what remains of the vessel, and you can see an image I took in the next section of the article.
However, here I’ve included pairs of images that show the same scene with and without a neutral density filter.
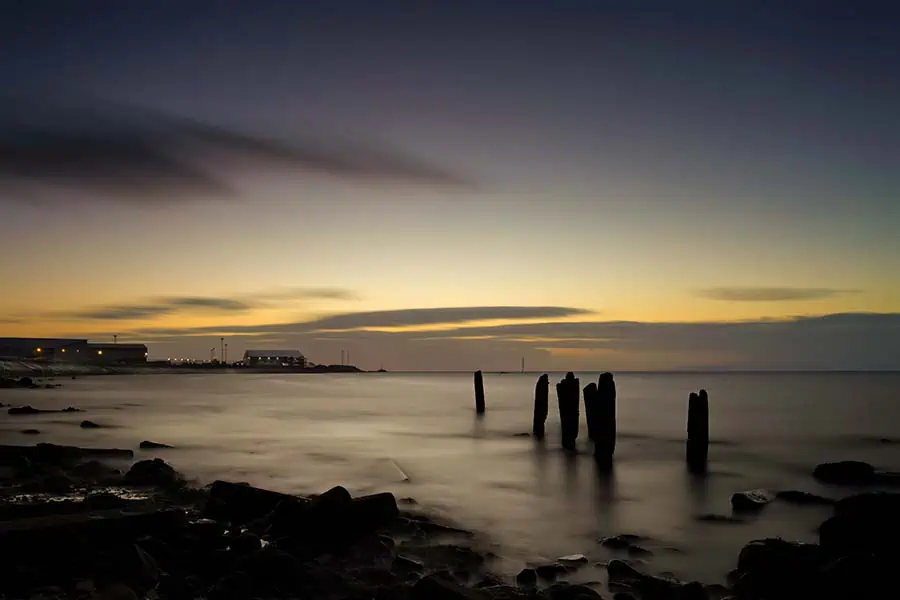
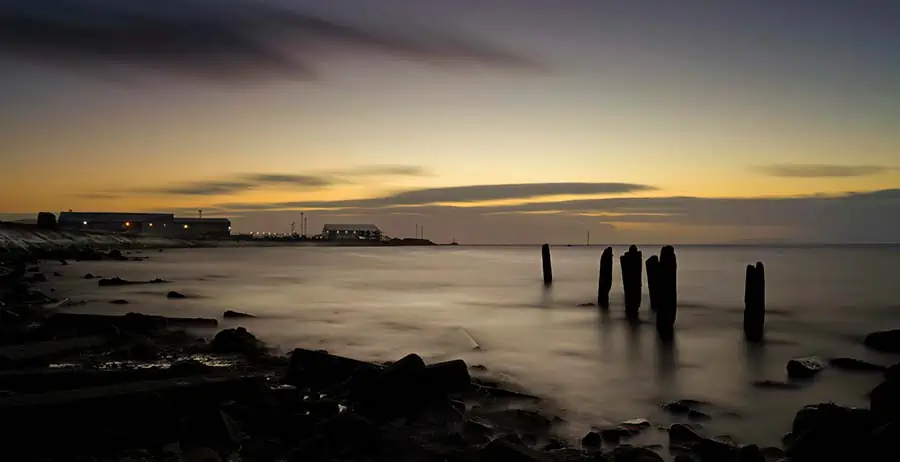
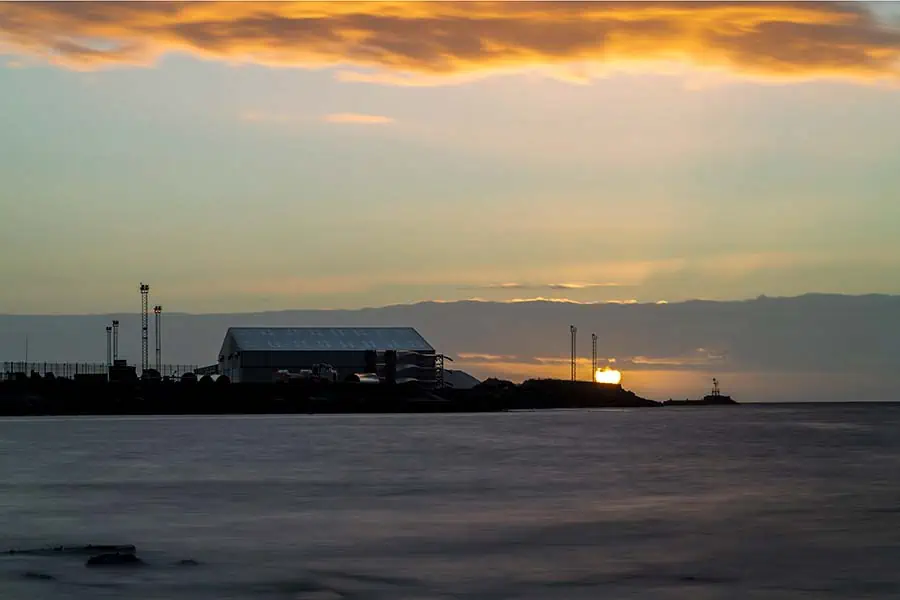
The first pair of images is a wide shot taken just after sunset and at a focal length of 24mm, an aperture of f11, and ISO100. This gave a shutter speed of 1/4 sec without the ND filter.
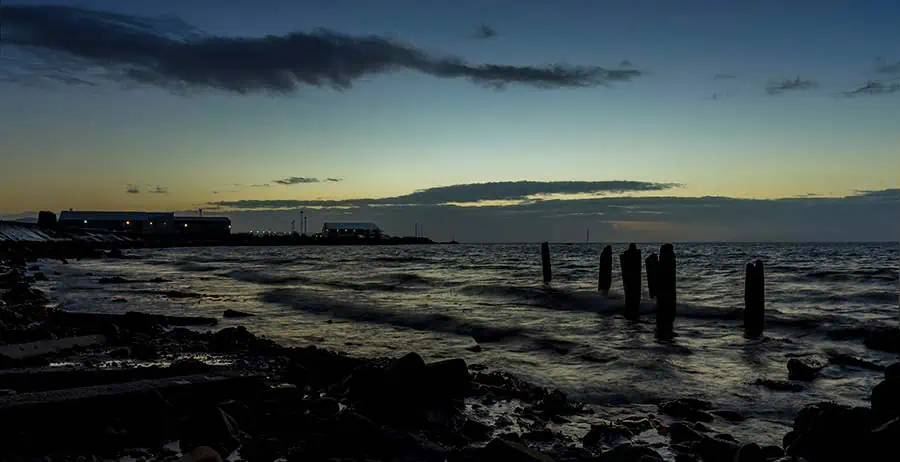
The second image was taken immediately after the first, but after adding a 10-stop ND filter. The exposure time should have been about 4min 15sec, but I added an extra 30sec since I was concerned about the fading light. Of the two images, I much prefer the second. The water has an almost misty or cloud-like appearance and the clouds look as if they have been added with a paint brush.
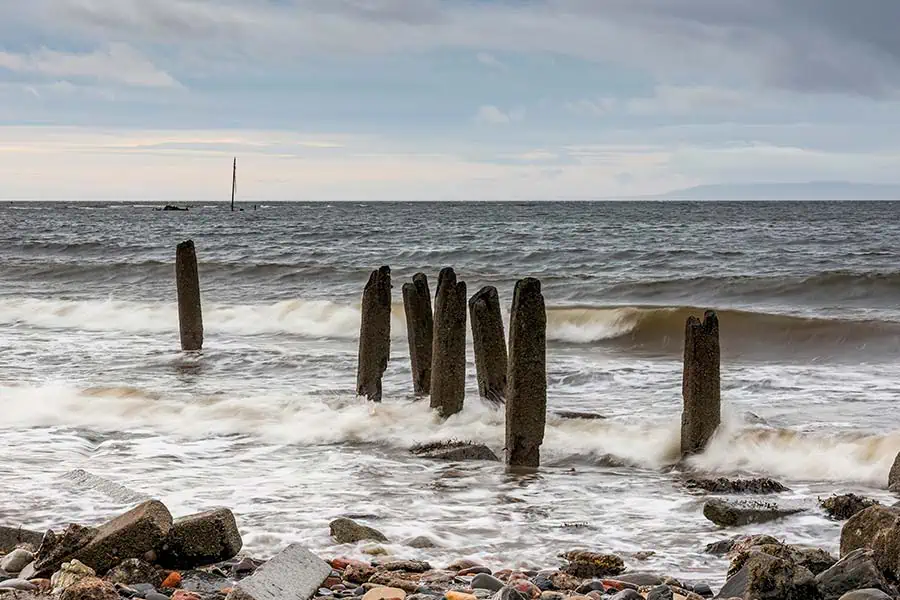
This next pair of images was taken with the camera close to the wooden posts. The focal length was 58mm, but the aperture and ISO were again f11 and ISO100. Notice in the first image I have used a shutter speed of 1/4 second which is long enough to capture movement in the water of braking waves. If I had chosen a faster shutter speed the waves have appeared frozen rather than having a sense of movement.
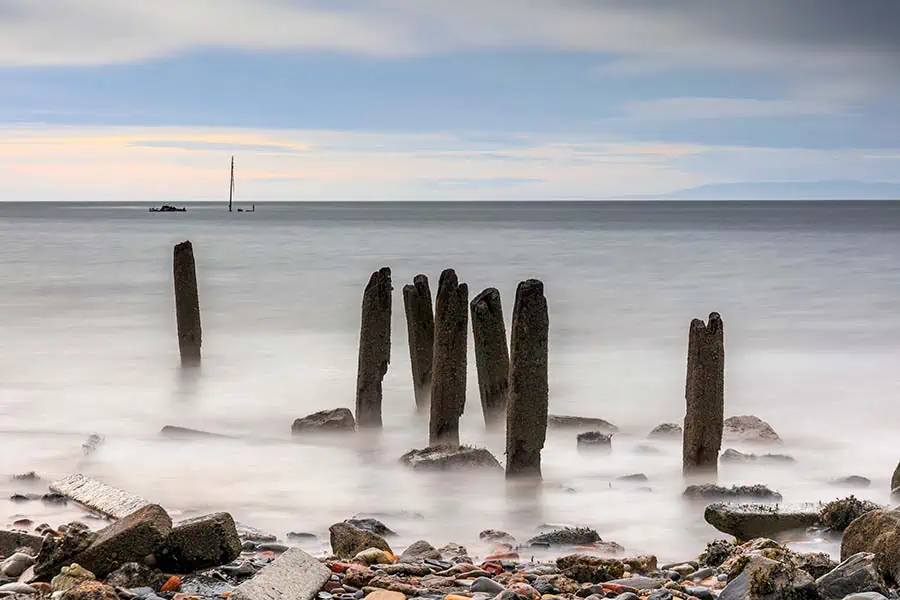
In this second image with the 10-stop ND filter, I have extended the exposure to 4min 30sec. The water surface isn’t completely smooth, for that I would have needed a 15-stop ND filter. Nonetheless, where the waves were coming up and retreating around the base of the wooden posts, the water looks quite wispy.
This pair of images was taken just before sunset, as you can see the sun is just about to go down. I used a focal length of 100mm, and since I was shooting in the direction of the sun I reduced the exposure by a stop, taking the shutter speed down to 1/8 sec.
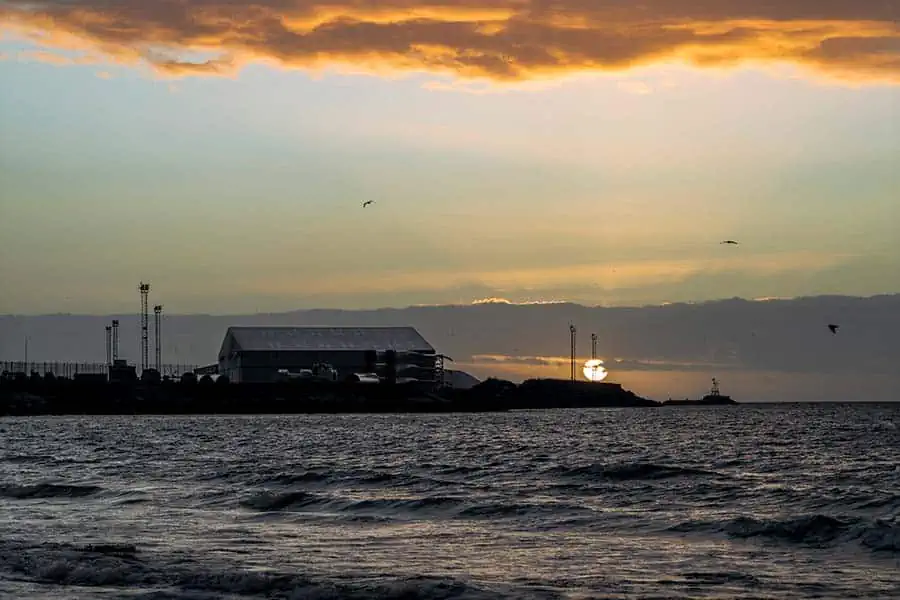
In the second shot, I didn’t want to use a 10-stop filter because I would have needed to set the shutter speed to 2min 8sec, which at a focal length of 100mm would have made the sun’s image appear as a trail rather than a disk. So, I opted to stack an ND2 and ND64 (1 stop + 6 stops) filter together, giving a shutter speed of about 14 seconds. This gave some smoothing of the sea and a little smearing of the orange clouds.
In the final three images, the sun has set but there’s still some color in the sky. In the first image, the aperture is f11, but because it’s getting into the blue hour, I’ve bumped up the ISO to 800. That gives a shutter speed of 1.3 seconds, which is short enough to keep some detail in the water.
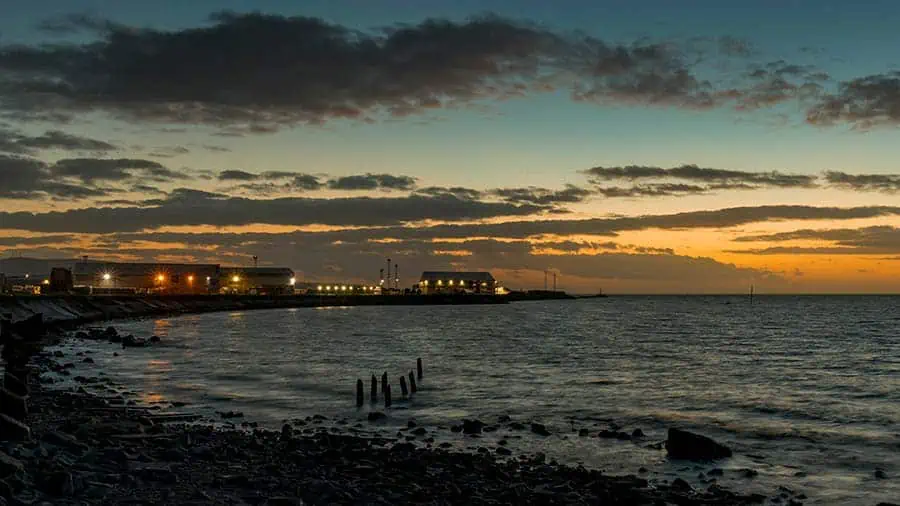
In the next image, I didn’t add any ND filters, I merely dropped the ISO by three stops from ISO800 to ISO100. With a 3-stop reduction, that meant I would need to increase the shutter speed to 10sec, but I gave it a little extra, making it 13sec. The sea is now starting to become smooth, but there’s still some detail in it.

In the final image, I put the ISO back to 800 and stacked ND4 and ND64 filters together, giving an 8-stop reduction in light. That required the shutter speed to be extended to 5 minutes 33 seconds. With such a long exposure, the sea is milky smooth and the motion in the clouds has been blurred.
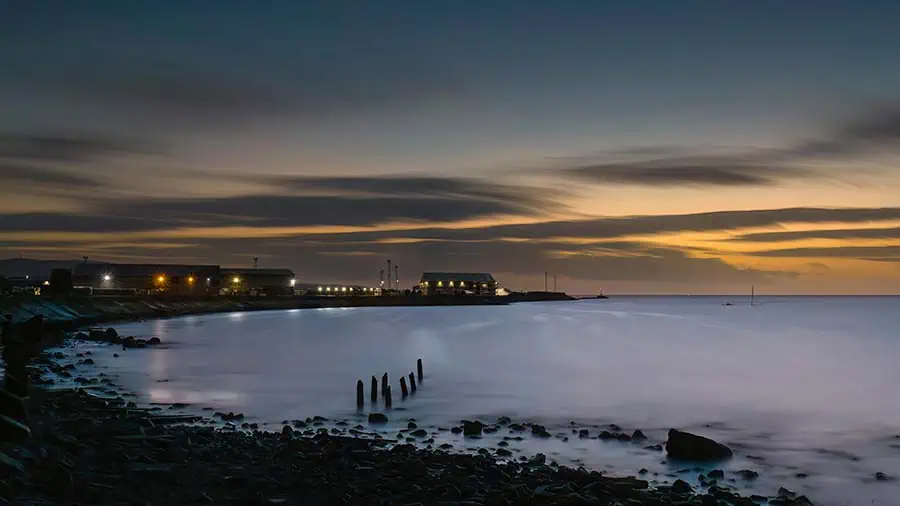
Note that in these last three images, I wanted the lights on the harbour buildings to appear prominent, so I did not adjust the length of the exposures to take account of the rapidly changing light levels just after sunset. If this had not been the case I would have assumed the neutral density filter was about one extra stop. So instead of calculating a 5min 33sec shutter speed, I would extend this to 10 or 11 minutes. Alternatively, I could bump up the ISO to 1600. When using modern cameras and post-production noise reduction, high ISO is not as much of a problem as you might think.
When to Use a Neutral Density Filter
By reducing the amount of light entering the lens, ND filters allow photographers and videographers to use combinations of aperture, shutter speed, and ISO that would normally cause the image to be overexposed.
This means that the aperture can be optimally set for your creative needs.
For instance, by using an ND Filter to reduce the amount of light entering the camera, you can use a low f-stop to create a shallow depth of field and blurry backgrounds. As you can see in this image of a cat.

Or you can maximize image sharpness by avoiding the need to use a small aperture that would introduce softness due to diffraction.
Alternatively, ND filters can be used to blur motion and make moving water appear milky smooth by allowing a long exposure time.
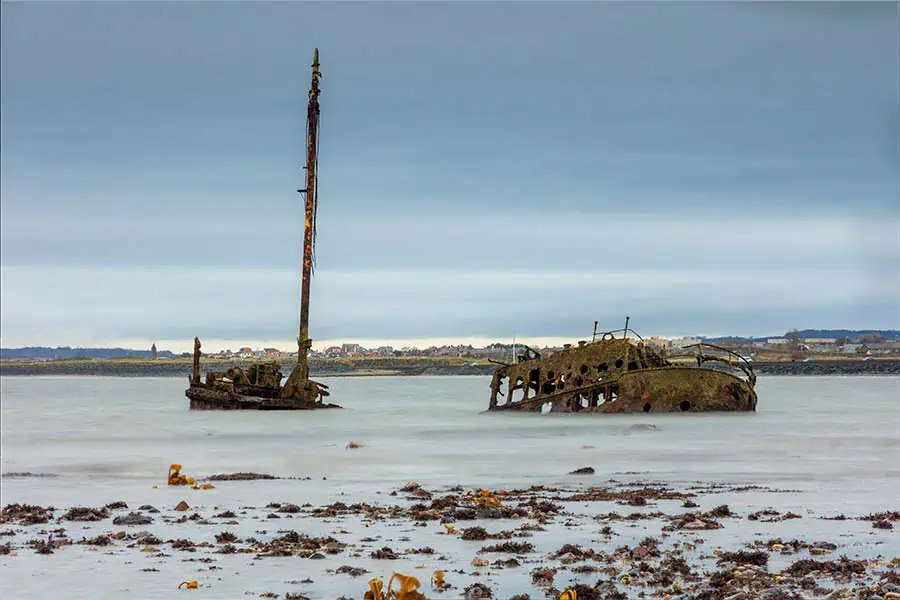
In the next image of MV Kaffir, which was wrecked on rocks just north of Ayr Harbour, I used a 10-stop ND Filter to get a 2-minute exposure. The exposure without the filter would have been about 1/8 second at f11. You can see the water has become smooth, but not completely. This is because you need a low tide to get out to the rocks where the vessel sits, and on this day that was around midday and relatively light.
ND filters can also help you remove objects from a scene that are moving. By extending the exposure to several minutes, pedestrians, motor cars, or anything else that is moving will not remain in the same position for long enough to be captured in the image.
This is a 4-minute exposure made possible by adding a 10-stop ND filter in front of the lens. Despite several cars passing right to left and others driving up the road, you can’t see them in the image. Nor can you see the person who was tending his lawn or me walking up and down the road. That’s because none of us remained in the same place for long enough to register on the camera’s sensor.
If you’re a landscape photographer, using an ND filter will allow you to add motion blur to clouds, giving them a painterly effect.
Calculating Long Exposure Times when using ND Filters
You don’t need to guess or use trial and error to get to the correct exposure time when using ND Filters. All you need to know is either the ND number or the Stop value of the ND Filter, plus the exposure time without the ND filter.
As a reminder, here is a table of ND filter strengths in the three formats you’ll come across them..
| STOPS | 1 | 2 | 3 | 4 | 5 | 6 | 7 | 8 | 9 | 10 |
| ND Filter | ND2 | ND4 | ND8 | ND16 | ND21 | ND64 | ND128 | ND256 | ND512 | ND1024 |
| Optical Density | 0.3 | 0.6 | 0.9 | 1.2 | 1.5 | 1.8 | 2.1 | 2.4 | 2.7 | 3.0 |
Methods to calculate the new shutter speed
I’ll give you two ways to calculate the correct shutter speed to use once you’ve added an ND filter to the front of your camera lens. Both require you to know the correct exposure without the ND filter. So, without the ND filter attached, compose the shot, set the correct exposure, and take note of the shutter speed.
Method 1: In the first method you need to know by how many Stops the ND filter reduces light passing through it. Starting at the shutter speed without the filter, increase the exposure time by the Stop value of the ND filter.
Method 2: In the second method you need to know the ND number of the filter. This is the fraction of light that the filter will let through, so you need to multiply the shutter speed without the filter by the ND number of the filter.
Worked Examples
To understand how to calculate the new exposure time using each method, it’s useful to see a couple of examples. In both cases, I’ll assume the correct shutter speed or exposure time is 1/60th of a second and that a 6-Stop or ND64 filter is being used.
Method 1 Example
We know that without the ND filter, the shutter speed is 1/60th of a second.
After fitting the ND filter, the shutter speed needs to increase by the equivalent of 6 stops. That means doubling the shutter speed six times.
So, if the original shutter is 1/60 sec you keep doubling like so. 1/60 sec -> 1/30 sec -> 1/15 sec -> 1/8 sec -> ¼ sec -> ½ sec -> 1 sec.
Note that when you increase the exposure time (shutter speed) by one stop, you need to roll the shutter speed dial to the left by 3 clicks.
So, when using the 6-Stop ND filter you need to roll the shutter speed dial to the left by 6 x 3 clicks, or 18 clicks.
Method 2 Example
We know that without the ND filter, the shutter speed is 1/60th of a second and that we’re using a 6-Stop or ND64 neutral density filter.
To find the new shutter speed we need the ND value of the filter, which is 64, and multiply the shutter speed by this number.
So, the shutter speed with the ND filter fitted needs to be 64 x 1/60 sec, or effectively 1 sec.
Both methods give almost the same answer, but not quite. This is due to the way shutter speed intervals change in cameras. For all shutter speeds, from ¼ sec and lower, are fractions with 1 as the numerator, or number at the top. But when you halve or double some shutter speeds you end up with a fraction of a second that is not in the form 1/n, where n is some number.
For instance, in method 1, when we doubled the shutter speed from 1/15 sec to 1/8 sec, that is not mathematically correct. But it is how the shutter speed interval changes on cameras.
So, if you use Method 2 and find that the answer is slightly out, don’t worry. Just use the nearest shutter speed on your camera.
N.B.: When multiplying a fraction, such as 1/60, you do not multiply the denominator or the lower number. Multiplying 64 by 1/60 is the same as dividing 64 by 60, or 64/60. This gives 1 and 1/15th, which is near enough to 1.
What Strength of ND Filter Should I Get
Once you’ve decided whether to buy circular or square neutral density filters, your next decision is, what strengths you need.
According to NiSi, makers of high-quality ND Filters, the three most common ND filter choices are:
- 3-stop (aka ND8, 0.9)
- 6-stop (aka ND64, 1.8)
- 10 stop (aka N1000, 3.0)
This is hardly surprising since these three ND filters cover most situations where you would need a neutral density filter. So, let’s look at each one.
3-Stop ND filter: With a 3-Stop ND filter you’re not going to be able to flatten the ocean and make it look milky smooth, but you’ll be able to capture some nice wave movement. This filter is useful for shots of rivers and waterfalls, where you only want to extend the exposure long enough to show movement in the water without smoothing it out.
However, a 3-Stop ND filter comes into its own if you’re taking shots of running water where light levels are low, such as gorges and forests. In such cases, you’ll be able to lengthen exposures to perhaps a minute or two.
6 Stop ND filter: This is frequently the first neutral density filter choice for many photographers. Because, if you choose your time correctly, you can do quite a few things with it. Although it’s not as extreme as a 10-stop ND filter, you’ll be able to get a long exposure of 1 or 2 minutes during the best parts of the golden hour.
So, you can start to flatten seascapes and blur cloud movements. But in the morning or afternoon, when it’s brighter, you’ll be able to get long exposures of 5, 10, and even 15 seconds under the right conditions.
10-Stop ND filter: If the 6-Stop ND filter is the first filter that many people buy, the second will undoubtedly be the 10-stop. It enables extremely long exposures of 4 and 5 minutes that will completely flatten moving water and clouds.
Even in the middle of the day, you’ll be able to extend exposures to about a minute. If architectural photography is your thing, a 10-stop ND filter will let you eliminate moving objects (people and vehicles) from an otherwise motionless scene.
Although a 10-stop ND filter is useful throughout the day if the daylight is very bright, a 15-stop ND filter may be necessary. But before you rush off to buy one, try stacking your 6-stop and 10-stop filters together for a similar effect.
Getting 3, 6, and 10-stop ND filters may be all you need, although having a fourth can be useful. I ended up also getting a 2-Stop (ND4) filter since it and the 2-Stop (ND8) filter is useful for video work.
Using Graduated ND Filters to Prevent Blowing Out the Sky
If you shoot outdoors, you’ll have come across a common problem. When you set the exposure correctly for the scene in front of you, the sky gets blown out and appears pure white. But if you adjust the exposure to save the sky, your scene becomes too dark. This is where graduated neutral density filters (GND) can help.
It’s true that if you shoot RAW and are somewhat careful when setting your exposure, you will be able to recover detail in the sky during post-processing. But if you prefer to balance the sky with the rest of the scene while taking the shot, you might want to get a graduated ND filter.
As I mentioned earlier, you can get these with a soft or hard transition edge. I prefer the soft version where the dark glass at the top gradually blends into the clear glass at the bottom. This helps to blend the darkening in the sky into the untouched area below.
The soft gradient filter I use is a GND8 (0.9), which provides 3 stops of dimming in the bright sky area.
Beware of Changing Light Levels at Sunrise and Sunset
I know that the brightness of daylight gradually changes over a day, but it never occurred to me that the rate of change can be faster at sunrise and sunset than by the middle of the day. That changed when I discovered a video by Attilio Ruffo, an Italian fine art landscape photographer and YouTuber.
In his video Long Exposure Photography in Lake Como![]() , he took a long exposure across Lake Como in fading light. Without any filters, his shutter speed should have been 1/10 sec, but with a 10-stop ND filter the exposure became 1 minute 42 seconds. However, the sun was already behind the ridge of the mountains and the light was fading rapidly. So, he increased the length of the exposure to 3 minutes, which was equivalent to adding over three-quarters of a stop.
, he took a long exposure across Lake Como in fading light. Without any filters, his shutter speed should have been 1/10 sec, but with a 10-stop ND filter the exposure became 1 minute 42 seconds. However, the sun was already behind the ridge of the mountains and the light was fading rapidly. So, he increased the length of the exposure to 3 minutes, which was equivalent to adding over three-quarters of a stop.
I’ve used this sunrise/sunset light compensation method myself, and for me, it works well by adding one stop at sunset and deducting one stop at sunrise. To calculate the correct exposure length, I use the PhotoPills App, entering the strength of my ND filter minus 1 stop at sunrise and minus 1 stop at sunset.
Preventing Camera Movement During Long Exposures
When taking long exposure images, your camera mustn’t move, otherwise, the areas of the scene that should be sharp will be blurred. But what is a long exposure? If you’re photographing waterfalls and want to capture the water movement without rendering everything milky smooth it could be ¼ second. On the other hand, I’ve shot seascapes that were around 5-minute exposures. So what are the options?
Handheld: At a push you could shoot handheld without any stabilization. You can do this, but I’d add a couple of caveats. First, it only works with shorter focal lengths (wide angle) lenses, and you need to avoid as much movement as possible. If I use the 2-second delay and press my elbows into my side and force the cup of the camera’s EVF into my eye I can get sharpish images at shutter speeds of ¼ sec.
Using a Support: If necessary, I’ll put a small bean bag on a rock, wall, or even my car door and push my camera into it. This works well, but there isn’t always something you can lean on.
Handheld with stabilization: Stabilization in lenses and cameras has been a game-changer. Using gear like my Canon EOS R6 and RF14-35mm F4 lens lets me use shutter speed that would not have been possible before. At a focal length of 24mm, I can shoot sharp images with a shutter speed of ½ sec, and almost sharp images at 1 second. Moving to a focal length of 14mm, I have managed to use shutter speeds of 2 sec.
Tripod: Tripods are of course the best way to prevent camera movement and blur. I’ve written a separate article that you might find useful called, Tips on How to Use a Tripod for Landscape Photography. But the most important thing is to get a sturdy tripod. It doesn’t need to be expensive, but it must keep your camera rock solid.
Shooting on sand: Thomas Heaton, a YouTube landscape photographer showed an ingenious solution to shooting at the water’s edge in one of his videos. He placed CDs under each tripod foot. Spreading the load over a wider area prevented tripod movement on damp sand.
Two ND Filter Useful Long Exposure Accessories
There are a couple of accessories that will make your life easier when using ND Filters.
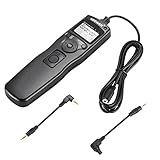
Remote Shutter Release
Strictly speaking, this isn’t essential for some uses of ND Filters, but if you want to do long-exposure photography you will need this item.
You can use the controls on a DSLR or Mirrorless camera to set the exposure length to as long as 30 seconds. However, if you attach a 10-stop ND filter, a ¼ sec shot will now take 4 minutes. To keep your camera’s shutter, open for more than 30sec you’ll need to use Bulb mode or B mode on your camera.
You could keep your finger on the shutter button for 4 minutes, but it’s 99.999% certain that you’ll introduce some vibration into the camera body that will cause blurring of the image. Instead, you need a remote shutter or timer. This is one of the few times in photography when buying cheap gear won’t affect the quality of your images negatively.
I bought a cheap Neewer Digital Timer Remote that can be used in a couple of ways. If you can’t be bothered setting the timer, there’s a big round button you can press that will keep the camera’s shutter open for as long as you hold the button down. A better way is to take a few seconds to set the timer length. When you press the Start/Stop button the timer remote will fire the camera’s shutter, and after the set length of time, the remote will end the exposure.


Last update on 2026-03-01 / Affiliate links / Images from Amazon Product Advertising API
Step Up Rings
Unless you use wide-angle lenses, a set of Step-Up Rings can save you the expense of multiple sets of ND Filters if you have lenses with differing filter thread sizes.
Buy ND Filters for the larger diameter lens and then use the Step-Up rings to attach the filters to your smaller diameter lens.
Here’s a link to K&F Concept’s 18-piece step-up and step-down adapter set.
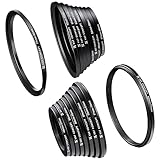
- Include Step Up Filter Adapter Ring Kit(37-49, 49-52, 52-55, 55-58, 58-62, 62-67,67-72, 72-77,…
- Include Step Down Filter Adapter Ring Kit(49-37, 52-49, 58-55, 55-52, 62-58, 67-62,72-67, 77-72,…
- Great tightness,no wobbling or cross-threading. Ultra-low chemical residues, attached to a solid!
- Converts the thread size of your lens to the thread size of any other accessory (such as filters,…
Last update on 2026-03-01 / Affiliate links / Images from Amazon Product Advertising API
Coping with Noise when using ND Filters for Long Exposures
You probably learned that you need to dial down the ISO as low as possible to keep noise in the image under control. That’s because noise in the image can be caused by using higher ISOs and is evenly spread across the whole image. The noise caused by long exposures looks different, it appears as isolated bright spots that seem randomly spread across the image and can be white, blue, green, or red.
These are not random spots, but the same pixels that appear bright in every long exposure image taken under the same conditions. They are caused by heat building up on the sensor during the exposure and can become more apparent as the length of the exposure increases. Because the problem is associated with heat in the sensor, you may also find that this noise is more apparent when the ambient temperature is higher. So, you might see less noise in the winter than in the summer.
Not all cameras suffer to the same extent from long exposure noise. Often full frame cameras are better than APS-C cameras. Also, more expensive modern cameras tend to perform better than mid-range and budget models. For instance, my Canon EOS R produces long exposure noise in 30-second shots, but my more expensive and newer EOS R6 shows almost no long exposure noise in similar shots.
It’s important to note that you might not notice this noise when looking at the image on your camera’s LCD screen, it will become apparent when viewing the image on your computer screen. That’s because the noise is basically “hot” pixels, so they become more noticeable the larger the image.
Although you can fix this noise in post-production, it can be difficult and time-consuming, so it’s better to avoid it if you can. Fortunately, most cameras have a feature called something like Long Exposure Noise Reduction.
On Canon Cameras you’ll find it Long Exposure Noise Reduction in the red Shoot menu. It has three settings, Disable, Enable, and Auto. If you enable Long Exposure Noise Reduction, it will be applied to any image where the exposure is longer than 1 sec. If you choose Auto, the camera will decide whether noise reduction is needed, and apply it as required. I prefer to have control over whether the noise reduction is applied or not, and there’s a good reason for this, I’ll explain once you understand how the noise reduction works.
When Long Exposure Noise Reduction is enabled, after taking a long exposure, the camera automatically takes a second shot with the shutter closed. This is called a “dark frame”, and the length of the exposure will be the same as the original shot so that the noise is the same. Once the dark frame has been taken, the camera subtracts it from the first image, thereby removing the noise.
You could do this semi-manually by shooting a dark frame after each image and then using the subtract blending mode in your photo editing software. But even when you subtract the dark frame from your normal shot, the method only works well if the background in your original image is dark. Where the background is white, you might find that subtracting the noise in the dark frame creates dark spots in white areas.
Furthermore, you must take the dark frame just after taking the original image. This is because the noise depends on the heat that has built up in the sensor. Therefore, this method won’t work with old images. In such cases, you’ll need to manually remove each spot in the image, which can be a time-consuming process.
If you think that it makes sense to leave Long Exposure Noise Reduction permanently enabled, first consider the subject. In a landscape shot where almost everything is static, except moving water, it might make a lot of sense to enable long exposure noise reduction. But where you have limited time, you might miss important shots because you must wait between shots for a dark frame to be taken. Remember, the dark frame exposure needs to be the same duration as the original shot, so the time you have to take shots will be cut in half.
Typical situations where you might wish to leave the noise reduction disabled would be sunset or aurora shots, where the light can change rapidly.
Summary
Neutral Density filters are an extremely useful tool, whether you’re a photographer or videographer. They can help you shoot when it’s impossible to increase your shutter speed and reduce the aperture of your lens. Equally, they let you extend your shutter speed to seconds or even minutes by limiting the amount of light entering the lens. As well as allowing you to shoot creatively in bright conditions, ND filters also open the world of long-exposure photography. You can see in my example images what a difference using neutral density filters can make.
Finally, unless you have a good reason for getting a variable ND Filter, I would advise you to get a set of fixed ND Filters instead. The cost might be a little more, but you won’t experience any of the problems you can get with variable ND Filters, including the dreaded X-pattern.
Can you help? If you liked this article, please share it.
It will mean a great deal to me if you share this post because a few seconds of your time will seriously help my blog grow. The share buttons are below the “About Author” section.
Thanks. 🙂

About the author: Tosh Lubek is a multi-award-winning broadcaster, writer, and video producer, with 40 years of experience in professional broadcasting and has been using Canon video and stills cameras since 2010. He has worked with radio and TV broadcasters, advertising agencies, and direct clients on a variety of projects including radio and television advertising, online video production, corporate videos, award ceremony motion graphics, and theme park sound design. Tosh has won numerous awards, including a Radio Academy Awards Gold Sony, a Gold, Silver, and Bronze World Medals in the New York Festivals International Advertising Awards. Since about 2007 he has been creating YouTube videos. Tosh has been a sponsor of the “video booth” at HashTag Business Events across the UK.
Recent Posts
Most people use sandbags the wrong way. Here’s how to hang them properly on a light stand for maximum stability and safety — plus what to fill them with.
You're Using the Canon RF 50mm f/1.8 WRONG! Here’s How to Fix It
If you’ve recently picked up the Canon RF 50mm f/1.8 STM—affectionately known as the Nifty Fifty—you might be confused by that strange switch on the side of the lens. It doesn’t say AF/MF...