
DIY Video Studio is supported by its readers. Please assume links on this site are affiliate links or ads, and that I get commissions for purchases made through these links. As an Amazon Associate, I earn from qualifying purchases. Thank you if you use any of the links.
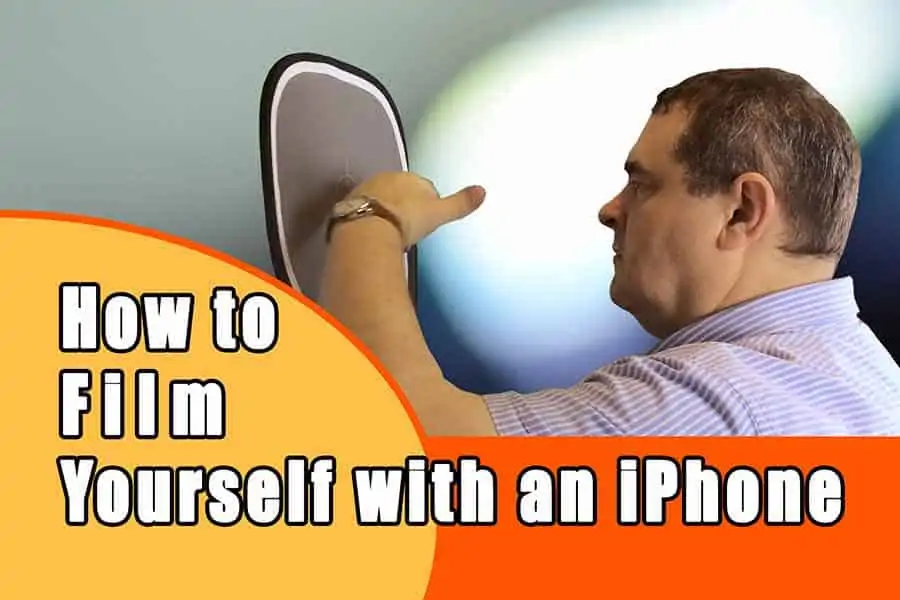
When starting out you need to work out how to film yourself on iPhone or video camera. To correctly frame yourself it would be ideal to have a flip or flippy screen. Of course, that’s just not an option on an iPhone or many other cameras. But I do have a workaround for you. It involves using a 12x12inch videographer’s gray card, light stand, and clamp. What you need to do is:
- Clamp the grey card to the stand so the card matches your head height
- Place the stand where you will be standing in your video
- Make sure the gray card is exactly where your face will be
- Put your iPhone on a tripod. Compose your shot, set the focus, and exposure using the gray card as a substitute for your face
- Set your iPhone recording and swap positions with the light stand and gray card
- Look into the lens of your iPhone, wait a moment, then start your piece to camera.
It’s that easy and you will get impressive results time after time when filming with iPhone. But let’s go through those steps in more detail.
How to film yourself on iPhone using a gray card
This gray card method is a refinement of the Mr. Cardboard hack in my Udemy course, Budget Video Production![]() . Whichever method you use you will be able to nail your piece-to-camera first time, every time.
. Whichever method you use you will be able to nail your piece-to-camera first time, every time.
The equipment you will need to film yourself
As I mentioned earlier, you will need a few pieces of studio equipment to successfully film yourself on iPhone. Previously you probably had to go back and fore making various adjustments until your framing looked right. With a little practice, the gray card method should speed up your filming process. It will also allow you to use manual settings for focus and exposure.
Equipment list
- Light stand
- Spring Clamp
- 12inch (30cm) 18% gray card
- Gaffer Tape
- Tripod
- iPhone tripod adapter
This method relies on the fact that an 18% grey card is approximately the same brightness as skin. However, you may need to make some adjustments. But for most people, using the gray card should be OK.
If you don’t know what a grey card, here’s an example. It’s my Lastolite Ezybalance collapsible grey card. It is one of the simplest pieces of equipment I own. Although it is eight years old and used all the time, it is still in good condition. The Lastolite gray card![]() is a quality gray/white card and is available from Amazon at a fair value price.
is a quality gray/white card and is available from Amazon at a fair value price.
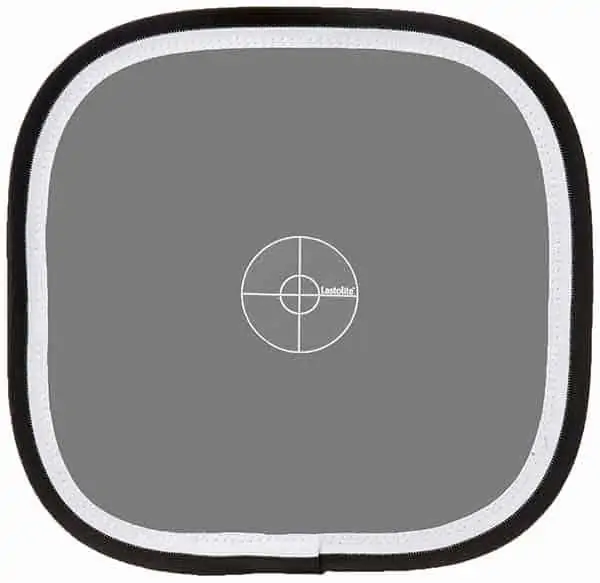
You can also get gray cards that are printed on cardboard or plastic. But the collapsible gray cards fold down and can be stored away in little space.
My gray card is reversible, the rear being white for taking a custom white balance. You will also notice from the image; the center has a cross and two concentric circles. This is ideal to check the focus, especially if you are using a video camera or mirrorless/DSLR camera instead of an iPhone.

- Color correction pre- and post-capture
- Exposure control pre- and post capture
- Accurate color rendition
- Collapsible, durable, and cleanable
Last update on 2025-10-20 / Affiliate links / Images from Amazon Product Advertising API
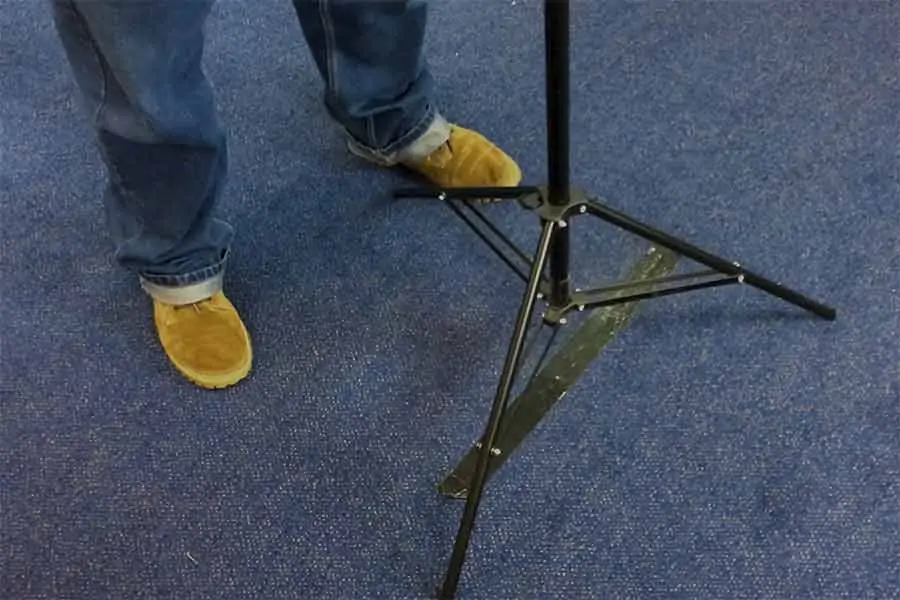
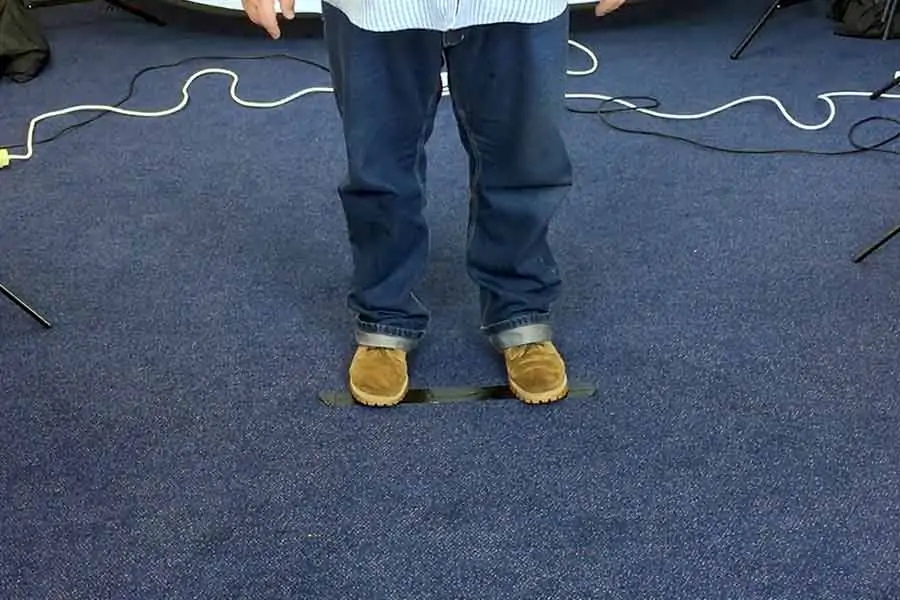
STEP 1: Mark your spot
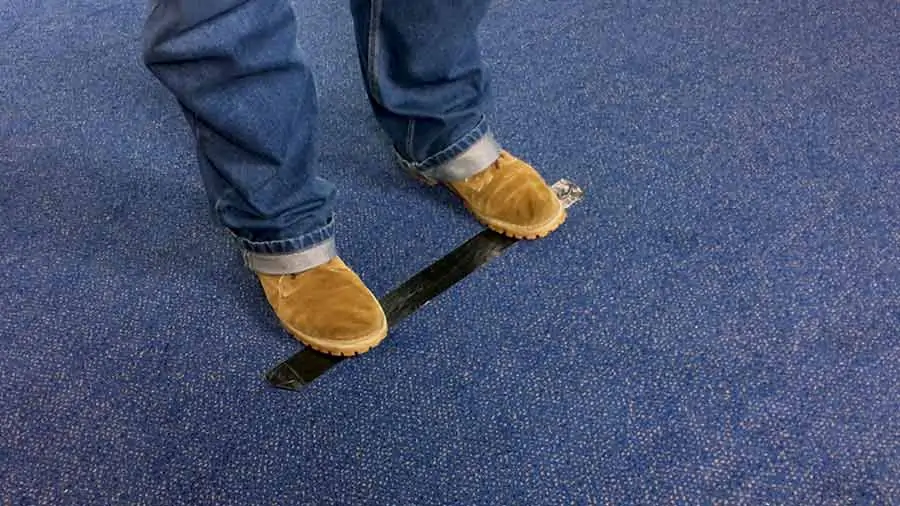
The first thing to do is decide where you want to stand in the scene and then mark it. This ensures you always stand in the same place throughout the filming process, no matter how many times you might stop and start. I use a short strip of gaffer tape and stand with a foot at each end of the tape.
I have used this method frequently and from experience I know the distance my feet should be apart. This means the length of tape I use is sometimes longer than it needs be, as can be seen in the image above. If you prefer, make two tape crosses, and place them on the ground exactly where your feet need to go. This will help you film yourself with an iPhone, or any other camera, when you can’t see yourself on the screen.
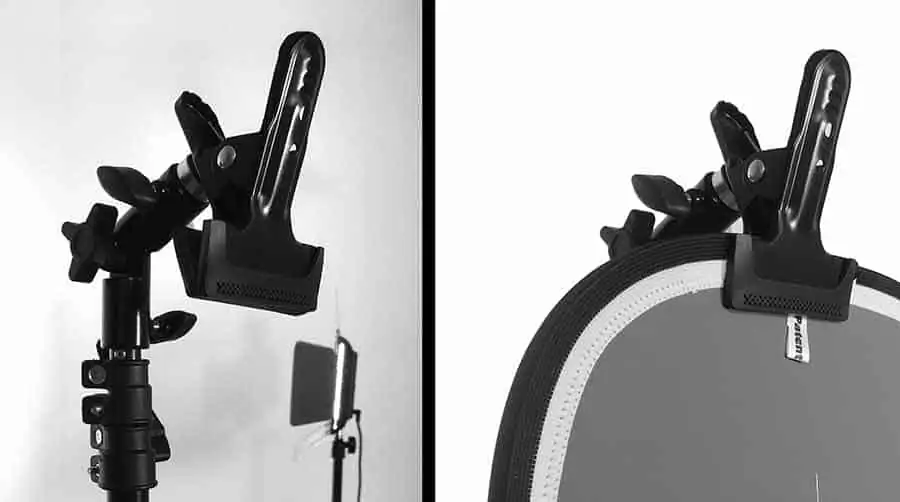
STEP 2: Clamp the gray card to the light stand
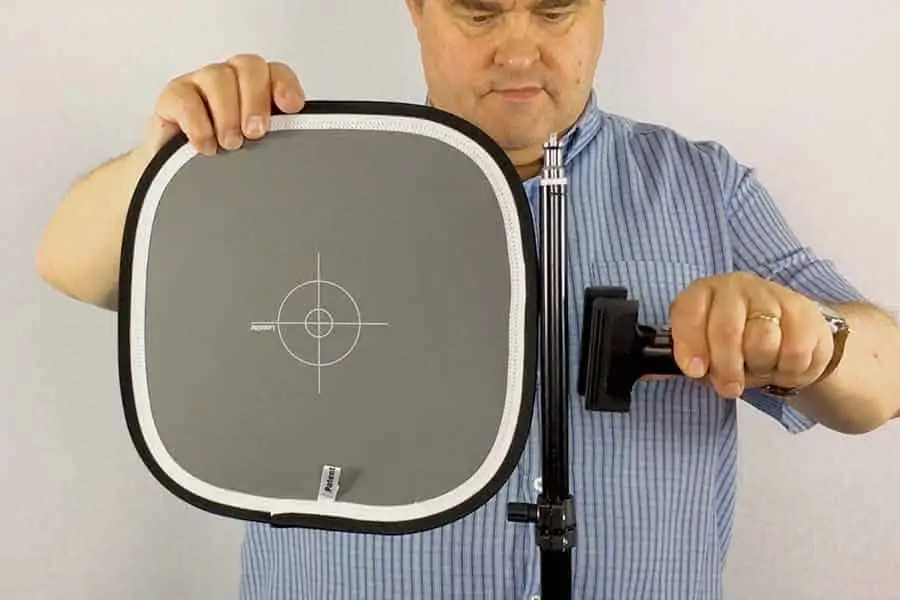
Using a heavy-duty studio clamp attach the gray card to the side of the light stand, as above. Although the standard heavy-duty clamp does a decent job of holding the gray card against the upright of the light stand, I have found a better arrangement.
By using a heavy-duty reflector/background clamp, as seen below, it is easier to attach the gray card to the light stand and to have its centerline directly in line with the center of the light stand. This will allow a much more accurate placing of the gray card above the center of the tape mark.
The heavy-duty reflector/background clamp![]() is available on Amazon at a reasonable price. The face of the gray card should be square on to wherever you have set up your iPhone or camera.
is available on Amazon at a reasonable price. The face of the gray card should be square on to wherever you have set up your iPhone or camera.
STEP 3: Place the light stand over the tape mark
Place the light stand and gray card over the tape mark on the floor. The center of the grey card should be over the center of the strip of tape or the midpoint between your tape crosses. This will ensure that the gray card is in the same position as yourself when filming.
If you used the standard heavy-duty clamp with the gray card attached to the side of the light stand you will have to offset the stand position by 6 inches to ensure the center of the card is directly above the center point of the tape mark.
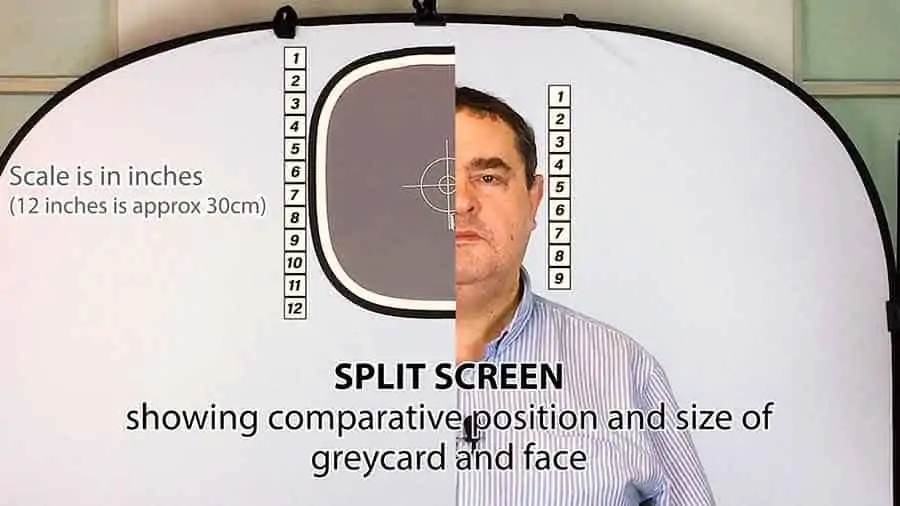
STEP 4: Adjust the height of the gray card

Adjust the height of the gray card so that its middle is roughly at the same height as your eyes or the middle of your face. Since the gray card is 12 inches and the height of the human head is about 9 inches, the top of the grey card will correspond to just a little above the top of your head.
Although the gray card is larger than the average human face, none-the-less it works well as a face substitute. We can make the center cross on the gray card represent the position of the eyes or the center of the face.
STEP 5: Adjust your framing, focus, and exposure
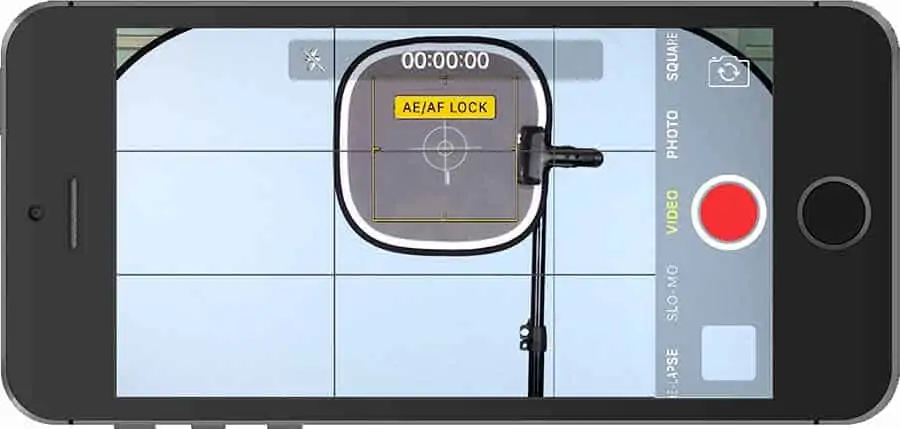
With your camera app open, center the grey card between the two vertical guidelines. You may have to move your iPhone or camera in order not to use the digital zoom, which would reduce your image resolution. With the gray card centered between the two vertical lines you should get a nice head and upper torso framing.
If you wish to reduce the headroom (the space between the top edge and the top of the head) drop the upper horizontal guideline to a little below the upper horizontal guideline. Alternatively, let the top of the gray card touch the top edge of the frame. Since the top of the gray card is higher than the top of the average human head you should still have enough headroom in your final shot.
If you are using the iPhone’s native camera app tap and hold on the image of the grey card to lock the autofocus and exposure.
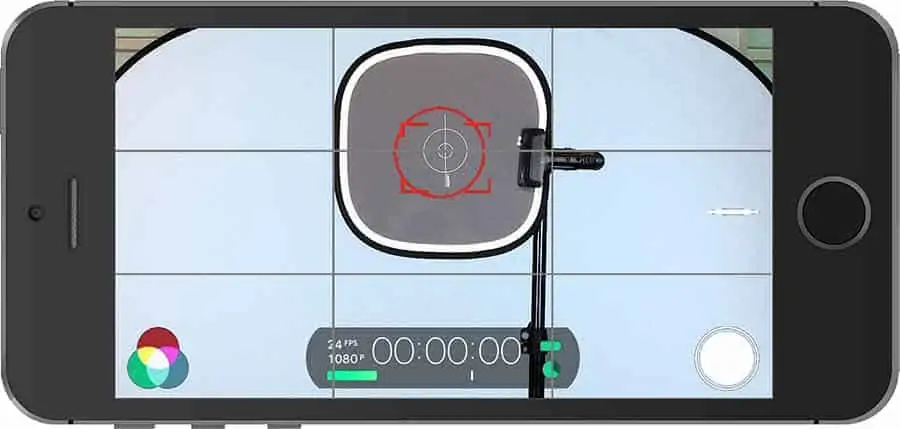
If you are using Filmic Pro as your camera app drag the focus and exposure reticles over to the grey card and hold to lock them (they will turn red).
STEP 6: Start recording
With the focus and exposure correctly set and locked you can remove the light stand and gray card, set your iPhone recording, and return to your mark indicated on the ground by the tape.
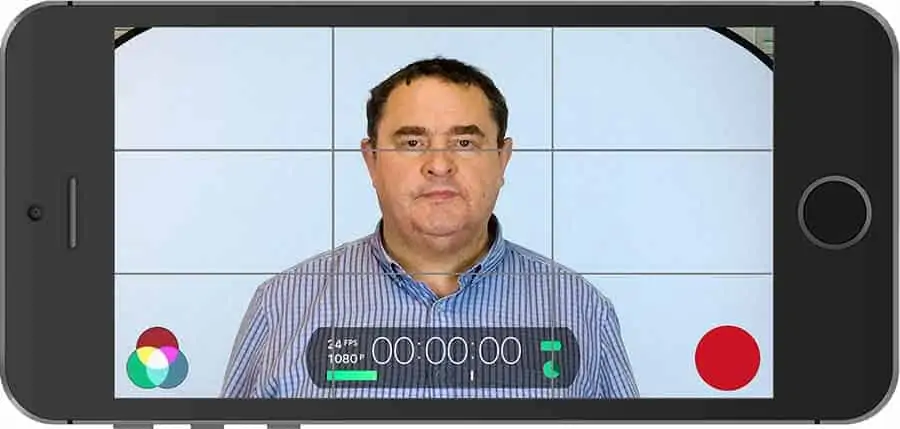
The middle of your face should be in the same place where the middle of the grey card was, and be correctly framed, in focus with the exposure properly set.
Of course, it would be wise to do a test recording to make sure everything is correct, including your sound. But there you have an easy low-tech answer to the question of how to film yourself with an iPhone.
The gray card method will ensure you get everything looking right for your piece to camera, with no need for someone else to operate your iPhone.
STEP 7: FiLMiC Pro Presets
Although this isn’t necessary before you start shooting, it’s useful to set up your FiLMiC Pro presets. I have written a straightforward guide on setting up FiLMiC Pro presets![]() that you’ll find useful.
that you’ll find useful.
Optional Step: Using the gray card to set the white balance
If you are using FiLMiC Pro as your camera app you can manually set your white balance. This will ensure the colors are as close to being true as you can make them. If your gray card is reversible use the white side to set your white balance.
Make sure the white card is positioned over the tape mark on the floor. In FiLMiC Pro zoom in on the white card until it fills most of the frame. Now tap the icon that looks like three overlapping color circles to open the Imaging Panel.
If you choose any of the presets or the white balance is manually adjusted the AWB icon will be gray. Tap the icon to enable auto white balance and the icon will turn blue.
The white circle (the selector) will move across the color panel until the white card appear white. When the selector stops moving and the card looks white tape the AWB icon again. This will lock the white balance and the AWB icon will turn red.
Finally, tap to the side of the Imaging Panel to close it and zoom out. Your white balance should now be correctly set.
Five extra methods to frame yourself correctly with an iPhone
If you would like more methods to help frame yourself when filming with the excellent quality rear-facing camera, I’ve got a treat for you. I’ve created an article that lays out five methods to get your framing right. Find the article by clicking here.
My Favorite Content Creation Kit
Thank you for taking the time to read this article. Hopefully, you found it helpful in creating your own content for your social media and YouTube channels. I have listed some of the gear I use as a YouTuber and online course creator and hope you’ll also find it useful. I have recommended this equipment to my readers and my own family and friends.
Audio Recorder: I use Zoom digital recorders to capture good quality audio for videos, podcasts, and radio/TV advertising. Unlike SLRs the Zoom Handy recorders can record from multiple sources simultaneously, ideal if you have two or more people speaking. I’ve used the H4n![]() , H5
, H5![]() , and H6
, and H6![]() and would recommend them to anyone.
and would recommend them to anyone.
Camera: You can use your smartphone when starting out, but I’d recommend getting a Mirrorless Camera. I use both the Canon EOS R![]() and EOS R6
and EOS R6![]() . Both can shoot Full HD or 4K, and the Eye AutoFocus will keep you sharply in focus even if you move around. If your budget is smaller, I would recommend the Canon M50 MkII
. Both can shoot Full HD or 4K, and the Eye AutoFocus will keep you sharply in focus even if you move around. If your budget is smaller, I would recommend the Canon M50 MkII![]() .
.
Video microphone: Arguably, sound quality is more important than video quality, that’s why I use a Deity V-Mi![]() c D3
c D3 ![]() Pro super-cardioid shotgun microphone on my mirrorless cameras. It automatically powers on when I turn on my camera and powers down when I switch off the camera. But I also like the versatility of the mic. It automatically senses what device it is connected to ensuring it works with SLRs, camcorders, smartphones, Handy recorders, laptops, and bodypack transmitters.
Pro super-cardioid shotgun microphone on my mirrorless cameras. It automatically powers on when I turn on my camera and powers down when I switch off the camera. But I also like the versatility of the mic. It automatically senses what device it is connected to ensuring it works with SLRs, camcorders, smartphones, Handy recorders, laptops, and bodypack transmitters.
Video Lighting: Although daylight is my favorite lighting, I use LED lighting for all the videos I shoot indoors because good lighting can make a tremendous difference to the visual appeal of a video. For video calls on Zoom or Teams, I use the Lume Cube Broadcast Lighting Kit![]() . For YouTube videos and creating video tutorials for online courses, I love the Lume Cube 18″ Cordless Ring Light Kit. Both these lights are excellent, and I wouldn’t hesitate in recommending them.
. For YouTube videos and creating video tutorials for online courses, I love the Lume Cube 18″ Cordless Ring Light Kit. Both these lights are excellent, and I wouldn’t hesitate in recommending them.
Teleprompter software: I use the iCue teleprompter![]() app on my iPad when using it with a traditional beam-splitter teleprompter and control it remotely with the iCue Remote
app on my iPad when using it with a traditional beam-splitter teleprompter and control it remotely with the iCue Remote![]() app on my iPhone. On my PC I use Teleprompter Pro
app on my iPhone. On my PC I use Teleprompter Pro![]() from the Microsoft Store.
from the Microsoft Store.
Teleprompter hardware: Teleprompters help you present to the camera without needing to learn your script. When I need more screen space and the durability of an all-metal build, I like the Glide Gear TMP100![]() beam-splitter teleprompter. It works with my mirrorless cameras and uses an iPad or tablet to run the teleprompter software.
beam-splitter teleprompter. It works with my mirrorless cameras and uses an iPad or tablet to run the teleprompter software.
Tosh Lubek runs an audio and video production business in the UK and has been using the Canon EOS R since it was released in the Autumn of 2018 and the Canon EOS R6 in 2020. He has used both cameras to shoot TV commercials broadcast on Sky TV, promotional business videos, videos of events and functions, and YouTube creator content. He has also won several international awards for his advertising and promotional work. You can meet him by visiting his “video booth” at HashTag Business Events across the country.
Recent Posts
Most people use sandbags the wrong way. Here’s how to hang them properly on a light stand for maximum stability and safety — plus what to fill them with.
You're Using the Canon RF 50mm f/1.8 WRONG! Here’s How to Fix It
If you’ve recently picked up the Canon RF 50mm f/1.8 STM—affectionately known as the Nifty Fifty—you might be confused by that strange switch on the side of the lens. It doesn’t say AF/MF...