
DIY Video Studio is supported by its readers. Please assume links on this site are affiliate links or ads, and that I get commissions for purchases made through these links. As an Amazon Associate, I earn from qualifying purchases. Thank you if you use any of the links.
Have you ever found yourself shooting a video in bright sunlight and realized getting the exposure right for your face is tricky? I know I have. But I kept at it, did my research, and put my findings into practice. Now I have a technique that answers the problem of how to film in direct sunlight.
But if you’ve not filmed in direct sunlight, you might be wondering, what’s the problem? After all, don’t you need lots of light to shoot good video?
Well, here’s the problem.
Bright direct sunlight is what photographers and videographers call hard light. And hard light produces harsh or hard shadows. So how to film in direct sunlight? You could use a reflector to bounce the sun’s light into those shadows. That can add extra problems and not easy if you are filming yourself. My preferred method is to move into a shadow or use a sun diffuser screen. Not only will the diffuser cut the amount of sunlight it will also change it to soft light, getting rid of those hard shadows.
![Julius Studio [2 Pack] Clamp Clip Holder Light Stand Mount Bracket with...](https://m.media-amazon.com/images/I/416XjQYfboL._SL160_.jpg)
Last update on 2025-10-20 / Affiliate links / Images from Amazon Product Advertising API
How to film in direct sunlight
Shooting video outside
I produce videos and TV spots for my clients and occasionally that involves an outdoor shoot, which can be a blessing or a curse. Often my clients will tell me, “The weather forecast says it’s going to be a bright sunny day. It’ll be a wonderful day for the shoot”. Well, that sounds reasonable enough. After all, the great outdoors looks wonderful when it’s sunny. Unfortunately, it can be difficult to get a well-exposed shot of your face in bright sunshine.
In theory, shooting outdoors should be great. The background is usually interesting, and the lighting comes free of charge.
The problem with filming outdoors is that you have little or no control over the sun.
First, the sun is continuously moving. Not only is it moving from east to west, but its height varies above the horizon. Depending on your climate, the other problem is cloudy skies. If you have broken cloud the brightness and quality of the light will change as the cloud covers and then uncovers the sun. But this article is about filming in direct sunlight, so I’ll assume there is little or no cloud.
Positioning the camera
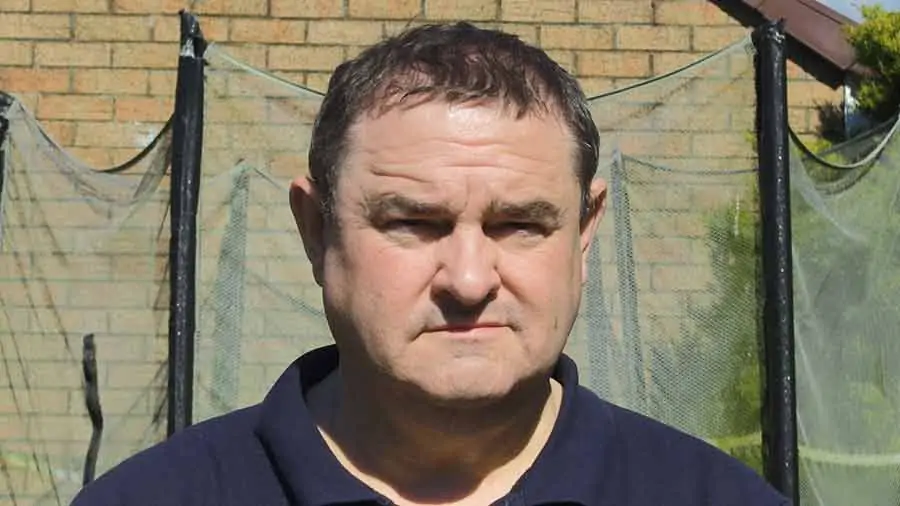
Filming in bright sunshine can be a challenge. The standard advice to newbie amateur photographers is to place the camera between the sun and your subject. As general advice that works reasonably well. As you can see above, the sun is square on to my face so it’s evenly lit. But with the sun relatively high in the sky there are deep shadows under my eyebrows and chin. However, the sun was still low enough to be in my eyes, causing me to squint and look uncomfortable.
When filming facing the sun you will have even lighting across the face but you could end up squinting
To get the sun out of my eyes I’ve moved so the sun is 45-degrees to the side. The problem with the shot this time is that it’s difficult to get good exposure. As you can see below, when the right side of my face is exposed correctly the sun-side is too bright. But if I try to adjust the exposure so those bright highlights look better, the shadows become deep. Neither is a good look but it’s a frequent problem when filming outdoors with an iPhone.
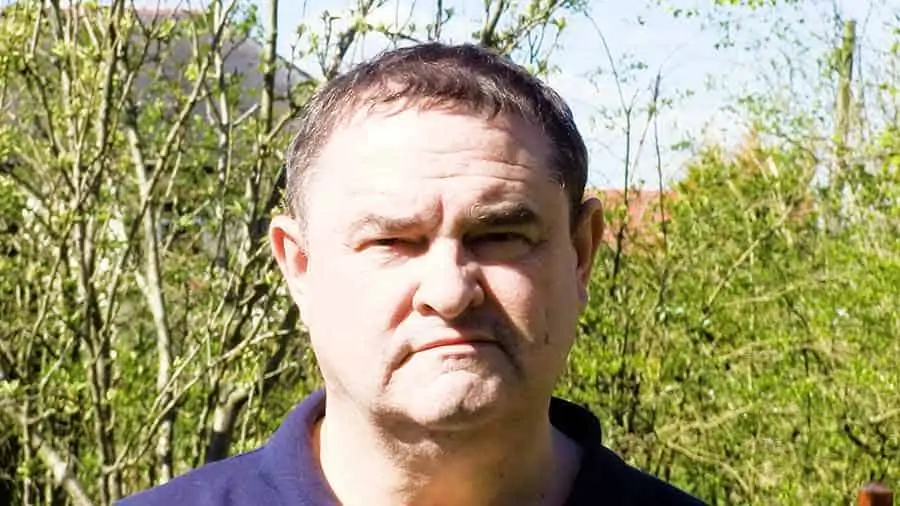
Having the sun off to the side is better but getting the correct exposure can be a problem
Shoot your video in the shadows
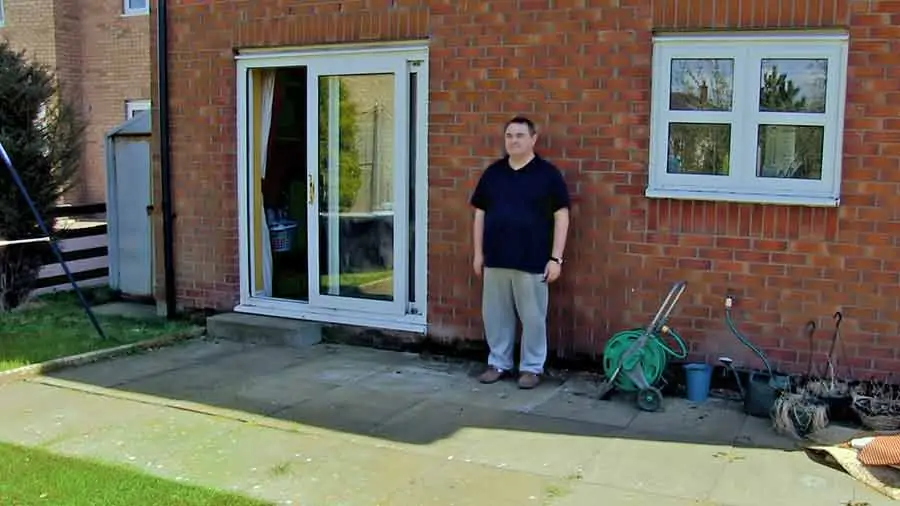
Under such bright conditions look for some shadows behind a building or hedge. When you are standing in the open, the shadow area it looks quite dark. However, there’s plenty of light in there for you to film. It looks dark because your eyes are adjusted to correctly see in the area lit by the bright direct sunlight.
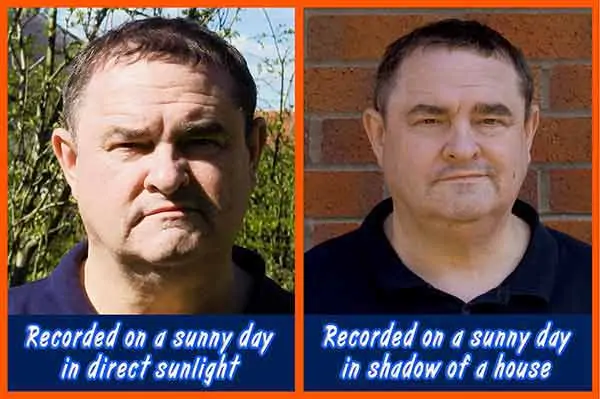
Because the sky scatters sunlight in all directions there is plenty of light, even in the shadows. The light evenly illuminates my face, and the look is more attractive than with direct sunlight. Now, look at the comparative images below. When I moved myself and my camera into the shadow of the house the look is much better. The soft light in the shadow of the house evenly illuminates my face. It’s not perfect but it is much better than the shot in bright sunlight.
The downside of filming in shadows is that you have lost those attractive outdoor backgrounds. There’s not a lot you can do about losing those backgrounds, but you could set up a backdrop. A plain background might be better than bricks. Filming in the shadows also makes the image a little flat. To put some contrast back into the shot try bouncing in some sunlight with a reflector. Of course, you will need some help using the reflector.
Fill in the shadows with a light reflector
To improve the lighting, you could try using a reflector. You can then bounce some light onto the dark shadow side of the face.
I use the reflector in the studio or for indoor shoots using a light stand and heavy-duty metal clamp with 5/8 inch light stand attachment. However, an extending swivel head boom arm reflector support is more elegant and easier to use with a reflector when working on your own.
Unfortunately, this is not a great solution when working outdoors. You will need to set up the reflector by trial and error until you have it at the right angle. Unfortunately, you will only get a short amount of shooting time before having to adjust the reflector.
The sun is not static and moves in both height and direction requiring repeated adjustments of the reflector. If you have an assistant to hold the reflector the sun’s movements will not be a problem. Your assistant will intuitively adjust the reflector to compensate for the sun’s movement.
Using a reflector to fill in those deep shadows works outdoors, provided you have an assistant. But if you are filming yourself the reflector is not going to work so well. You already have enough to do, never mind holding a reflector and tracking the sun! The other problem with using a reflector is that your talent may object to all that sunlight in their eyes. So, what would be a better option?
Use the reflector as a diffuser
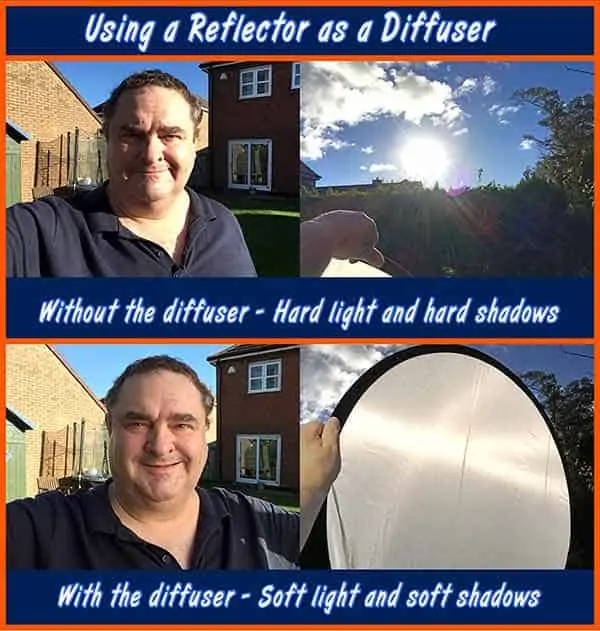
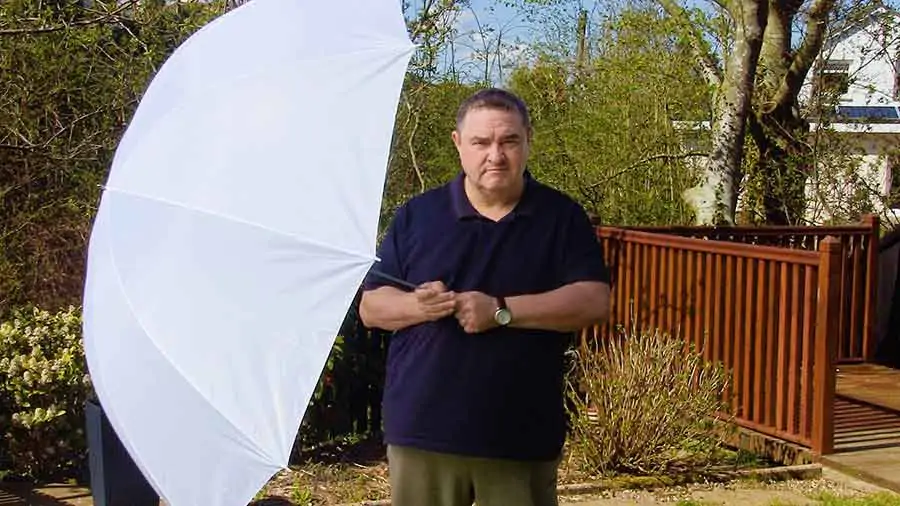
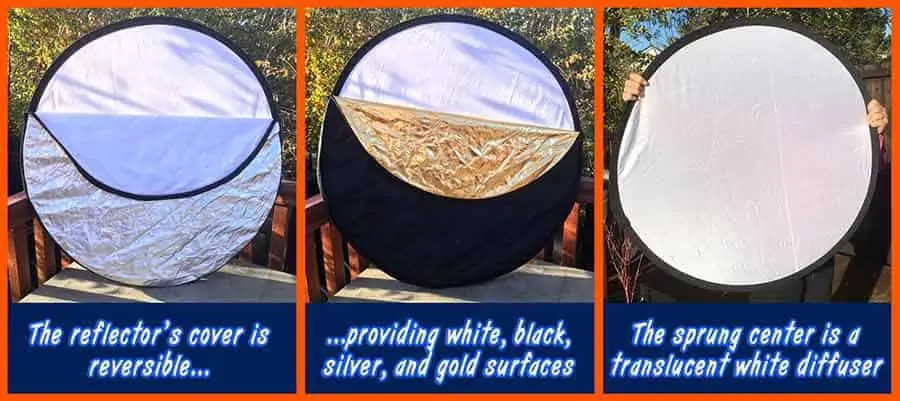
As I mentioned, the center of the reflector is a white translucent material. Instead of using it to bounce the light on to your talent you could use it as a diffuser. Not only will the amount of sunlight be reduced but it will also change the quality of the sunlight. The light now has a soft quality where the illumination seems to come from all parts of the diffuser. But you still get some shadows to give definition to your features. You can see the difference in the set of images below.
In the above images, I’m holding the translucent part of the reflector in my hand (let’s call it a diffuser). Unless you are happy with an outstretched arm this is not the ideal way of using the diffuser. As previously mentioned, it would be better to have an assistant holding the diffuser. But the angle is not a great concern when the sunlight is shining through the diffuser. So, if you are working alone, you could mount the diffuser on a light stand.
Admittedly the sun will still move and eventually, you will have to make an adjustment. But if you have a larger diffuser, say 43-inches or more, you will have enough time to record short videos. I use a Neewer 5-in-1 collapsible disc light reflector that really does an excellent job. Its diameter is 43-inches (110cm) and is easy to collapse and store in my camera case. The reflector has a white translucent center that can be used on its own as a light diffuser. Plus, the outer reversible cover converts the center to ![]() .
.
- 43" 110CM 5 in 1 Collapsible Multi Disc Light Reflector
- Translucent, silver, gold, white, and black
- This reflector fits any standard reflector holders
- 100% Brand New! 3 Months Warranty By Seller.
Last update on 2025-10-20 / Affiliate links / Images from Amazon Product Advertising API
If you want more time between adjustments, you could get a butterfly frame sun diffuser. But this would bump up the cost considerably as the frame is square or rectangular with the diffusing material stretched across it. The frame is then mounted between two heavy-duty stands.
The trouble with such bulky equipment, like a butterfly frame, it increases the complexity and set up time. With a much larger surface area, it will be affected much more in a light breeze so will need securing. To use the diffuser in a butterfly frame I know I would need assistance and I’m guessing you would too. When shooting alone, my solution to soften bright sunlight is to use a photographer’s translucent white diffuser umbrella.
Translucent white diffuser umbrella
When using light in your studio it will often be a point source. Point sources produce hard light and hard shadows. By placing a diffuser screen or diffuser umbrella in front of the light, it becomes a soft light source. That’s because the whole surface of the diffuser becomes the light source. The other effect the diffuser has is to reduce some of the light. In the case of the diffuser umbrella, about half of the light is blocked. So, in our scenario of filming in bright sunlight, the umbrella will do exactly what we are after. It will reduce some of the intensity of the direct sunlight and smooth out those hard shadows.
The idea is to reduce and diffuse the sunlight. The material of the umbrella will block about half of the sunlight and the whole umbrella becomes the light source. Those bright hotspots and dark shadows are eliminated because the intensity and quality of the light are now ideal.
There are two common sizes of photographer’s diffuser umbrella, 33inches, and 60 inches in diameter. The smaller 33-inch umbrella is big enough if filming yourself in a head and shoulder shot. For a wider shot or a two-person shot, I’d use the 60-inch umbrella. In fact, considering the larger umbrella is less than double the price of the 30inch, which wasn’t all that much to start with, I would buy the Neewer 60inch umbrella![]() that is available from Amazon. It offers much more flexibility for only a little more money and works really well.
that is available from Amazon. It offers much more flexibility for only a little more money and works really well.
So what difference does the diffuser umbrella make? Well, here’s my original shot, with the sun about 45 degrees off to the side. And the same shot with the umbrella blocking the direct sunlight.
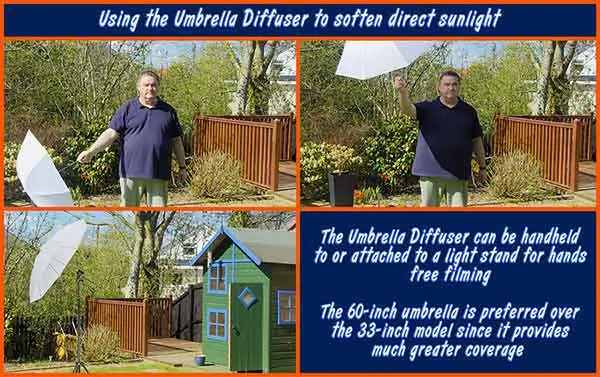
You can see in the images above when I use the umbrella the lighting of my face is improved. There’s still some shadow to give definition to my features but that harsh glare on the left has been eliminated. Don’t worry about having your arm stretched out holding the umbrella. To make sure you don’t look as if your umbrella take care when framing your shot. A simple head and shoulders shot should easily hide the umbrella. However, a wider shot may require a different method of holding the umbrella in place.

- This translucent umbrella is a plus for location shots
- The umbrellas soften, broaden and diffuse the light output of any tungsten or studio flash source
- It is perfect for photographers on the go for indoor or outdoor portrait photograph
- For shoot through, it allows approximately 5% light transmission. It acts like a very large softbox...
Last update on 2025-10-20 / Affiliate links / Images from Amazon Product Advertising API

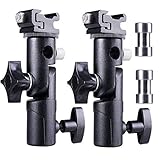
If holding the umbrella doesn’t work for you it is easy to mount the umbrella diffuser on a light stand. You will need a standard light stand and an umbrella holder. Here are two versions of my kit bag. The first incorporates a heavy-duty metal clamp for holding a reflector or small collapsible backdrop. The second has a hot-shoe mount that I also use for mounting an LED light panel.
Attach the holder onto the top of the light stand. Slip the shaft of the umbrella through the hole and tighten the thumbscrew to hold the umbrella in place. Adjust the direction and angle of the umbrella so you, or your talent, are in its shadow. When working outdoors it’s a good idea to add some sandbag weights. Place one or two over the legs of the light stand. I normally use one sandbag on the upwind side but do whatever is appropriate. If the breeze is too strong halt filming since your umbrella and stand may topple over. Remember, the umbrella will act like a sail and catch the breeze on a windy day.
Last update on 2025-10-20 / Affiliate links / Images from Amazon Product Advertising API
Get the right equipment
Do not try saving a few bucks by getting a white golf umbrella. I have tried one and it did not work well. The material on golf umbrellas is not sufficiently translucent and block too much light. Moreover, golf umbrellas need to be held since they cannot easily be mounted on a light stand. Even if you use the mental clamp holder on a light stand it will not be very secure.
Umbrella Diffuser
The proper 33inch reflector/diffuser umbrellas are OK but for less than double the price I would buy the 60inch version. I bought the smaller umbrella first and then bought the 60inch one so I could shoot wider shots. Considering the relative price of the two umbrella sizes it makes more sense to get the larger one. I bought both of my diffuser umbrellas from Amazon and have found the quality of both to be good. They are quite light to hold, and the results have been good. Even when filming on the brightest of days the umbrellas have become an indispensable part of my kit bag. The 60inch umbrella![]() is excellent value on Amazon.
is excellent value on Amazon.
- This translucent umbrella is a plus for location shots
- The umbrellas soften, broaden and diffuse the light output of any tungsten or studio flash source
- It is perfect for photographers on the go for indoor or outdoor portrait photograph
- For shoot through, it allows approximately 5% light transmission. It acts like a very large softbox...
Last update on 2025-10-20 / Affiliate links / Images from Amazon Product Advertising API
Neewer 5-in-1 collapsible disc light reflector
As I mentioned, the 43-inches (110cm) Neewer 5-in-1 collapsible disc light reflector also works well as a diffuser. Remember it is the core ring with a translucent material that you need to use as your light diffuser. Usefully the reflectors has interchangeable silver, gold, white and black covers. It is available at an affordable price from Amazon![]() .
.
- 43" 110CM 5 in 1 Collapsible Multi Disc Light Reflector
- Translucent, silver, gold, white, and black
- This reflector fits any standard reflector holders
- 100% Brand New! 3 Months Warranty By Seller.
Last update on 2025-10-20 / Affiliate links / Images from Amazon Product Advertising API
Universal Light Stands
If you haven’t already got some light stands (you can never have too many) here’s a link to a couple of universal light stands![]() on Amazon. With the right clamps/holders, they can be used for lights, holding your umbrella diffuser, reflector, or even a collapsible background. The stands can be adjusted from a minimum height of 2ft 8in to 7ft 6in. Each can support loads of up to 7lbs.
on Amazon. With the right clamps/holders, they can be used for lights, holding your umbrella diffuser, reflector, or even a collapsible background. The stands can be adjusted from a minimum height of 2ft 8in to 7ft 6in. Each can support loads of up to 7lbs.

- Compact and lightweight photography light stands with universal 1/4"-20 threads for easy setup and...
- Supports speedlights and small lights weighing up to 6.6 pounds, including off-camera flashes,...
- Spring-cushioned light stand has an adjustable height from 2 feet, 8 inches to 7 feet, 6 inches to...
- Wide, stable base for added security
Last update on 2025-10-20 / Affiliate links / Images from Amazon Product Advertising API
Umbrella holders/mounts
Finally, I also got my two umbrella holders online and both can be used for dual purposes. The reflector clamp with umbrella reflector/diffuser holder works well and I’ve also used it to support a collapsible 5x7ft background. You can get it here![]() on Amazon. The other type has a hot shoe mount above the hole for the umbrella reflector/diffuser. I use this when mounting LED light panels that need to be tilted either down or up. It’s available here
on Amazon. The other type has a hot shoe mount above the hole for the umbrella reflector/diffuser. I use this when mounting LED light panels that need to be tilted either down or up. It’s available here![]() on Amazon.
on Amazon.
Last update on 2025-10-20 / Affiliate links / Images from Amazon Product Advertising API
My Favorite Content Creation Kit
Thank you for taking the time to read this article. Hopefully, you found it helpful in creating your own content for your social media and YouTube channels. I have listed some of the gear I use as a YouTuber and online course creator and hope you’ll also find it useful. I have recommended this equipment to my readers and my own family and friends.
Audio Recorder: I use Zoom digital recorders to capture good quality audio for videos, podcasts, and radio/TV advertising. Unlike SLRs the Zoom Handy recorders can record from multiple sources simultaneously, ideal if you have two or more people speaking. I’ve used the H4n![]() , H5
, H5![]() , and H6
, and H6![]() and would recommend them to anyone.
and would recommend them to anyone.
Camera: You can use your smartphone when starting out, but I’d recommend getting a Mirrorless Camera. I use both the Canon EOS R![]() and EOS R6
and EOS R6![]() . Both can shoot Full HD or 4K, and the Eye AutoFocus will keep you sharply in focus even if you move around. If your budget is smaller, I would recommend the Canon M50 MkII
. Both can shoot Full HD or 4K, and the Eye AutoFocus will keep you sharply in focus even if you move around. If your budget is smaller, I would recommend the Canon M50 MkII![]() .
.
Video microphone: Arguably, sound quality is more important than video quality, that’s why I use a Deity V-Mi![]() c D3
c D3 ![]() Pro super-cardioid shotgun microphone on my mirrorless cameras. It automatically powers on when I turn on my camera and powers down when I switch off the camera. But I also like the versatility of the mic. It automatically senses what device it is connected to ensuring it works with SLRs, camcorders, smartphones, Handy recorders, laptops, and bodypack transmitters.
Pro super-cardioid shotgun microphone on my mirrorless cameras. It automatically powers on when I turn on my camera and powers down when I switch off the camera. But I also like the versatility of the mic. It automatically senses what device it is connected to ensuring it works with SLRs, camcorders, smartphones, Handy recorders, laptops, and bodypack transmitters.
Video Lighting: Although daylight is my favorite lighting, I use LED lighting for all the videos I shoot indoors because good lighting can make a tremendous difference to the visual appeal of a video. For video calls on Zoom or Teams, I use the Lume Cube Broadcast Lighting Kit![]() . For YouTube videos and creating video tutorials for online courses, I love the Lume Cube 18″ Cordless Ring Light Kit. Both these lights are excellent, and I wouldn’t hesitate in recommending them.
. For YouTube videos and creating video tutorials for online courses, I love the Lume Cube 18″ Cordless Ring Light Kit. Both these lights are excellent, and I wouldn’t hesitate in recommending them.
Teleprompter software: I use the iCue teleprompter![]() app on my iPad when using it with a traditional beam-splitter teleprompter and control it remotely with the iCue Remote
app on my iPad when using it with a traditional beam-splitter teleprompter and control it remotely with the iCue Remote![]() app on my iPhone. On my PC I use Teleprompter Pro
app on my iPhone. On my PC I use Teleprompter Pro![]() from the Microsoft Store.
from the Microsoft Store.
Teleprompter hardware: Teleprompters help you present to the camera without needing to learn your script. When I need more screen space and the durability of an all-metal build, I like the Glide Gear TMP100![]() beam-splitter teleprompter. It works with my mirrorless cameras and uses an iPad or tablet to run the teleprompter software.
beam-splitter teleprompter. It works with my mirrorless cameras and uses an iPad or tablet to run the teleprompter software.
Tosh Lubek runs an audio and video production business in the UK and has been using the Canon EOS R since it was released in the Autumn of 2018 and the Canon EOS R6 in 2020. He has used both cameras to shoot TV commercials broadcast on Sky TV, promotional business videos, videos of events and functions, and YouTube creator content. He has also won several international awards for his advertising and promotional work. You can meet him by visiting his “video booth” at HashTag Business Events across the country.
Recent Posts
Most people use sandbags the wrong way. Here’s how to hang them properly on a light stand for maximum stability and safety — plus what to fill them with.
You're Using the Canon RF 50mm f/1.8 WRONG! Here’s How to Fix It
If you’ve recently picked up the Canon RF 50mm f/1.8 STM—affectionately known as the Nifty Fifty—you might be confused by that strange switch on the side of the lens. It doesn’t say AF/MF...