
We’re an affiliate: We hope you love our articles and the products we recommend! Just so you know, when you buy through links on this site, we may earn an affiliate commission. Thank you if you use our links, we really appreciate it!
Have you ever tried to film yourself using the high-quality camera on the back of your iPhone?
When you can’t see yourself on your iPhone’s screen, framing yourself isn’t easy. You need to see yourself when filming with an iPhone, but it can be difficult. In fact, it can be a nightmare. I’ve tried little tricks like putting a mirror behind my phone, but all those hacks just suck.
So how do you film yourself with an iPhone when you can’t see the screen? In this article, I have five solutions to the problem. The methods range from the ultra low tech to solutions that use the tech built into your iPhone. They include…
- The Trial and Error method of framing for filming yourself
- The 4k Ultra HD re-framing cheat method
- Connect your iPhone to a monitor
- Screencasting to a PC or Mac method
- Using Filmic Pro Remote control
- Bonus method

But first, let me explain why you really do need to see yourself when filming yourself.
Why you need to see yourself while filming yourself
The main reason you need to see the frame your camera is recording while making a film by yourself is to get the framing right.
Your video will look downright amateurish if your face is in the bottom half of the frame or off to one side (unless you have a reason for doing so).
If you’re filming outdoors, you might discover you’ve committed another mistake of having a telegraph pole or streetlight seemingly growing out of your head. It really isn’t a good look.
Another problem with not seeing your iPhone’s display when you film outdoors is you don’t know what other people are doing in the background of your shot. It could be kids showing off, pulling faces, or worse. You won’t know what’s been happening behind your back until you watch the footage.
Lastly, your iPhone’s display lets you know whether your exposure is right. Even with the exposure set to auto your face won’t always look properly exposed. Say your background is relatively bright. It could be a bright sky, a white wall, or a window. In all those situations, the auto exposure will try to get the overall exposure right. But it’s going to look wrong. Sure, the background will look good, but your face will be dark and underexposed. To make sure you know how it looks you need to see the screen.
That’s why cameras with flippy out screens are so popular, they’re easy to use when making a film by yourself. Cameras like the Canon SL2, M50, 80D, EOS R, and 90D are fantastic vlogging cameras and they all have that flippy out screen.
Even though these are relatively lightweight cameras, the iPhone, or smartphone, has one big advantage over a DSLR or DSLM. You’ve almost always got it with you in your pocket.
One approach to selfie video making with an iPhone is to use the front-facing camera. However, that’s not the best quality camera on your phone that lets you do some cool stuff. So, if you want to use the rear-facing camera the next approach would be to try the “Trial and Error method”.
1: Trial and Error method of framing for filming yourself
For the trial error method, you would do the following.
- Mount your iPhone on a mini or full-size tripod.
- Make an educated guess for the correct height and angle of your iPhone.
- In the Filmic Pro camera app tap the round red button to start recording.
- Come round to the other side of your iPhone and take up your presenting position for a few seconds.
- Go back to your iPhone and check the clip you just recorded. If the framing wasn’t right, adjust the iPhone’s height or angle slightly.
- Now repeat steps 3 to 5 until the framing is correct.
Although the Trial-and-Error method does work, it’s not very time-efficient. You may also find it very frustrating because you can easily overshoot the right height and angle of your iPhone. You need an easier and quicker method to frame yourself.
2: The 4K Ultra HD re-framing cheat method
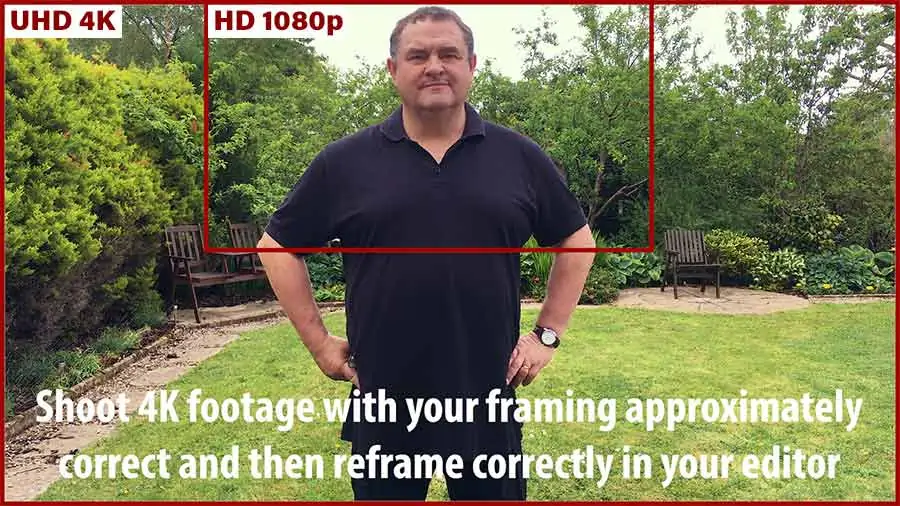
One solution to getting your framing right is to shoot 4K Ultra HD footage but edit and export your video as HD 1080p footage.
You don’t need the most recent iPhone to shoot 4K video. The first iPhones with 4K support were the iPhone 6s and iPhone 6s Plus. So, if you have an iPhone 6s or later you will be able to shoot 4K Ultra HD footage.
Ultra HD gives you twice the resolution you really need for your final HD video. That means there’s plenty of wiggle-room to reframe the footage. You can do this by scaling and cropping your 4K footage on your editor’s timeline to get the framing right without losing the HD quality.
3: Connect your iPhone to a monitor with a Lightning Digital AV Adapter
If you have an Apple Lightning Digital AV adapter you can connect your iPhone to an external video monitor, computer monitor, or TV that has an HDMI input socket. These days, that’s pretty much every monitor or TV.
Connect the Lightning to Digital AV Adapter to your monitor and you will be able to mirror exactly what you see on your iPhone (or iPad) onto your HDMI-compatible display.
The only problem is that external video monitors, like the Atomos Ninja V HDMI Monitor/Recorder, are not cheap. So, unless you are getting serious with your video production and want to film it yourself, this might not be the solution for you. At least, not if you are just starting out with vlogging.
But if you are filming yourself in your home video studio there are plenty of affordable small televisions with HDMI input you can buy.
With the Lightning Digital AV adapter and an external monitor or TV, you will be able to check your framing, exposure, and focus. I found the Lightning Digital AV adapter at a decent price on Amazon. You can find it using this link![]() .
.

4: Screencasting to a PC or Mac method
This method works well if you are filming yourself in a home video studio and is relatively inexpensive.
In one of my other courses, Budget Video Production![]() , I talk about using an app called Reflector 2, now Reflector 3, to cast your iPhone’s video display to a PC, Mac, or laptop. Reflector 3 is available for download from the AirSquirrels website and you can use it FREE of charge for 7 days. If you like it you can buy a license.
, I talk about using an app called Reflector 2, now Reflector 3, to cast your iPhone’s video display to a PC, Mac, or laptop. Reflector 3 is available for download from the AirSquirrels website and you can use it FREE of charge for 7 days. If you like it you can buy a license.
Reflector turns Mac, Windows and Android devices into AirPlay, Google Cast or Miracast receivers. You can use Reflector to wirelessly display and record iPhones, iPads, Chromebooks, Android devices and Windows tablets on a bigger screen.
Reflector page on Airsquirrels website
What you need to do is install Reflector 3 on your PC or Mac and enable AirPlay Mirroring on your iOS device. Finally, make sure your iPhone and computer are both on the same WIFI network. You can then share your iPhone’s display on your PC or laptop monitor.
Again, you can view yourself while shooting with the good quality rear camera on your iPhone.
Now that’s ok if you’re shooting indoors with a good Wi-Fi connection but if you want to be a bit more mobile and shoot outdoors, or where you don’t have a Wi-Fi connection, you need an alternative.
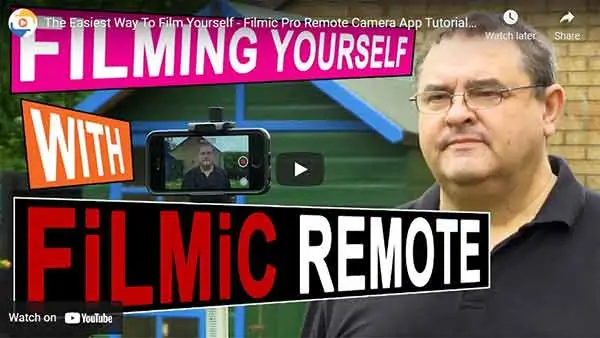
5: Filmic Pro Remote – Remote control of your iPhone’s camera
My favored solution to how to film yourself with a phone is to use the Filmic Remote app.
If you already have the FiLMiC Pro camera app you can download FiLMiC Remote app from AppStore or iTunes. But if you don’t have FiLMiC Pro yet you can download FiLMiC Pro and the FiLMiC Remote app together as the FiLMiC Pro camera kit. The app bundle costs about $19.
Install Filmic Pro on the iPhone you’re going to be filming with. Then install Filmic Remote on an iPad, 2nd iPhone, or iPod Touch.
You can connect your 2 iOS devices over Wi-Fi or connect peer-to-peer using Bluetooth.
A Filmic Pro Bluetooth remote connection will allow you to shoot outdoors, controlling Filmic Pro remotely. Filmic Remote displays what your iPhone sees, and allows you to control focus, exposure, white balance, zoom, and record operations.
So, with filmic pro remote access, you can view yourself and control the Filmic Pro camera app remotely. It solves all your problems when filming yourself on your phone.
If you have multiple iOS recording devices you can even create a multi-cam setup with several iPhones and control each device from the one copy of Filmic Remote on an iPad.
FiLMiC Remote setup
With Filmic Pro on your iPhone and Filmic Remote on another iOS device, you need to enable Remote in your Filmic Pro device settings.
Tap on the settings gear wheel in the bottom right corner of the screen. Go to device, and where it says enable remote, slide the button to the right. Now open the remote app on your other iOS device. From within the remote app, tap the plus button in the bottom left of the screen to search for the iPhone running Filmic Pro. When you see your iPhone’s name, tap to connect. Your iPhone will ask for permission to pair the two devices. Select the length of time you’re willing to give permission for.
Problem connecting?
If Filmic Remote keeps searching without finding your iPhone, go into your Filmic Pro settings on your iPhone, disable and then re-enable Remote. Filmic Pro on your iPad or other iOS devices should see your iPhone almost straight away and you can connect.
How to see yourself when filming with iPhone and FiLMiC Pro Remote
With the app set up, mount your iPhone on a tripod and get it roughly at the right height and angle. You can now use your iOS device as a monitor to help frame yourself correctly.
To frame yourself, according to the rule of thirds, tap the greater-than symbol at the top left-hand corner, then tap the rule of thirds guide icon. Use those third lines, and their intersections, to compose your shot. If you’re unsure about the rule of thirds, place yourself in the center with your eyes or the middle of your head on or close to the top third line.
Now drag the square focus reticle over your face to focus there. Then tap, so that the reticle turns red showing that the focus has now locked.
You can now drag the round exposure reticule around until the exposure is as you want it. Again, tap to lock the exposure. The circle will then turn red.
When you’re ready to start recording tap the record button and it will become a larger solid circle and the time counter will start advancing. Once you’re done tap the record button again to stop.
Don’t worry if the footage looks choppy on your iPad or whatever you’re running remote on. Filmic Pro will record the footage correctly.
Incidentally, if you have Bluetooth earbuds you should be able to monitor your sound whilst you’re recording. I found it to have a slight delay and that probably will be distracting if you’re listening to yourself whilst recording. However, you can use them to check the audio at the start and then ditch the earbuds.
Working with FiLMiC Pro and Remote will take a little practice, so I urge you to spend some time trying out the FiLMiC pro camera kit. With just a little practice you will become proficient at using the two apps together.
The real benefit of using FiLMiC Remote, other than getting your videos looking good, is that you’ll make more videos and more content. That’s a win-win
You can watch the video version of this article on my YouTube channel![]() .
.
Bonus method for how to see yourself when filming with iPhone
I’ve written an article detailing how to film yourself on an iPhone using a gray card, a clamp, and a light stand. It’s a quite simple method that will let you get your framing, exposure, and focus right. If you would like to read the details, click this link.
Related Questions…
Where do you look when making a video?
When making your video do not look at your phone’s screen or the flip-out screen on your camera, look straight into the lens. Remember, your viewer is effectively where your camera’s sensor is, behind the lens. By looking at the lens, it will appear to your viewer that you are looking at them. That will help to establish a connection with the viewer and build trust.
How do I shoot video on my phone?
Although the native video app is OK if you want better results use a video camera app such as FiLMiC Pro, Moment, or Mavis. It’s worth spending a small amount of money to get more control over the camera settings and ultimately better video quality.
How do I record a video on my iPhone using an external mic?
If your iPhone is earlier than an iPhone 7 you can plug a microphone with a 3.5mm TRRS jack into the headphone socket. From the iPhone 7 and later you can still plug in a mic with a TRRS jack, but you will need the headphone to lightning socket adapter available from Apple online store.
Tosh Lubek runs an audio and video production business in the UK and has been using the Canon EOS R since it was released in the Autumn of 2018. He has used the camera to shoot TV commercials for Sky TV, promotional business videos, videos of events and functions, and YouTube creator content. He has also won international awards for his advertising and promotional work. You can meet by visiting his “video booth” at HashTag business events across the country.
Recent Posts
Most people use sandbags the wrong way. Here’s how to hang them properly on a light stand for maximum stability and safety — plus what to fill them with.
You're Using the Canon RF 50mm f/1.8 WRONG! Here’s How to Fix It
If you’ve recently picked up the Canon RF 50mm f/1.8 STM—affectionately known as the Nifty Fifty—you might be confused by that strange switch on the side of the lens. It doesn’t say AF/MF...
