
Author: Tosh Lubek Published: 25th May 2023
DIY Video Studio is supported by its readers who use the affiliate links or ads on this site. As an Amazon Associate, I earn from qualifying purchases. Thank your support if you use any of the links.
Digital single-lens reflex (SLR) cameras began to outsell film cameras by the mid-noughties. But because the film SLR camera had been around for about 70 years, a lot of cameras and lenses had been made in that time.
Even though their moment in the sun seemed to have come and gone, a lot of that photography gear survived in lofts and the back of cupboards. That’s not surprising since, like today, good cameras and lenses were expensive, so photographers probably didn’t feel like throwing them in the trash.
My late father-in-law, a winner of some amateur photography competitions, never threw anything away. He insisted, “You never know when it might be useful again”. That’s why I came to have access to his old Olympus OM-10 film camera, a few vintage lenses, and the original invoice.
In May 1983 he paid £105 for the camera with an OM Zuiko 50mm f1.8 kit lens. A couple of months later he spent almost £115 on a Vivitar 70-210mm f3.5 lens. Clearly, lenses costing as much or more than the camera body is nothing new.
My mirrorless photography/videography experience is based on using the Canon mirrorless R system, so this article is based on using vintage lenses with these camera bodies. But the basic principles also apply to using vintage lenses with other mirrorless camera bodies. So, dust off those classic lenses and join me on a journey of combing some vintage magic with modern Canon R series mirrorless cameras.
Can you use old camera lenses on new digital cameras?
Provided you have the correct adapter, you can adapt most vintage lenses to a Canon R system mirrorless camera.
What is important is to use an adapter that allows you to match the overall Flange Focal Distance (FFD) or back focus distance that the vintage lens would originally expect.
But what’s the Flange Focal Distance?
It’s the distance between the lens flange on the front of the camera body and the camera’s image sensor, or originally, the film surface. In most film cameras and DSLRs the flange focal distance is much greater than on modern mirrorless cameras. For example, the Canon FD mount used an FFD of 42mm whereas the new Canon RF mount uses an FFD of 20mm.
If we want to use a vintage Canon FD mount lens on a mirrorless EOS R camera and focus correctly from the minimum focus distance to infinity, the rear of the lens must be 42mm from the sensor. But this would require the lens to be 22mm (42mm – 20mm) in front of the camera body.
Obviously, this would leave a gap between the lens and the camera body. The lens adapter fills that gap, keeping the lens at the correct distance so it can focus all the way to infinity. The adapter also matches the different mount connects on the lens and camera.
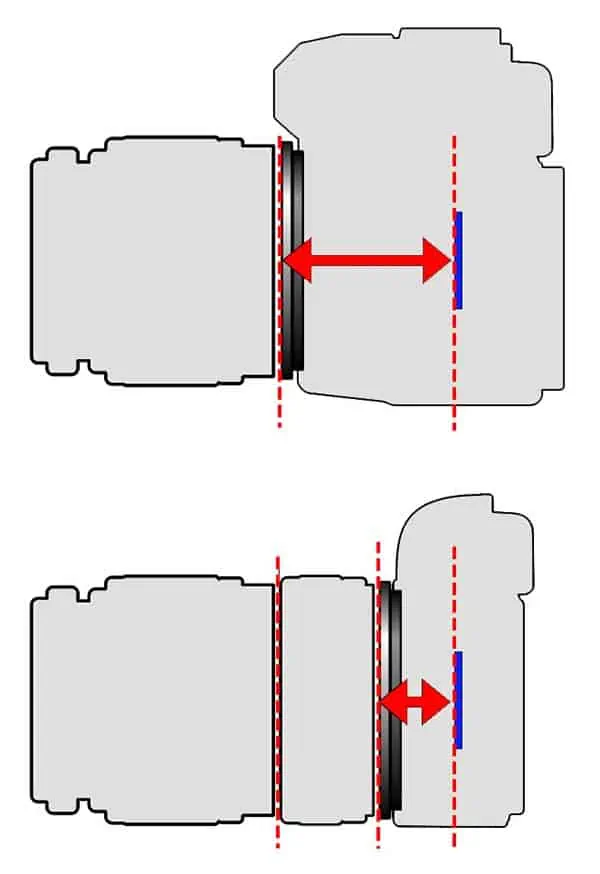
The following diagram illustrates what I mean. The upper image represents a typical vintage SLR camera and lens, and the red line with arrowheads is the flange focal distance of the camera system. The lower image represents the vintage lens adapted onto a mirrorless camera body, which has a much short FFD. For the lens to work properly the difference in the two flange focal distances is filled with the lens adapter.
If we want the vintage lens to focus properly from the minimum focus distance to infinity, the lens must be at the same distance from the sensor as it would have been on the vintage camera body. The lens adapter fills that extra space.
Normally, it should be straightforward to adapt a lens with a longer flange focal distance onto a camera body with a shorter flange focal distance. That’s because the adapter only needs to be an empty metal tube to fill the gap and connect the lens and camera body. But if the vintage lens were to have a shorter FFD, the adapter would need to contain a lens element for the image to be focused on the camera’s sensor.
The following table shows the flange focal distance for Canon lenses and several vintage SLR camera lenses, along with their production dates.
| Mount | Flange focal distance | Years of Production |
| Canon RF mount | 20.00 mm | 2018– |
| Konica AR-mount | 40.50 mm | 1965–1988 |
| Canon FL-mount | 42.00 mm | 1964–1971 |
| Canon FD-mount | 42.00 mm | 1971–1990 |
| Minolta SR-mount | 43.50 mm | 1958–2001 |
| Fujica X-mount | 43.50 mm | 1980–1985 |
| Canon EF-mount | 44.00 mm | 1987– |
| Canon EF-S-mount | 44.00 mm | 2003– |
| Praktica B-mount | 44.40 mm | 1978–1990 |
| Sigma SA-mount | 44.00 mm | 1992– |
| Minolta AF/Sony A-mount | 44.50 mm | 1985– |
| M42×1 | 45.46 mm | 1949– |
| Pentax K-mount | 45.46 mm | 1975– |
| Contax/Yashica C/Y-mount | 45.50 mm | 1974–2005 |
| Olympus OM-mount | 46.00 mm | 1972–2002 |
| Nikon F-mount | 46.50 mm | 1959– |
| Leica R-mount | 47.00 mm | 1964–2009 |
| Tamron Adaptall/Adaptall-2 | 50.7 mm | 1973-2006 |
When you have finished reading this article you might like to watch the YouTube video
Types of lens adapters for vintage lenses
To adapt a vintage lens onto a mirrorless Canon R system camera, there are three types of adapters to consider.
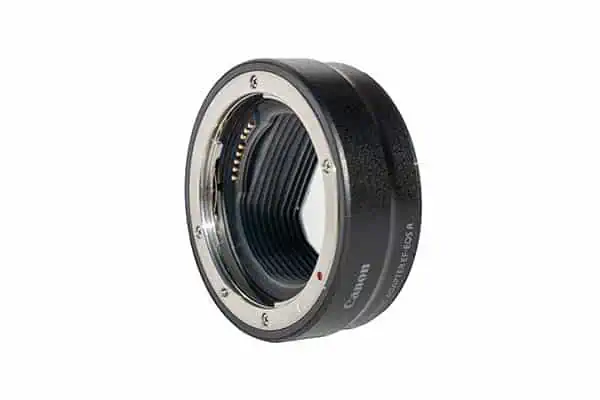
The first type is the Canon EF-RF adapter, the basic version of which costs about $99 and allows lenses with EF or EF-S mounts to be adapted onto an EOS R system camera body. The adapter includes electronic contacts allowing autofocus and aperture control.
Although EF and EF-S lenses are not obsolete or vintage yet, you might need this adapter if you are going to use the second type of vintage lens adapter.
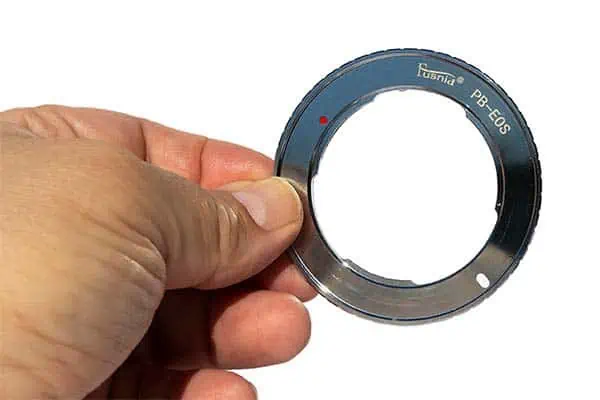
The second type of adapter is a thing metal ring that has the EOS RF mount connection on one side and the vintage mount connection on the front. You would mount the Canon EF-RF onto your camera body, put the ring adapter onto the front of the EF-RF adapter, and finally mount the vintage lens.
Because the adapter ring adds a couple of millimeters to the flange focal length distance (back focus distance) you may not be able to focus to infinity. However, foreground and midground subjects will appear to be in focus.
I would only buy this type of adapter if you cannot find a lens adapter to convert directly from your vintage lens mount type to the RF mount type, which is the third type I’m considering here.
The third type of adapter, and the one I prefer, directly connects the vintage lens to the EOS R system camera body. It is like the first type of adapter I’ve mentioned, except that it goes from vintage mount to RF mount. They are like extension tubes, in as far as they are empty metal tubes that connect the lens to the camera.
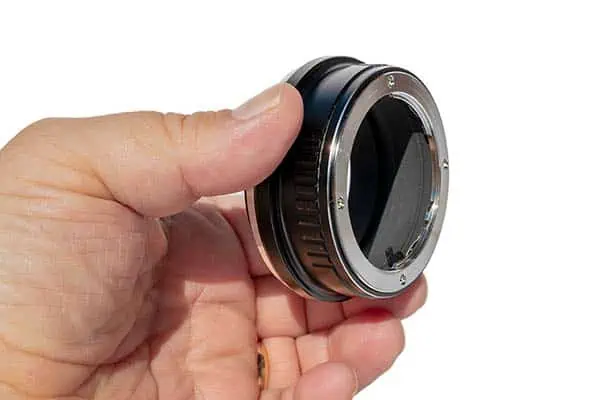
They are “dumb” connectors since they do not include electrical contacts for autofocus and aperture control. This is not a problem since vintage lenses, being fully manual, lack electronic autofocus and aperture control.
The length chosen for the adapter is chosen so that the rear of the vintage lens is the correct distance to the camera’s sensor to enable you to focus to infinity.
How to use vintage lenses with a DSLR or mirrorless camera
If you thought there’s more to adapting a vintage lens onto a mirrorless camera than just using a lens adapter, congratulations, you’re right. Fortunately, what you need to do isn’t that difficult, but it does involve making a small change to your camera’s menu settings.
Essential menu setting change
This applies to any mirrorless camera, not just Canon R system cameras. So, if you’ve got a Sony, Nikon, or whatever type of mirrorless camera you’ll also need to do this. Your camera’s menu might look different, but there will be something like the change you need to make on a Canon camera.
On a Canon R system camera press the menu button and then go to the orange menu. On the EOS R6 it’s the fourth tab but on other EOS R system cameras it might be a different orange menu tab. Then look for the setting called “Release shutter w/o lens”, go into that and enable it by changing from OFF to ON.
The default on these cameras is to prevent the shutter from activating when it detects there’s no lens. Your camera knows when a lens isn’t fitted because it won’t be able to communicate with the lens through the electrical contacts on the lens mount.
That’s fair enough when using modern lenses that are electronic, but vintage lenses, being fully manual, don’t have any contacts. So, when the camera doesn’t sense the lens, it assumes it isn’t there and won’t let the shutter fire. It’s trying to protect the camera’s sensor from dust and dirt that could otherwise get in.
But when you mount a vintage or manual lens, you’ll need to change that menu setting so the camera knows it’s OK to release the shutter even if it thinks there’s no lens.
Keeping the camera steady
Unlike many modern lenses, vintage lenses do not include image stabilization. Fortunately, some mirrorless cameras have in-body stabilization (IBIS) plus movie digital stabilization.
If you have an EOS R6, go into the red Shoot 7 tab of the menu and look for “IS (Image Stabilizer) mode”. On other EOS R cameras, it might be on a different red Shoot tab, but you will find it in the red Shoot part of the camera menu.
Once into the IS (Image Stabilizer) mode settings make sure IS mode is set to On. I also like to have Still photo IS set to Always. Then under Focal length, enter the focal length of the lens you are using. Putting in the correct focal length will give you the best results.
If you’re going to shoot video footage, you might also like to enable Digital IS and select the amount of stabilization you require. Remember, the Enhance level will cause the camera to crop in more than on the standard level. If you don’t want any cropping, leave Digital IS set to OFF.
Focusing to infinity with a vintage lens
If you’re using a thin ring adapter you might not be able to focus to infinity because the flange focal distance doesn’t exactly match. For example, I have a 50mm f1.8 Carl Zeiss Praktica B mount (PB) lens but could only find a PB – EOS EF adapter ring but no PB – EOS R adapter.
The metal adapter ring is about 2mm thick, and the Praktica B mount flange focal length is 44.5mm compared to the 44mm of the Canon EF mount. So, with this adapter, the lens position will be off by 2.5mm. When combining the PB – EOS EF ring adapter with Canon’s EF – EOS R adapter the lens will also be off by 2.5mm on an EOS R camera.
Because of this, you’ll be able to focus on foreground and midground subjects, but you won’t be able to focus to infinity. This will mean backgrounds will appear blurry, especially when shooting with large apertures (low f-numbers). But there is a hack to make your backgrounds look acceptably sharp.
If you’re a landscape photographer you’ll be used to setting your aperture to f8, f11, f16, and possibly even higher to make your image appear sharp from front to back. The smaller aperture (higher f-number) increases the Depth of Field, so more of the scene appears to be in focus.
So, if you want to make a distance subject appear to be in focus, choose f11 or f16. The downside is that you’ll need to increase the ISO or your shutter speed to get the correct exposure.
Here’s an example image taken with a Carl Zeiss 50mm f1.8 lens on my Canon EOS R6 camera body. I’ve cropped into the center of the image to make sure you can see the detail. The left side was shot at f16 while the right side was shot at f1.8. In both cases, the focus ring was turned to infinity to try and focus on the white flats in the distance (c. 180m). The gray motor car is about 30m from the camera.

You can see that even if the flange focus distance is slightly off, it’s still possible to get acceptable results.
Manual Exposure and Focusing on a vintage lens
If you decide to try using vintage lenses you need to understand that most of them do not have the option of electronic communication with your modern mirrorless camera body. So, you can forget autofocusing, eye tracking, and auto aperture control.
Nonetheless, this isn’t the end of the world. After all, generations of photographers shot excellent images with these lenses and your modern camera body will still give you several advantages.
FOCUSING WITH A VINTAGE LENS: Focusing shouldn’t be much of a problem, although you won’t be able to autofocus with the press of a button.
You can activate focus peaking on your Canon EOS R camera so in focus areas outlined in red (or the color you choose). You can also magnify the image in the EVF or on the rear screen to visually check the focus. Yes, it’s not as quick as autofocus but you can nail focus.
EXPOSURE WITH A VINTAGE LENS: As far as exposure is concerned, there’s no need to find this daunting. Your camera has tools to help you deal with it. First, you can display a histogram and use it to make sure you’re not clipping the whites or blacks. But if you want more help from your camera, set the shutter speed or ISO (or both) to AUTO, then dial in your preferred aperture on the lens. This way you only need to worry about controlling the focus.
You can see that using a manual vintage lens does not mean you have to go 100% manual in every respect. Your camera will still provide plenty of tools to overcome the limitations of using 20- to 50-year-old lens technology.
Why use a vintage lens on a mirrorless camera
There are a few reasons why you might want to use vintage lenses with a modern mirrorless camera, but I would say the biggest reason to use them is that they are fun.
The most quoted reason I have seen is that they give you a vintage look. The vintage look is about character, and they have plenty of that. It comes from the type of glass and aperture blades that were used in the lenses. This could lead to a softer image, remarkable bokeh, lens flare, ghosting, and reduced contrast. Qualities you won’t get from modern lenses. They have been designed to be clinically sharp and as optically perfect as possible.
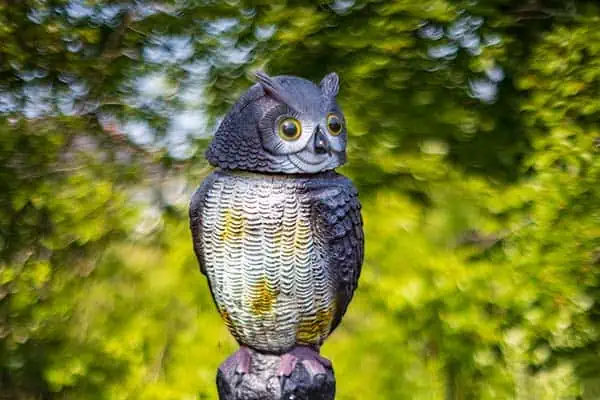
For example, the Super-Takumar 50mm f1.4 lens can produce a lovely soft look for portraits and gorgeous bokeh. Talking of bokeh, the Soviet-made Helios Helios 40-2 lenses produce distinctive and wildly swirling bokeh. Even the bokeh on my Olympus Zuiko 50mm f1.4 can be quite impressive, as you can see in this image. It was taken in my backyard with my owl bird scarer serving as my subject.
So, vintage lenses can give you a look that you just won’t get with current lenses. But there is another reason you might want to give vintage lenses a try. You’ll have to put your hands onto the lens to change focus and aperture. You can’t set these to automatic and you won’t have the benefits of eye-tracking.
However, mirrorless cameras have the tools to let you nail focus with a manual lens as well as get the exposure right. Focus peaking and the ability to magnify the image will enable you to focus. While the histogram and the camera’s digital display or EVF will let you judge the exposure.
The manual nature of vintage lenses will slow you down. Unless you’re on a professional shoot, this is no bad thing. You’ll be more thoughtful about your photography and build a better appreciation of what goes into creating better images, especially because you’ll have to interact with the lens.
The final reason for getting a vintage lens is the cost. Because many vintage lenses tend to be cheap, you can load up with a selection of lenses for very little money. An example of this is the OM Zuiko 50mm f1.4 I bought off eBay last year for about £40 ($50). Prices have gone up a little as more people have begun to appreciate how good these lenses can be, but even now I could get the same lens for £50-£60.
Videographers who hanker after a cinematic look will also appreciate the OM Zuiko glass. This is one area where manual focus isn’t seen as an issue. And the fact that you can de-click the aperture ring on the 50mm lenses is a bonus, enabling smooth aperture changes.
Final Thoughts
While old camera lenses can add a distinctive look to your digital photography, you should realize modern lens technology offers advantages that vintage lenses cannot match. Furthermore, when working on your images in programs like Adobe Lightroom, don’t expect to find lens profiles to automatically fix distortion and vignetting. If you proceed thinking vintage lenses are a cheap alternative to Canon’s very expensive RF L lenses, you’ll be disappointed. But if you want to have an exciting photography adventure, I think you’ll end up being thrilled.
You might also like…
Here’s a big ask from me: If you liked this article, please share it.
It will mean a great deal to me if you share this post because a few seconds of your time will seriously help my blog grow. The share buttons are below the “About Author” section.
Thanks. 🙂

About the author: Tosh Lubek is a multi-award-winning broadcaster, writer, and video producer, with 40 years of experience in professional broadcasting and has been using Canon video and stills cameras since 2010. He has worked with radio and TV broadcasters, advertising agencies, and direct clients on a variety of projects including radio and television advertising, online video production, corporate videos, award ceremony motion graphics, and theme park sound design. Tosh has won numerous awards, including a Radio Academy Awards Gold Sony, a Gold, Silver, and Bronze World Medals in the New York Festivals International Advertising Awards. Since about 2007 he has been creating YouTube videos. Tosh has been a sponsor of the “video booth” at HashTag Business Events across the UK.
Recent Posts
Most people use sandbags the wrong way. Here’s how to hang them properly on a light stand for maximum stability and safety — plus what to fill them with.
You're Using the Canon RF 50mm f/1.8 WRONG! Here’s How to Fix It
If you’ve recently picked up the Canon RF 50mm f/1.8 STM—affectionately known as the Nifty Fifty—you might be confused by that strange switch on the side of the lens. It doesn’t say AF/MF...