
Author: Tosh Lubek Published: 3rd September 2023
DIY Video Studio is supported by its readers who use the affiliate links or ads on this site. As an Amazon Associate, I earn from qualifying purchases. Thank your support if you use any of the links.
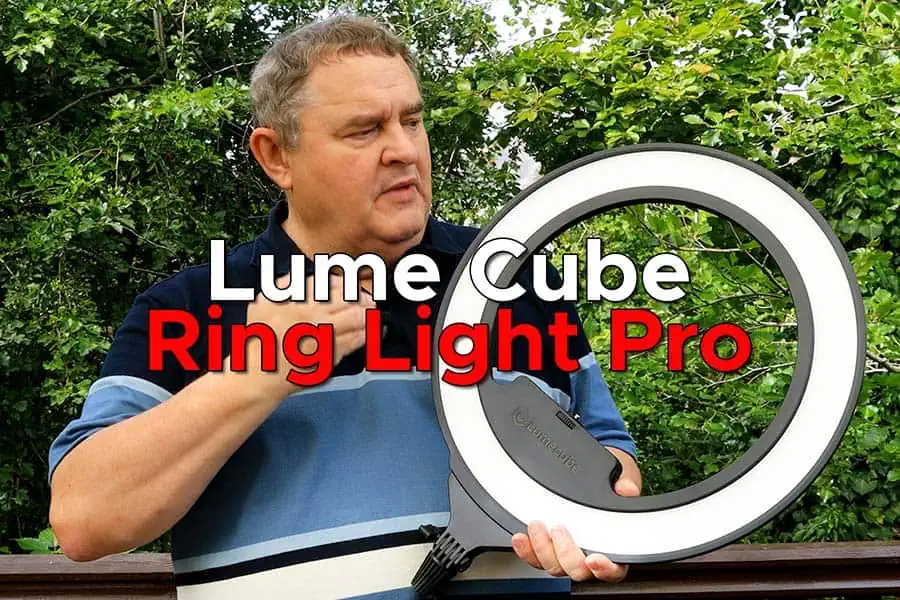
If you create videos for YouTube and social media or need a distinctive and flattering light for portrait photography, you should consider the Ring Light Pro from Lume Cube. It helps to eliminate harsh bright light spots and smooths shadows for a flawless look.
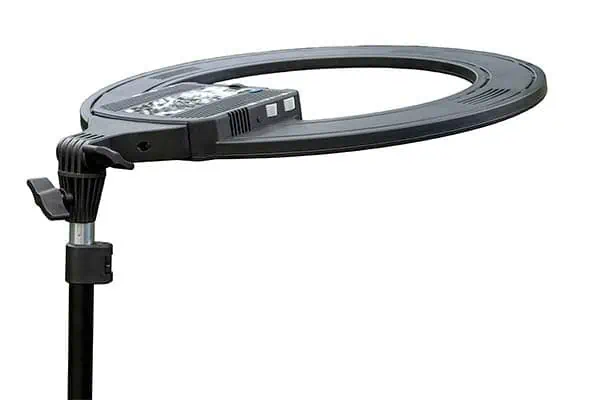
Lume Cube Ring Light Pro is a 17-inch rechargeable LED video & photography ring light for content creators. Internal batteries allow cordless operation, but they can be used with the AC charger. Brightness and color temperature are adjusted from the control panel or wireless remote. USB ports allow phone charging.
IN A HURRY? Here’s a quick summary of the Lume Cube LED Ring Light Pro![]() .
.
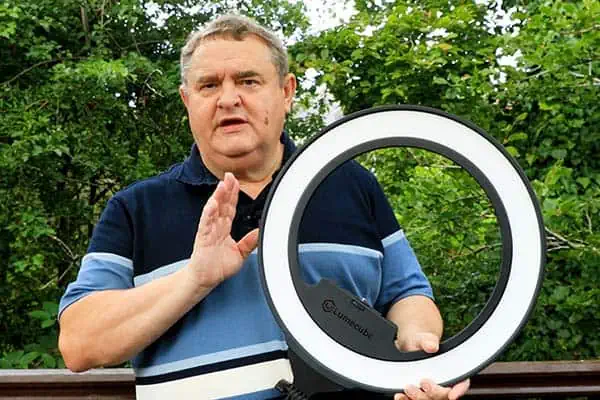
At 17 inches across, is a larger diameter ring light. This means it can produce soft and flattering light, whether your subject is close by or several feet away. The high-quality LEDs are dimmable, and the ring light color temperature can be varied from 3200K to 5600K. The onboard controls and wireless remote allow easy control of the ring light. The rechargeable internal battery makes this a portable ring light with cordless performance in any location. You can use the light at 100% brightness (1700 lux at .5 meters) for over an hour. USB-A ports also allow you to charge your smartphone or camera while recording. This is not the cheapest ring light on the market, but the design quality and included features mean this is one of the best ring lights available to content creators for video or photography. Furthermore, it comes from Lume Cube, a respected American premium brand.
I’ve recorded a video review of the Lume Cube Ring Light Pro, including test shots. You can watch it here or continue reading for a detailed review.
To see before and after ring light example shots created with the Lume Cube Ring Light Pro click here to jump ahead![]() .
.
What’s in the box
- Ring Light Pro
- AC power adapter
- Telescopic light stand
- Smartphone holder (including Allen key)
- Wireless Remote Control
- 2x AAA batteries
- Soft travel case with zipper
- Information card
Get the Ring Light Pro direct from Lume Cube by clicking here![]() .
.
Lume Cube Ring Light Pro Description
The ring light is made from black plastic, but it is robust enough for routine use, and because a padded travel case is included, you will be able to take it with you on your travels as a portable ring light without it coming to harm.
The ring light consists of three main parts: The LED light ring itself, a control center, and the tilt-head and light stand mount. I describe each of these parts in detail.
The LED light ring
The ring has an overall diameter of 17.5 inches (44.5cm), although the maximum diameter of the illuminated ring is 17 inches (43cm). Because LEDs are used in this ring light rather than a fluorescent tube, the ring is only about 3/8th inch (1cm) thick.
The illuminated part of the ring is 4cm wide and includes what Lume Cube calls Edge Lit Technology. The 256 high-quality inward-facing LEDs are covered by a white plastic diffuser and produce 1700 lux at .5 meters.
As well as the LEDs being dimmable (1-100%), the color temperature is adjustable from a warm 3200K to 5600K daylight. Color rendering of the subject is excellent since the LEDs have a CRI rating of 96+.
Control center
The control center box is approximately 5.5 inches (14cm) wide, just over 5 inches (12.7cm) high, and 1.25 inches (32mm) thick. The extra thickness, compared to the ring, makes the light more rigid and provides the space for the controls, electronics, the rechargeable battery, and connection points. The bottom of the control center also has the tilt head and light stand connector.

Camera and accessory mounting points
On the top edge of the control center there is a ¼”-20 screw mounting point for the phone holder or a DSLR/Mirrorless Camera. The screw is surrounded by a circular rubber pad to prevent the phone holder or camera from slipping.
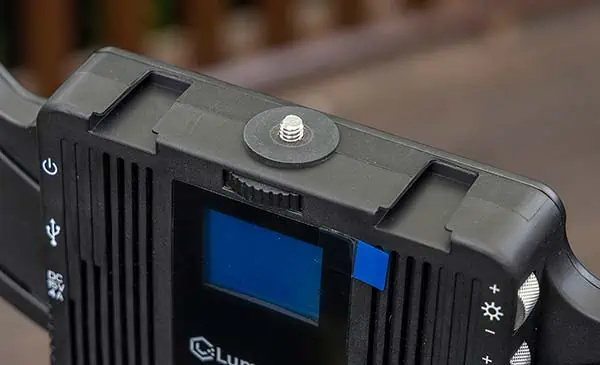
Below the top edge of the control center (and above the LCD screen), there is a thumb wheel that protrudes from the front and rear sides of the control center. This allows you to tighten and adjust the direction of the camera or phone holder.
On either side of the ¼”-20 mounting screw, there is a cold shoe mount. These can be used to add other accessories, such as a video microphone, or even mount two smartphones side-by-side. Note that you will need to get a different phone clip or phone holder that has a cold shoe plate on the bottom, such as the Ulanzi ST-06S that is available from Amazon![]() .
.
LCD Screen
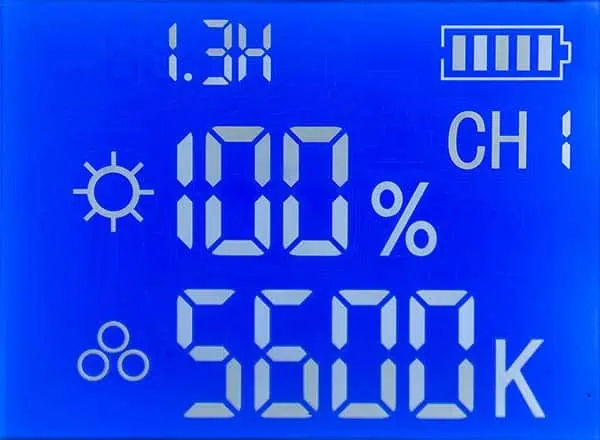
The LCD screen is on the rear of the control center, just below the camera mounting screw and thumb wheel. It displays important information, including a battery life indicator, a time estimate of the remaining battery life, the current channel number that is being used for the wireless remote, the brightness, and color temperature. The LCD screen also provides visual feedback while charging the internal battery with the AC adapter.
Ring light controls
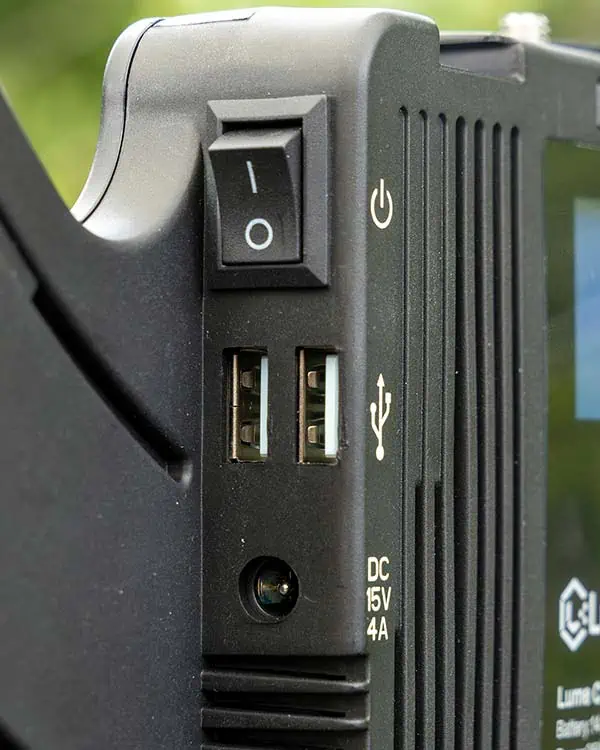
The ring light controls are on the left and right sides of the control center.
On the left side, from top to bottom, you’ll find the
- ON/OFF power switch
- 2x USB-A ports
- DC power input socket
On the right side, from top to bottom, you’ll find the
- Brightness control dial
- Color Temperature control dial
- Wireless remote channel button
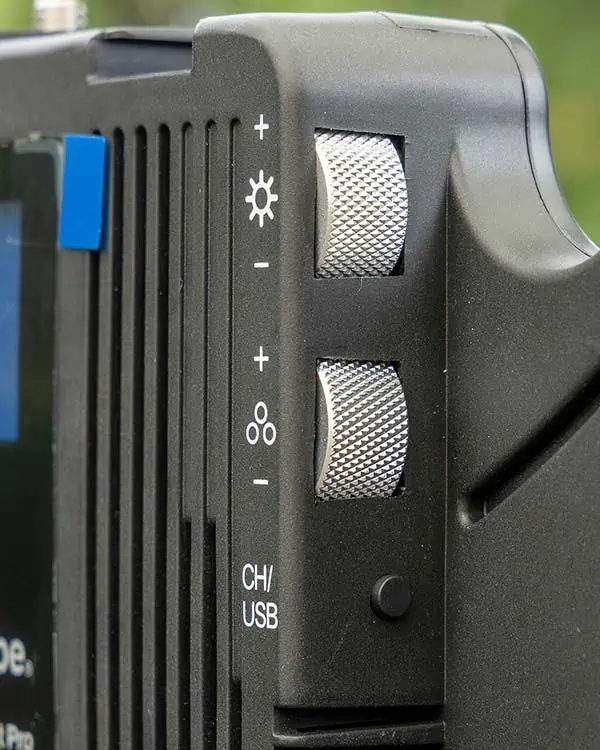
The brightness and color temperature controls are not the press button type on cheaper ring lights. Instead, they are substantial metal roller dials with a knurled finish. Instead of endless pressing of a button to change the brightness or color, you can easily and quickly roll the dial to the desired value.
The brightness can be varied from 1-100% in 5% increments, which is enough to make any change appear seamless. The color temperature can be varied from 3200K to 5600K in 100K increments. Again, any adjustment appears to be smooth and not staggered in value.
USB-A ports
The USB ports on the Ring Light Pro are worth mentioning because they can extend the shooting time on your recording device. They allow you to supply power to a couple of devices, such as phones, cameras, and audio recorders. This allows you to keep shooting without worrying about the battery life falling on your phone or camera. My only gripe about these two USB ports is that they are both USB-A. This seems odd considering most modern smartphones and cameras now use USB-C. Even Apple are moving away from the Lightning connector to USB-C on their newer iPad and iPhone models (albeit because of EU legislation).
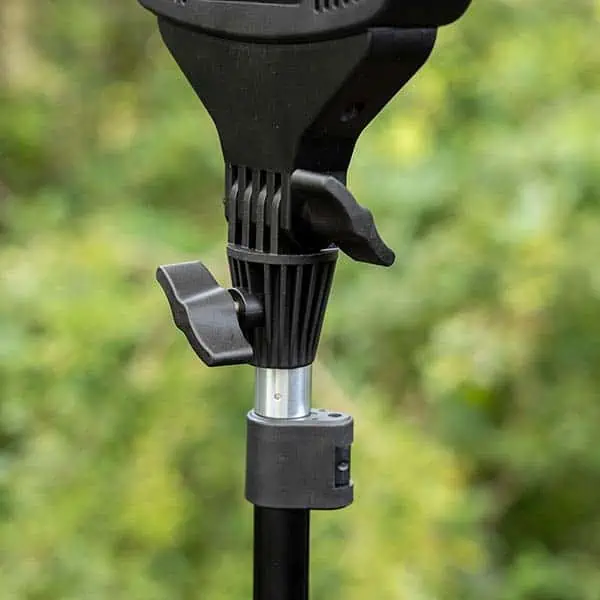
Tilt head and mounting point
The bottom of the control center is where the tilt head and mounting point are located. The tilt head enables the ring light to be tilted through 180 degrees. I found it to be quite stiff the further the ring was tilted from the vertical position. Although it might loosen with use, the stiffness meant the ring light couldn’t accidentally flop either forward or backward. This could well be an important consideration if you intend to use the Ring Light Pro for fingernail, eyebrow, or other beauty treatments, since the ring won’t collapse onto your subject. There is also a substantial thumb knob at the pivot point to help you tighten off the ring light.
Below the tilt head, there’s a fluted light stand connector that is intended to slip onto the light stand’s spigot. A thumb wheel is included to secure the ring light in place.
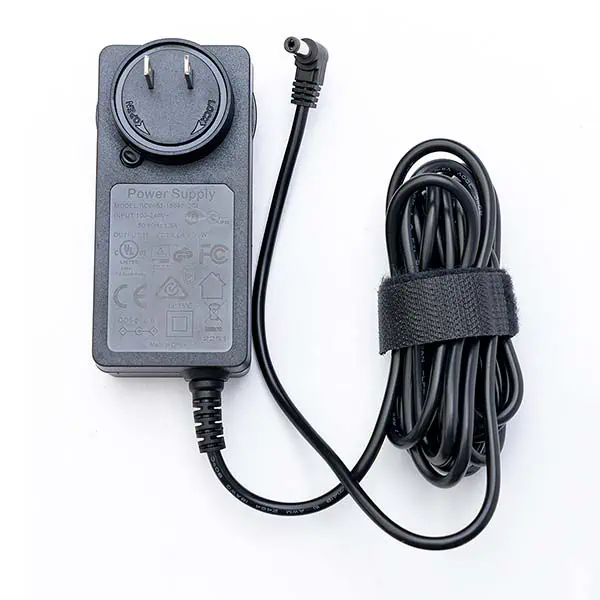
AC Power supply for the rechargeable Ring Light Pro
The supplied power supply can be used in any country, with a suitable travel adapter, so you can use the Ring Light Pro at home, in the office, or on the go. It takes an input of 100-240V, 50/60Hz, 1.5A. The output is 15.0V, 4.0A, 60.0W. Although the ring light can be used with the AC power supply for extended video or photo shoots, it is also used to charge the internal lithium-ion battery.
Lume Cube’s folding light stand
Lume Cube says that when they looked for a light stand to go with the Ring Light Pro, they couldn’t find a stand that they liked. Consequently, they designed their own. It’s a little different from the standard light stand you get with consumer-level video and photography lights. It seems a little more solid and the legs fold upwards, so they lie down beside the vertical column.
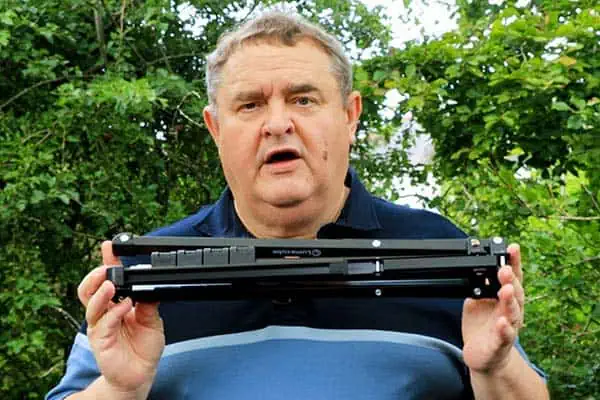
This means that the light stand takes up less space in the carry case, folding down to a compact size of 18 inches (47cm). Even so, at full height, the stand is about 6ft (1.8m) high, and then you have the height of the ring light on top of that.
Smartphone holder
The Lume Cube smartphone holder is one of the best I’ve used. The jaws open up to about 4 inches (10cm), so you can use just about any smartphone. If you intend to use an iPad or Android tablet, you will need to get a different holder. The base has a treaded ¼”-20 mounting hole, allowing it to screw onto the mounting screw on the ring light.
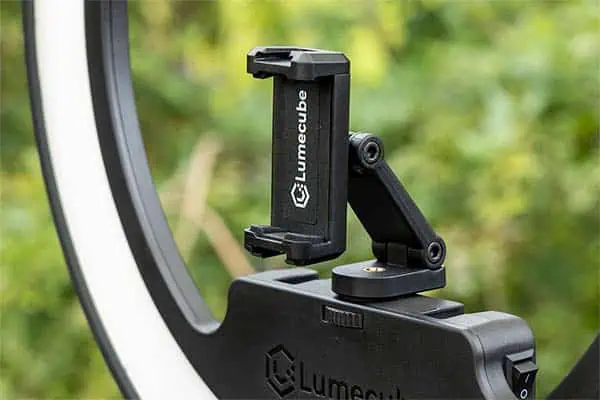
Unlike many standard smartphone holders designed for shooting video, this one pivots in two places, allowing you to get your device in just the right position. Once you’ve settled on how it needs to sit, you can use the supplied Allen key to tighten the two screws and lock the pivot points in place.
Don’t worry if you decide to switch between portrait and landscape mode for your videos, the phone holder can rotate to position your phone in the desired orientation. Lume Cube’s phone holder, or clip, has another trick up its sleeve. Each end of the clip includes a cold shoe mount, allowing you to attach further accessories.
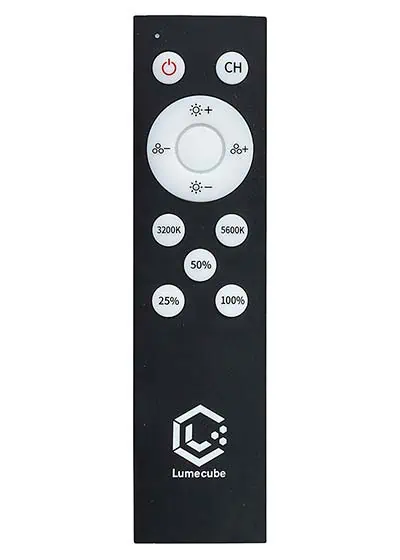
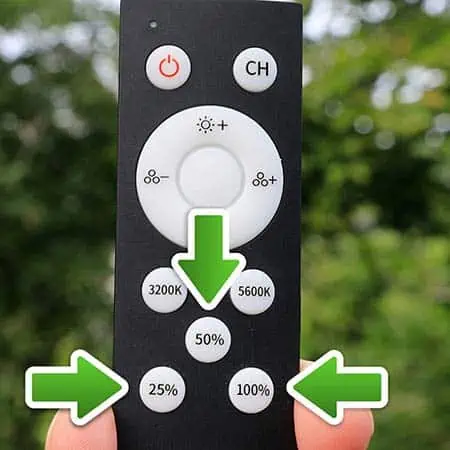
Wireless Remote
The wireless remote is a great time saver if you’re a solo video shooter. By using the remote, you can control the brightness and color temperature of the ring light from your position in front of the light and camera. For me, removing the battery compartment cover was a little tough, but it eventually came off and I was able to insert the two supplied AAA batteries. Replacing the battery compartment cover was much easier, and I assume in the future, the cover would be easier to remove.
With the batteries inserted, you should be ready to go because the wireless remote and ring light should be already paired. To use the remote, make sure the power button on the ring light is in the ON position.
At the top of the remote, there are On/Off power and CH channel selector buttons.
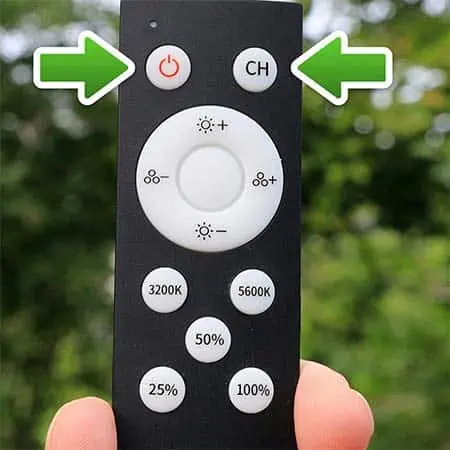
The top and bottom buttons on the cross pad control the brightness.
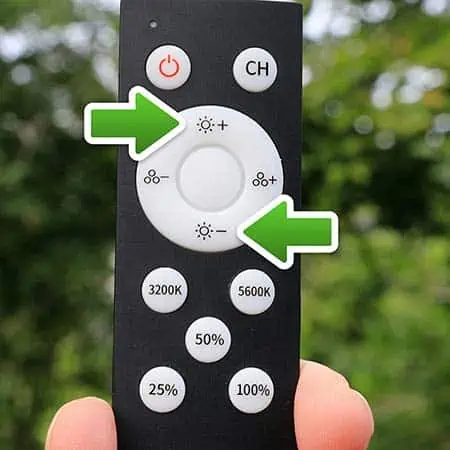
The left and right buttons on the cross pad adjust the color temperature.
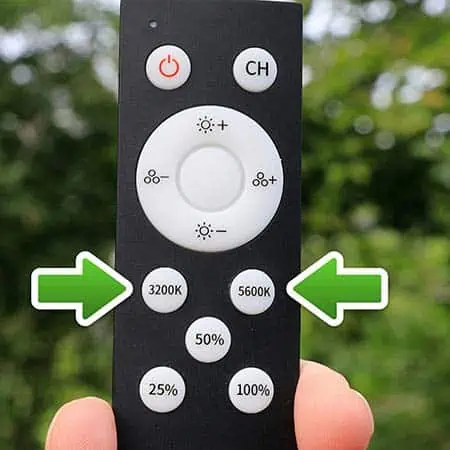
Below the cross pad, there are quick preset buttons. The first two set the color temperature to 3200K (left button) or 5600K (right button).
Beneath the color temperature buttons, there are three brightness presets. They are 25%, 50%, and 100%. In theory, each step represents one stop of exposure, so going from 25% to 100% brightness is an increase of 2 stops. A quick test in my video editing software seemed to confirm this was approximately true.
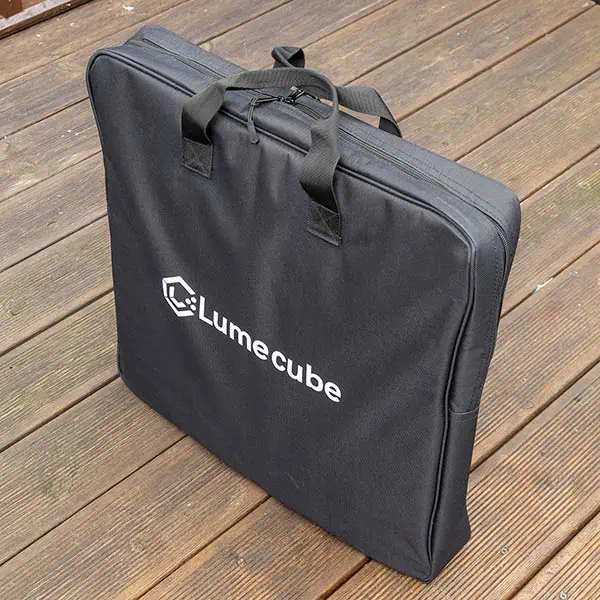
Lume Cube quality soft travel case
The ring light and accessories come prepacked in the soft carry case. It allows you to safely transport your ring light. It’s made from a tough black material and has padded sides to protect the contents. The case measures about 19 inches (49cm) square, with twin handles and a zipper.
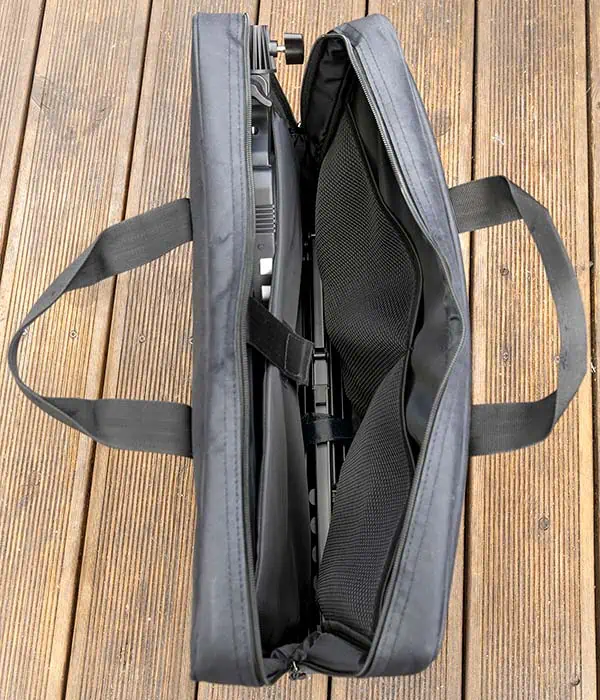
The interior is split into compartments for the various parts. One side is for the ring light and a Velcro securing strap is included to keep the light in place. The opposite side is split into two pockets. These are for the power supply, remote, etc. The middle, between the two sides, is where the light stand goes. Because it is slightly shorter than the width of the case, it can be laid flat across the bottom. It’s a very nice carry case, and much more substantial than the bags I’ve received in the past with much cheaper lights.
Information card
A card is included. It is white on one side and blue on the other and provides information about all the buttons and screen display.
On the white side, you’ve got the Ring Light Pro details. On the blue side, you’ve got the details of the wireless remote.
It’s not exactly a quick start guide, but it does explain what all the buttons and does are.
Lume Cube Ring Light Pro Battery Life
Battery life is important on any device that is going to be used by content creators since they will frequently batch record rather than make content individually.
Despite the Ring Light Pro being quite bright at 100% power, it still has an impressive battery life. Lume Cube’s marketing material claims that the internal Li-Ion battery will allow the ring light to operate for about 70 minutes at a brightness setting of 100%.
My own experience showed that Lume Cube was a little conservative in its estimate since I got slightly better battery life than they suggested. But I must admit I was using a brand-new ring light pro and my battery performance was likely to be better than a battery that had gone through very many recharge cycles due to ‘battery aging![]() ‘.
‘.
So, what battery life did I get? On a full charge, I was able to run the Ring Light Pro for 1h 22m. That was from turning the light on to the light cutting out.
Of interest here, I did not notice any drop in the brightness level of the ring light as the battery charge was depleted with use. What happened was that the light just suddenly turned off rather than gradually dimming. I assume the batteries still had some charge left, but most devices do not completely discharge Li-Ion batteries since this will degrade them.
Because the ring light just turned off when it did, it meant the brightness of the light did not change to any noticeable extent, so I didn’t need to alter my exposure settings due to dimming.
As mentioned earlier. The LCD display on the Ring Light Pro not only displays a battery life icon but also shows an estimate of hours and minutes of the remaining battery life.
I found the displayed estimate of the remaining battery life to be close to the actual performance. At the start of my recording session, the display suggested I would get 1.3 hours of run time, which was only a couple of minutes out compared to reality.
The light gave the following battery life estimates at various power levels.
| Brightness Setting | Estimated run time |
|---|---|
| 25% | 4.5h (4h 30m) |
| 50% | 2.6h (2h 36m) |
| 75% | 1.9h (1h 54m) |
| 100% | 1.3Hr (1h 18m) |
Lume Cube Ring Light Pro Battery Recharging Time
Just as important as the battery life is the charging time. I tested this with the ring light sitting on my desk and my stopwatch in hand. During the charging process, the screen displays an animation of the charging battery icon. Once charging is complete, the process stops, and the screen turns off.
The time to charge the battery was 1h 16m. This is only slightly less than the light’s battery life when the brightness is set to 100%. So, broadly speaking, the charge time is the same as the 100% brightness run time.
My observations were made when only using the ring light and did not include the additional use of the internal battery as a USB power bank for other devices, such as charging my camera.
Setting up and using the Ring Light Pro
One thing to note is that the Lume Cube Ring Light Pro can be powered from the supplied AC power adapter or from the internal Lithium-Ion battery. You should be able to slowly charge the internal battery while running the light at full power.
The first few steps are the same whether you want to shoot with a smartphone or DSLR/Mirrorless camera.
STEP 1: First, unfold the legs until they are perpendicular to the central column. Then pull up the central section that the legs are joined to. You want the legs to be reasonably far apart for good stability. Finally, tighten the thumb screw.
STEP 2: Release the clasps on each section of the central column and extend it to the required height. Then refasten the claps.
STEP 3: Loosen the thumb screw on the ring light’s fluted light stand connector.
STEP 4: Lower the connector onto the silver spigot of the light stand and tighten the thumb screw on the connector to secure the ring light on the stand.
STEP 5: The next steps depend on your choice of camera. I have split the setup into two sections, according to the type of camera. First a smartphone and then a DSLR/Mirrorless camera.
Using a Lume Cube Ring Light Pro with a smartphone
STEP 6a: Screw the phone holder onto the ¼”-20 mounting screw on the ring light. You can eventually tighten it off with the thumbwheel that is below the mounting point.
STEP 7a: Rotate the phone clip into the orientation you require and insert your smartphone.
STEP 8a: Adjust the smartphone holder and phone to correctly frame your subject. You also want the phone’s camera lens to be as close to the center of the ring light as possible.
STEP 9a: If necessary, fix the phone holder in place by tightening up the screws with the supplied Allen key. Be careful not to change the setup as you tighten the screws.
STEP 10a: If you wish to use the internal battery power, skip to the next step. But if you want to use AC power, plug the AC power supply into the wall outlet and then plug the DC power plug into the socket on the left of the ring light control center.
STEP 11a: Turn on the ring light by moving the power switch to ON.
STEP12a: Use the controls on the ring light or wireless remote to set the brightness and color temperature.
STEP13a: Take a test shot and check the result. If necessary, adjust the brightness of the ring light, or change the smartphone camera settings.
STEP14a: Finally, go ahead and shoot your video.
Using a Lume Cube Ring Light Pro with a DSLR/Mirrorless camera – Method 1
STEP 6b: Attach a ball head with a quick-release plate holder (not included with the Ring Light Pro) to the ¼”-20 mounting point on the ring light.
STEP 7b: Us the thumbwheel to tighten the screw.
STEP 8b: Screw the quick-release plate onto the tripod mounting hole of your camera.
STEP 9b: Attach the camera to the ball head and tighten down the quick-release plate.
STEP 10b: If you wish to use the internal battery power, skip to the next step. But if you want to use AC power, plug the AC power supply into the wall outlet and then plug the DC power plug into the socket on the left of the ring light control center.
STEP 11b: Turn on the ring light by moving the power switch to ON.
STEP12b: Use the controls on the ring light or wireless remote to set the brightness and color temperature.
STEP 13b: Take a test shot and check the result. If necessary, adjust the brightness of the ring light, or change the smartphone camera settings.
STEP 14b: Finally, go ahead and shoot your video.
Using a Lume Cube Ring Light Pro with a DSLR/Mirrorless camera – Method 2
STEP 6c: Attach the camera to a tripod
STEP 7c: Place the tripod and camera behind the ring light and adjust the height of the tripod so the camera’s lens is approximately at the same height as the center of the ring light
STEP 8c: Move the camera tripod forward so the camera lens is poking through the ring of the ring light
STEP 9b: If you wish to use the internal battery power, skip to the next step. But if you want to use AC power, plug the AC power supply into the wall outlet and then plug the DC power plug into the socket on the left of the ring light control center.
STEP 10b: Turn on the ring light by moving the power switch to ON.
STEP11b: Use the controls on the ring light or wireless remote to set the brightness and color temperature.
STEP 12b: Take a test shot and check the result. If necessary, adjust the brightness of the ring light, or change the smartphone camera settings.
STEP 13b: Finally, go ahead and shoot your video.
Heat produced by the LEDs
As already mentioned, this ring light has 256 high-quality LEDs, that have a CRI rating of 96+. When used at full power, these LEDs will generate some heat. This shouldn’t be a concern, and in fact, you may not even notice this. But if you run the light for a little while at a brightness of 100%, you may observe that the inner part of the ring gets a little warm.
I have found that this was nothing to worry about. The build-up of heat was neither great enough to soften the plastic of the ring light nor cause any burns to my fingers and hand. Neither was there any smell you get when an electrical component overheats.
Nevertheless, if you do have any concerns, let the ring light stand for a few minutes after switching it off before handling and stowing it away in the travel case.
One improvement I would like to see on the Ring Light Pro
Overall, I like the Lume Cube Right Light Pro, but as a regular YouTuber, there is something I’d like this excellent product to have.
If you are a solo video shooter you cannot see the LCD screen since it’s on the rear of the ring light. To check any details on the display, including the remaining battery life, you need to get up and look at the back of the ring light.
This is not something that is unique to the Ring Light Pro, it’s common to all the ring lights I’ve seen and used. But if the ring light did have a second display, either on the front or, better still, on the wireless remote, this would be a useful addition.
Having said that, the lack of a second LCD screen is not a deal breaker.
Pros and Cons
| PROS | CONS |
|---|---|
| Well-designed premium product | No display on the front for solo video shooters |
| AC or internal battery power | Not for someone just starting out and on a tight budget |
| Battery life estimate on LCD screen in hours/minutes | |
| USB port for charging phone/camera or accessories | |
| Excellent phone holder that can be used for landscape or portrait shooting | |
| Wireless remote control that is already paired with the ring light | |
| Up to 9 separate wireless channels, so you could have multiple lights and control them remotely | |
| Portable and can be used anywhere | |
| Excellent travel case |
Lume Cube Ring Light Pro before and after example shots
The following four images are stills from a video that was shot in a totally dark room using a 35mm f1.8 lens and with me 4ft from the camera and ring light. The shutter speed was 1/50 sec, the aperture was f1.8, and the ISO at 100.
The first image is with the ring light and room lights turned off. Not surprisingly, the image is completely black.

In the second image, I switched on the ring light and set the brightness to 25%. Clearly, the image is underexposed.

In the third image, I set the ring light brightness to 50%, or approximately 1 stop brighter than the 25% image.

In the fourth image, I set the right light brightness to 100%, or approximately 2 stops brighter than the 25% image.

For this situation with me in a darkened room and the camera settings of shutter 1/50 sec, aperture f1.8, and ISO100, the ring light brightness of 100% worked well. I later moved closer to the camera and ring light (3ft away) so the illumination was naturally brighter. For a correct exposure, I probably would have needed to set the ring light brightness to about 75%.
Note that this set of images was taken with an f1.8 lens. But say you’re using an f4 lens, that will let in over 2 stops less light. That means if you had the ring light at 100% brightness you could expect your image to look approximately like my second image, the one at 25% brightness.
Does that mean the Lume Cube Ring Light Pro is going to be useless for slower lenses? Not at all. I had the sensitivity at ISO100, the lowest value on my camera. If I changed my aperture to f4 and set the sensitivity to about ISO400, then with the ring light brightness at 100% I would get the same result as in the fourth example image.
Shooting at ISO400 is not a problem and won’t degrade the image quality in most situations. In fact, when using my Canon EOS R6 I think nothing of shooting my videos with an ISO of between 1000 and 6400.
Here is a still from a sample video shot at night with all the room lights turned off. The ring light brightness was 100%, and I used a 14mm focal length lens with the shutter speed at 1/50 sec, the aperture set to f4, and the ISO at AUTO.

I’m sure the ISO did not go up to a ridiculous level, despite me being 7ft from the camera and ring light and the far wall being another 7ft behind me. Furthermore, I didn’t boost the brightness in my video editing software. You can see that the result is perfectly acceptable, and I didn’t need to apply any noise reduction plug-ins.
The next pair of images illustrate what happens when you set the camera’s White Balance to Daylight and use the 3200K and 5600K color temperature settings on the Ring Light Pro. In both of these images, the ring light brightness is 100%, the ISO is 100, the aperture is f1.8 and the shutter speed is 1/50 sec.


You can see that at the warm color temperature of 3200K the image is orange, provided the camera’s white balance is set to Daylight. If I had set the white balance to Tungsten Light or punched in the value of 3200K, the image taken with a color temperature of 3200K would look normal, while the image taken with the ring light set to a color temperature of 5600K would have looked bluish.
For more details on color temperature check out my article: The best color temperature for video lighting – This may surprise you![]()
Is the Lume Cube Ring Light Pro worth it?
The answer to this question is going to depend on your circumstances. The Ring Light Pro is not the cheapest ring light out there. There are several similar budget ring lights that cost less, and there are smaller ring lights that are cheaper. But if you need or want the quality and features that this light delivers, and you’re not on a tight budget, then I certainly do think the Ring Light Pro is worth the money.
The brightness of this ring light is more than enough for photography and videography projects typically done with a ring light. Most vloggers will find one ring light is enough, but you could do even more with a pair of ring lights, or a Lume Cube Ring Light Pro plus an RGB Panel Pro 2.0![]() .
.
Summary
There’s a lot to love about the Lume Cube Ring Light Pro if you are a YouTuber or Content Creator.
First, there’s the soft flattering lighting it produces that helps to smooth wrinkles and blemishes. That’s a big plus for me since I’m not exactly a spring chicken. But it’s not just human complexions that benefit from being lit using the Lume Cube Ring Light Pro. It also does a good job on flat lays, food, and product videos, where you want that flawless style of lighting.
The second thing I really appreciated was the wireless remote. Initially, I did what I did with all of my other lights. I would turn them on, sit down for a test shot, get back up to adjust the lights, sit down for another test, etc. until everything looked correct.
The reason I did that was because I was used to the poor performance of remote controls that come with many consumer-level lights. Frankly, I toss most aside because they’re useful. But I felt I better try Lume Cube’s remote for the sake of this review. Wow. It worked, and I especially liked the preset brightness and color buttons. I might not need exactly 25%, 50%, or 100%, but it got the brightness into the ballpark, and I could then finetune the illumination with the plus and minus buttons.
Having had plenty of experience of hauling loads of equipment to client premises and exhibition venues for talking head videos, I appreciated how compact the Ring Light Pro is. Everything fits into a 19×19-inch soft travel case, which has enough spare space in it for other bits and pieces.
Not only was carrying around the light easy, but I also liked that I wasn’t tethered to an AC outlet. The internal rechargeable battery gave me the freedom to shoot videos anywhere I wanted. If you have wanted my video you will have seen that I even shot test videos in my garden at nighttime when it was pitch black outside (I live in a rural location).
Finally, the controls were easy to use since they were proper dials that rotated to change the value, and not push buttons that you need to keep jabbing to change the brightness or color.
If initially, I felt there was a downside to the Lume Cube Right Light Pro it was the price. You can buy cheaper ring lights but not necessarily ones that are as good. Having used the Lume Cube Ring Light Pro for a few weeks now, my experience reminds me of the old saying, “You get what you pay for”.
To finally sum up, here are the main points about the ring light.
- Dimmable LED ring light (1-100% in 5% increments)
- Adjustable color temperature 3200K-5600K (in 100K increments)
- 256 high-quality LEDs with a CRI rating of 97+ for great color rendering
- Real control dials instead of pushbuttons
- Cordless ring light with rechargeable Li-Ion battery that can be used in any location
- 70mins of battery life at full brightness
- AC adapter to charge batteries or run the light from the AC outlet
- Mounting point for a smartphone or DSLR/Mirrorless camera
- Two cold shoe mounting points for accessories
- A multi-position smartphone holder
- Multichannel wireless remote with incremental controls and presets
- 6ft light stand that can fold down to a compact 47-inches size
- Tilt head that can rotate through 180-degrees
- Has numerous video and photography uses
- 2 USB-A charging ports
- High-quality travel case with storage compartments
You might also like…
Can you help? If you liked this article, please share it.
It will mean a great deal to me if you share this post because a few seconds of your time will seriously help my blog grow. The share buttons are below the “About Author” section.
Thanks. 🙂

About the author: Tosh Lubek is a multi-award-winning broadcaster, writer, and video producer, with 40 years of experience in professional broadcasting and has been using Canon video and stills cameras since 2010. He has worked with radio and TV broadcasters, advertising agencies, and direct clients on a variety of projects including radio and television advertising, online video production, corporate videos, award ceremony motion graphics, and theme park sound design. Tosh has won numerous awards, including a Radio Academy Awards Gold Sony, a Gold, Silver, and Bronze World Medals in the New York Festivals International Advertising Awards. Since about 2007 he has been creating YouTube videos. Tosh has been a sponsor of the “video booth” at HashTag Business Events across the UK.
Recent Posts
Most people use sandbags the wrong way. Here’s how to hang them properly on a light stand for maximum stability and safety — plus what to fill them with.
You're Using the Canon RF 50mm f/1.8 WRONG! Here’s How to Fix It
If you’ve recently picked up the Canon RF 50mm f/1.8 STM—affectionately known as the Nifty Fifty—you might be confused by that strange switch on the side of the lens. It doesn’t say AF/MF...