
DIY Video Studio is supported by its readers who use the affiliate links or ads on this site. As an Amazon Associate, I earn from qualifying purchases. Thank your support if you use any of the links.
Can you turn a computer into a desktop or laptop teleprompter?
At first glance, it seems obvious that you should be able to do so. You have a screen where you can display your script, and a webcam to record the video. But just because you have those two elements ignores how a teleprompter works.
In a sense, a teleprompter is like a magician’s trick. It’s designed to create the illusion of allowing you to look directly at the viewer to make eye contact with them, while at the same time reading a script.
In a traditional teleprompter setup, the illusion is created by having an upward-facing screen displaying your text, a camera at the side of the screen, and a beam-splitter mirror at an angle of 45° between the screen and camera.
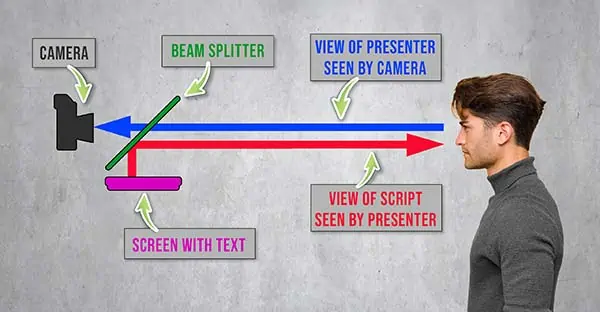
When you stand opposite the camera, the script appears in front of the lens, but only you can see it. The camera only sees you looking directly into the lens.
Returning to our computer teleprompter, obviously, we can’t put the screen text in front of the camera lens, but we can put the camera in front of the text, which can be read when it scrolls up and is revealed above the top edge of the camera.
However, there’s a little more to converting a desktop or laptop computer into a teleprompter. In total, we need to do the following:
- Secure the video camera in front of the screen text
- Scroll the text upwards so we appear to look at the same spot
- Reduce the angle between the camera, your eye, and the text
In addition, you might want to consider your lighting and sound quality, since both will have an impact on the quality of your footage. But I’ll not go into details since they are not an essential part of making a computer into a teleprompter.
So, let’s go through each of those points.
Hanging your teleprompter camera on your computer screen
We need a way of positioning the camera just in front of the screen. I have tried a few options. One that worked reasonably well as a desk stand was the Ulanzi VIJIM LS11.
It has a telescopic support column that clamps onto the edge of a desk, and an arm that holds the camera. A second arm holds an LED camera light. But even this has a couple of problems. Depending on your desk there may not be enough of a desktop overhang there may not be enough for the desktop stand to clamp onto. But a bigger problem is camera shake. If you tap or knock the desk, the vibration will cause the desktop stand to vibrate, resulting in camera shake.
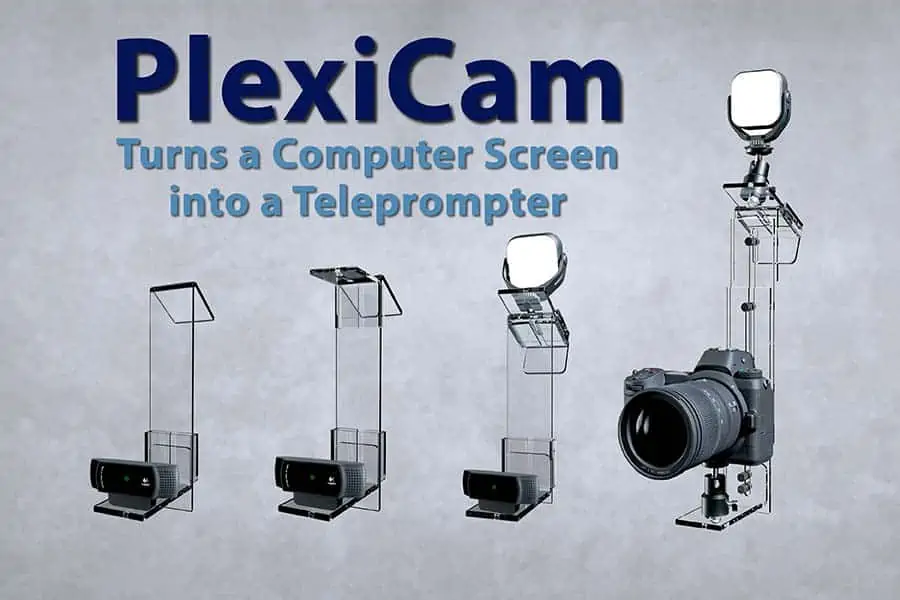
However, the best product I’ve used to make a desktop or laptop computer teleprompter is a PlexiCam![]() .
.
The company that makes them sent me a PlexiCam Pro+ and a PlexiCam Max to test. PlexiCam has not required me nor paid me to write this article. My opinion of the products is entirely my own.

With that said, let me describe what a PlexiCam is and how it will help you create your own computer teleprompter.
What is a PlexiCam
A PlexiCam is a transparent webcam and camera mount that hangs from the top edge of your computer monitor. It’s made from ¼-inch thick acrylic, which is commonly known as Plexiglass in America and as Perspex in the UK.
Opposite you can see the PlexiCam Pro+ and PlexiCam Max, however, there are a total of six models in the range.
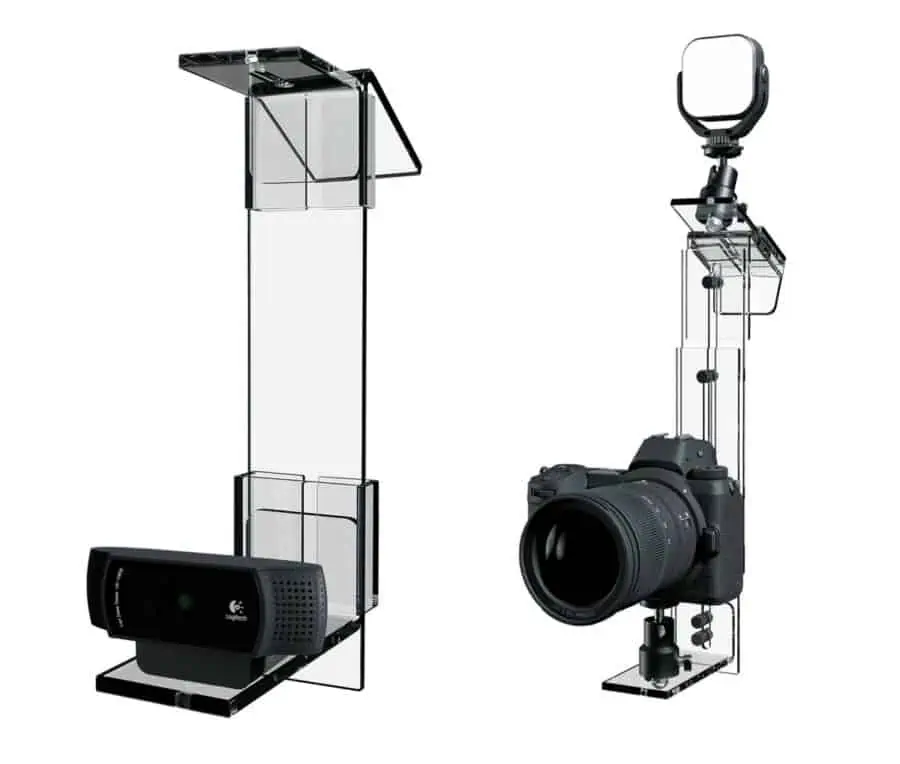
Most are designed for webcam use, but the PlexiCam Max can take mirrorless or DSLR cameras of up to 5lbs in weight. To put that into context, my Canon EOS R6 full-frame camera with an RF to EF adapter and a Canon EF-S 10-18mm lens weighs about 2.2lb.
The following table shows the PlexiCam range and the typical use of each product.
| Model | Ideal for Desktop | Ideal for Laptop | For Camera Type | Light Shelf Included | LED Light Included | Usage |
|---|---|---|---|---|---|---|
| PlexiCam Mini | YES | Webcam | NO | NO | All laptops | |
| PlexiCam Pro | YES | Webcam | NO | NO | Larger laptops or desktop monitors 15 to 27″ | |
| PlexiCam Pro+ | YES | Webcam | YES | NO | Desktop monitors 27″ or larger | |
| PlexiCam Max | YES | Mirrorless or DSLR up to 5lbs | YES | NO | Desktop monitors 10″ to 85″ | |
| PlexiCam Road Warrior Mini | YES | Webcam | YES | YES | Travel/All laptops | |
| PlexiCam Road Warrior Pro | YES | YES | Webcam | YES | YES | Travel/Large laptop, or hotel large-screen TV |
Except for the PlexiCam Mini and Pro models, the rest of the range comes with a video light shelf. The two Road Warrior models also have a rechargeable LED light with adjustable brightness and color temperature. The light has 66 LEDs, delivering up to 800 LUX at a distance of 18″. The rechargeable battery provides up to 10 hours of use if set to 10% power and 2 hours of use at 100% power.
If you want more details on the PlexiCam range and the full range of accessories that are available visit the PlexiCam website![]() . It shows far more than I can describe here and includes a demon simulation of how the system can work on your computer.
. It shows far more than I can describe here and includes a demon simulation of how the system can work on your computer.
Why use a PlexiCam for your computer teleprompter
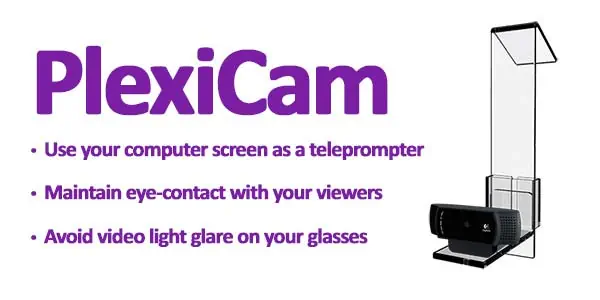
A PlexiCam teleprompter webcam and camera mount lets you place a camera just in front of your computer’s monitor while covering the least amount of the screen. In other words, it puts your camera right next to the text you’ll be reading. However, it’s easy to move the PlexiCam and camera off to the side of your screen, or even round to the back, when you aren’t recording videos or participating in conference calls.
Another excellent reason to buy one is that it keeps your camera rock solidly in place, producing no camera shake. If your computer monitor is securely set up on your desk, so will your camera.
PlexiCam assembly
Each PlexiCam comes with assembly instructions that include a QR code that will open the assembly page on the PlexiCam website![]() . Choose your model and you’ll be shown a video of how to assemble the product.
. Choose your model and you’ll be shown a video of how to assemble the product.
Assembly is simple. Most parts just slide together and are held in place by friction. Some models, like the PlexiCam Max require the use of a screwdriver and the ability to apply two sticky rubber pads. Honestly, it’s not difficult. Just follow the pictures on the instruction leaflet or watch the assembly videos.
Note that the flat side of the Friction Sleeves should rest against your computer’s screen and the open side should face toward you. This should minimize scuff marks on the hanger.
Initially, I was skeptical that the product would work. Even though it’s transparent, I thought it would get in the way of my reading the text. Moreover, I was worried that the product wouldn’t be strong enough to take the weight of my mirrorless camera. Fortunately, neither of my concerns proved to be a problem.
Putting the PlexiCam on your computer screen
With the PlexiCam assembled, slip a nylon washer onto a ¼ inch D-ring camera screw, and secure the camera onto the camera shelf bracket. Try and position the camera as close to the hanger as possible.
Now hook the PlexiCam onto the top of the computer screen, approximately in the middle. You can adjust the height of the camera shelf by sliding the friction sleeve and shelf up or down the hanger.
Displaying the script on your computer teleprompter
You have a few options when it comes to displaying the script on your screen.
You could use a word processor or simple text editor, you could purchase teleprompter software, or even link your smartphone to your computer and use a teleprompter app on your phone. I’ll go over each of these options.
Using a word processor to display the script
If you have a subscription to Microsoft 365 (previously called Office 365), the obvious way to display the script may be to use MS Word. However, there are other options that won’t cost you anything. Google Docs, Apple Pages, and Microsoft Word are all available for Mac or PC. What’s more, they are free to use online in a browser.
For instance, Apple Pages is available through your Apple iCloud login. While Microsoft Word is available if you register for a Microsoft account, which does cost anything. Then there’s Google Docs that can be accessed through the Chrome browser when you’re logged in to your Google account.
Whichever word processor you’re using you need to choose a font and font size that you are comfortable with. The important thing here is to make reading the script easy, so you can make it sound like natural speech and not something you’re reading.
Another thing you should do is make the script document appear continuous, so there are no gaps between pages and no headers and footers.
Using teleprompter software and apps
There are several teleprompter packages that you can use on your computer, but many cost a fair amount of money. The one I have used on my Windows desktop and laptop computers is Teleprompter Pro. When I last looked on the Microsoft Store it cost $8.99/£7.49, but a free trial is available if you want to try it before you buy.
If you have teleprompter apps on an Android smartphone, you can run them on your Windows PC by activating Phone Link.
I believe iPhone and iPad apps can run on a Mac by using Apple silicon, however, I cannot give detailed instructions since I’m not a Mac user.
Whether your operating system is Windows or iMac, you can also run Android apps by using an emulator. The one around is BlueStacks![]() . With it installed you’ll be able to access the Play Store and use any Android teleprompter apps you want.
. With it installed you’ll be able to access the Play Store and use any Android teleprompter apps you want.
This brings me to my recommended teleprompter apps. A free teleprompter available for both Android and iOS users is DV Prompter. Here are the links for the app from the Apple App Store![]() and Google’s Play Store. It’s simple to use and I’ve had it on my iPad and Android phones for many years. For Mac users who want more functionality, try the excellent iCue app
and Google’s Play Store. It’s simple to use and I’ve had it on my iPad and Android phones for many years. For Mac users who want more functionality, try the excellent iCue app![]() . It costs $7.99 but I think it’s worth the money and have been using it on my iPad since the start of the pandemic lockdown.
. It costs $7.99 but I think it’s worth the money and have been using it on my iPad since the start of the pandemic lockdown.
How to scroll your text up the screen
The trick of appearing to look at the viewer requires you to keep looking in approximately the same spot on the computer screen.
If you’re using a word processor or text editor to display your text, the easiest way to get it to move up the screen is to use the scroll wheel on your mouse. Alternatively, place the cursor at the end of your text, then keep tapping the down arrow on the keyboard. Both methods work, but it can become tiresome on a long video and the keyboard noise may be picked up by the microphone.
Another method for word processors is to place the cursor on the side of the document and click once using the scroll wheel. The Cursor will change to the head of an arrow above and below a dot. Now, slightly now the mouse towards you, and the text will begin to move. The speed of the scrolling text is determined by the amount you moved the mouse.
If you’re using the Teleprompter Pro app for Windows, it will automatically scroll the text for you. The scroll speed can be set in the app, and you can use the mouse to start and stop the scrolling text. Another method is to use an inexpensive wireless presentation remote control clicker to start/stop the scrolling text. Finally, Teleprompter Pro has a voice activation option, so the app can hear you read the script and will advance it as you read the words. This offers the huge advantage of you being in complete control of how quickly the text advances. You could even go off script for a little while before going back to where you left off.
When using DV Prompter on your Android phone, use the mouse to click on the blue transport buttons at the top of the window to start and stop the text scrolling.
Reduce the angle between the camera, your eye, and the text
For the viewer to believe you are looking at them, you should do two things.
First, you need to sit about 3-4ft from the screen. This ensures you can look slightly above or to the side of the webcam without moving your eyes very much away from the camera lens. So as far as the viewer is concerned, it appears you are looking at them.
Second, reduce the length of each line of text so that whatever you are reading, the text is within a couple of inches of the camera lens.
You can think of this screen space as a circular area around the webcam. PlexiCam call this area the Gaze Target. It’s the area contained within the green area shown opposite.
By ensuring a short line length, your eyes will not need to flip from side to side as you read the text.

Second, reduce the length of each line of text so that whatever you are reading, the text is within a couple of inches of the camera lens. You can think of this screen space as a circular area around the webcam. PlexiCam call this area the Gaze Target. By ensuring a short line length, your eyes will not need to flip from side to side as you read the text.
Increasing your distance from the screen and reducing the line length helps to ensure an immersive experience for the viewer.
If you are using MS Word to display your script, you can reduce the line width by changing to Immersive Reader view. This will also eliminate the empty space between pages. Click on View in the menu bar, then click Immersive Reader. Once you are in Immersive Reader view, change the Column Width to either Narrow or Very Narrow.
When using other word processors, you can reduce the line length by pulling in the margins. You need the text area to approximately occupy the middle third of the document.
For a fuller discussion on using MS Word as a teleprompter read my article Can Microsoft Word Scroll Like a Teleprompter.
Better sound and image quality
Now that you have created a computer teleprompter, I would also urge you to consider upgrading your sound and image quality. The internal microphones, even those that offer sound canceling, do not provide good sound. Ideally, you should use an external microphone.
As far as image quality is concerned, and webcam will produce a better image with less video noise if you improve your lighting. This can be done in a few different ways.
I have covered the subject of external microphones and video lighting in other articles.
Summary
Creating a desktop or laptop teleprompter isn’t that difficult, provided you can bring all the necessary elements together. An essential part is a transparent teleprompter camera hanger, like one of those from PlexiCam. This allows you to read a script just as the text scrolls up from behind a webcam and hence facilitates the illusion of you looking at the viewer while reading the script. There are various ways of displaying the text on your computer screen, but the key is to ensure it appears within a couple of inches of the webcam lens.
Tosh Lubek runs an audio and video production business in the UK and has been using the Canon EOS R since it was released in the Autumn of 2018 and the Canon EOS R6 in 2020. He has used both cameras to shoot TV commercials broadcast on Sky TV, promotional business videos, videos of events and functions, and YouTube creator content. He has also won several international awards for his advertising and promotional work. You can meet him by visiting his “video booth” at HashTag Business Events across the country.
Recent Posts
Most people use sandbags the wrong way. Here’s how to hang them properly on a light stand for maximum stability and safety — plus what to fill them with.
You're Using the Canon RF 50mm f/1.8 WRONG! Here’s How to Fix It
If you’ve recently picked up the Canon RF 50mm f/1.8 STM—affectionately known as the Nifty Fifty—you might be confused by that strange switch on the side of the lens. It doesn’t say AF/MF...