
DIY Video Studio is supported by its readers. Please assume links on this site are affiliate links or ads, and that I get commissions for purchases made through these links. As an Amazon Associate, I earn from qualifying purchases. Thank you if you use any of the links.
What are the 7 Video Composition Rules?
In my personal video production handbook, there to be 7 video composition rules, and they are all important if you are to create video content that looks attractive and holds the viewer’s attention. Those composition rules are:
- Ensure your horizontals are horizontal.
- When applicable use the Rule of Thirds.
- Keep your composition balanced.
- Consider the Headroom.
- When necessary, include some leading room.
- Apply the 180 Rule and don’t cross the line.
- Always consider the background.
Why should you care about good video composition?
We’ve all seen videos on social media that don’t follow the so-called rules, but they still get likes and shares. But if the creators had used the good video composition rules the videos may have performed even better. They would have certainly looked much more professional.
We have all subconsciously learned the rules of good video composition through a lifetime of exposure to paintings, photographs, movies, and television. We instinctively know when something looks wrong. The viewer’s subconscious knowledge is important for video creators, especially if you are making marketing videos.
If you do not apply the video composition rules or know when it is OK to break them, the viewer will be distracted and not concentrate on your core sales message. They will know something’s wrong, even if they don’t know what it is. That feeling of “wrongness” could transfer to the product or service in your video. Therefore, good video composition should be an important consideration each time you shoot a video.
Now that I hope you agree that good composition in video production is important, let’s consider the 7 rules of good composition.
Keep your camera level
Make sure your camera is level. Generally, your horizontals, like the horizon, should be horizontal. Keeping your horizontals, horizontal makes a substantial difference. However, it’s literally a question of degree.

Being slightly off level it looks like a mistake. But being off by a significant angle looks like you’ve made an artistic choice.
A bubble-level on your tripod or camera rig would help. But if you have a DSLR or mirrorless camera you could use the electronic level.
If you have a larger screen or an off camera monitor you will find it easier to spot an error in the level.
In cinematic terms, it’s called a Dutch angle and is meant to create tension, unease, disorientation or even drunkenness. You might use it occasionally don’t overuse it.

Use the rule of thirds
Now that you’ve got everything level, where should you put your subject in the shot?
A good starting point is to use the rule of thirds![]() overlay on your camera to help you.
overlay on your camera to help you.
Placing your subject on the left vertical is fine. On the right vertical is fine. And even right in the center works well, because it helps to focus the viewer’s attention onto the subject.
What’s not quite right is putting your subject too close to an edge, unless you have a good artistic reason for doing so.
Place significant parts of the subject on the third lines or at the intersection of the vertical and horizontal lines.
In the next still, taken from a marketing video, the eyes have been placed on the top third line and center framing of the subject. This type of composition is used frequently in videos where the subject is speaking to the camera.

Keep things balanced
Remember to balance your composition.
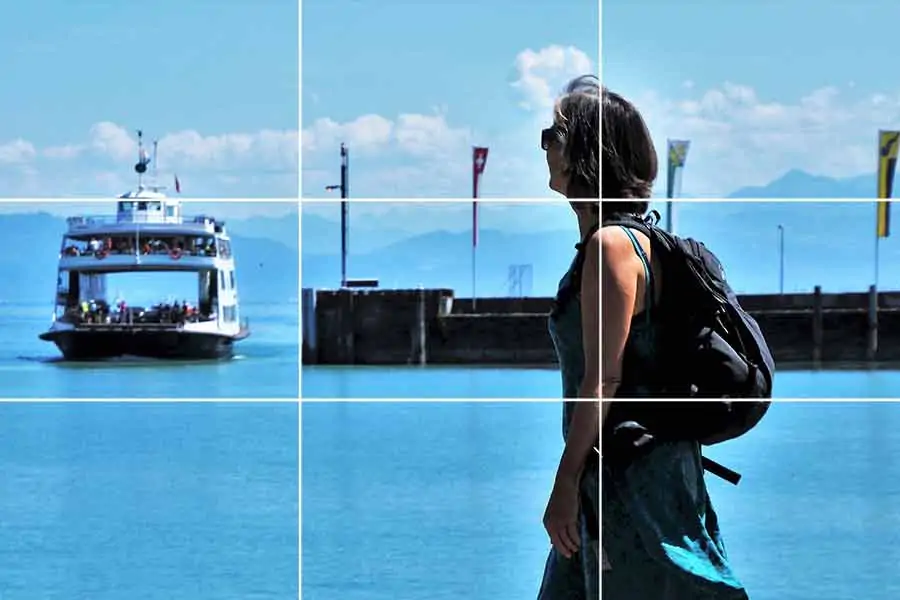
If you place the subject on the right vertical third line, it’s usually a good idea to balance things by putting something on the left vertical third line, or at the intersection of that vertical and a horizontal third line. In this example, the church is on the right third line.

This is balanced by having the mountain peak falling on the left third line. This balances the shot and makes it more interesting. Also, notice the vertical symmetry. The church spire falls on the intersection of the top third and right third lines. This is literally mirrored by having the reflection fall on lower intersection of the third lines.
However, with talking head videos![]() , don’t get too concerned about keeping the subject on one of the vertical third lines.
, don’t get too concerned about keeping the subject on one of the vertical third lines.
Being in the center can also appear balanced. The empty spaces on either side of the subject give a sense of symmetry. Plus central framing is simple to get right, therefore recommended for the beginner.
Include enough Headroom
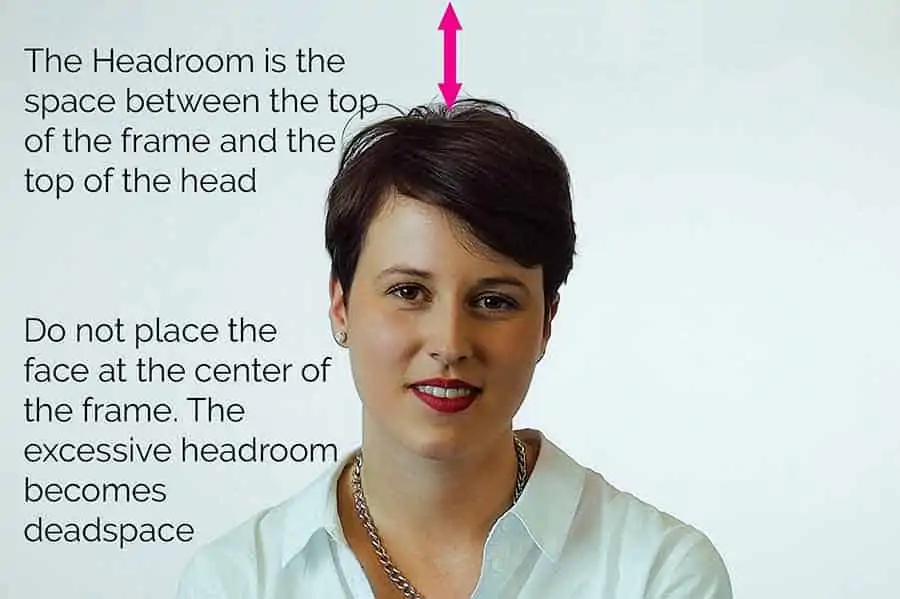
You should include a little headroom in your shot. This is the space between the top of the subject’s head and the top of the frame. Most of the time you should leave a small gap. But just like the Goldilocks fairytale, the gap has to be ‘just right’.
A tiny gap where the head almost touches the top of the frame it looks wrong. But put the face in the middle of the frame and there’s too much headroom, as you can see in this example.
Take the subject even further down and the headroom problem gets worse. That is unless they look up as if gazing at something just out of shot. If that is the case the headroom could be considered lead room.
When to use lead room
To explain lead room, imagine someone is moving left to right across the set. If the camera pans to follow them, the lead room, sometimes also called nose room, is the space between the person and the edge of the frame they seem to be walking towards. The lead room shows the subject has space to move into. Normally you would place the subject two-thirds of the way from the frame edge they are moving towards.
If you apply central framing by keeping the subject in the middle of the frame, they appear to have too little space to move into.
Even worse is placing your subject right up close to the frame edge they are moving towards. The situation now looks uncomfortable and awkward. The subject has nowhere to go. That frame edge takes on the feeling of a physical boundary.
Leading room in interviews
Lead room can be extended to interview situations. For the close-ups place the interviewer and interviewee on the furthest third line from the frame edge they are looking towards.
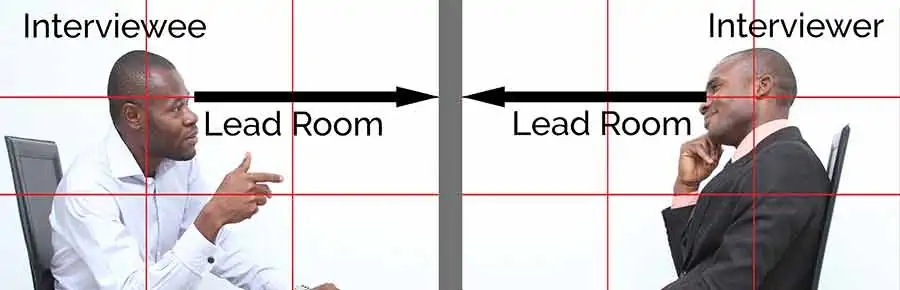
Each will be framed as the reverse of the other with the correct amount of lead and headroom. The lead room helps to lead the viewer to where the subject is looking, i.e. to where the other person should be.
Apply the 180 Rule
Another rule that is appropriate to an interview situation is the 180-degree rule.
Draw an imaginary line between the two people who are speaking.
Wherever you place the camera it should never cross that invisible line otherwise the individuals will appear to be looking in the wrong direction.
Placing the camera square on to the 180-degree line is OK. We see one or both subjects in profile.
Putting the camera just to the right of the interviewer and pointing towards the interview subject is also OK. As is the reverse shot with the camera to the left of the person being interviewed and pointing at the person asking the questions.
Even an over the shoulder shot is fine.
But if we cross the 180-degree line we disrupt the spatial continuity and people appear to be looking the wrong way.
Choose your background carefully
Your background is an important part of the composition. If you are in the studio, you have complete control, whether it is pure white or color backdrop, or even a virtual set.
Recording interviews or vlogging outdoors is a different matter.
Outdoors you must carefully choose where your subject will stand. Ensure the background complements or illustrates what is being said without distracting the viewer’s attention.
Newbie mistakes include trees and telegraph poles seemingly growing out of the top of your subject’s head. Other distractions may include people pulling faces and waving (or worse) behind your subject. Alternatively, it could be that you are shooting at a client’s premises, which are untidy.
The solution would be to move to a better spot, perhaps just a few yards away. But you could zoom in to effectively crop the unsightly background in the shot. You can also open up your aperture to reduce the depth of field![]() and blur out the background. You can see the effect below.
and blur out the background. You can see the effect below.

Video composition tips
If you’re recording a piece to camera, or talking head video, and are still worried about your video shot composition, just pick central framing. Place your eyes, or face, a third of the way down from the top of the frame. This type of composition works, especially if you’re speaking directly to your viewer.
Center framed composition makes it easy for your viewer to understand what to concentrate on in the shot. The subject’s right there in the middle. You are effectively saying to the viewer, “Hey, look at me”.
To make sure your framing is right don’t forget to use the rule of thirds overlay on your camera. If it isn’t already on go into the camera’s setup menu. It should be called something like “Guide”.
For more YouTube video production tips check out the other articles here at the DIY Video Studio. If you plan to create videos using your iPhone I have 10 practical tips on preparing for your video shoot in this article![]() .
.
If you would like to discover more about creating blurry backgrounds in your videos when shooting on an iPhone read my simple guide to depth of field with an iPhone by clicking here![]() .
.
Vertical Video is increasingly the video format of mobile social media. Even if you dislike watching it on a widescreen device it is worth knowing when it makes sense to make your videos vertical. Read about it in this post![]() .
.
Tosh Lubek runs an audio and video production business in the UK and has been using the Canon EOS R since it was released in the Autumn of 2018 and the Canon EOS R6 in 2020. He has used both cameras to shoot TV commercials broadcast on Sky TV, promotional business videos, videos of events and functions, and YouTube creator content. He has also won several international awards for his advertising and promotional work. You can meet him by visiting his “video booth” at HashTag Business Events across the country.
Recent Posts
Most people use sandbags the wrong way. Here’s how to hang them properly on a light stand for maximum stability and safety — plus what to fill them with.
You're Using the Canon RF 50mm f/1.8 WRONG! Here’s How to Fix It
If you’ve recently picked up the Canon RF 50mm f/1.8 STM—affectionately known as the Nifty Fifty—you might be confused by that strange switch on the side of the lens. It doesn’t say AF/MF...