
Author: Tosh Lubek Published: 16th May 2023
DIY Video Studio is supported by its readers who use the affiliate links or ads on this site. As an Amazon Associate, I earn from qualifying purchases. Thank your support if you use any of the links.
I’ve mentioned in other articles that the Blue Yeti is a good microphone and versatile microphone. It has an impressive frequency response of 20-20kHz, it offers a choice of four polar patterns, its all-metal body looks the part, and its often-discounted price of under $100 means it’s easily within the reach of most beginner creators.
But the Blue Yeti is not the latest USB microphone on the block.
The Blue Yeti was launched in 2009, 4 years after the first YouTube upload. It was within reach of creators and made USB microphones a credible choice for recording good-quality audio for podcasts, online music collaborations, and YouTube videos. Today, it remains a popular creator microphone.
But how can you get the best out of this legend of a microphone? One way is to use Direct Monitoring. Hang on, what is Direct Monitoring on a Blue Yeti, and when should you really use it?
Let me explain as we go through this article.
- Blue Yeti USB Gaming Microphone: Elevate your gaming with this Blue Yeti USB microphone…
- Custom Blue Yeti Pop Filter: Keep your stream clean with the included custom Blue Yeti microphone…
- Exclusive Streamlabs Themes: Give your game stream a custom look with three exclusive downloadable…
- Blue VOICE Effects: Yeti USB condenser microphone improves your sound and stream with fun vocal…
Last update on 2026-03-01 / Affiliate links / Images from Amazon Product Advertising API
What is Direct Monitoring on a Blue Yeti microphone
Direct monitoring on the Blue Yeti enables listening directly to the audio from the microphone before it is converted to a digital signal and sent to and returned from the computer. This means there is no delay in the audio and is the same as zero latency monitoring.
If you own a Focusrite Scarlett 2i2 audio interface you may have noticed it has a Direct Monitor button![]() . When this button is pressed, the Focusrite Scarlett 2i2 allows you to monitor the audio before it is processed and sent to your DAW on the computer. This is basically the same process as direct monitoring on a Blue Yeti.
. When this button is pressed, the Focusrite Scarlett 2i2 allows you to monitor the audio before it is processed and sent to your DAW on the computer. This is basically the same process as direct monitoring on a Blue Yeti.
How to use Direct Monitoring on a Blue Yeti
Unlike the Focusrite Scarlett 2i2, the Blue Yeti does not have a physical button to enable/disable direct monitoring. However, due to updates in Windows, it’s very easy to ensure that you’re listening to your Blue Yeti with direct monitoring on, and only slightly more complicated to listen without direct monitoring.
To use direct monitoring on a Blue Yeti, plug your headphones into the Yeti’s headphone socket. The Yeti has a built-in headphone amplifier and sends a latency-free audio signal directly to the headphones. Adjust the volume with the headphone volume dial on the front of the Blue Yeti.
So, if you want to record your voice or your playing of an instrument follow these steps.
- Use the USB cable to connect the Blue Yeti to a USB port on your computer.
- In the computer’s sound settings ensure that the Yeti is set as the input audio device/microphone.
- Plug your headphones into the headphone socket on the base of the Blue Yeti.
- Open your recording software and choose the Blue Yeti as the audio input device.
- Adjust your microphone gain and headphone volume as necessary.
- Start recording and you will hear yourself in real time in your headphones.
A side note. It does not matter what you’ve selected as your Input and Output devices in your computer’s sound settings, you will always hear latency-free audio from the Yeti if your headphones are plugged into the Yeti’s headphone socket.
If you are using a Blue Yeti Nano microphone and find that you can’t hear anything in your headphones, it could be because the Direct Monitoring has been turned off. To fix the problem, read my article, Blue Yeti Nano Headphone Direct Monitoring Not Working Fix.
How to use Direct Monitoring on a Blue Yeti in Windows 10
Because Windows gets updated, there’s a good chance you won’t need to do this, but it’s worth knowing how to do it.
Right-click on the sound properties speaker icon on the right side of the Taskbar, it’s beside the time and date. This will open a menu with a few options, although what you see will depend on your system. For example, here are the different menu options I see on a couple of my Windows 10 PCs.
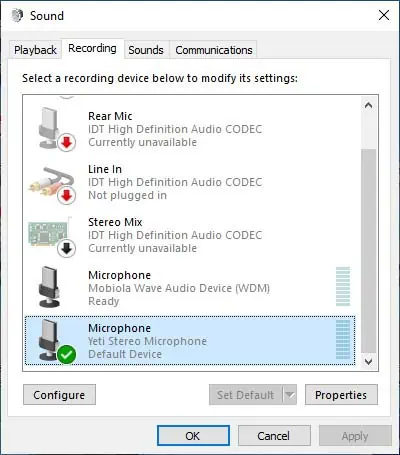
Whether you choose Playback Devices or Sounds when the properties panel opens you need to click on the Playback tab. In the list of devices select the Yeti Stereo Microphone as your Playback speaker or device and then click on the Properties button to open the Speakers Properties panel.
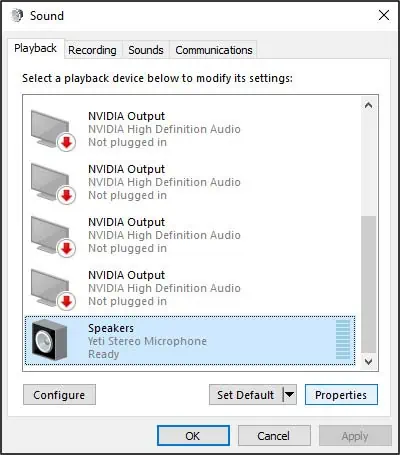
You should see that the microphone’s blue speaker icon has a red warning circle with a line through it. This indicates that the microphone’s speaker output is muted.
Click on the muted speaker icon to unmute the Blue Yeti.
Congratulations, you should now be able to hear your voice in real time!
This might seem counterintuitive to go to the Playback properties since you are trying to record with the Blue Yeti microphone, but let’s see what happens if you were to try and solve the problem in the Recording Tab.
Again, right-click on the sound properties speaker icon on the right side of the Taskbar and this time go to the Recording device tab instead of the Playback tab. Then go ahead and click on the Properties button.
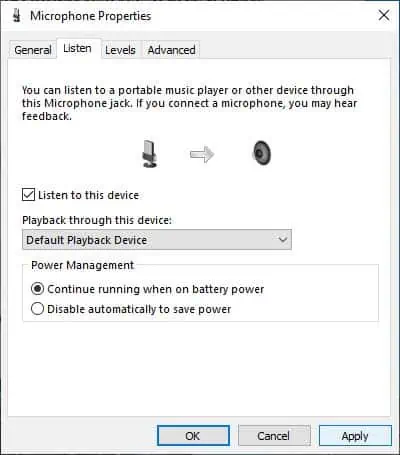
Once the Microphone Properties panel opens, click on the Listen tab.
You can see, about halfway down, there is a check box. Click on it to check it and then click on the Apply button.
You can now hear yourself through your headphones, but there’s an issue, your voice will be in delay. Although you can hear yourself this is not direct monitoring or latency-free headphone monitoring.
What’s happening is that the sound from the microphone has been converted from analog to digital, sent to your computer via the USB cable, returned to the Blue Yeti via the USB cable, converted from digital audio to analog audio, and finally sent to your headphones. With the audio spending so much time being processed and being sent back and fore, it’s inevitable that a slight delay is introduced.
Why use direct monitoring on a Blue Yeti
Direct monitoring on a Blue Yeti microphone, or zero-latency monitoring, is the preferred option for creators, such as musicians, podcasters, and YouTubers, needing to monitor their live performances. It allows them to listen to their performance without any delay in the audio, which would be off-putting.
Without direct monitoring creators would hear a delay, the length of which would depend on the latency setting in their recording software. As the delay becomes more significant and noticeable it becomes very difficult to speak coherently while hearing yourself in delay.
When I started my radio career in the early 1980s, we had an entertaining party trick of trying to see how long you could speak while hearing yourself delayed. We did this using reel-to-reel tape recorders because tape recorders could create a delay, or echo because the record and playback heads were not in the same place. The audio would be recorded onto the tape at the recording head, the tape would move about an inch or two in just under a fifth of a second and the audio would be reproduced at the playback head. The delay made it very difficult for one to speak without sounding drunk, and it was highly entertaining to watch someone attempt to do it.
When should you use direct monitoring with a Ble Yeti
It is best to use direct monitoring with a Blue Yeti when you are the performer and you need to hear yourself “live”, or as you are speaking, singing, or playing.
This is especially true if there are others, or something else, in the background. In such circumstances hearing yourself lets you judge your own performance without your performance being crowded out by everything else that is happening around you.
But you need to monitor more than your performance, especially if you’re working on your own. You should be able to monitor the quality of the audio, the audio level, and even check whether there is any audio at all.
There’s nothing worse than starting a live stream or getting to the end of a recording only to discover the mic is/was muted, the audio sounds off-mic, or the level was so high that the recording is badly distorted. Direct monitoring of your audio, as it happens and from the outset, gives you the opportunity to correct any errors so everything sounds perfect. I have come across some live streamers who seem to revel in appearing amateurish
So, if you’re a podcaster, live streamer, YouTuber, singer, or musician, using direct monitoring can be advantageous. Of course, some people will say they don’t like the sound of their own voice. That may be so, and I can understand from my own experience, but your performance is not for you to judge. You’re doing it to share with your audience and it is for them to decide whether they like it or not. It’s your job to make it sound as good as you can, and that’s what direct monitoring can help you with.
When not to use Direct Monitoring
There are times when you probably do not want to use Direct Monitor. An example would be if you need to hear the performance mixed with other elements, such as music, sound effects, and other voices. However, this mix will be slightly delayed, due to audio latency on your computer.
Monitoring the mix in this way is more commonly done by a sound engineer or producer rather than the performer.
Another reason why you might not want to have direct monitoring is if you do not want to hear your own voice. Many people, usually inexperienced creators, podcasters, or performers do not like hearing their own voices. However, they may need to hear the other elements of the mix.
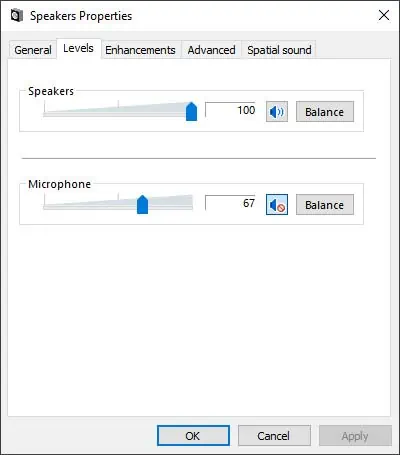
To turn off Direct Monitoring but continue hearing the rest of the mix is easy in Windows 10. Click on the speaker icon in the taskbar and in the Sound preferences panel go to the Playback Devices tab. Click on the Blue Yeti in the list (it should be should like Speaker Yeti Stereo Microphone), and then click the Properties button. In the Speaker Properties panel that opens open the Levels tab and mute the microphone by clicking the speaker icon beside the microphone’s volume slider.
Direct monitoring when using Blue Sherpa Software
You may also encounter Direct Monitoring if you previously downloaded and installed the Blue Sherpa software. Although Blue Sherpa was replaced by the more powerful Blue Voice software in 2021, some creators may still be using it.
In the Blue Sherpa software, there is a MIC GAIN slider and a DIRECT MONITORING slider. Make sure you plug your headphones into the Blue Yeti’s headphone socket if you want to benefit from the use of the Direct Monitoring slider.
When using Direct Monitoring and you adjust the Blue Sherpa mic gain slider you won’t hear a level change in your headphones. The headphone level is adjusted with the DIRECT MONITORING slider. Be careful, this can lead to a false perception that the Blue Yeti is live when in fact the mic gain is low or muted.
If you are still using the Blue Sherpa software, you should always check the audio meter to ensure you are in fact sending a signal to your computer.
Summary
You should now have a good understanding of what Direct Monitoring is on a Blue Yeti microphone. It is a very useful feature if you need to hear and monitor your performance in real-time. With the latest updates in Windows, accessing Direct Monitoring might be no more complicated than plugging your headphones into the Blue Yeti. You might not want to use Direct Monitoring if you are taking on the role of a producer or sound engineer. In this case, you probably will want to hear the performance in the mix.
You might also like…
- How to setup and use a Blue Yeti microphone on a PC
- Blue Yeti Nano Headphone Direct Monitoring Not Working Fix
Here’s a big ask from me: If you liked this article, please share it.
It will mean a great deal to me if you share this post because a few seconds of your time will seriously help my blog grow. The share buttons are below the “About Author” section.
Thanks. 🙂

About the author: Tosh Lubek is a multi-award-winning broadcaster, writer, and video producer, with 40 years of experience in professional broadcasting and has been using Canon video and stills cameras since 2010. He has worked with radio and TV broadcasters, advertising agencies, and direct clients on a variety of projects including radio and television advertising, online video production, corporate videos, award ceremony motion graphics, and theme park sound design. Tosh has won numerous awards, including a Radio Academy Awards Gold Sony, a Gold, Silver, and Bronze World Medals in the New York Festivals International Advertising Awards. Since about 2007 he has been creating YouTube videos. Tosh has been a sponsor of the “video booth” at HashTag Business Events across the UK.
Recent Posts
Most people use sandbags the wrong way. Here’s how to hang them properly on a light stand for maximum stability and safety — plus what to fill them with.
You're Using the Canon RF 50mm f/1.8 WRONG! Here’s How to Fix It
If you’ve recently picked up the Canon RF 50mm f/1.8 STM—affectionately known as the Nifty Fifty—you might be confused by that strange switch on the side of the lens. It doesn’t say AF/MF...