We’re an affiliate: We hope you love our articles and the products we recommend! Just so you know, when you buy through links on this site, we may earn an affiliate commission. Thank you if you use our links, we really appreciate it!
Deity V-Mic D3 and D3 Pro
For the last ten years, Rode has produced some great shotgun microphones for videographers but the new kid on the block is Deity Microphones. More to the point, their microphones are both excellent and affordable.
Deity Microphones has a pair of microphones that I consider to be among the best on-camera mics that are available today. They are the Deity V-Mic D3 and the V-Mic D3 Pro.

A more professional microphone
The Deity D3 and D3 Pro not only sound great but they’re also some of the more rugged on-camera mics around. Their mic tubes are made from aluminum alloy, unlike many of their rivals who opt for plastic in their mic’s construction.
The Deity V-Mics also look like professional pencil shotgun mics, with everything within or in line with the microphone tube. Meanwhile, many other on-camera mics have the microphone tube stuck into a bulbous housing that sits on top of your camera.
A further improvement on many rival’s camera microphones is the mic cable. One end is not permanently fixed into the microphone’s tube. The smart TRRS coiled cable is a separate element, so it can easily be swapped over or replaces. A handy feature to have if it were ever to become damaged or you need to use a TRS connector instead of the supplied TRRS cable.
Both are low noise super-cardioid directional shotgun microphones. They are intended for DSLRs/DSLMs, camcorders, smartphones, tablets, handy recorders, and laptops
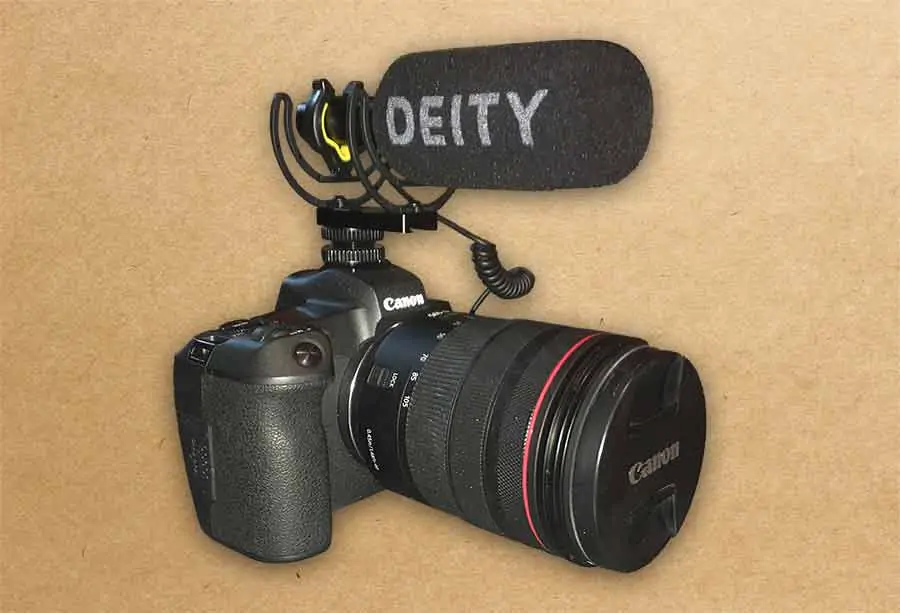
They come with an adjustable Rycote shock mount that ensures the microphone can be mounted on your DSLR/DSLM without bumping into your forehead when using the electronic viewfinder (EVF).
Since they are condenser microphones, they need electrical power to work. The D3 uses a single AAA battery, whereas the D3 Pro has a built-in rechargeable lithium battery.
The Deity D3 and D3 Pro microphones don’t require external phantom power
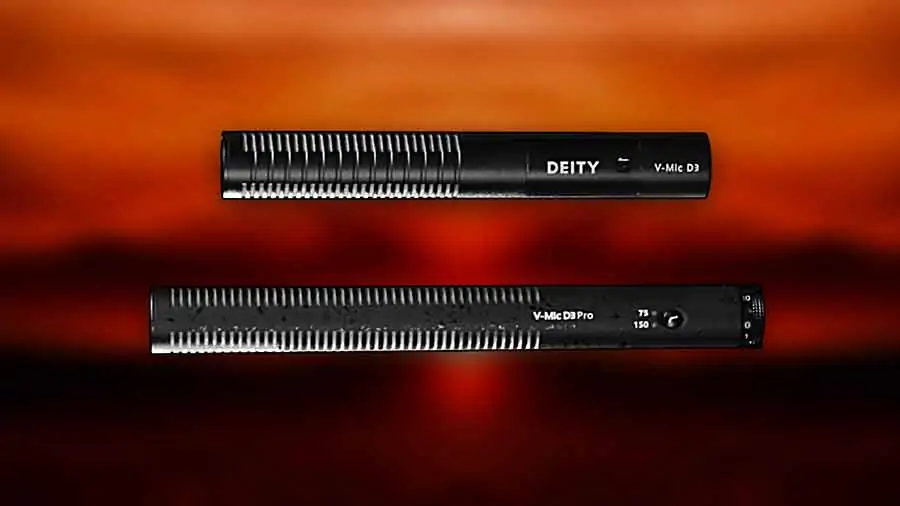
When tested, side by side, the V-Mic D3, and D3 Pro sounded remarkably similar. That’s not so surprising since both use the same 14mm mic capsule. But the D3 Pro has a slightly longer interference tube, so it may be a little better at rejecting ambient noise from the sides than the standard D3 microphone.
In further tests, the Deity D3 Pro sounded remarkably like the Rode Videomic Pro Plus. In fact, to my ear, the D3 Pro sounded a tiny bit better, with the Rode emphasizing low-frequencies on in-door recordings. In contrast, the D3 Pro had a broadly flat frequency response, which I prefer.
So, if all three microphones sound similar, why have I chosen the Deity mics over the well-established Rode video microphones?
When comparing the Deity V-Mic D3 Pro vs Rode Videomic Pro Plus there’s one inescapable truth, the D3 Pro is significantly cheaper. I mean, a lot cheaper
The Deity V-Mic D3 Pro is a hundred dollars less than the Rode videomic Pro Plus. Meanwhile, the D3 sells for under $100. The excellent sound quality and value for money price puts the Deity mics some of the best on camera mics you can buy.
With that incredible price in mind, let’s see what the two Deity mics have to offer for the commercial videographer, YouTube Creator or Vlogger.
What comes in the box?
You can buy these mics in three forms. The D3, the standard D3 Pro kit, and the D3 Pro location kit. The latter has everything in the standard D3 Pro kit plus Deity’s D-XLR adapter and the Rycote Duo-Lyre pistol grip boom pole shock mount.
Here are the details for comparison.
The V-Mic D3
- Deity V-Mic D3 Super Cardioid Microphone
- Rycote Adjustable Hot-Shoe Shock Mount
- Smart TRRS to TRRS Coiled Cable
- Foam Wind Screen
- Alkaline AAA battery
- User manual
See more images of the Deity V-Mic D3 on Amazon by using this link. The page will open in a new window.
Standard V-Mic D3 Pro kit
- V-Mic D3 Pro Shotgun Super Cardioid Microphone
- Rycote Lyre Adjustable Shoe Shock Mount
- Smart 3.5mm TRRS Coiled Cable
- Deity Foam Windscreen
- Semi-Rigid Nylon Carrying Pouch
- USB charging cable
- User manual
See more images of the Deity V-Mic D3 Pro on Amazon by using this link. The page will open in a new window.
V-Mic D3 Pro Location Kit
- V-Mic D3 Pro Shotgun Super Cardioid Microphone
- Rycote Lyre Adjustable Shoe Shock Mount
- Rycote Duo-Lyre Pistol Grip Boom Pole Shock Mount
- Smart 3.5mm TRRS Coiled Cable
- Deity Foam Windscreen
- Semi-Rigid Nylon Carrying Pouch
- USB charging cable
- D-XLR Phantom Power adapter
- User manual
See more images of the Deity V-Mic D3 Pro Location Kit on Amazon by using this link. The page will open in a new window.
Deity V-Mic D3

Switching on the microphone
When you connect the D3 to your camera be aware that the mic isn’t turned on.
So how do you turn on the mic?
It’s quite simple.
Just turn on your camera. The microphone automatically detects that the camera has been turned on and it turns on itself. You can see that the microphone is on because the LED on the rear of the mic tube lights up green.
So how did the mic detect the camera being turned on if it was switched off itself?
In truth it wasn’t off, it was in standby mode waiting to be woken up.
As soon as you insert the AAA battery into the microphone it is in standby mode and waiting for action. If you prefer, it’s sleeping and just waiting to be woken up.
Bearing that in mind, if you’re not going to be shooting anything for a while, like a month or so, take the battery out. If you leave the battery in the mic for a long time, there is a small chance that the battery could corrode or leak inside your microphone. If that happens the outcome might not be so good.
Although the mic has a smart switch-on and switch-off you can still go manual since the end of the mic is a touch-sensitive switch. Don’t expect anything to move or to hear a click. Just hold a finger on the end of the mic for a couple of seconds and a green light will turn on at the top edge of the mic’s rear. To turn-off, hold a finger for a couple of seconds on the rear of the mic and the green light will go out.
Battery life

The D3 really scores when it comes to battery life.
You can expect about 166hrs from an alkaline AAA battery. A 900mAh NiMH AAA rechargeable is only slightly behind at around 150hrs.
Deity D3 – Best microphone under 100 dollars
Although the D3 has the same 14mm capsule as the D3 Pro, the mic is slightly shorter.
Having used it for a couple of months I have to say I love this little mic.
I bought this microphone for my Canon EOS R DSLM since I was filming some run and gun footage for a client where it wasn’t going to be possible to use a lav or boom mic.
When researching the Deity V-Mic D3 I watched a couple of YouTube videos that reassured me that the audio quality was much higher than the relatively low price would suggest. Now that I’ve tried the microphone on both outdoor and interior shoots I’m really impressed with the results.
Both the frequency response and signal to noise ratio are excellent and more than good enough for my client videos.
The mic has a super-cardioid pick-up pattern and as I mentioned above, it shares the same 14mm pre-polarized condenser capsule as the V-Mic D3 Pro. The audio quality is like the more expensive Pro version.
The frequency range is 50Hz to 20kHz, and it’s flat across that range. Where a lot of budget lav mics cut out at about 15 or 16 kHz the Deity mics span almost all of the human hearing range. This also means they perform as just as well when recording the higher range of female voices as with lower range male voices.
The D3 has low distortion, a signal to noise ratio of 78dB SPL, and a dynamic range of 114dB.
The Deity D3 is a good microphone for vlogging
The D3 comes with the Rycote adjustable cold shoe shock mount for DSLRs. The shock mount’s cold shoe base includes a 1/4-inch screw mounting hole, so it would be easy to mount the microphone on a tripod, light stand, or mic stand (with the appropriate 1/4-inch adapter).
When you combine the facts that the microphone’s interference tube is short and that you can move the mic back on the adjustable shock mount is good news for vloggers.
Since vloggers often have their cameras at about arm’s length, say 2 to 2.5ft, that requires the use of a wide-angle lens. Using such a lens can have an unwanted side-effect, the tip of a microphone, especially if you add a windshield or dead cat, can appear in the shot. However, with the standard D3’s ability to move backward on its shock mount there is less chance of that happening.
One thing a lot of YouTube vloggers forget is that shotgun microphones are really intended for larger spaces or outdoor use. It’s to do with the way an interference tube creates the focused directional pick-up pattern. Having said that, these Deity mics perform well when used indoors to reduce the room echo or reverberation.
As Andrew from Deity Microphones’ advice goes, the more ports on the interference tube the bigger the indoor space the microphone is suited for. With fewer ports, the microphone is suited to smaller spaces.
With that advice, the shorter D3 might be better if you’re recording in a small domestic room with reflective walls.
One of the things I really like about the D3 is that I don’t need to worry about it. Once switched on and in standby-by mode, it automatically switches on when I turn on the camera and it then turns off when I switch off my camera. That saves me the bother of having to press another button and saves the AAA battery. But if you want to go manual, there’s a touch-sensitive on/off button at the rear end of the microphone tube.
A standard Alkaline AAA Battery will give you 166hrs of power. A little less from a NiMH Rechargeable Battery at around 150hrs. And 208hrs from a Lithium AAA Battery.
So if you’re going to be shooting every weekday for around 8 hours each day, a single AAA alkaline battery should last you about a month.
Interestingly, whichever type of AAA battery you choose it will power the D3 for at least three times longer than the internal lithium battery will power the D3 Pro, which lasts 50 hrs. The comparison makes the battery performance of the Pro version sound poor but it’s not. It really emphasizes what a stunning performer Deity has created with the standard D3.
The D3 does not have a volume control but that’s OK. I always set the volume within my Canon EOS R camera, my Zoom H4n Handy Recorder, or even my iPhone SE. If you want a volume control on the mic you should go for the D3 Pro, but since both mics sound remarkably similar you’re effectively paying an extra $100 for a gain control knob.
The flexibility of the V-Mic D3 microphone is another thing that I like. As mentioned above it works with my DSLM, my Handy recorder and my iPhone. But I’ve no reason to believe that it wouldn’t also work with consumer-level camcorders, my laptop, or a bodypack transmitter.
I record a lot of piece-to-camera videos with clients, where I use a boom mic stand and Sennheiser ME66 super-cardioid mic. However, the V-Mic D3 sounds almost as good, and having a super-cardioid pick-up pattern does a rather excellent job of rejecting sound from the sides and rear.
To get the best sound quality I intend to set up the mic close to the talent and running a cable back to my camera. When I’ve performed a more in-depth test, I’ll update this article.
Deity V-Mic D3 Pro
Switching on the microphone
This microphone operates slightly differently to the D3.
To turn on the microphone you hold down the low-cut filter for a couple of seconds. At that point, the orange LED will light, indicating the microphone is in standby mode and waiting for your camera to be turned on.
With the microphone connected to your camera turn on the camera and you’ll notice the LED changes from orange to green. That green LED indicates the D3 Pro is now fully awake and ready to record.
When you’re done shooting your video clip just turn off the camera and the LED will turn orange. The microphone has now gone to sleep and is in standby mode. Once you’ve finished your shoot hold down the button again to turn off the microphone.
Battery power
The D3 Pro has an internal 320mAh Lithium-Ion battery, giving the microphone a run time of 51 hours and a standby time of 74hrs.
If you run out of electrical juice the battery will be fully charged in just under 2 hrs using the USB C charging cable.
Unfortunately, it’s the internal rechargeable battery that slightly lets down this mic. In comparison, the rechargeable battery on the Rode Videomic Pro+ lasts 100hrs and can be swapped out for a pair of alkaline AA batteries.
The battery performance is also not as good as its little sibling, the D3. A single NiMH rechargeable battery gives 150hrs of power.
The battery life sounds a little poor, but one charge is going to be enough to take you through four working days of non-stop filming. So really the internal battery performance is much better than good enough.
External phantom power
You can use the Deity D3 Pro with phantom power. Check out the optional D-XLR adapter, I mention it later in this article. Click here to skip ahead.
How to calibrate the D3 Pro
The objective is to match the output level of the D3 Pro with your camera audio input settings. This will give you a bit of headroom to avoid clipping and distortion while still having some latitude with the mic’s gain knob to boost or lower the input gain.
A good place to start is to set the gain knob to 6, which represents a gain boost of +12dB. If you are a Lumix user, you might find this gives you too hot an input signal. If that’s the case initially try a setting of 3 on the dial, which means +6dB.
This setting should be a good starting point when you are recording talking head interviews or vlogging.
Each number on the gain knob is half the actual gain boost on the microphone. So, 1 = +2dB, 6 = +12dB, and 10 = +20dB
The next step in calibrating the audio setup is to go into your camera’s sound recording menu and choose the recording level. You should have a VU meter display with plus (right) and minus (left) keys to adjust the camera’s preamp gain.
On my Canon EOS R the VU meter goes from -40dB on the left to 0dB on the right, with the -12dB position also shown.
You now need to get your talent to stalk so you can do a soundcheck.
Position them about 2 to 4 feet in front of the camera and ask them to speak naturally. Now adjust your camera’s recording level so the speech levels peak between -12dB and -6dB.
Congratulations. You’ve calibrated your D3 Pro with about 8dB spare gain left on the microphone just in case your talent starts speaking more quietly. If that happens, you can use the gain knob to turn up the level without having to dive into the camera’s menu.
Included adjustable Rycote shock mount
Deity has partnered with Rycote to create a unique on-camera shock mount. It allows the microphone to be mounted forward, in the middle, or further back.
If you like using your camera’s EVF set the adjustable shock mount forward to avoid the rear of the microphone digging into your forehead.
If you plan to use a super wide-angle lens slide the shock mount backward to help keep the tip of the mic out of shot.
But if you’re mounting your camera on a gimbal adjust the microphone so it’s centered over your camera for perfect balance.
If you look at the bottom of the hot shoe plate, you’ll find a 1/4″ threaded female mounting point. Perfect if you want to mount the microphone on the end of a mic stand boom arm, on top of a modern light stand, etc.
The Rycote adjustable cold-shoe shock mount is made of durable plastic. It all feels pretty solid, and I have no worries about anything snapping.
There are two thumbwheels on the shock mount. Make sure the lower one is tightened down on your camera’s hot shoe to prevent the mic coming adrift. The upper thumbwheel screen locks the backward or forward position of the microphone.
Optional Accessories
Phantom Power and clearer audio with a D-XLR Adapter
The D-XLR adapter allows you to adapt the D3 or D3 Pro microphones to be compatible with a 3 pin XLR input camera or audio recorder.
However, the D-XLR adapter has another trick up its sleeve.
It can reduce 12-48V phantom power down to 3V for microphones with 3.5mm TRS connectors to run off Plug-In Power.
The D-XLR has been specially designed for the Deity V-Series of microphones (V.Lav, V-Mic D3, V-Mic D3 Pro) to trigger their smart 3.5mm TRRS outputs with bias power from a standard XLR input. However, it will also work with other 3.5 Standard TRS microphones.
What does that really mean for you?
Your on-camera microphone can be used off the camera and fit it to a boom pole and have longer XLR cable runs without the worry of introducing extra noise. In fact, you should be able to record clearer interviews and dialogue than if you tried using a 3.5mm extender.
The D-XLR is designed to have a 3.5mm TRS standard wired input. So, many other 3.5mm standard TRS microphones will work with it.
Which version should you buy?
The question is, would I buy the V-Mic D3 again or consider the D3 Pro? More importantly, would I recommend these mics to others?
It’s a no brainer. The answer to all three questions is Yes, Yes, Yes.
If you are a commercial videographer on a budget, a YouTube Creator or vlogger these microphones are for you.
Their performance, even if priced at a similar level to the more expensive Rode Videomic Pro Plus, is good. The smart on-off feature means you won’t waste countless batteries because you forgot to switch off the mic at the end of a shoot. And since they are battery powered there’s no need for external phantom power.
But are they the best sounding shotgun mics?
Well, of course not. You get what you pay for. For instance, I think the Sanken CS-M1 microphone sounds really sweet, but it will cost you $900 and requires an external phantom power supply.
But for the intended market, I feel confident in saying the Deity mics are the best choice.
But which one should you buy?
I think it’s down to how you intend to use them. If you’re vlogging or creating YouTube videos using a wide-angle lens and the camera is 2 – 4ft from you, then go for the Deity D3. It’s going to give you pretty much all the performance you need. If you need to tweak the audio, perhaps roll-off some bass, you can easily do that in post-production.
Now, if you tend to record other people, perhaps interviews, piece-to-camera stuff, or documentaries the D3 Pro might be the better choice. The easily accessible step-less gain knob will be extremely useful if the voice level of your talent changes over time.
Also, although I have no hard evidence of this, I suspect the 3 Pro will have better focused on the sound directly ahead because of the longer interference tube.
Unlike many other on-camera video mics the V-Mic D3 Pro can work with other shock mounts since the supplied shock mount is not incorporated into the microphone body. The D3 Pro can fit into most universal shock mounts on the market. The Location Kit bundle kit adds a Rycote InVision Mount featuring the Duo-Lyre on a pistol grip, a Deity Wind Jammer, and a D-XLR (phantom power to 3-volts 3.5mm adapter.).
If you work at greater distances to the talent and want to mount the microphone either on a boom pole or on a microphone stand’s boom arm, consider the D3 Pro with the Location Kit.
Tosh Lubek runs an audio and video production business in the UK and has been using the Canon EOS R since it was released in the Autumn of 2018. He has used the camera to shoot TV commercials for Sky TV, promotional business videos, videos of events and functions, and YouTube creator content. He has also won international awards for his advertising and promotional work. You can meet by visiting his “video booth” at HashTag business events across the country.
Recent Posts
Premiere Pro Editors STOP Dragging Clips WRONG! Edit 10x FASTER
Hey there, Premiere Pro users! If you're dragging your video clips from the project panel to the timeline listen up, there's a better way! The program monitor holds some hidden editing superpowers...
Conquer Your Next Media Interview Like a Pro! (With 15 Actionable Hacks)
Feeling anxious about your upcoming interview? Don't worry, we've got you covered! Whether you're a seasoned professional or a first-timer, mastering the art of the media interview can be daunting....


