
DIY Video Studio is supported by its readers. Please assume links on this site are affiliate links or ads, and that I get commissions for purchases made through these links. As an Amazon Associate, I earn from qualifying purchases. Thank you if you use any of the links.
The FiLMiC Pro video app is packed full of professional features which explains why filmmakers like Sean Baker and Steven Soderbergh have used the app, coupled with an iPhone, on their movies “Tangerine” and “Unsane![]() ”.
”.
Today I’m going to show you why FiLMiC Pro should be your video app of choice.
I’ll explain how to access those features and how they can help you with your video production or filmmaking.
Hopefully, you’ll be able to take away some useful nuggets.
So, let’s dive right in.
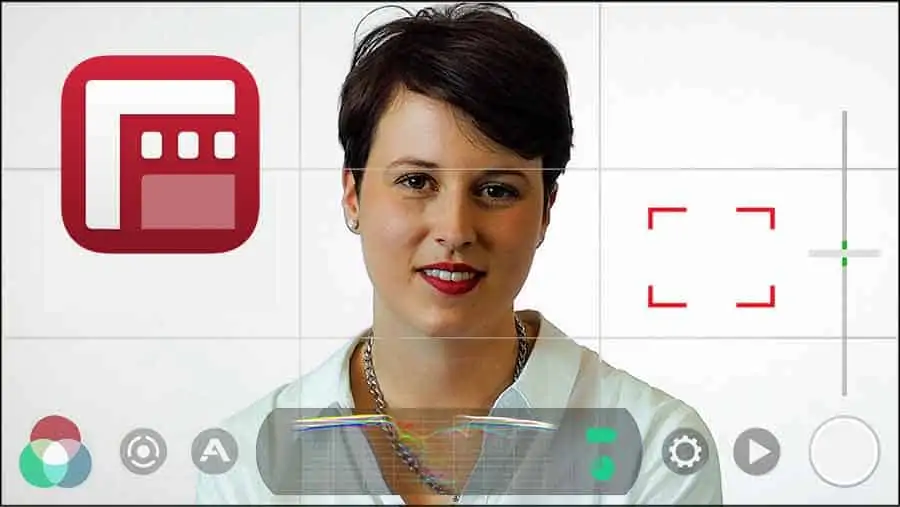
1: Easy-to-access controls
Considering the features available in FiLMiC Pro the interface is easy to use.
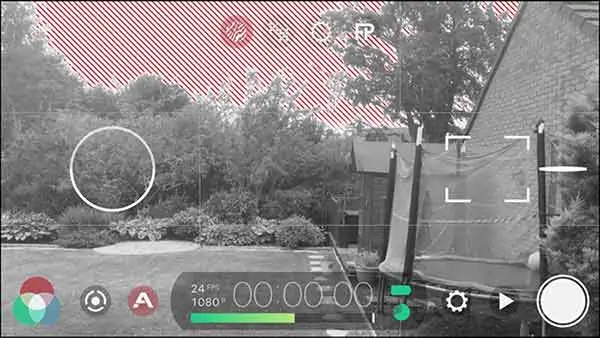
Straight out the box, you will see two reticles. A circle to control the exposure and a square to control the focus and zoom.
Drag the reticles to where you want the video app to focus or set the exposure. When in auto mode the reticles will be white, but if you tap and hold the reticles, they’ll turn red and lock the focus or exposure.
For more precise control over ISO, shutter speed, focus, and zoom you can use the manual arc sliders.
Three ways to reveal the arc sliders
- Tap the arc button in the bottom left corner of the display. It looks like a white dot surrounded by three white arcs. This will bring up both the left and right arc sliders. Tap the button again to hide the arc sliders and lock the settings.
- Tap and hold one of the reticles. It will first turn red but keep holding and the associated arc control will appear. To hide the arc slider, tap the screen away from the arc.
- Swipe in from the left (ISO and Shutter speed) or right (focus and zoom) edges to reveal the arc sliders. To hide them, swipe them off to the sides of the screen.
Once you have revealed the arc sliders choose between ISO/Shutter speed or Focus/Zoom and drag the arc circle up or down.
If you like having a clean screen once you start recording, that’s easy to do. Tap the screen to hide the controls. To reveal the controls, tap the screen again.
You will need to set this up first by going to Settings > Device and slide over the switches for “Tap to Hide Interface”, “Hide Reticles with Interface”, and “Hide Zoom Rocker”.
There are other controls
2: The correct Frame-Rate for your project
The FiLMiC Pro video app hands you control of your iPhone’s (or Android phone’s) camera in a way that the native camera app just doesn’t.
For instance, with the iPhone’s native camera app you’re stuck with a frame rate that’s a multiple of 30. That’s understandable since, in North America, the home of Apple, the TV standard is 30fps.
However, if you want a cinematic look, which of course Sean Baker and Steven Soderbergh when making movies for theatrical release, you want to shoot at 24fps.
Or, if you’re shooting television in Europe, like the BBC’s science documentary, “Secrets of the Super Elements![]() ”, you need to shoot at 25fps.
”, you need to shoot at 25fps.
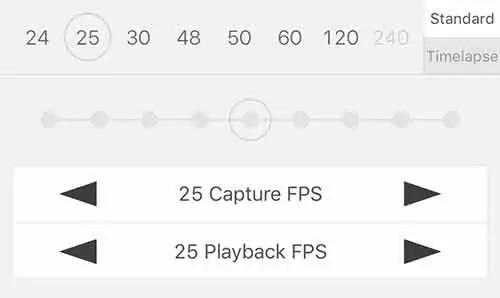
FiLMiC Pro gives you access to the frames rates you need. They include 24, 25, 30, 48, 50, 60, 120, or 240 frames per second.
3: Shutter speed & ISO control
When using the native camera app, the exposure is controlled by a combination of the sensor sensitivity (ISO) and Shutter Speed.
But the video and film industry tends to use the 180-degree rule.
It’s a relationship between the frame rate and shutter speed that introduces just the right amount of motion blur so the recording appears like human vision.
The 180-degree rule states that the shutter speed should be double your frame rate. So, if you are shooting at 30fps the shutter speed is 1/60.
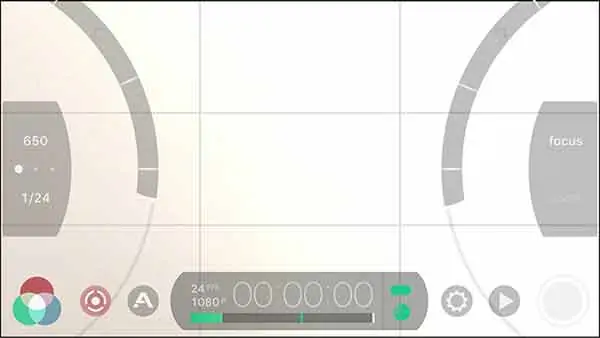
To the left of the exposure arc slider, you will see two numbers separated by three white dots. The upper number is your ISO. The lower number is your Shutter Speed.
Drag the arc slider and adjust the exposure. You will notice the ISO and shutter speed will vary together. Assuming you are shooting at 30fps when the shutter speed is 1/60 (1/48 for 24fps or 1/50 for 25 fps). Tap on the shutter speed. It will turn red and will be locked.
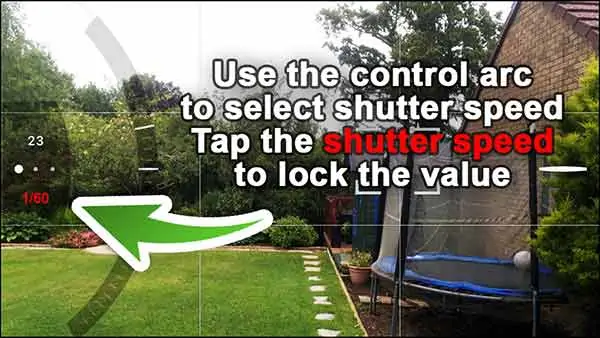
If the shutter speed is much higher, make sure the left most of the three white dots is highlighted and try again.
Note: The 180-degree rule is intended to make motion look natural. But if you are recording a piece-to-camera or interview the rule can be relaxed and you can vary the shutter speed as necessary. If recording green screen footage increase the shutter speed. This will eliminate motion blur on hand movements and make pulling a good key much easier.
4: Manual focus control
If you are using your smartphone to film yourself, you’ll probably use autofocus.
However, precise manual control is useful, especially if you are filming objects that are a few inches to a couple of feet away. For instance, macro videography or product shots.
Just like adjusting your ISO and Shutter Speed you will use the arc manual sliders. Open the one on the right of the display. You’ll see a tab between the arc and the side of the screen with “focus” and “zoom”. Make sure the word “focus” is highlighted.
Drag the arc up and you’ll focus on background objects. To focus on foreground objects, pull the arc downwards.
To lock the focus, tap the screen away from the arc slider. You’ll hide the arc, and the square reticle will appear red (unless you’ve chosen to hide that as well).
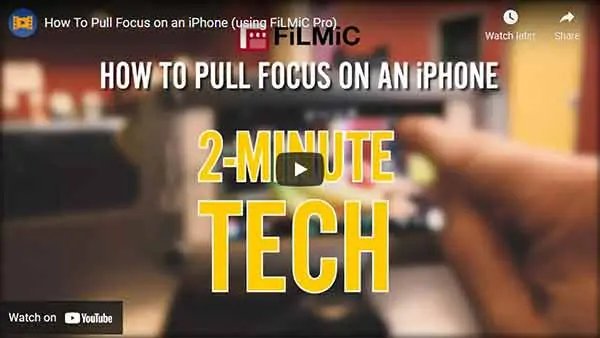
5: Pull-to-Point feature
Pull-to-Point is one of the features that can help add visible production value to your videos.
It can be used to create smooth and precise pull focus, zooms and changes in exposure.
You may have noticed the manual arc controls are intersected by short lines. The line is the current level of focus, zoom, or exposure. The other two lines are the points to which the video app will move the focus, zoom or exposure.
You’ll most likely use the feature to pull focus in your scene, a very cinematic technique.
To set a pull-point, adjust the manual control arc to where you want your point. Then tap on the centerline on the arc. Now do the same to set your other pull point.
With both pull-points setup, you can focus anywhere in between by dragging the arc. When you want to pull focus to one of your setpoints just tap on that mark on the arc control. The FiLMiC Pro video app will execute a perfect pull focus for you.
To adjust the speed of the pull focus swipe left on the focus/zoom tab to reveal a slider. Use this to change the speed between 1 (slow) to 10 (fast). A speed of 5 is about right in most cases.
Creating the pull-focus technique with the FiLMiC Pro video app is demonstrated in this video by iPhonegraphers.
6: Histograms and WFM
The time code counter hides three gems, although they could do with being a little taller. One of these is normally only available on pro video cameras.
You can go through them by tapping the time code counter. They are a luminosity histogram, an RGB and composite histogram, and finally a Wave Form monitor.
The histograms will help in judging your exposure. The WFM, I find useful when judging whether the illumination is even across a backdrop. A useful tool when shooting talking head videos against a white or green screen.
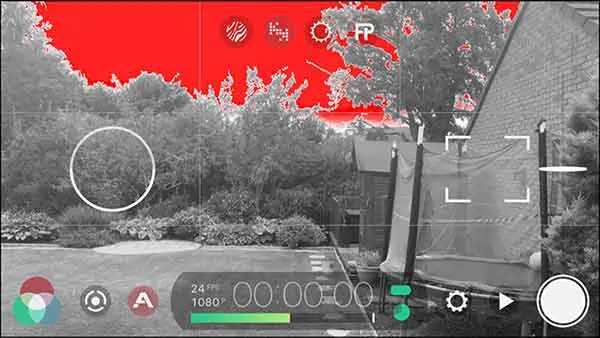
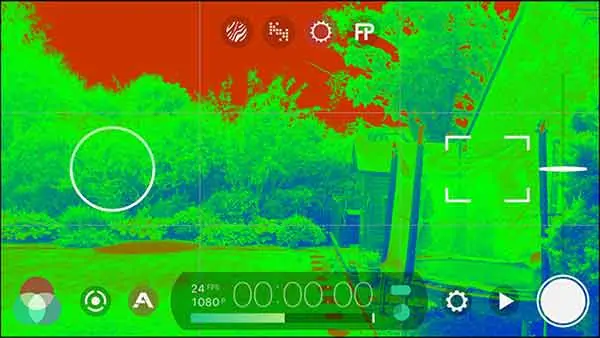
7: Real-time analytics
The FiLMiC Pro video app includes live analytics that you might expect on professional video cameras.
Tap on the Analytics button in the bottom left quarter of the screen (it looks like an A) to reveal the Analytics tray. This is located at the top center of the display and includes four buttons. From left to right they enable Zebra Stripes, Clipping, False Color, and Focus Peaking, and Zebra Stripes.
Zebra Stripes: Underexposed areas are overlain with blue backward stripes. Overexposed areas are overlaid with red forward stripes.
Clipping: A red overlay is displayed over areas where the image is so overexposed that the signal is “clipped” and effectively recorded as white. A blue overlay is displayed over areas that are underexposed.
False Color: This overlay provides whole image information. Over and underexposed areas are overlaid in red and blue respectively. Areas that are correctly exposed are overlain in green.
Focus Peaking: This provides information on areas that are in focus. Edges that are in focus will be shown in green, the sharper the focus the brighter the green.
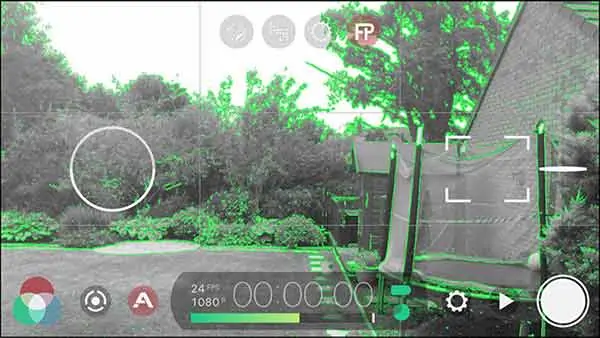
If you leave the analytics tray open, whenever you use the manual arc sliders to adjust exposure or focus, the zebra stripes or focus peaking will automatically be applied. Once you let go of the slider the zebra stripes or focus peaking will fade off.
8: White balance
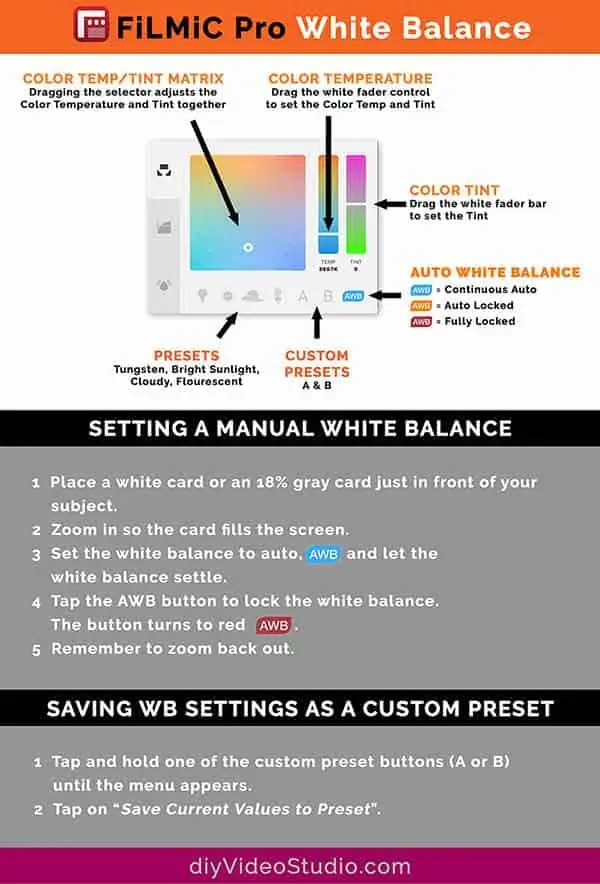
FiLMiC Pro provides a comprehensive set of tools to nail your white balance during the shoot. Although you could also use them to warm or cool your shot during the shot.
You’ll find the usual default presets, a couple of custom presets, plus auto and manual white balance.
Tap the imaging panel button in the lower-left corner of the screen (three overlapping color circles), to access the white balance controls.
You can set your white balance manually by the Temperature/Tint Matrix or the Color Temperature/Tint sliders. However, the easiest way to set a correct white balance is to use a white or gray card and the auto white balance.
- Place a white card or an 18% gray card just in front of your subject, so that the light falling on the card will be the same that illuminates the subject.
- Use the zoom rocker to zoom in until the card fills the screen.
- Set the white balance to auto, that’s the blue AWB button, and let the white balance settle.
- Tap the AWB button to lock the white balance. The button will turn red.
- Now zoom back out.
Saving the white balance settings for future use is easy. Once you have your white balance set, save them as one of the custom presets as follows.
- Tap and hold one of the custom white balance buttons (A or B) until a menu appears.
- Tap on “Save Current Values to Preset”.
9. Cinematographer Kit
The filmic pro cinematographer kit is an in-app purchase, but it’s worth the extra expense.
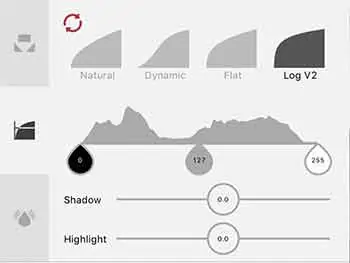
Shooting flat and log footage has been the cause of a lot of buzz online. It’s what you expect on pro video cameras and pro DSLRs. Videographers are so keen to shoot that way that they’ll use third-party software to “upgrade” their cameras, potentially invalidating their warranty.
With the filmic pro cinematographer kit, the video app allows you to shoot with a flat and log gamma profile.
If you don’t know what that means, shooting with FiLMiC Pro log V2 will give you more dynamic range. So, after applying the deLOG LUT in your editor, you will see more detail in the shadows.
The latest iPhones and FiLMiC Pro Log V2 will give you over twelve stops of dynamic range, but the results on an iPhone SE are noticeably enhanced.
Although you must pay extra for the FiLMic Pro Cinematographer Kit, FiLMiC Pro LUTs are free downloads from the FiLMiC Pro website![]() .
.
10. Hardware support
While other video apps just concentrate on shooting footage, FiLMiC Pro also integrates with external hardware.
It offers support for the DJI Osmo Mobile, Zhiyum Smooth 4, Movi Cinema Robot.
Moondog Anamorphic Adapter, BestGrip 35mm adapter and stereo microphones.
Personally, I have used FiLMiC Pro with both the original DJI Osmo Mobile and the Osmo Mobile 2. Instead of controlling the video app from the screen, the hardware buttons of the OSMO Mobile can be used instead.
To work with external hardware tap on the gearwheel and then the hardware box. Scroll through the list of hardware. When you have found the one you are looking for, slide across the switch button.
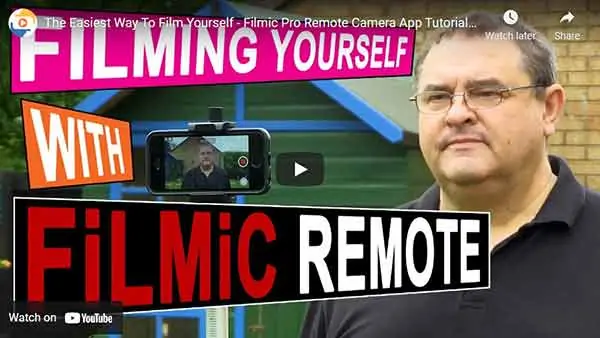
11. Filmic Pro Remote
If you have tried making a selfie video or filming yourself on a smartphone, you will understand that framing yourself can be a haphazard affair.
Since you want to record in the best possible quality, naturally you want to use the rear-facing camera.
Now there’s the problem.
If the rear-facing camera if pointing at you, you cannot see the smartphone’s display.
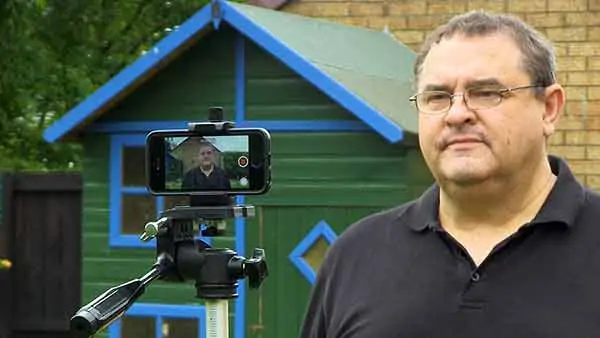
Provide you have a second device, FiLMiC has a solution. It’s called FiLMiC Remote.
Remote allows the use of an iPad, or second phone, not only as an external monitor but also as a remote control.
FiLMiC Remote allows you to frame yourself correctly, set your exposure and focus, and then start recording. All from your second device.
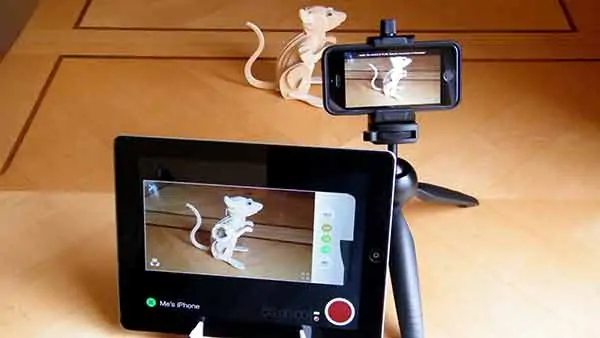
In the image above, you can see my iPhone SE is recording a shot of the wooden mouse. In the meantime, the iPhone recording is being monitored and controlled on the iPad using FiLMiC Pro Remote.
When I’ve used Remote it has occasionally been a little flaky. Overall, it makes recording yourself when filming with an iPhone much easier. Even when recording someone else, the large screen size of an iPad is especially useful to check the focus.
You can save yourself a little money by purchasing the video app and Remote together. You can find out more on iTunes about the FiLMiC Pro Camera Kit![]() .
.
I’ve written an article about how to film yourself on a phone that provides five methods that will allow you to see yourself when using the good quality rear-facing iPhone camera![]() .
.
12. Choice of recording quality and resolutions
Most consumer level cameras do not offer a range of resolutions and data-rates you can shoot at.
This is where FiLMiC Pro comes up trumps again. The video app provides the following resolutions.
- SD 540p
- HD 720p
- HD 1080p
- 2K 1152p
- 3K 1836p
- 4K 2160p
But that’s only half the story. The data-rate is important in determining the video quality.
FiLMiC Pro offers four target data-rates.
- FiLMiC Extreme
- FiLMiC Quality
- Apple Standard
- Economy
I’ve covered these, and provide more details, in my article on FiLMiC Pro settings.
If you want the best possible quality, perhaps because you are shooting for television or cinema, HD 1080p or 4K at FiLMiC Extreme quality would be your choice.
The same choice of resolution and data rate would also apply if you were shooting in front of a green screen or intend to color grade your footage. Your files will be large, but your footage will be more robust and handle the processing in post-production.
13. Headphone monitoring
If you are serious about shooting video, you will want to be able to monitor your audio during your recording session.
Even though the iPhone no longer has a headphone socket the FiLMiC Pro video app allows you to listen to your audio on Bluetooth headphones or earbuds.
This ability to monitor your sound is important since it allows you to catch audio problems early on and not once you’ve got your footage onto your computer.
When I record on my iPhone, I use a pair of Anker SoundBuds Slim. They are relatively cheap and work fine. With my setup, the only problem is that I cannot wear the Bluetooth SoundBuds throughout the recording due to a delay. Perhaps on more recent (and so more powerful) iPhones, there may be less of a delay.
Even with the delay, I can still check the audio, even if I then set aside my earbuds once I start my piece-to-camera.
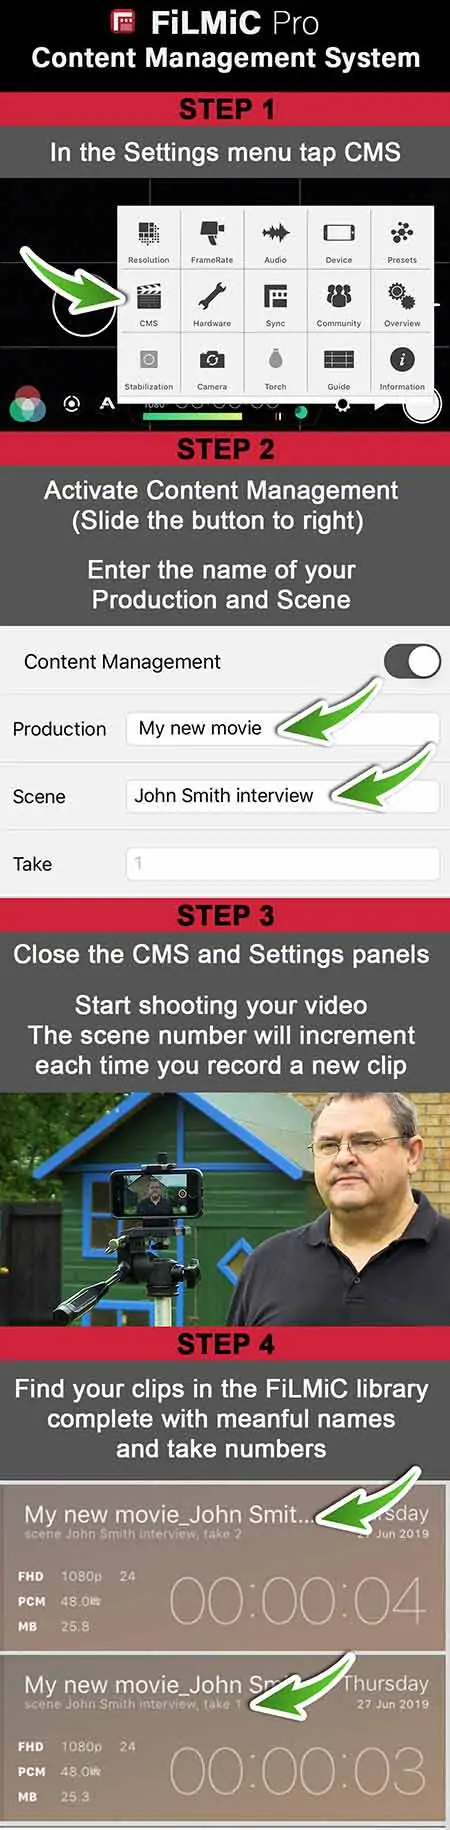
14. CMS or Content Management System
To boost your video production productivity, it makes sense to dedicate one longer session for the recording of several videos.
The problem with that is that it’s easy to lose track of what’s on each clip, especially if you do a few takes of each section or scene.
The video app’s Content Management System allows you to give meaningful names to your clips.
Go into your settings and tap on CMS. Then slide over the switch for Content Management.
You can now give titles to the production and the scene. In the example below I’ve called the production, “My New Movie”, and the scene name is, “John Smith Interview”.
Each time I start recording the clip will be given the take number, starting with take #1.
Keep a note of which takes are keepers and you will speed up the post-production process. You will know what each clip is, and which ones you need to transfer over to your computer for editing.
Conclusion
In my opinion, the FiLMiC Pro video app offers so much, especially if you are an iPhone user and get FiLMiC Remote and the Cinematographer’s kit.
What’s exciting about using a smartphone with FiLMiC Pro is that they open up filming opportunities that aren’t there if you use conventional cameras.
Having FiLMiC Pro on a recent iPhone is like having a movie studio in your pocket. You can shoot and edit your video right on your phone.
Tosh Lubek runs an audio and video production business in the UK and has been using the Canon EOS R since it was released in the Autumn of 2018 and the Canon EOS R6 in 2020. He has used both cameras to shoot TV commercials broadcast on Sky TV, promotional business videos, videos of events and functions, and YouTube creator content. He has also won several international awards for his advertising and promotional work. You can meet him by visiting his “video booth” at HashTag Business Events across the country.
Recent Posts
Most people use sandbags the wrong way. Here’s how to hang them properly on a light stand for maximum stability and safety — plus what to fill them with.
You're Using the Canon RF 50mm f/1.8 WRONG! Here’s How to Fix It
If you’ve recently picked up the Canon RF 50mm f/1.8 STM—affectionately known as the Nifty Fifty—you might be confused by that strange switch on the side of the lens. It doesn’t say AF/MF...