
Author: Tosh Lubek Published: 17th July 2023
DIY Video Studio is supported by its readers who use the affiliate links or ads on this site. As an Amazon Associate, I earn from qualifying purchases. Thank your support if you use any of the links.
The Zoom Handy recorders are excellent portable recorders for audio and video production. I’ve had my Zoom H4n for about ten years and before that, I used the Zoom H4 when I worked in various radio stations.
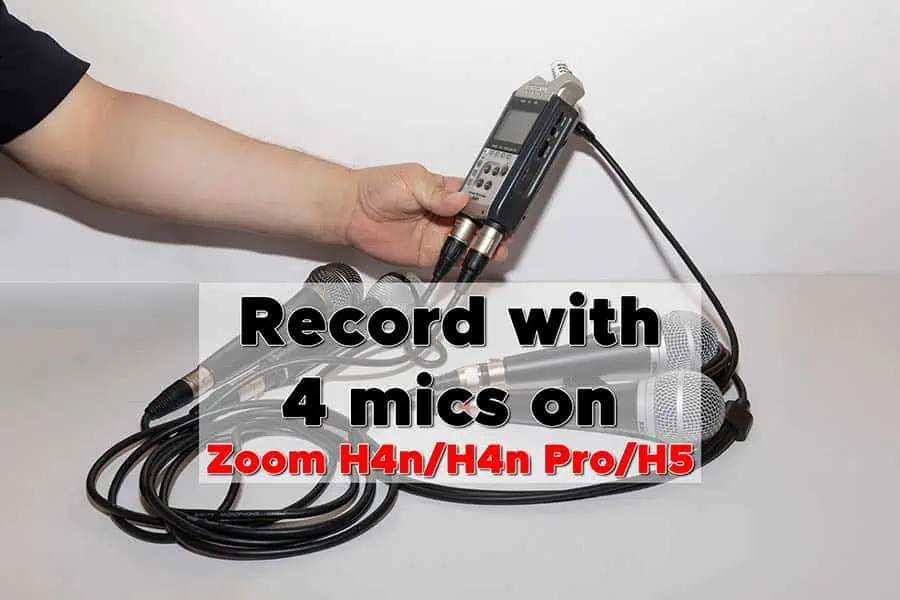
The Zoom H4n, H4n Pro, and H5 all have a feature that makes them useful for podcasters, musicians, and other content creators. They all can record four separate audio sources simultaneously.
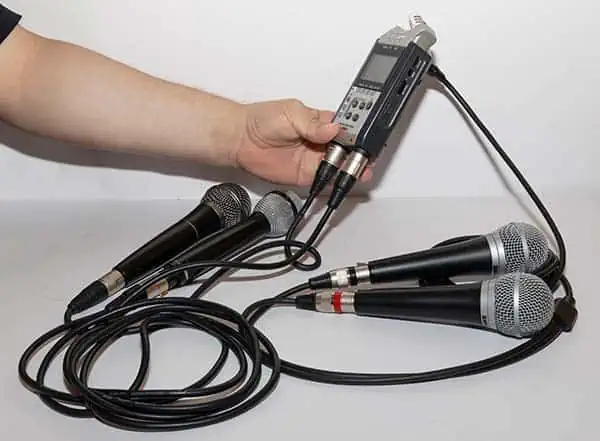
If you have one of these recorders you might be yelling, “Yeah. But two of those audio sources are the built-in microphone capsules”. But in this article, I’ll show you how you can record with up to four external microphones on the Zoom H4n, H4n Pro, and H5.
I’d like to thank one of my YouTube viewers, @marcodanieli2467, for asking a question that prompted me to write this article.
Setting up your Zoom device for 4-channel recording
If you didn’t already know, the Zoom H4n, H4n Pro, and H5 can record up to 4 audio tracks. However, when you received your recorder, it will be in its default mode, which is STEREO.
That’s not so surprising. Most people will either use the built-in XY stereo mics or the two XLR/Jack inputs. In both cases, you have two microphones, so a two-channel or stereo recording is perfect. On playback the output from each microphone will be on its own channel or track, appearing on the left or right.
But if you want to push your Zoom Handy recorder to its full capabilities and record 4 separate tracks, perhaps using the two built-in mics and the two XLR inputs, you need to change the recording mode. Don’t fret, this is easy to do.
Once the recorder has booted, press the MENU button and scroll down and select MODE. On the MODE SELECT screen you will have three choices:
- STEREO
- 4CH
- MTR
Stereo is obviously stereo mode, 4CH is the 4-channel mode, and MTR is the multi-track mode. To record 4-channel audio scroll to 4CH, then press the scroll dial to select it. The recorder will exit the menu system and return to the record screen. However, you will notice that the display has changed slightly.
On the Zoom H4n and Zoom H4n Pro you will now see four level meters instead of two. The first two are marked MIC L and R. These represent the levels on the built-in mics are a mic that has been plugged into the 3.5mm MIC socket on the rear of the silver mic capsule section. Below these, you will see two further level meters marked IN 1 and 2. These represent the levels of mics or instruments that have been plugged into the XLR/Jack combo inputs 1 and 2.
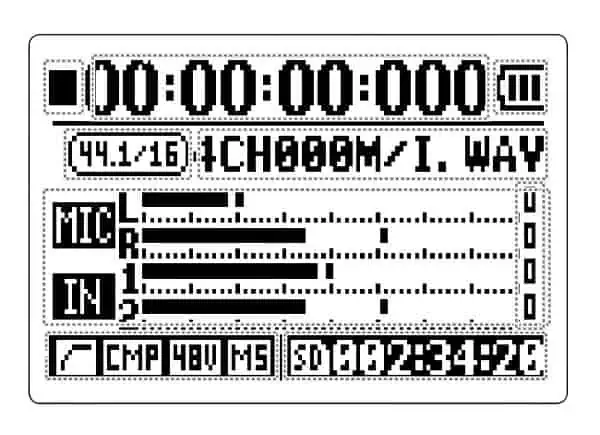
You will also see that all three INPUT buttons are lit up. If you press the MIC button, the current MIC record level will be displayed. Unfortunately, the MIC L and R record levels are linked and cannot be adjusted separately.
If you press INPUT button 1 or 2 the current recording level will be displayed on those inputs.
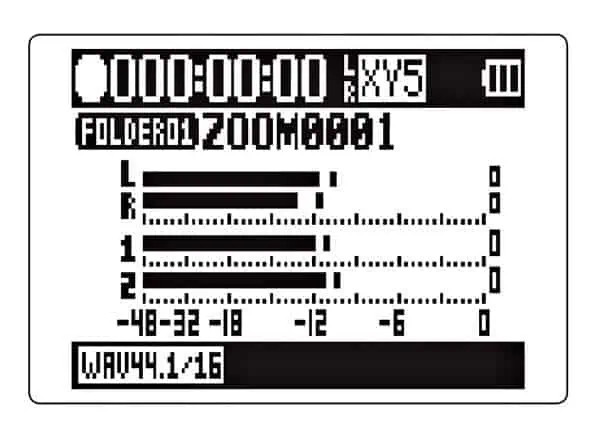
On the Zoom H5, the 4-channel mode is called Multi File mode. To select it, go into the Menu, then REC MODE, and then MULTIFILE. After enabling multi-file mode you will see four level meters. on the screen. From top to bottom, they are marked as L, R, 1, and 2. The L & R represent the MIC input and 1 & 2 are Inputs 1 & 2.
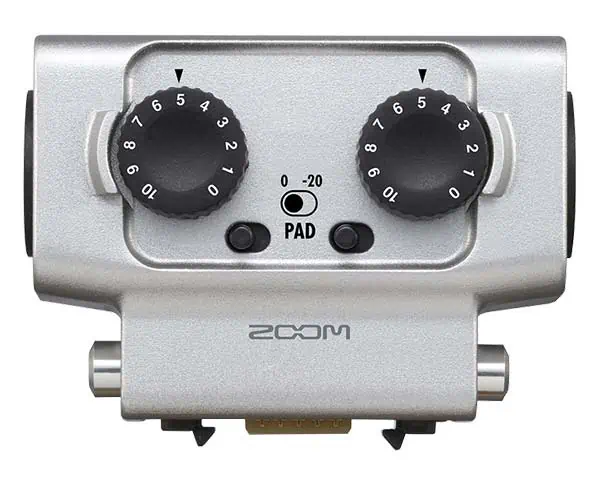
As a side note, I should point out that the EXH-6 dual XLR/TRS Combo capsule (see opposite) is available for the Zoom H5 and replaces the XY mic capsule. Using the EXH-6 is the best way to record four separate inputs on the Zoom H5 since the capsule includes two XLR connectors and level controls for these two inputs. However, my method is cheaper than purchasing the optional EXH-6 capsule.
As a side note, I should point out that the EXH-6 dual XLR/TRS Combo capsule is available for the Zoom H5 and replaces the XY mic capsule. Using the EXH-6 is the best way to record four separate inputs on the Zoom H5 since the capsule includes two XLR connectors and level controls for these two inputs. However, my method is cheaper than purchasing the optional EXH-6 capsule.
Now that the Zoom recorder is in 4-channel (4CH) mode, we can proceed to recording multi-channel audio with it.
Recording 4-channel audio on the Zoom H4n, H4n Pro, and H5
In this section, I’ll explain four different scenarios for recording 4 channel audio on these Zoom recorders.
The setups are as follows:
- Recording with 2 XLR mics and the 2 built-in XY mic capsules
- Recording with 2 XLR mics and 2 lavalier or 3.5mm video mics
- Recording with 4 XLR microphones
- Recording with 4 Lavalier microphones
Some of the procedures are the same in many of these setups, so to save you reading time I’ll mention them before getting into the individual scenarios.
PHANTOM POWER: The first is the use of the XLR/TRS Jack combo inputs, which are known as Inputs 1 & 2. If you use condenser microphones on these inputs you’ll probably need phantom power. Fortunately, your Zoom Handy recorder can provide phantom power, but it will increase the power drain on the batteries. So, it’s worth knowing that these recorders offer a few different voltages for phantom power. Choosing a lower voltage can reduce power consumption and extend the recording time on one set of batteries. Phantom power is not required by most dynamic microphones.
When phantom power is enabled on these Zoom Handy recorders, it is provided on both H4n/H4n Pro XLR inputs. However, on the H5 you can select which XLR input receives phantom power.
To enable phantom power, press the MENU button, scroll down and select INPUT, then press the scroll dial. On the INPUT SETTINGS screen scroll to and select PHANTOM then press the scroll dial. Voltages of +24V and +48V are available, scroll over the required phantom voltage and press the scroll dial. Finally, press the MENU button twice, or one long press, to exit the menu.
On the Zoom H5 follow this path in the menu. MENU > IN/OUT > IN 1/2 PHANTOM > ON/OFF.
On the ON/OFF screen select to which input you wish to send phantom power. Selecting ALL will send power to both Input 1 & 2. Back up to the In 1/2 PHANTOM screen and choose VOLTAGE. On the Voltage screen, you can choose the phantom power voltage to be +12V, +24V, or +48V.
SELECTING THE INPUTS: On the H4n and H4n Pro the MIC and Inputs 1 & 2 will have been automatically selected when switching to 4-channel mode, so you should see all three INPUT buttons glowing red.
On the Zoom H5, the track indicator lights and buttons are below the two round input level dials and are marked L, R, 1, and 2. Press the buttons of the tracks you want to record. The indicator light above the selected tracks will light red.
SETTING THE RECORDING LEVELS: To adjust the recording level on each input, press the relevant input button (MIC, 1, or 2) to choose the microphone you wish to adjust and then use the Recording Level control on the side of the recorder to set the required peak level.
Note that the L and R channels of the built-in microphone (MIC) input are linked, so the same adjustment will be applied to both channels.
On the Zoom H5 use the round record level dials to set the recording level. The single round dial controls the level of both the L and R inputs from the XY microphone capsule. The level on Inputs 1 and 2 are controlled by dial 1 and dial 2.
Recording with 2 XLR and the 2 built-in mics on the Zoom H4n/H4n Pro/H5
This is the easiest setup and only requires two XLR microphones and two XLR microphone cables. The two XLR microphones can be either condenser or dynamic mics. Plug the two XLR mics into the XLR inputs on the base of the recorder (inputs 1 & 2). Set the recording level as described earlier. This is the easiest setup and only requires two XLR microphones and two XLR microphone cables. The two XLR microphones can be either condenser or dynamic mics.
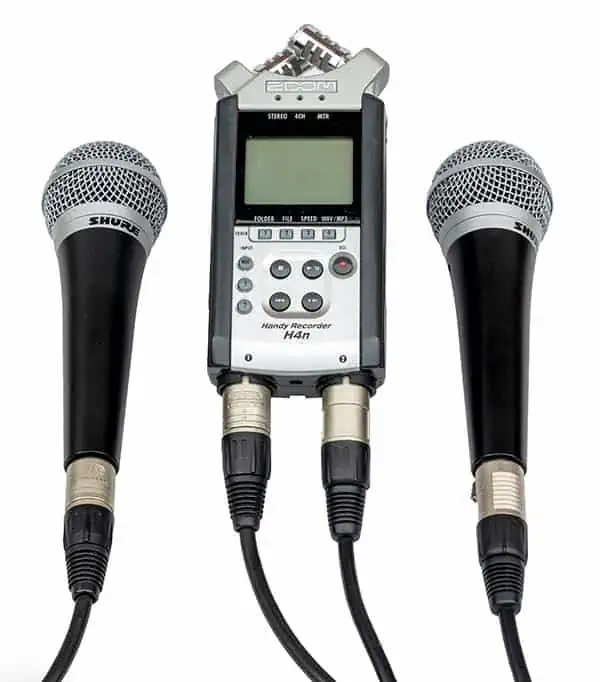
Plug the two XLR mics into the XLR inputs on the base of the recorder (inputs 1 & 2). Set the recording level as described earlier.
Note that it is not necessary to use two XLR microphones. If you only need one microphone you do not need to plug in a second, all that will happen is that the unused track will be blank.
Recording with 2 XLR and 2 Lavalier mics on the Zoom H4n/H4n Pro/H5
This setup is useful for audio podcasts or where you have up to four audio sources in a video. Connect your XLR microphones to inputs 1 & 2 on the base of the recorder, as described in the previous setup.
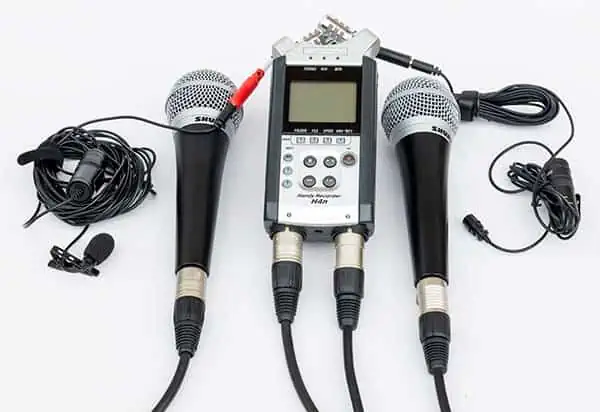
For the two Lavalier microphones, you’ll use the 3.5mm MIC input on the rear of the H4n/H4n Pro or the right side of the XY mic capsule on the H5. This is a stereo input, so it has a left and right channel. If you separate the left and right channels you can record different mono inputs to each.
Necessary Adapter: To get this to work you will need a stereo breakout 3.5mm TRS to dual 3.5mm TSF adapter. Normally this splits a stereo signal into two mono signals, where one is the left leg of the stereo signal and the other is the right leg of the stereo signal. However, you will use it in the opposite way and have it combine two mono signals into a stereo signal that can be recorded on your Zoom device.
The stereo breakout adapter I use is made by HOSA and is available on Amazon. Here is the link if you want to get the same one.
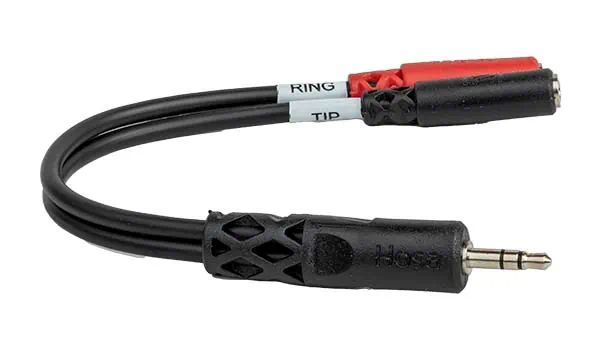
This consists of a male 3.5mm TRS jack that splits into two female 3.5mm jack sockets. The black socket is marked TIP, indicating it carries the signal that connects to the tip of the 3.5mm TRS jack. The red socket is marked RING because it carries the signal that connects to the ring on the 3.5mm TRS jack.
CONNECTING YOUR LAV MICS: Although I’m referring to Lavalier mics, you could also use any mics with 3.5mm TRS jacks. For example, you could use a Rode VideoMic Pro+ or Deity V-Mic D3 Pro.
Plug the 3.5mm jack of the HOSA breakout adapter into the TRS MIC socket on the back of the Zoom H4n / H4n Pro recorder. On the H5, the socket is on the right side of the XY mic capsule.
Now plug your two mics into the adapter’s female sockets. If you’re concerned about the spatial position of the mics, the black socket corresponds to the left audio and the red socket corresponds to the right audio.
Your microphones must have TRS jacks or TRRS jacks that are switchable to a TRS layout. Lavalier mics such as the MOVO LV1 and BOYA BT-M1 can do this by moving the switch on the control unit. I have both Lavalier mics, which are basically the same but sold under different brands. The audio quality and versatility are remarkably good when you consider their low cost. I’ll include a couple of links to these mics on Amazon.
Buy the BOYA BY-M1 and MOVO LV1 Lavalier Microphones on Amazon

- SUPERIOR SOUND QUALITY – Capture crystal-clear audio with the omni-directional polar pattern,…
- MINIMAL BACKGROUND NOISE – Achieve pristine audio with a signal-to-noise ratio of 74dB or more,…
- EFFORTLESS COMPATIBILITY – Connect to a wide range of devices using the 1/8″ Mini TRRS connector,…
- ULTIMATE PORTABILITY – The included storage pouch and compact design make it easy to carry and…
Last update on 2025-10-20 / Affiliate links / Images from Amazon Product Advertising API
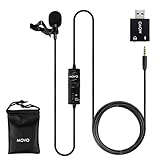
- BE HEARD CLEARLY – Easy to install USB lavalier microphone creates clear sound for video tutorials,…
- UNIVERSAL COMPATIBILITY – Included USB adapter allows seamless compatibility with both 3.5mm and USB…
- 1-YEAR WARRANTY: We’ve got your back. Our products are designed to ease your technical woes, not…
- EXTENDED REACH -20ft cord for computer microphone usb provides space for movement as you record your…
Last update on 2025-10-20 / Affiliate links / Images from Amazon Product Advertising API
Since these microphones have 20ft cables they suit this setup. You will have plenty of cable length to comfortably record four people around a table for an audio podcast or place your subjects at a reasonable distance from a video camera.
If you use a Lavalier mic that is not self-powered, you will need to enable Plug-In power on your Zoom recorder. You can think of this as being like phantom power for Lavalier microphones, but plug-in power and phantom power are certainly not the same.
You can enable plug-in power in the Zoom recorder’s menu.
Press the MENU button, scroll down to INPUT, and press the scroll dial. On the INPUT SETTING screen scroll down to PLUG-IN and press the scroll dial. In the PLUG-IN POWER menu choose ON and press the scroll dial.
On the Zoom H5, the process of enabling Plug-In power is very similar. Press the MENU button, scroll doe to IN/OUT, and press the scroll button. On the INPUT/OUTPUT screen scroll down to PLUGIN POWER and press the scroll button. On the PLUGIN POWER screen select ON and press the scroll button.
SETTING THE RECORDING LEVELS: As mentioned earlier, the L & R recording levels of the MIC input (H4n/H4n Pro) are linked and cannot be adjusted independently. Therefore, you will need to be careful to whom you assign the Lavalier microphones. Both people should speak at about the same level, but in any case, set the recording level based on the person who is the louder of the two. This will help to ensure their level does not clip.
To help manage your recording levels you could enable compression or limiting on the recorder. You’ll find the function in the INPUT menu (IN/OUT on H5). However, I prefer to do this in post-production since I do not like to “bake-in” effects into my original audio. I would also normalize all the individual channels in post-production so that each voice peaks at the same level.
As far as setting the recording levels on the MIC and XLR inputs, follow the instructions set out in SETTING THE RECORDING LEVELS![]() in the earlier section of this article.
in the earlier section of this article.
Recording with 4 XLR mics on the Zoom H4n/H4n Pro/H5
It is possible to record with four XLR microphones on the H4n/H4n Pro and on the H5 when using the supplied XY microphone capsule. As in the previous setups, any XLR microphones can be plugged into the XLR/TRS Jack combo inputs on the base of the recorder (Inputs 1 & 2).
Necessary Adapter: But to use two further XLR microphones you can again exploit the fact that the MIC input is stereo and that different audio sources can be fed to the left and right channels. As in the previous setup, you will need an adapter, but this time you will need a stereo 3.5mm TRS jack to dual female XLR Y-splitter breakout lead.
I bought the tisino Dual XLR to 3.5mm Stereo Mic Cable from Amazon and found it to work as required. If you want to buy the same adapter here it is on Amazon.
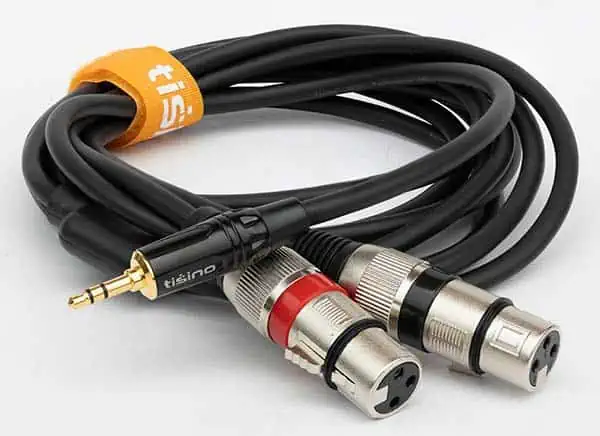
Buy the tisino Dual XLR to 3.5mm Stereo Mic Cable on Amazon

- This xlr to 3.5mm cable is designed to connect two microphones (left channel Right channel) with XLR…
- The XLR connectors are color-coded Black(Left Channel) and Red(Right Channel), It splits closer to…
- XLR Connector with internal strain relief for rugged reliability, Oxygen-Free Copper (OFC) conductor…
- Heavy Duty Gold-plated connectors resist corrosion, provide durability and improve the signal…
Last update on 2026-03-01 / Affiliate links / Images from Amazon Product Advertising API
Plug the 3.5mm TRS jack of the adapter into the MIC socket on the Zoom recorder. Then plug the XLR plugs on the Y-splitter cables into your XLR microphones. To use this type of adapter, you must have two XLR microphones attached. If only one XLR microphone is connected, you’ll hear a 50 or 60Hz mains hum due to a ground loop. Attach the second mic and the hum will stop.
When using the MIC input with the Y-splitter cable to plug in XLR mics you must remember that the MIC socket can only supply plug-in power and not phantom power. This means you can only use dynamic with the MIC input, unless you have condenser mics that are self-powered, or you have included an in-line phantom power supply.
To set your recording levels on the MIC and XLR inputs, follow the instructions set out in SETTING THE RECORDING LEVELS![]() in the earlier section of this article.
in the earlier section of this article.
Recording with 4 lavalier mics on the Zoom H4n/H4n Pro/H5
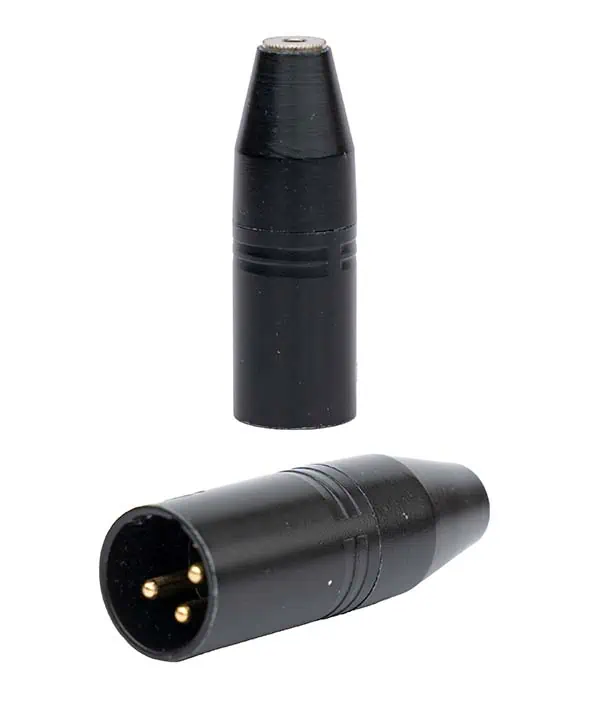
In each of the setups so far, I’ve always mentioned using XLR microphones with Inputs 1 & 2. However, there is no reason why you cannot connect Lavalier or other microphones that have 3.5mm TRS jacks. There are various connectors that can plug into an XLR socket and have a female 3.5mm jack socket at the other end that you can plug your 3.5mm microphone jack into.
One example is the Rode VXLR Mini-Jack Female to XLR Male Adapter. This Rode adapter is very affordable and is available on Amazon. Here is a link to the product.
Buy the RØDE Mini-Jack Female to XLR Male Adapter on Amazon

- The VXLR is a female 3.5mm TRS mini-jack to male XLR adaptor for connecting microphones with a 3.5mm…
- Female 3.5mm TRS mini-jack to male XLR adaptor
- 58.00mmH x 19.00mmW x 19.00mmD
- 1 year warranty
Last update on 2025-10-21 / Affiliate links / Images from Amazon Product Advertising API
Another option, which is also cheaper, is to use the 1/8” TRS jack part of the combo sockets on the Zoom recorder. You will need a 6.35mm (1/4 inch) Male to 3.5mm (1/8 inch) Female audio jack adapter for Inputs 1 and 2.
You can get a two-pack from Amazon for less than the cost of the fancy Rode VXLR to mini jack adapter. Here’s the link if you want to get the same product I’ve found.
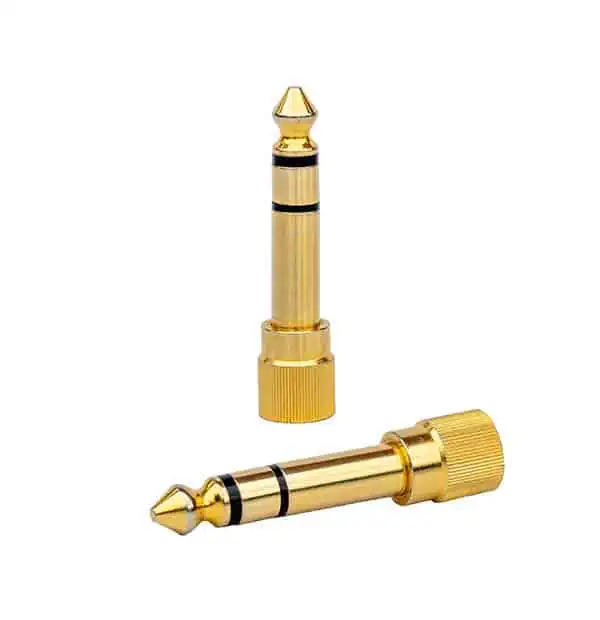
Buy the 6.35mm (1/4 inch) Male to 3.5mm (1/8 inch) Female Audio Jack Adapter on Amazon

- 1/4” to 3.5mm Audio Jack Adapters allow a 6.35mm stereo port to connect a 3.5mm plug aux cable
- Connect audio devices such as guitar amplifiers and AV receivers to headphones or MP3 Players with…
- 24K gold-plated connectors ensure reliability and eliminate signal loss and noise possible, offer…
- 1/8 inch to 1/4 inch TRS adapter. 360 degree grip treads help easy plugging and unplugging.
Last update on 2026-03-01 / Affiliate links / Images from Amazon Product Advertising API
CONNECTING TO INPUTS 1 & 2: Whichever of these two adapters you choose, plug one into each of the combo inputs on the base of the Zoom H4n/H4n Pro or H5 recorder. You can now plug your Lavalier or other microphones with a 3.5mm TRS jack into the adapters. Since you are not going to get any plug-in power from these two inputs, you’ll need to use microphones that have their own power source. The MOVO LV1 and BOYA BT-M1 lavalier microphones will work, as would the Rode VideoMic Pro+ or Deity V-Mic D3 Pro.
Now comes the second part of this setup, attaching two Lavalier microphones to the recorder’s stereo MIC input. To do this, use the same procedure mentioned in the setup to record with 2 XLR and 2 Lavalier mics. To save you from looking back, here is a summary of the procedure.
You will need a stereo breakout 3.5mm TRS to dual 3.5mm TSF adapter to combine the two lavalier microphone signals into a single stereo signal. This can then be fed into the stereo 3.5mm MIC input on the Zoom recorder.
Here is the stereo breakout adapter from HOSA that I use. It’s available on Amazon through the following link.
CONNECTING TO MIC INPUT: Plug the 3.5mm jack of the HOSA breakout adapter into the MIC input socket on the back of the Zoom H4n / H4n Pro recorder. On the H5, the socket is on the right side of the XY mic capsule.
Now plug your two mics into the adapter’s female sockets. The black socket corresponds to the left audio and the red socket corresponds to the right audio.
Please note that your Lavalier microphones must be designed to work with devices that have 3.5mm TRS sockets. If your Lavalier mic 3.5mm has four sections, the type that is/were used on smartphones, then they will not work. You need a microphone that has a 3.5mm TRS jack or a 3.5mm jack that can be switched over to a TRS layout. The microphones mentioned earlier will all work fine.
If your Lavalier mics are not self-powered, enable Plug-In power in the Zoom recorder’s menu.
To enable plug-in power, press the MENU button, scroll down to INPUT, and press the scroll dial. On the INPUT SETTING screen scroll down to PLUG-IN and press the scroll dial. In the PLUG-IN POWER menu choose ON and press the scroll dial.
On the Zoom H5, the process of enabling Plug-In power is very similar. Press the MENU button, scroll down to IN/OUT, and press the scroll button. On the INPUT/OUTPUT screen scroll down to PLUGIN POWER and press the scroll button. On the PLUGIN POWER screen select ON and press the scroll button.
What audio files are created in 4CH or Multi File mode
In 4-channel mode, the H4n records two stereo WAV files: one stereo WAV file for the built-in microphones (or MIC input) and one stereo WAV file for Inputs 1&2. The stereo file for the built-in microphones or MIC input has a file name that ends with “M”. The name of the stereo file for inputs 1 & 2 ends with “I”.
On the Zoom H5 in multi-file mode, the L/R inputs (XY mic capsule and MIC in) will be recorded to the L and R channels of a stereo wav file (ZOOMnnnn_TrLR.WAV). Inputs 1&2 will be recorded to two WAV files (ZOOMnnnn_Tr1.WAV and ZOOM0001_Tr2.WAV).
If desired, you can link the audio from input 1&2 into a single stereo file (like on the H4n/H4n Pro). To do this, press the track 2 button while pressing and holding 1. If you do this, two stereo files will be created, one for the L/R inputs and one for the 1/2 Inputs.
Once you are done, you can deactivate the stereo link by pressing the track 2 button while pressing and holding 1 again.
Summary
The Zoom H4n/H4n Pro and H5 can all record four audio tracks simultaneously, the two built-in XY microphones and the two XLR/Jack combo inputs. However, because the built-in microphones can be bypassed by plugging in an external 3.5mm microphone, it is easy to record with three microphones.
What is less well known is that you can in fact record with four microphones by using an adapter with the MIC input on the XY mic capsule. Depending on the adapter you use, you can plug in two 3.5mm microphones or two XLR microphones. This can make these Zoom recorders extremely useful for podcasters who need to record 2, 3, or 4 microphone sources.
In this article, I have described various scenarios, given details of what adapters you will need, and explained how to select your audio sources and set levels.
Here’s a big ask from me: If you liked this article, please share it.
It will mean a great deal to me if you share this post because a few seconds of your time will seriously help my blog grow. The share buttons are below the “About Author” section.
Thanks. 🙂

About the author: Tosh Lubek is a multi-award-winning broadcaster, writer, and video producer, with 40 years of experience in professional broadcasting and has been using Canon video and stills cameras since 2010. He has worked with radio and TV broadcasters, advertising agencies, and direct clients on a variety of projects including radio and television advertising, online video production, corporate videos, award ceremony motion graphics, and theme park sound design. Tosh has won numerous awards, including a Radio Academy Awards Gold Sony, a Gold, Silver, and Bronze World Medals in the New York Festivals International Advertising Awards. Since about 2007 he has been creating YouTube videos. Tosh has been a sponsor of the “video booth” at HashTag Business Events across the UK.
Recent Posts
Most people use sandbags the wrong way. Here’s how to hang them properly on a light stand for maximum stability and safety — plus what to fill them with.
You're Using the Canon RF 50mm f/1.8 WRONG! Here’s How to Fix It
If you’ve recently picked up the Canon RF 50mm f/1.8 STM—affectionately known as the Nifty Fifty—you might be confused by that strange switch on the side of the lens. It doesn’t say AF/MF...