
Author: Tosh Lubek Published: 15th March 2023
DIY Video Studio is supported by its readers who use the affiliate links or ads on this site. As an Amazon Associate, I earn from qualifying purchases. Thank your support if you use any of the links.
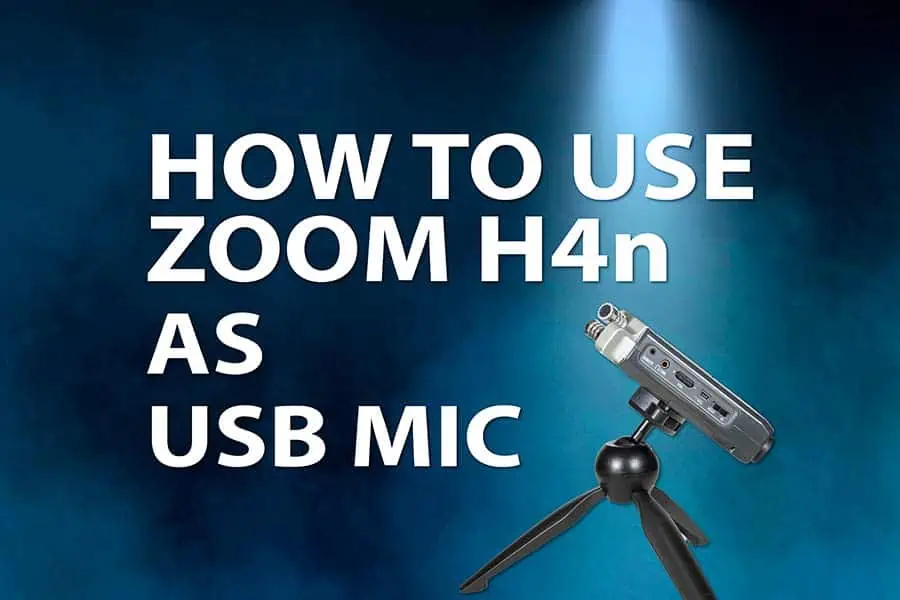
Remote communication has become increasingly prevalent, especially since the COVID pandemic. As a result, the need for high-quality audio has become ever more important. Although laptops and mobile devices have built-in microphones, they often produce mediocre results. But if you use a Zoom H4n or H4n Pro Handy recorder as a USB microphone, your colleagues will be able to hear you clearly.
To use the H4n (Pro) as a USB microphone, connect it to your computer with a USB cable. Let it boot up to the USB screen, then select AUDIO I/F. Choose your preferred sampling frequency, then select CONNECT. Finally, on the H4n, select the built-in XY microphones by pressing the MIC input button.
In this article I’ll lead you through the process of using the Zoom H4n (Pro) as a USB microphone, and how to get the best sound quality from it.
So, whether you’re looking to improve the quality of your online meetings, or want to record a voiceover, podcast, or instrument, read on and I’ll explain how you can record to your laptop using a Zoom H4n (Pro).
Setting up the Zoom H4n Pro as a USB microphone
Setting up the Zoom H4n (Pro) as a USB microphone is a straightforward process. It requires three things, however, a mini tripod stand or mic stand will also be useful:
- A computer with a USB port.
- The Zoom H4n (Pro).
- A compatible USB cable.
- Mini tripod stand.


Last update on 2025-10-20 / Affiliate links / Images from Amazon Product Advertising API
You do NOT need to have the Zoom H4n switched on prior to connecting it to your computer. In fact, the procedure is quicker if you start with the recorder powered off.
- With the Zoom H4n (Pro) turned off, connect it to your computer using the USB cable. The Zoom recorder will turn on, show the Zoom splash screen and then boot up straight to the USB menu screen.
- In the USB menu, you have two choices, STORAGE and AUDIO I/F. Select AUDIO I/F and press the scroll dial inwards to open the USB AUDIO I/F screen.
- On the USB AUDIO I/F screen you can select the sampling frequency (44.1kHz or 48kHz). Then select CONNECT and press the scroll dial. You will see “Please Wait” appear on the H4n (Pro) screen. After approximately 20sec a pair of audio level bar meters will appear on the screen.
- If not already enabled, select the built-in XY microphones by pressing the MIC Input button.
- Go into your computer’s sound settings and under Input, ensure the Zoom H4n (Pro) is as the Microphone. It will be identified simply as H4. Then adjust the volume to about 60%.
Troubleshooting your setup
If you’re having trouble with your setup, here are some troubleshooting tips to help you out:
- Make sure that your USB cable is functioning correctly and that both ends are securely connected. If possible, try using a different USB cable.
- Check your computer’s audio settings to make sure that the Zoom H4n (Pro) is selected as your default audio input device.
- Check that the input volume in your computer’s audio settings is not turned down or muted.
- Ensure that the built-in XY microphones are selected.
- If you’re using the Zoom H4n Pro with a DAW, other recording software, live streaming software, or a conferencing app, ensure that you have the Zoom H4n (Pro) selected as the audio input device in the software settings.
By following these simple steps and troubleshooting tips, you can set up your Zoom H4n Pro as a USB microphone in no time.
You might also like: How to Use Zoom H4n/H4n Pro as USB Audio Interface
When you have finished reading this article you might like to watch the YouTube video
Using the Zoom H4n Pro as a USB microphone
Setting up your Zoom H4n (Pro) to function as a USB microphone is only part of the story, you now need to optimize your audio quality.
Mounting the Zoom H4n as a microphone
You don’t want to be holding the Zoom handy recorder since this may introduce unwanted handling noise. Instead, use the threaded mounted hole on the rear of the recorder to attach it to a desktop or boom microphone stand.
Capturing a stereo voice recording
If you wish to record your voice in stereo, adjust the orientation of the Zoom H4n (Pro) so the top is pointing toward your mouth. You can imagine that the plastic body of the Zoom recorder is the tube-like part of a handheld microphone and the XY capsules are the equivalent of the mic capsule at the end of the handheld microphone.
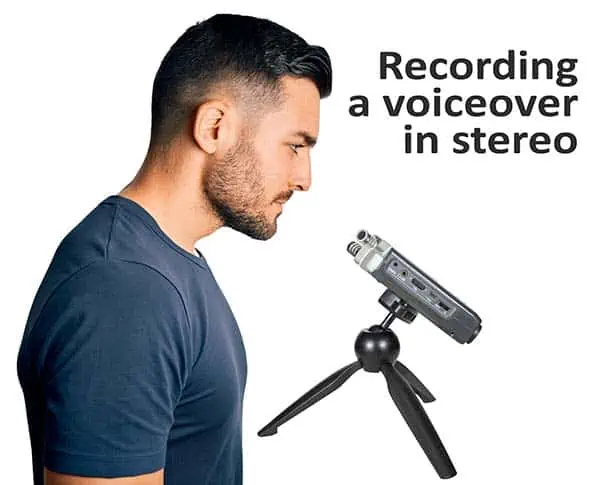
Although this is correct when using the handy recorder as a stereo microphone for streaming or recording music, you can improve the clarity of a voiceover recording by just using one of the mic capsules.
Capturing a clear voice recording
One of the problems with using the Zoom H4n (Pro) XY microphone is that the stereo recording of a voiceover can sound “off-mic” or perceived as having a slight echo. This isn’t really the case, but the effect doesn’t sound right for a voiceover. You really need to be speaking into, or just past one microphone.
Although both XY mic capsules are always active together, you can preferentially use one in your stereo recording and only use that track in your editing software.
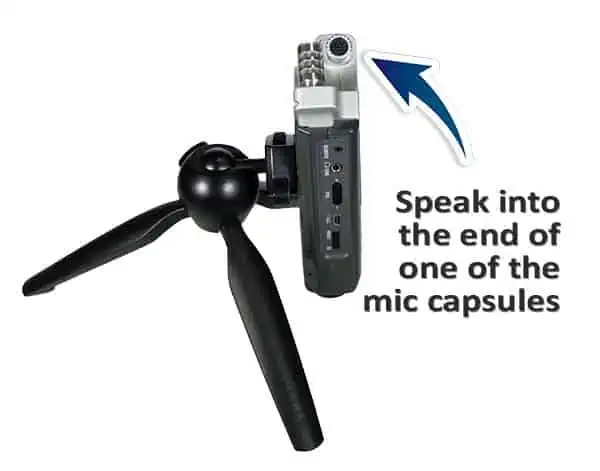
To achieve this, move the recorder, or yourself, so you are facing the end of one of the mic capsules and at about 6-8 inches.
Note that the left mic capsule records the right-hand audio and the right mic capsule records the left-hand audio (it’s because of the direction they are pointing and not which side they are on that matters).
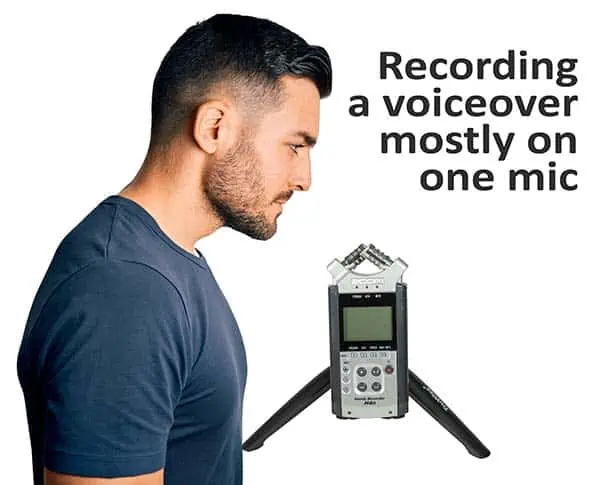
When you have finished recording split your stereo track into two separate mono tracks. Then delete the track with the lower level. This can easily be done in recording software such as Adobe Audition and Audacity.
With the stereo recording split in two, when you listen back to the two tracks you will notice that the voice on the higher-level mono track appears to be much clearer, while the voice on the lower-level track seems off-mic or even echoey.
Changing the way you use the microphones has effectively improved the clarity of one-half of your recording. This is because when using the XY mics as a stereo pair you are about 45° off to the side of each mic capsule. But when facing the end of one capsule, you’re speaking directly into that microphone where it is most sensitive and can capture its full range of frequencies.
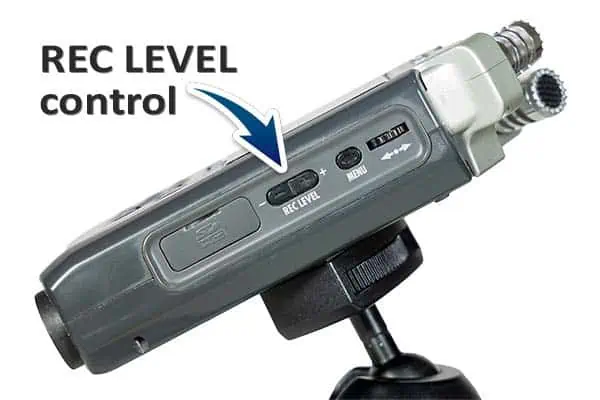
Adjusting the gain
Ensuring your recording level is correct is important. You can adjust it in two ways. There’s the input volume that you set in your computer’s sound settings (we set it to 60%).
But you can also use the Rec Level control on the Zoom H4n (Pro), which is where I suggest you do most of your gain adjustment.
Start by setting the gain fairly low and gradually increasing it until you reach your desired recording level. I aim to have my audio peak at around -12dB. You can either use the level meter on the handy recorder or check the level in your DAW.
Pros and Cons of using the H4n (Pro) as a USB Microphone
PROs:
One of the most significant benefits of using the Zoom H4n Pro as a USB microphone is that you already have one of these handy recorders. If you’re looking for a USB microphone I wouldn’t go out and buy a Zoom recorder. But if you already use the recorder for other things and want to save some cash, then this might be a solution that will work for you.
The portability of the Zoom H4n (Pro) is another stand-out feature. The device comes with a hard plastic case, it’s not very heavy, and it’s not too big. Everything I need to transport will fit into my camera bag, so I easily head out of my home studio to create content.
You also have a great deal of versatility. The built-in microphones are good-quality condenser mics, but you could plug in any XLR or 3.5mm lavalier mic and use the H4n as an audio interface.
CONs:
The technology in a Zoom H4n or H4n Pro is far from new. The analog to digital converters used in these recorders is not as good as those used in the latest USB microphones. For example, a cheap microphone like the Fifine K669 is an excellent USB condenser microphone, considering the price.
Unfortunately, the H4n does not simultaneously record to the SD card as a backup.
You might also like…
Summary
The Zoom H4n (Pro) is a versatile and powerful recording tool that can also be used as a USB microphone. Although it might not sound equal to the latest USB mics, it can perform well and is easy to transport. If necessary, it can be used to record music, a podcast, or voiceover directly to your computer’s DAW.
Here’s a big ask from me: If you liked this article, please share it.
It will mean a great deal to me if you share this post because a few seconds of your time will seriously help my blog grow. The share buttons are below the “About Author” section.
Thanks. 🙂

About the author: Tosh Lubek is a multi-award-winning broadcaster, writer, and video producer, with 40 years of experience in professional broadcasting and has been using Canon video and stills cameras since 2010. He has worked with radio and TV broadcasters, advertising agencies, and direct clients on a variety of projects including radio and television advertising, online video production, corporate videos, award ceremony motion graphics, and theme park sound design. Tosh has won numerous awards, including a Radio Academy Awards Gold Sony, a Gold, Silver, and Bronze World Medals in the New York Festivals International Advertising Awards. Since about 2007 he has been creating YouTube videos. Tosh has been a sponsor of the “video booth” at HashTag Business Events across the UK.
Recent Posts
Most people use sandbags the wrong way. Here’s how to hang them properly on a light stand for maximum stability and safety — plus what to fill them with.
You're Using the Canon RF 50mm f/1.8 WRONG! Here’s How to Fix It
If you’ve recently picked up the Canon RF 50mm f/1.8 STM—affectionately known as the Nifty Fifty—you might be confused by that strange switch on the side of the lens. It doesn’t say AF/MF...