
DIY Video Studio is supported by its readers who use the affiliate links or ads on this site. As an Amazon Associate, I earn from qualifying purchases. Thank your support if you use any of the links.
Author: Tosh Lubek Published: 21 February 2023
Superficially, the Zoom H4n and H4n Pro look different, but apart from the H4n Pro having a more rugged appearance and some better-quality components, such as improved mic preamps, both recorders function in basically the same way. So, whether you have a Zoom H4n or H4n Pro, you will be able to follow the instructions in this article.
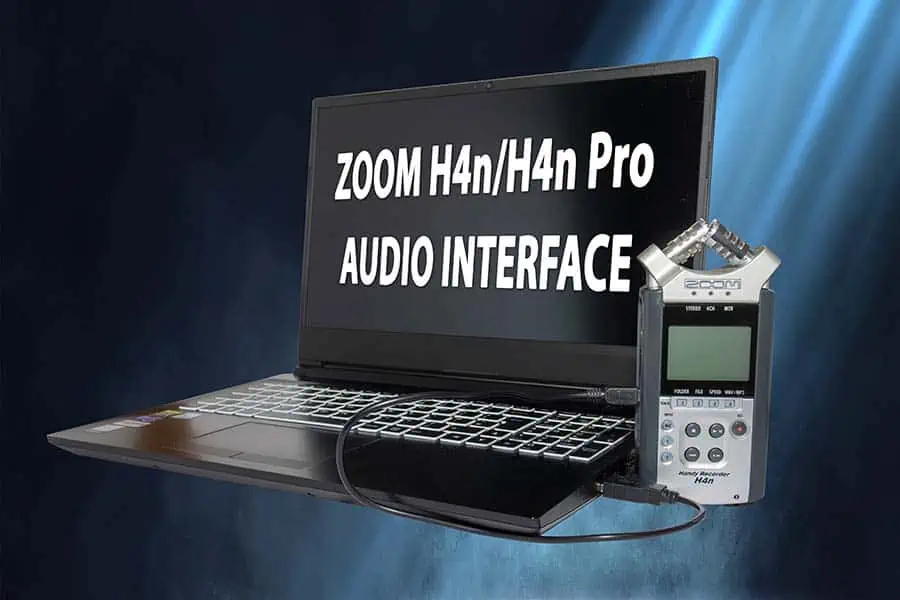
To connect a Zoom h4n or Zoom H4n Pro to a computer as an Audio Interface, use the USB cable that came with the device. Once connected and in the Zoom H4n USB menu, choose Audio I/F, then select your required sampling rate. Finally, choose Connect. The H4n will now behave as a 2-in/2-out audio interface.

- Capture Professional-Quality Audio: With four-track simultaneous recording, built-in X/Y stereo…
- Connect with Confidence: The H4N offers extensive connectivity options, including two mic/line level…
- Unlock Powerful Recording Capabilities: Record up to 140 dB SPL with X/Y microphones, and support up…
- Portable and Convenient: The H4N is compact and versatile, making it perfect for on-the-go…
Last update on 2026-03-13 / Affiliate links / Images from Amazon Product Advertising API
What do you need to use Zoom H4n/H4n Pro as an Audio Interface
Just like using a conventional audio interface, like a Focusrite Scarlet 2i2, you don’t need much to get a Zoom Handy recorder to function as an audio interface. You only need three things.
- A Zoom H4n or H4n Pro handy recorder.
- The USB cable that came with your recorder.
- Your Desktop or Laptop computer.
You do not need a power supply or even to have any batteries fitted in the recorder. When used as an Audio Interface the Zoom H4n can draw 5V bus power from your computer’s USB port, just like most modern audio interfaces do.
How to connect a Zoom H4n to a computer as a USB Audio Interface
As already mentioned, you will need the USB cable that came with your Zoom H4n/H4n Pro. This has a mini-USB connector at one end, which goes into the USB port on the Zoom recorder, and a USB-A connector at the other, which goes into a USB port on your computer.
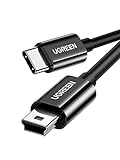
However, some recent laptop computers only have USB-C type ports. If this is the case, you will either need a USB-A to USB-C adapter or a dedicated mini-USB to USB-C cable. The adapter and cable I bought, tested, and have successfully used with my laptop are available from Amazon and I’ve provided links below.

Last update on 2025-10-20 / Affiliate links / Images from Amazon Product Advertising API
There are two starting points for setting up a Zoom H4n/H4n Pro as an audio interface. Basically, is your Zoom handy recorder powered on or powered off? As previously mentioned, you do not need to have batteries fitted or to have a power adapter connected, since the Zoom H4n/H4n Pro will draw power from the computer’s USB port. However, I’ll first describe how to use the Zoom H4n.H4n Pro as an Audio Interface from a powered-on state and then from a powered-off state.
Connect the Zoom H4n/H4n Pro in a powered-on state:
- With the recorder switched on, connect the H4n/H4n Pro to a USB port on your computer using a USB cable.
- Press the Menu button on the right-hand side of the recorder to enter the menu system.
- Scroll down and select USB, then press the scroll dial.
- Select AUDIO I/F, then press the scroll dial.
- Select FREQUENCY, then press the scroll dial.
- Select the sampling rate you require. The choices are 44.1kHz or 48kHz, once you have selected the sampling rate you want, then press the scroll dial.
- Finally, select CONNECT and press the scroll dial.
Connect the Zoom H4n/H4n Pro in a powered-off state:
- With the recorder switched off, connect the H4n/H4n Pro to a USB port on your computer using a USB cable. The recorder will turn on and quickly boot up to the USB menu screen.
- Select AUDIO I/F, then press the scroll dial.
- Select FREQUENCY, then press the scroll dial.
- Select the sampling rate you require. The choices are 44.1kHz or 48kHz, once you have selected the sampling rate you want, then press the scroll dial.
- Finally, select CONNECT and press the scroll dial.
Whichever route you chose, the H4n/H4n Pro screen will now show a display header of “USB Audio I/F”, and a two-channel audio meter. If you do not see the meter level bars moving, choose an active input using the input buttons. Since the built-in microphones are permanently available, press the MIC input button and you should see levels move as you speak into the recorder. If you still do not see any movement on the audio meter, check that the Rec. Level is not turned down.
How to disconnect the Zoom H4n/H4n Pro Audio Interface
Although it is possible to disconnect by just pulling out the USB cable from either the USB port on the recorder or computer, this isn’t necessarily the best way. Instead, you should use the DISCONNECT function in the H4n/H4n Pro menu.
- Press the MENU button on the side of the recorder to enter the menu.
- Scroll down and select DISCONNECT, then press the scroll dial.
- The screen will display, “Are you sure?” Select YES, then press the scroll dial. The screen will show that the device is saving data and then return to the AUDIO I/F screen.
- You can now pull out the USB cable.
What inputs can I use when using the H4n as an audio interface?
The Zoom H4n/H4n Pro has multiple inputs and all of them can be used as input sources, although not necessarily all at the same time. The inputs are as follows.
- Built-in X/Y stereo condenser microphone capsules.
- 3.5mm TRS EXT MIC input on the back of the X/Y microphone module.
- Two XLR/Jack inputs on the base of the recorder labeled Input 1 and Input 2.
These inputs can be selected by using the Input buttons that are to the left of the transport buttons. They are marked MIC, 1, and 2. The MIC input button will select the built-in X/Y microphone capsules or a lavalier microphone plugged into the H4n/H4n Pro EXT MIC socket. Inputs 1 and 2 select the two XLR/Jack sockets on the base of the recorder.
So, when using the H4n/H4n Pro as a USB Audio Interface you could use the recorder as if it were a microphone (using the built-in X/Y mic pair), plug in a lavalier microphone, use one or two XLR microphones or plug in one or two instrument ¼” jack inputs.
Number of channels and sampling frequencies
The Zoom H4n/H4n Pro can be used as a 2-in/2-out audio interface. So, you have two audio channels or a stereo pair.
There are only two available audio sample rates, 44.1kHz or 48 kHz. The first is the standard audio sample rate for most consumer audio, such as CDs. While 48kHz is a common audio sample rate used in video and film.
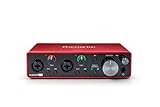
Compared to newer audio interfaces, like the very affordable Focusrite Scarlett 2i2, the audio sampling rates provided by the Zoom H4n/H4n Pro are limited. For instance, the Scarlet 2i2 offers a choice of sampling rates of up to 192kHZ.
Can you use another audio interface along with the Zoom H4n/H4n
As we already know, the Zoom H4n/H4n Pro can be used as a 2-in/2-out audio interface. Therefore, you could monitor the audio from your computer on the recorder’s built-in speaker or plug a set of headphones into the headphone socket.
Nonetheless, you could the Zoom H4n/H4n Pro audio interface for audio inputs and use another audio interface for playback to speakers. I have done this using a Focusrite Scarlet 2i2 and 8i6 but how useful this setup would be is debatable. The only instance where I would do this is if I needed to use the Zoom H4n/H4n Pro as a USB microphone. If I had a good quality XLR microphone and a Scarlet 2i2, I would just use them since I would have higher audio sampling rates available to me.
- Pro performance with great pre-amps – Achieve a brighter recording thanks to the high performing mic…
- Get the perfect guitar and vocal take with – With two high-headroom instrument inputs to plug in…
- Low-noise for crystal clear listening – 2 low-noise balanced outputs provide clean audio playback…
- Studio quality recording for your music & podcasts – Achieve pro sounding recordings with Scarlett…
Last update on 2025-10-20 / Affiliate links / Images from Amazon Product Advertising API
Is it worth using a Zoom H4n or H4n Pro as an audio interface?
I have already explained that when using the Zoom H4n/H4n Pro as an audio interface you only have two channels and a sampling rate of either 44.1kHz or 48kHz. However, this can still be very useful, especially since many creators will only use up to two channels simultaneously.
Although enthusiast musicians and audiophiles will want the highest sampling rates, for many, the sampling rates available on the Zoom H4n/H4n Pro will be good enough. This is especially the case if your recordings are destined for social media platforms like Facebook, TikTok, and YouTube. Only a tiny proportion of listeners will ever notice the difference.
So, who would use this audio interface?
- Someone who doesn’t already have an external audio interface.
- A person who wants to record on a second computer.
- An individual recording and producing away from a home studio.
What you’ll be recording is another matter, but I imagine two scenarios.
Recording music: In this case you could simultaneously record a vocal track and an instrument track in your computer DAW by using the two XLR/Jack inputs (Input 1 and Input 2). Alternatively, record with two microphones or two instruments, like electric guitars, keyboards, or acoustic pickup.
Recording a podcast: Record one or two XLR microphone inputs to your laptop computer DAW. Or use the built-in X/Y microphones on the Zoom H4n/H4n Pro as a USB microphone.
To use the H4n/H4n Pro as an audio interface, you will need to connect it to your computer using a USB cable, and then select it as the audio input/output device in your computer’s audio settings. The H4n/H4n Pro will appear as a separate audio device in your computer’s audio settings, and you can select it as the input/output device for your audio recording or playback software.
Final thoughts
If you have a Zoom H4n/H4n Pro you can use it as a 2-in/2-out audio interface with audio sampling rates of 44.1kHz and 48kHz.
In some cases this can be useful, however, if you are recording on the go you might be better recording to the handy recorder’s SD card and then transferring the audio to your computer. Alternatively, an external audio interface like the Focusrite Scarlet 2i2 is lightweight, does not need batteries or an external power supply, and allows you to record at higher sampling rates.
The ability to record audio directly into your computer using the H4n/H4n Pro as an audio interface is a feature that could be useful in an emergency, as a backup, or if you need to keep your budget tight.
Last update on 2026-03-13 / Affiliate links / Images from Amazon Product Advertising API
Here’s a big ask from me: If you liked this article, please share it.
It will mean a great deal to me if you share this post because a few seconds of your time will seriously help my blog grow. The share buttons are below the “About Author” section.
Thanks. 🙂

About the author: Tosh Lubek is a multi-award-winning broadcaster, writer, and video producer, with 40 years of experience in professional broadcasting and has been using Canon video and stills cameras since 2010. He has worked with radio and TV broadcasters, advertising agencies, and direct clients on a variety of projects including radio and television advertising, online video production, corporate videos, award ceremony motion graphics, and theme park sound design. Tosh has won numerous awards, including a Radio Academy Awards Gold Sony, a Gold, Silver, and Bronze World Medals in the New York Festivals International Advertising Awards. Since about 2007 he has been creating YouTube videos. Tosh has been a sponsor of the “video booth” at HashTag Business Events across the UK.
Recent Posts
Most people use sandbags the wrong way. Here’s how to hang them properly on a light stand for maximum stability and safety — plus what to fill them with.
You're Using the Canon RF 50mm f/1.8 WRONG! Here’s How to Fix It
If you’ve recently picked up the Canon RF 50mm f/1.8 STM—affectionately known as the Nifty Fifty—you might be confused by that strange switch on the side of the lens. It doesn’t say AF/MF...