
DIY Video Studio is supported by its readers who use the affiliate links or ads on this site. As an Amazon Associate, I earn from qualifying purchases. Thank your support if you use any of the links.
Almost every beginner will have used umbrella lights as their first proper video lighting setup.
Umbrella lights are used in video as a source of soft light, smoothing shadows on the subject’s face and eliminating the subject’s shadow on a backdrop. They can be used as key lights and fill lights, normally placed at 45° to either the right or left of the subject and above head level. Their tendency to spill light means they will also illuminate the backdrop.
In this article, I answer how to put up umbrella lights, how do you use an umbrella light for video, what’s the correct way to fit the bulb to your umbrella, why you would want to use an umbrella light, and give you instructions, with graphics and sample images, of how to create those umbrella light setups.
If you don’t already have a video lighting kit here are some umbrella lighting kits I have bought and would recommend, along with the LED bulbs I use in my lighting kits.

Last update on 2025-10-20 / Affiliate links / Images from Amazon Product Advertising API
Why use an umbrella light
Umbrella lights are one of the best lights you can get when you’re starting out making videos.
They’re very cheap, so you can get hold of several different umbrella types and sizes without spending a fortune. Also, because they’re inexpensive it’s not going to be the end of the world if the umbrella gets knocked over or damaged.
Plus, if the metal shaft gets a dint or slightly bent that’s no big deal, it’ll still work. Even if one of the ribs snaps, although it may not look good, you can carry on using it.
Another reason to get an umbrella is that they’re super quick and easy to setup or takedown. They fold down and open just like regular rain umbrellas. Hold the end of the metal shaft and push up the center collar until the umbrella clicks into shape. Then slip the umbrella shaft through the hole in the light holder or light head, secure it with the thumb screw, and you’re done.
Because umbrellas fold down small, they take up very little space. So, they’re easy to transport if you’re shooting somewhere else, and when you’re done making videos or taking photos, they’re easy to store.
Because umbrella lights are cheap, easy to use, and because they can light the backdrop as well as your subject, they’re a good starting point for beginners. However, you’ll also find professionals using them.
What’s not so good about an umbrella light
Of course, umbrella lights aren’t perfect. If they were, we’d be using them all the time. Clearly, that’s not the case.
The main drawback of umbrella lights is the lack of control over where the light falls. You don’t have any directional control. That’s especially true of the umbrellas with white silk diffuser canopies, also known as a shoot-through umbrella. The light not only falls on the subject, but it also spills in every direction because there’s nothing to constrain the light.
If you want to control over where the light falls, a shoot-through umbrella probably isn’t the way to go. However, reflective, or silver and black umbrellas, are more effective at doing that.
What does an umbrella light do?
Umbrella lights are what’s known as a light modifier. They modify or change the quality of the light source.
So, what do I mean by that?
The quality doesn’t have anything to do with the color or the brightness of the light. It’s more to do with how it illuminates the subject. Umbrella lights produce diffused or soft light that softens the hard shadows caused by bare bulbs or small lights. They do that by becoming a large light source instead of that small bulb.
That soft light wraps around the subject and is a much more attractive type lighting. It’s the type of lighting that’s loved by beauty photographers because it helps to smooth out skin wrinkles and blemishes.
The correct way to attach an umbrella to the bulb holder
One problem with umbrella lights is that many people don’t use them properly. I’ve seen people attaching the bulb so it points in the opposite direction to the umbrella canopy.
I suppose it kind of makes sense if you think of the inner curve of the umbrella as a reflector. If the light reflects forwards then perhaps the bulbs should point that way too. Unfortunately, that’s not the case.
But here’s the thing. The white translucent umbrellas are called shoot-through umbrellas because the light is shot through and diffused by the white material. The bulb points into the umbrella canopy and the umbrella then points towards the subject.
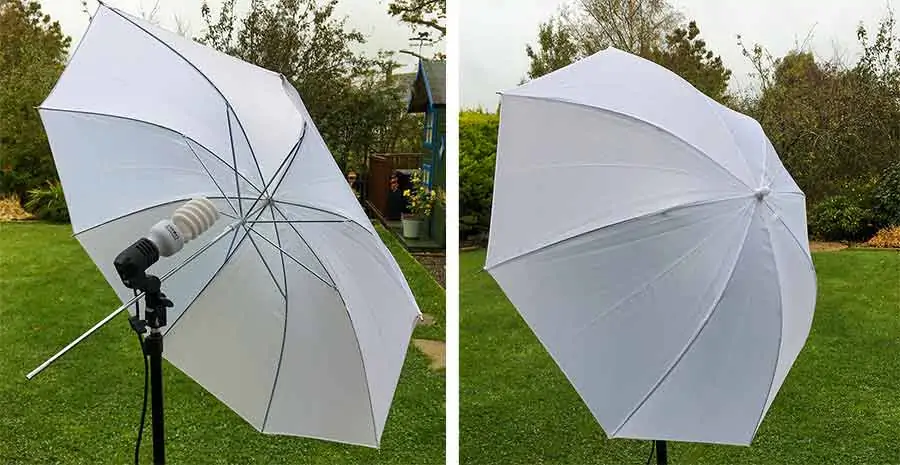
The white silk diffusion material, which is made of nylon, diffuses the light, giving it that beautiful soft quality. The bulb illuminates the whole umbrella canopy from behind, making the entire outer side of the canopy a large bright light source.
But you can also get black and silver and sometimes black and gold umbrellas. They’re reflective umbrellas. With this type of light modifier, again bulb points into the reflective inner side of the umbrella. But this time the reflective side points at the subject.
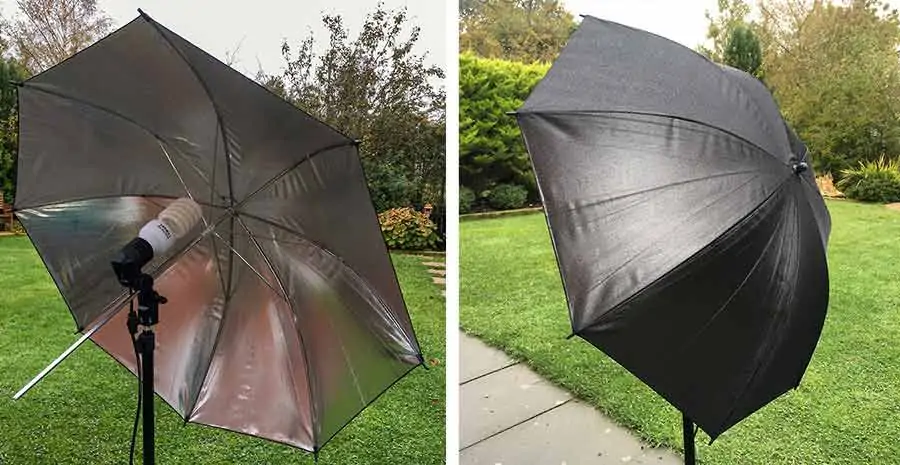
The light illuminates the whole inner side of the umbrella canopy and the reflective surface bounces the light towards the subject. Because the whole inner area of umbrella is now the light source it produces diffuse or soft light. But it appears brighter and can add specular highlights, the bright light spots on shiny objects. This is because it’s more directional than the shoot-through umbrella, since the light is constrained by the reflector so it can’t spill everywhere and be wasted.
How to use umbrella lights in video
Distance between the Umbrella light and subject
Earlier I said umbrella lights change small light sources, like bulbs, into large light sources. But it’s the relative size of that light source compared to the subject that matters.
If I have a large umbrella close to me it’ll produce soft light because the umbrella is relatively large compared to me. But if I put it way in the distance it’s going to appear to be a much smaller light source. The further away the umbrella light the less soft it’ll be and harder the shadows it produces across my face.
So, get the umbrella light close to your subject, like just a few feet away at most. Remember, the closer the umbrella, the softer the light, and the more flattering the light.
Adjusting the bulb to diffuser distance
But there’s also another way to adjust the softness of the umbrella light.
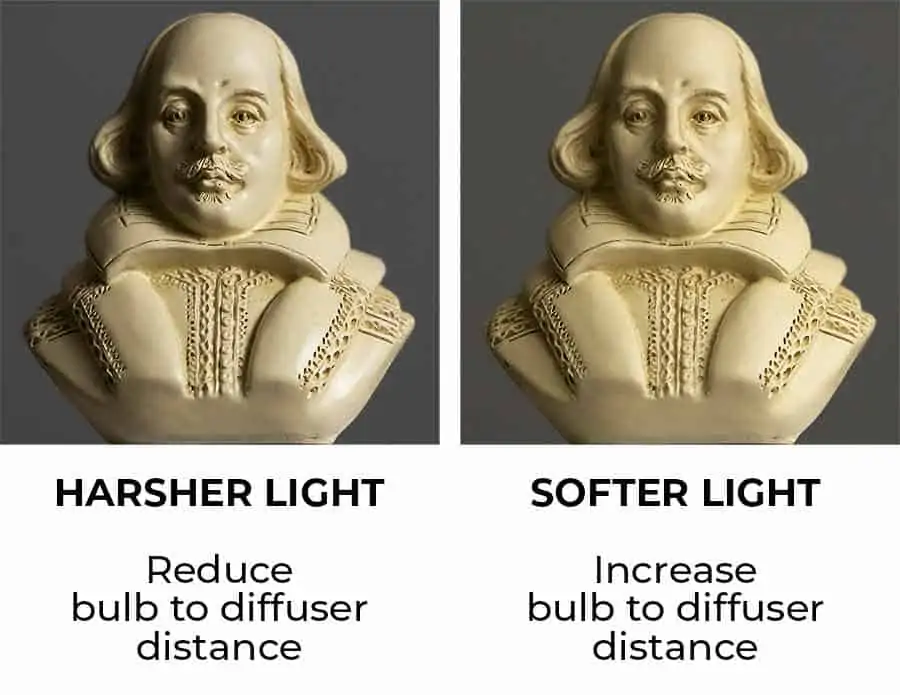
By changing the position of the bulb on the umbrella shaft you can alter the amount of diffusion. That’s because the closer the bulb gets to the umbrella’s canopy; the light gets concentrated on a smaller area of the diffusion material. So, instead of the whole umbrella canopy being the light source it effectively becomes a much smaller area of the material.
If you want the softest light from the shoot-through umbrella, pull the bulb back to evenly illuminate the canopy. The light’s brightness will appear a little lower, but the quality of the light will be improved.
Quick Tip: Small distance between bulb and diffuser = Harsher light. Greater distance between bulb and diffuser = softer light.
You can see the difference changing the position of the bulb on the umbrella shaft makes. The image on the left was taken with the bulb as close as possible to the umbrella canopy. The shadows are harsher, with more pronounced edges. The image on the right was taken with the bulb much further back on the umbrella shaft so all the canopy was illuminated evenly. The shadows are much softer, and the specular highlights reduced or eliminated.
Things are a little different with a reflective umbrella, the black and silver type. A reflective umbrella light also produces soft light, but not as soft and with more contrast than with a shoot through. Potentially, it’ll also produce some specular highlights.
Unlike the shoot through umbrella, with the reflective type you adjust the bulb position on the umbrella shaft not to adjust the softness of the light but the brightness. The inner surface of the umbrella doesn’t have a perfect focus point but as you move the bulb along the shaft there will be a position where the umbrella will reflect the maximum amount of light onto the subject.
Look at the following images. On the left the bulb is as close as possible to the umbrella reflecting canopy but only a small amount of light is reflected toward the subject. The middle image shows the illumination when the bulb is about halfway along the shaft, this is the optimal position. The right image is again dark because the bulb is at the end of the shaft and the reflector cannot catch enough light to bounce toward the subject.
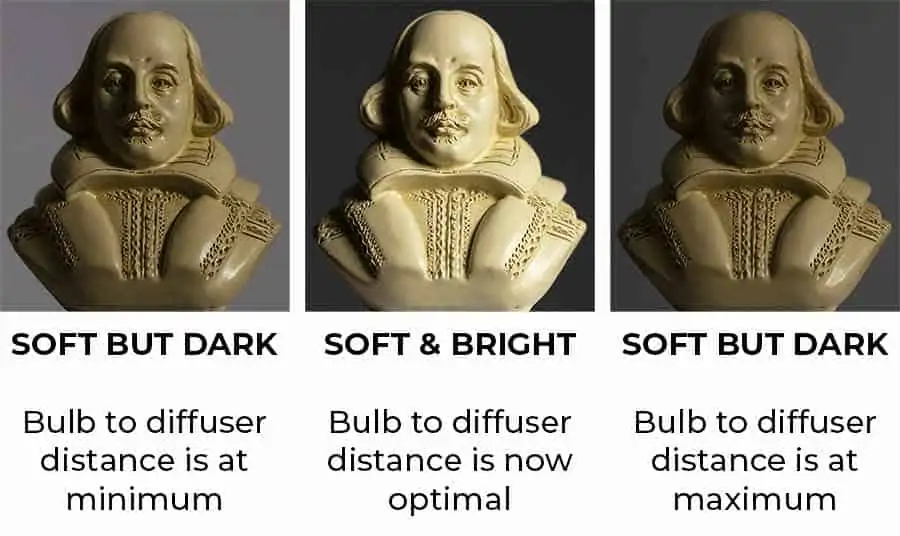
So, if you’re going to use a reflective umbrella make sure you test where the best place is to fix your bulb.
Video lighting setups using Umbrella Lights
Like a soft box, the umbrella light will produce a diffuse spread of light. However, it will spread much wider and you won’t be able to control it so much.
Because there’s no black hood around the sides and rear of the bulb in a shoot through umbrella, light can spread in many directions. It will bounce off nearby surfaces, like the ceiling, walls, floor, and even furniture. This extra bounced light will reduce contrast and reduce shadows in the scene. If your subject is close enough to the backdrop you may even find you don’t need to light it separately.
We’ll look at a couple of basic video lighting setups using a single white umbrella and towards the subject and then one setup using a silver reflective umbrella. In all the following cases a white backdrop was used but the subject was at least 6ft away in front of it. If you want a brighter background move the subject a little closer or use separate background lighting.
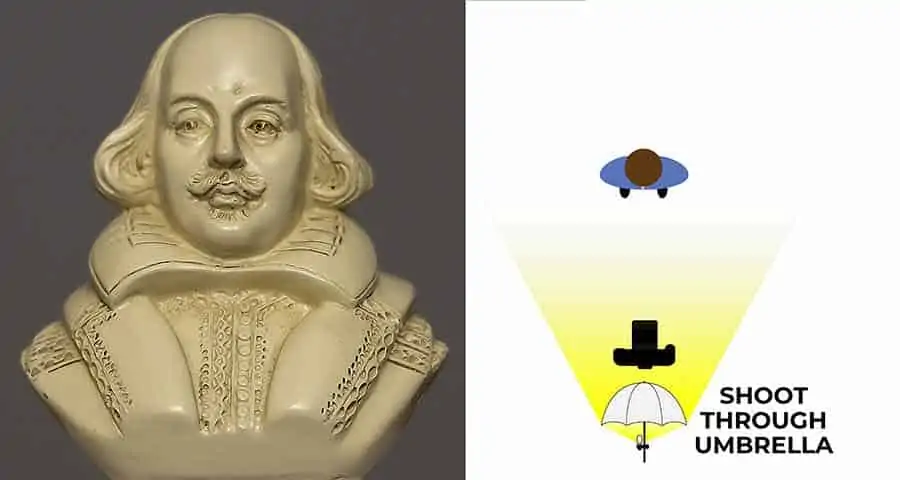
Setup 1: White umbrella at a 45° angle
In the following graphic you can see a bird-eye view of the setup, along with the resulting image.
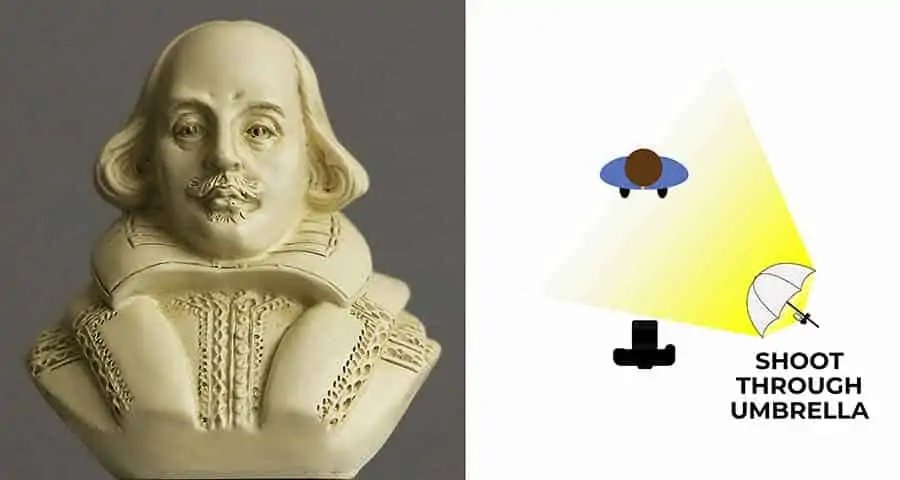
This is one of the most popular lighting setups with a single light, whether it’s an umbrella or soft box. Place the light about 45° off to the side of the camera and have it a little above the subject’s head and pointing at them.
This setup is used to produce the classic Rembrandt triangle of light under the eye on the cheek on the opposite side of the face from the light. The triangle of light is produced by the light that passes over the subject’s nose and is defined by the nose and cheek shadows.
There’s no perfect angle and height for the light to create a Rembrandt light triangle. The angle and height will depend on the shape and size of the subject’s nose and check. However, if the light is too close to the camera the shadow from the nose won’t reach the cheek. If the light is too high the triangle become too long down the face, but if the light is too low the triangle under the eye disappears completely.
Because the white shoot-through umbrella produces a soft light, especially if you are using a large umbrella, the Rembrandt triangle is less noticeable but it’s still there. That’s OK for video lighting since a strong Rembrandt light triangle is more of a photographic portrait style of lighting.
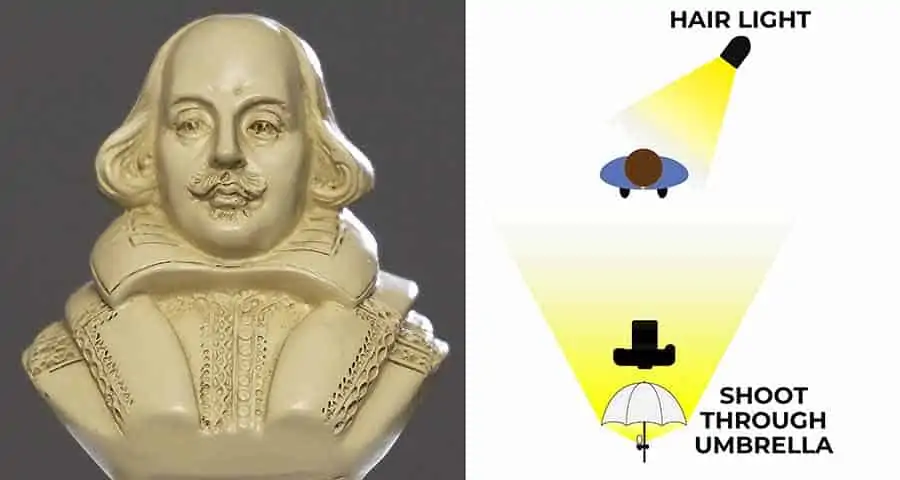
Setup 2: White umbrella at a 45° angle + Hair light
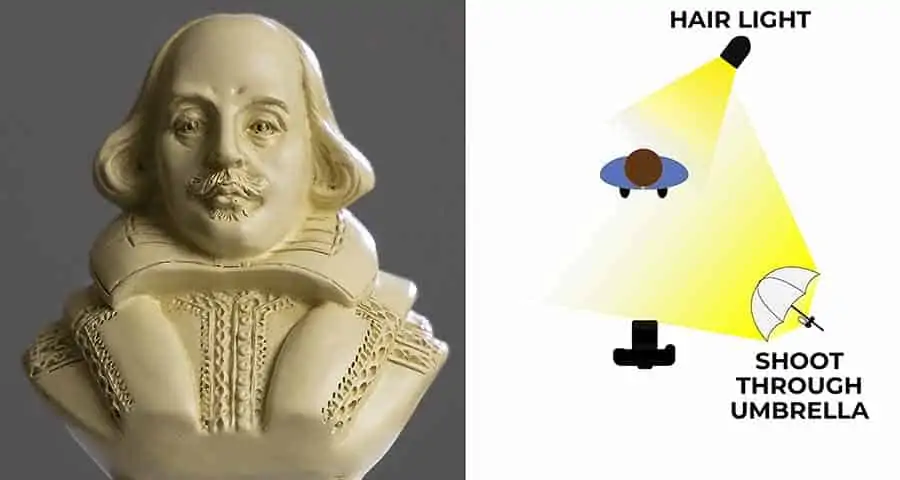
Hair lights, or rim lights, are backlights used to add some illumination to the edge of the subject. This helps to separate them from the background, as you can see in the graphic.
The setup is the same as before, with the addition of an extra light above and behind the subject’s head. It’s angled down towards the subject’s head and shoulders. You can place the light directly behind the subject if you have a light stand with boom arm, since the stand won’t appear in shot. Otherwise put the light on a standard light stand placed off to one side to get the effect in our example shot below.
Often a spot or smaller directional light is used but a softbox will also be effective as a hairlight, since it will produce softer light with more of a wraparound effect than with a spot.
Setup 3: Reflector umbrella at a 45° angle
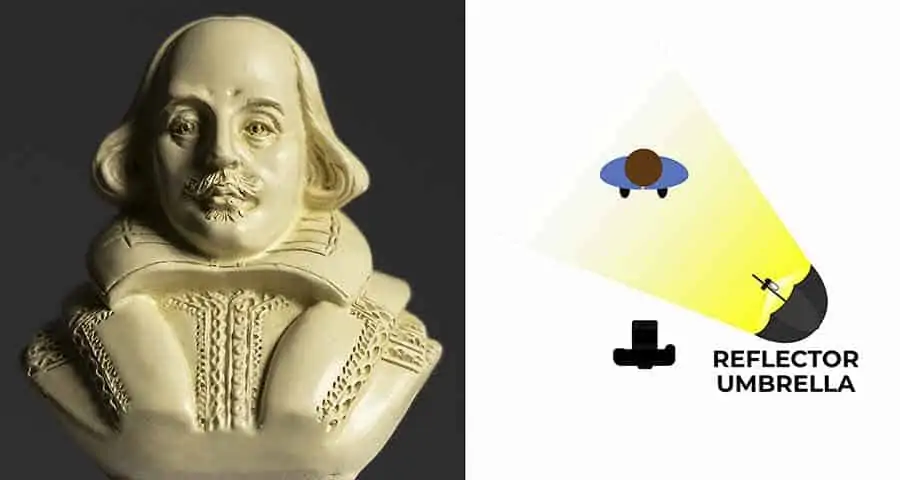
This setup is almost identical to that with the white shoot through umbrella in setup 1. The only difference is we’re using a reflective umbrella that’s in the opposite orientation compared to a white umbrella. Again, move the light about 45° away from the camera and have the umbrella light pointing down and toward the subject.
With the reflector umbrella, although the light is softer than just using a bare bulb, the light is more concentrated than with a white shoot through umbrella. You’ll notice there’s more contrast in the lighting. The highlights are brighter, and the shadows are darker. Even so, there’s still a soft transition in the shadows.
The other thing you’ll notice with a reflector umbrella is that the background will be darker than when using a white umbrella. If you light the look that’s fine, if not, you may need to add separate lighting for your background.
Remember that with an umbrella reflector the bulb should point in towards the reflective surface and NOT out. It’s just like a satellite TV dish in that respect.
Setup 4: Reflector umbrella at a 45° angle + Hair light
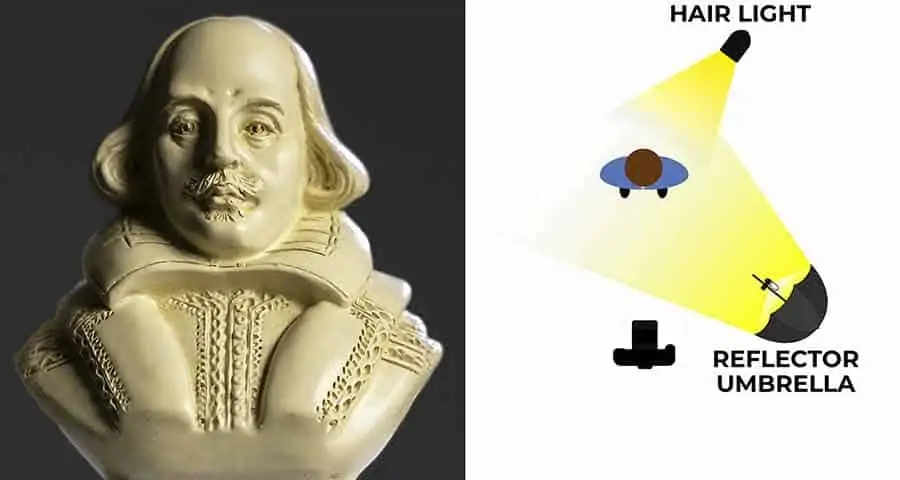
This is like the previous setup but with the addition of a hair light. I talked a little about hair lights in setup 2, so if necessary, check-out that section.
Because the reflective umbrella can produce a darker background, adding the hair light can help separate the subject from the background.
The look an umbrella reflector gives you, whether with or without a hair light, is quite dramatic. Often it can be too dramatic for Zoom meetings, vlogs and business videos. But that’s not always the case, so it’s worth experimenting with your lighting. With umbrellas being so cheap, this is one area of video and photo lighting where experimenting will prove to be inexpensive and easy to do.
Setup 5: White umbrella face-on
Frequently vloggers and small business will place the umbrella light behind the camera, so that the subject, camera, and light are in a straight line. Like the Rembrandt setup, the umbrella light will be above the subject’s head and point toward them. In effect, the light is almost face-on to the subject.
The advantage of this setup is that it’s simple, takes up very little space and it works. However, I don’t think the result is as attractive as having the umbrella light off at an angle.
For anyone with a rounder face, like me, the shadows on either side of the face carry through to those under the chin, forming a U-shaped outline. Its these shadows that seem to define the face rather than the real facial features, which now appear flatter because the light is face-on. It looks more one-dimensional.
One way to reduce these side shadows is to use a larger umbrella, and that’s what I have done when I needed to use a single umbrella light that’s face-on to me. A standard white umbrella is about 33-inches across, but I’ve also got a 60-inch umbrella that didn’t cost that much more than the 33-inch type. The wider size of the umbrella produces softer light and can throw some extra light in from the sides to soften those shadows.
Of course, being a larger umbrella requires extra light, so I replaced the single lamp holder with one that could take four bulbs. However, the extra cost is offset if you can find an additional use. I regularly use my 60-inch umbrella as a sin scrim when shooting videos outside in bright sunlight. I explain how in this article![]() .
.
There are other disadvantages to having the umbrella light facing the subject. If your subject wears glasses, you can get glare reflected from the lenses into the camera. One solution is to raise up the light so its reflection does not enter the camera lens.
Another problem can arise if your subject is reading from a teleprompter. If the light is approximately in the same direction as the teleprompter it might be difficult to read the script.
Just like the other setups, you can add a hair light.
As before the hair light helps in separating the subject from the background and adds a more professional touch to the lighting setup.
Setup 6: Two or three light white umbrella lighting
If you’re a beginner I’d say, master the one light setup first. But once you understand what you’re doing, try more sophisticated lighting setups.
You could use two white umbrella lights, each at a 45° angle and above the height of your subject, but that’s going to produce a flat lighting effect. The trouble is, you’ve two equally bright lights illuminating everything, but each is cancelling out the interesting effects the other one is creating.
What you need to do is make one of your umbrella lights about half as bright as the other. That way you’ll have a key light or main light that illuminates your subjects face and defines their features with soft shadows. Your second light, the one you’ve made half as bright, becomes the fill light. It fills in some of the shadows from the opposite side but does not eliminate them.
But there’s a problem. Most CFL or LED bulbs for video are not dimmable. But there’s a simple hack. You could get two bulbs with different power levels. Say two CFL bulbs, one that’s 105W for your key light and a 45W for the fill light.
Another way of reducing the effective brightness of the fill light is to move it further away from the subject.
But there’s another method you could try.
On your umbrella light that is going to be your fill light, loosen off the bulb holder and slide it toward the end of the umbrella shaft. Now, close the umbrella canopy a little. Even though the bulb puts out the same amount of light, as the umbrella closes the umbrella’s effective surface area decreases. Also, you are likely to have overlapping layers of the diffusion material, effectively increasing the thickness of the material. The overall result is the umbrella light gets dimmer.
That’s the two-umbrella light setup, but you can make it look even more professional by adding a hair light, just as we did in the earlier setups. You’ll have a three-point lighting setup that should produce really good results. But don’t just setup the lights and assume everything will work perfectly. Practice with your lights and see how making small adjustments affect the look.
Last update on 2025-10-20 / Affiliate links / Images from Amazon Product Advertising API
Real-world examples using umbrella lights
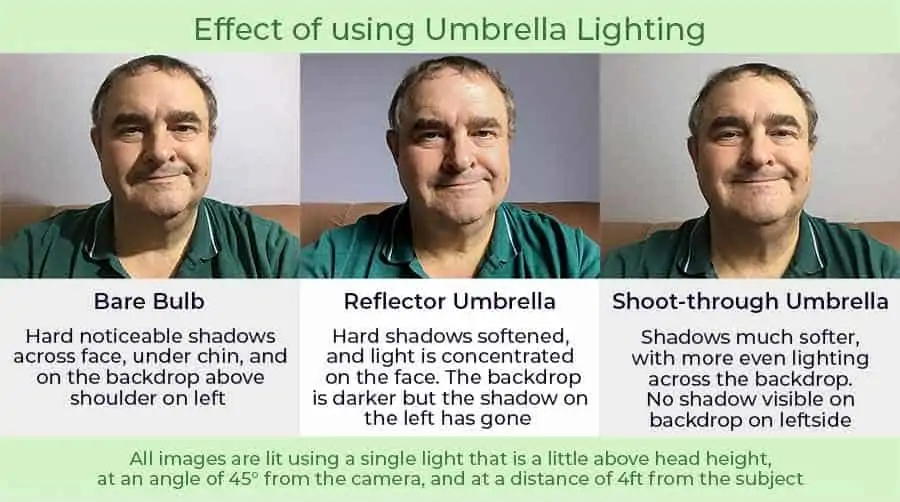
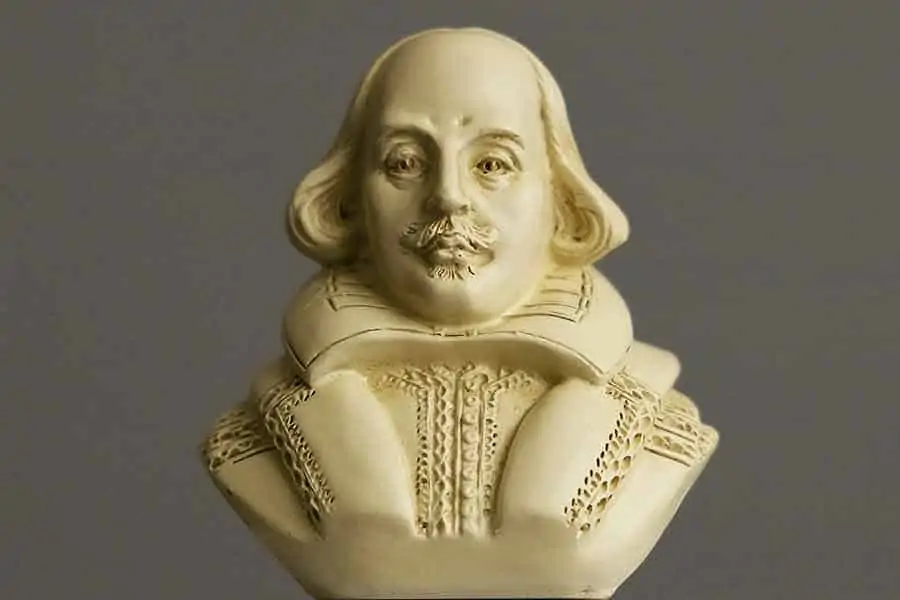
Instead of using the bust of William Shakespeare my subject I’ve sat in front of the white backdrop. However, I’m within 2-3 feet of the backdrop so the umbrella lighting has more opportunity to also illuminate the backdrop.
My three examples are a bare bulb (left), a reflective umbrella (center), and a white shoot-through umbrella (right). In each case, I’ve used the same 45-Watt CFL bulb at about 4-ft from me and off to the right. The two umbrellas were 33-inch in size.
Notice how the bare bulb not only causes hard shadows across my face, but it also creates an uneven light across the backdrop. It also casts a shadow of my head on the backdrop (just above my left shoulder). Both the reflector and shoot-through umbrellas make the lighting on the backdrop appear more even and eliminate the shadow cast by my head.
Although both the reflective and shoot-through umbrella lights produce soft light, the light from the shoot-through umbrella seems softer.
The reflective umbrella light put more light on me, caused some specular highlights on my cheek and forehead. There’s also more contrast between the light and shadows plus the background appears darker, just like it did in our setups using the bust of William Shakespeare.
What is the best size umbrella light for video?
Whether you’re using a softbox, some other type of diffusion, or an umbrella, larger is always better. A larger effective surface area will produce a softer light.
Obviously, the larger the umbrella the better. But not so fast. Like everything else it’s a bit of a compromise. You need to balance a few competing factors.
As you go larger, you’ll need a brighter bulb or even multiple bulbs. If you go large but keep the same bulb, you’ll end up with more dim diffusion material, but it’ll be dimmer because the light has been spread across more material.
There’s also the cost. Although a 60-inch umbrella is perhaps only twice the cost of a 33-inch, which is fairly inexpensive, you need to factor in the cost of more bulbs and a new lighting head that can take two or four bulbs.
Also, how much space have you got where you’re going to be filming? It’s not just a case of the width and length of the room, you need to think about the height. Your light should be above your head’s subject and pointing down. If you’re using a 60-inch umbrella instead of the standard 33-inch, can you get it high up enough, especially if your subject is standing?
So, in an ideal world, you can go large. But most of the time 33-inch umbrellas will do fine.
Replace CFL with LED light bulbs
Most umbrella light kits you can buy come with CFL bulbs. They’re the energy-saving spiral compact fluorescent lights that took over from the old-fashioned incandescent bulbs. They use much less energy, and they last longer, but in the last 5 years or more lighting has changed a lot.
Developments in LED lighting mean that we can swap out the CFL bulbs in our lighting kits for LED bulbs. The lights are better quality, are even more efficient and produce less heat. On top of that, unlike CFL bulbs, LED bulbs are not made from glass but use plastic, so they’re resilient to knocks. LED bulbs don’t contain toxic mercury, like CFL bulbs. And their price has come down, even the best quality ones, so they are affordable.
Another practical advantage of LED bulbs is that when you switch them on, they are immediately at their full brightness. CFL bulbs, however, have to warm up and can take a few minutes before they are ready to use at their full brightness.
Basically, CFL bulbs have been superseded by LED lighting. Even household LED bulbs are good enough for video lighting. The ones I use for my own videos are LOHAS 23W bulbs![]() with an E26 medium screw base. They are Daylight white (5000K) and produce 2500 lumens. They’re equivalent to a 150W incandescent bulb, so they’re bright.
with an E26 medium screw base. They are Daylight white (5000K) and produce 2500 lumens. They’re equivalent to a 150W incandescent bulb, so they’re bright.
If you do replace the CFL bulbs don’t just through them in the garbage. They contain a small amount of mercury, which is toxic, so make sure you dispose of them properly.
People also asked…
What is a Hairlight?
A hair light or rim light is a light used in video production and photography to add a rim of light to the subject’s hair and shoulders. It should not spill over onto the subject’s face. It helps to separate the subject from the background. The hair light is placed above and behind, or to the side, of the subject, pointing down at their head and shoulders.
What is the purpose of a key light?
The key light is the main light used to illuminate the subject in a film or video, usually from either the right or left. It is used to highlight the subject’s features, essentially giving it or them a sense of being three-dimensional. The key light also helps to set the look and tone of the scene.
What is the difference between key light and fill light?
The key light is used as the main light in a scene, used to illuminate and shape the subject. The fill light is about half as bright as the key light. Its purpose is to add some light into the shadows created by the key light, making them less harsh but without destroying the definition they create.
Tosh Lubek runs an audio and video production business in the UK and has been using the Canon EOS R since it was released in the Autumn of 2018. He has used the camera to shoot TV commercials for Sky TV, promotional business videos, videos of events and functions, and YouTube creator content. He has also won international awards for his advertising and promotional work. You can meet him by visiting his “video booth” at HashTag business events across the country.
Recent Posts
Most people use sandbags the wrong way. Here’s how to hang them properly on a light stand for maximum stability and safety — plus what to fill them with.
You're Using the Canon RF 50mm f/1.8 WRONG! Here’s How to Fix It
If you’ve recently picked up the Canon RF 50mm f/1.8 STM—affectionately known as the Nifty Fifty—you might be confused by that strange switch on the side of the lens. It doesn’t say AF/MF...