DIY Video Studio is supported by its readers. Please assume links on this site are affiliate links or ads, and that I get commissions for purchases made through these links. As an Amazon Associate, I earn from qualifying purchases. Thank you if you use any of the links.
One of the cheapest and easiest ways of recording good audio is to use a lavalier microphone or lapel mic. But most people don’t know how to use a lapel microphone or how to wear a lav mic.
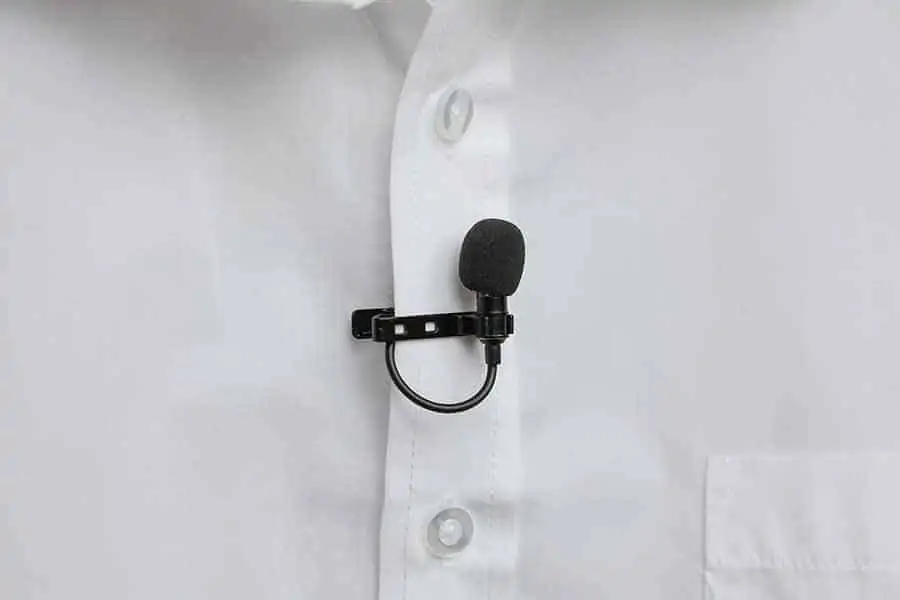
A lavalier mic can be worn on the lapel of a jacket; a tie; the center of a shirt, blouse, or button-up T-shirt; on the neckline of an ordinary T-shirt or dress. If the lav mic needs to be hidden, it can be attached under clothing, on the back of a tie, or even under a shirt collar.
I’ll explain how this is done, although I’ll also explain the advantages of using a lavalier microphone. If you’re in a hurry you can use this link to jump ahead to How to wear a Lav Mic. For a DIY solution to hide a Lav Mic jump to how to make a gaff tape triangle. Otherwise, keep reading for a few basics on Lav Mics.
You can also find more details about using lavalier microphones in my article, Best lavalier microphone position for good sound.
Why do I need a lavalier microphone for my video recording?
By using a lavalier microphone, you can get the mic close to the subject’s mouth to capture clear audio.
Using the camera’s built-in microphone is not recommended. The mic quality will not be as good as an external mic, it will pick up noise from the lens autofocus, and the distance to your subject is likely to be three feet or more.
Ideally, the mic-to-mouth distance should be less than that, and with a lavalier mic, it can be about six inches.
Although you can buy mini shotgun microphones to mount on top of a DSLR camera or smartphone. That doesn’t get the mic close to the subject. These mics will only improve audio quality if mounted close to the subject. Mounting the mic on the camera is only ideal in run-and-gun style shooting.
How does getting close affect audio quality?
Wherever you record there will be some background noise. The noise may include fans, aircon, nearby traffic etc. Because the lavalier mic is much further from the background noise than your mouth, the sound level of the noise stays the same as you make small movements of the mic of about one or two feet.
In comparison, that movement of one or two feet is significant for the sound of your voice. By placing the lav mic about 6-inches from the mouth the sound of your voice will become much louder, while the background noise stays at about the same level.
Since your voice is now much louder, you will need to turn down the recording level on your camera (or digital audio recorder). That has the effect of bringing down the level of your voice to the correct level for recording but also making the background noise much quieter.
So, by getting the microphone close to your mouth, you are effectively removing background noises, including the reverberation of your own voice.
Other benefits of using a lavalier mic
A lavalier microphone gives you or your subject the freedom to move around in front of the camera.
Say you are a food vlogger moving about in your kitchen, you won’t always be facing the mic or be at the same distance to the mic. If the microphone is fixed on the camera or on a boom arm, the audio level will change as you move around.
By using a lavalier mic, either wired or wireless, the microphone capsule always stays the same distance from your mouth, unless you turn your head significantly. As a result, the voice level also remains the same.
Your voice will be much clearer, no matter how far you are from the camera, or even with outdoor on-location filming.
Avoiding Lav Mic Clothing Rustle
Attaching the lav mic to a lapel and tucking the microphone’s cable under the jacket can look untidy and cause lav mic clothing rustle being heard. This is because the cable can work its way into view as the subject moves, and the cable can transmit vibrations up to the microphone capsule.
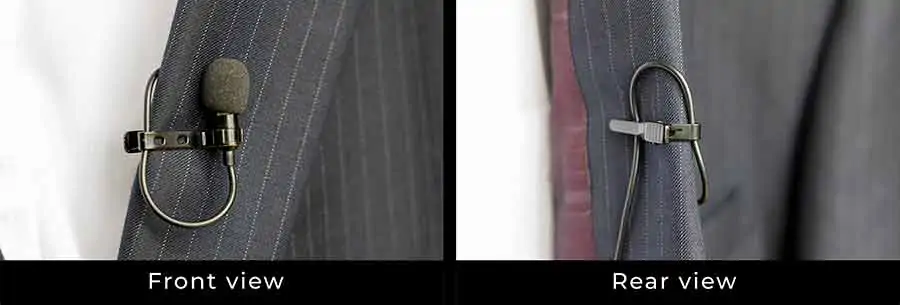
Both these problems can be avoided by forming a Broadcast Loop (aka Newsman’s Loop) in the cable.
To form a Broadcast Loop, form the cable immediately below the mic capsule into a “U” shape. Pass the end of the cable up through the bend in the tie-clip. Then form an inverted U in the cable and pass it down. Hold it in place against the back of the clothing with the teeth of the alligator clip. You can see how this is done in the image of a lav mic attached to the lapel of a jacket.
Making a Lav Mic Gaff Tape Triangle
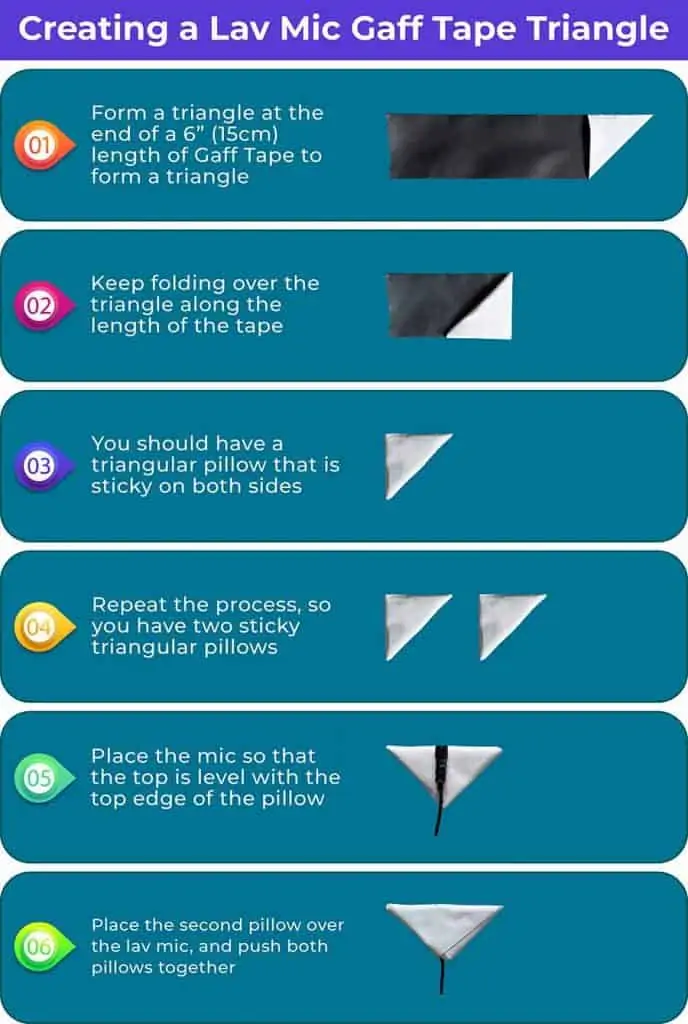
There are a few methods you can use when it comes to hiding a lavalier microphone under clothing, but a cheap and easy option is to use a couple of lengths of Gaff Tape to make a lav mic tape triangle. I will describe using them a few times later in this article.
A lav mic tape triangle is made by folding over two sticky triangles onto themselves with the sticky side facing outward. The lav mic capsule is held in place between the two gaff tape triangles. The sticky outward sides also allow the triangle to be stuck between layers of clothing.
ALLERGY WARNING: Gaff tape should not be stuck directly to the skin. Only material like microporous surgical tape and moleskin should be used when attaching anything to your skin.
Because the gaff tape is folded over a few times, each triangle is like a vibration-absorbing pillow, which helps to prevent the sound of clothing rustle from being picked up by the microphone.
The following infographic shows how a gaff tape triangle can be made for a lav mic.
How to wear a lav mic
You now know that getting a lavalier microphone close to your mouth is important. Ideally, you should place the lavalier microphone at about 6 to 10 inches to your mouth.
But wearing a lav mic can mean that is visible to the viewer. In most cases it does not matter, however, sometimes you may wish to hide a lav mic under clothing. So, I will go through both options.
Many people get worried about which direction the lavalier mic should be pointing. You don’t need to. Most lavalier mics are omnidirectional, so it doesn’t matter whether the mic capsule is pointing up, down, or sideways.
One advantage of having the mic pointing downward is that it will help prevent blasts from your breath being picked up. This is because the rear of the microphone capsule acts as a physical barrier to the passing breath wind.
Please note, where I mention attaching a lav mic to your skin, only use hypoallergenic adhesive tapes, like microporous surgical tape and moleskin. Material such as gaff tape should only be used when attaching the lav mic to clothing.
How to wear a lav mic on a jacket or blazer
The easiest way to attach a lavalier microphone to the lapel of a jacket or blazer is to use the alligator tie-clip that came with the lav mic.
Before deciding which lapel to attach the mic to, consider how you will be standing. If your body and face will be square on to the camera, either lapel will do.
But if you’ll be turning your head to one side, then choose the lapel on the side your head will be turning toward. This will ensure the mic will pick up your voice clearly whether your head is pointing forward or turned to one side.
Depending which lapel you choose, you may need to unclip the mic capsule and turn the tie-clip through 180°.
When you attach the mic and tie-clip remember to form a Broadcast Loop with the cable to make things look tidy and avoid the transmission of vibrations to the mic capsule.
You can run the cable round to a wireless bodypack transmitter or connect to a longer lead that returns to the camera or digital audio recorder.
The result should look like the images below. For a good look at the Broadcast Loop, I’ve provided an image of the front and rear of the lapel.

How to hide a Lav Mic on a jacket
There are a few simple ways to hide a lav mic on a jacket or blazer.
Imagine where you would place the lav mic on the lapel of the jacket and then position it at the same spot but the inside of the jacket. Keep the mic capsule close to the opening so that the jacket material does not unduly block the sound.
Next you need to decide how to fix the mic capsule in place but in a way that avoid clothing rustle. Readymade options are available to buy, but many are over-priced for what they are or are designed for specific professional lav mics.
Method one: Lav Mic Tape Triangle
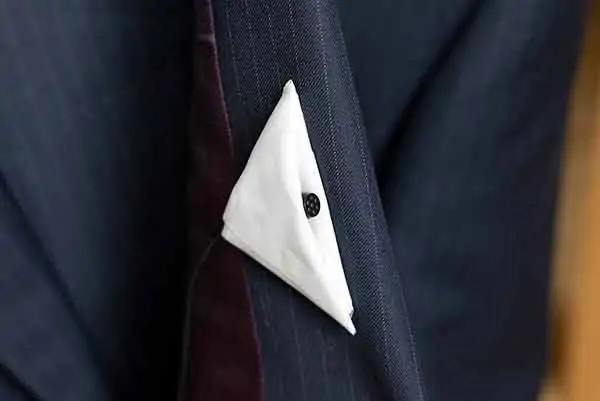
This method is cheap, though a little fiddly. You need two lengths of gaff tape that are folded over to form a sticky triangle that will hold the lav mic and then stick to your clothing. I show how to make a Lav Mic tape triangle in the infographic earlier in this article.
This method can be used to secure the lav mic behind a jacket lapel. Make sure you have the top of the lav miv pointing out from behind the jacket, as shown in the following image.
The gaff tape triangle method can also be used to attach the lavalier mic under jackets, like a fleece, or under other clothing where the mic capsule can be covered.
Stick the lav mic, in its gaff tape triangle pillow, onto your inner shirt at about the position of your sternum (bottom of your breastbone). Now zip up or button up your outer jacket. You can see how it is done in the following pair of images that show a lav mic being hidden beneath a fleece jacket.

A bonus of using this method is that the outer layer of clothing will help reduce wind noise when filming outdoors on location shoots. If you need extra wind protection you can add a small furry windshield or “dead kitten” onto the lav mic.
If you find this method too fiddly, or just want a more professional look, try the Isolate IT Lavalier Microphone Isolation Shield System.
Last update on 2025-07-01 / Affiliate links / Images from Amazon Product Advertising API
Method two: Gaff tape and furry mic windshield
This is a quick and straightforward way of attaching the lav mic to a jacket. All you do is use a short piece of gaff tape to secure the mic to the inside of the jacket, just behind the lapel.
If your subject does not move around, this simple approach should work fine. But if they do move, even if they gesticulate with their hands, the bare microphone capsule may pick up some clothing noise.
To improve this simple method, so that you minimize picking up clothing noise, cover the lav mic capsule with a small furry windshield or “dead kitten”. Then attach the mic capsule to the reverse of the jacket lapel by putting the gaff tape strip across the mic cable. The method is shown in the following image.

Method three: Rode vampire clip
If you have a Rode lavalier microphone you can use the Rode vampire clip. This has a circular plastic clip on one side to hold the lavalier mic capsule and the reverse side has two metal pins. The pins of the vampire clip can be pushed into clothing to hold the microphone in place.
Vampire clips work well on sweaters, T-shirts, and other clothing where the pins won’t damage the material. You may need an alternative method if clothing is made of fine material, such as silk.
- Size: 16mm x 7mm x 12mm
- Weight: 0.04 oz (
Last update on 2025-07-01 / Affiliate links / Images from Amazon Product Advertising API
Method four: DIY moleskin vampire clip
An inexpensive alternative to a bought vampire clip is to make your own. You’ll need one or two medium or large safety pins and some moleskin tape.
Place the closing side of the safety pin (or pins) along the side of the lav mic capsule, making sure the sharp end of the pin points down in the direction of the cable.
Wrap a small strip of moleskin around the mic capsule to secure the safety pin in place. A small improvement for better isolation is to have a layer of moleskin between the mic capsule and safety pin, but this is optional.
The single or two pins can now be pinned onto clothing to secure the lav mic.
How to wear a Lav Mic on a shirt or blouse
Attach a lav mic to the shirt opening with an alligator tie clip, about 6-10″ from the mouth. For a blouse, rotate the tie-clip through 180°. To hide a mic under a shirt, attach it to underwear with a vampire clip or tape. Or stick it to the skin with microporous surgical tape or Rycote Under Covers.
Using an alligator tie-clip is the easiest method to use. The method is like that used to place a lav mic on a jacket lapel. Include a broadcast loop, or newsman’s loop, in the cable and then tuck the rest of the cable through the opening of the shirt. The cable can then be run to a wireless bodypack or fed down under the clothing and out to the recorder.
The next pair of images demonstrate how to wear a lav mic on a shirt.
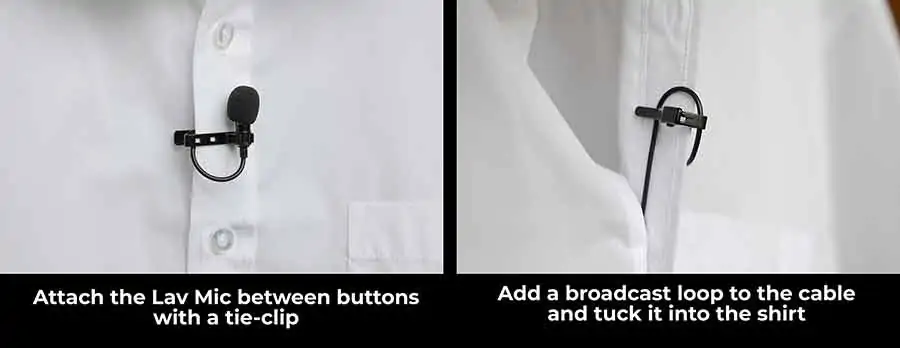
Do the same with a blouse. But since shirts and blouses button up in opposite directions, you may need to unclip the mic capsule, rotate the clip, and reattach the mic.
If you need to hide the lav mic under a shirt you can attach the mic to your T-shirt using a vampire clip, a gaff tape triangle, or Rycote Under Cover. If you’re not wearing anything under the shirt you can use microporous surgical tape or Rycote Under Covers and Over Covers to stick the mic directly to your skin.
Last update on 2025-07-02 / Affiliate links / Images from Amazon Product Advertising API
Ladies wearing a blouse have the option of using a vampire clip in the middle of a bra.
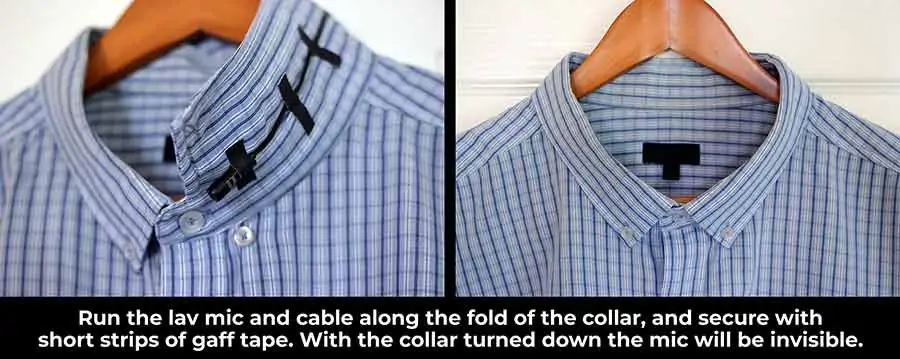
Another way of hiding a lavalier microphone on a shirt is to conceal it under the shirt collar. Run the mic and cable along the fold of the collar, securing the cable with short strips of gaff tape, as you can see I the image below.
At the back of the shirt, run the cable down the back of the shirt, either on the inside or outside, to a wireless bodypack or off to your audio recorder.
How to wear a lav mic on a T-Shirt or Dress
Lav mics are often attached to the neckline of a T-Shirt or Dress using the mic’s alligator tie clip. The cable is then tucked inside the clothing and run to a wireless bodypack or to a recorder.
If the lav mic needs to be hidden, the mic can be stuck to the chest using surgical tape or Rycote Under Covers. In the case of a lady, the lav mic capsule can be secured in the middle of the bra with a vampire clip.
A sports shirt with a collar and a couple of buttons is miked in the same way as an ordinary shirt. Use the alligator tie clip that came with the lav mic and tuck the cable inside the shirt at the button opening. The cable can then be fed round to the wireless bodypack or out from underneath the shirt to the audio recorder.
Summary
In this article, I’ve shown you how to use a lapel microphone on clothing. It’s easier to mike someone if the Lav Mic remains visible but it’s not too difficult to conceal the microphone. The simplest way to wear a lav mic is to use the alligator tie clip that normally comes with the mic but there are other ways as well. These include using vampire clips plus Rycote Over and Under Covers. One of the advantages of hiding the microphone under a layer of clothing is that the outer clothes act as a windscreen for the mic. Of course, you don’t need to buy extra equipment to attach your Lav Mic, you can make your own, such as the gaff tape triangle and DIY vampire clip using a safety pin and moleskin tape.
I hope you found this article useful. If you did, please consider sharing it. You’ll find social sharing buttons below.
Tosh Lubek runs an audio and video production business in the UK and has been using the Canon EOS R since it was released in the Autumn of 2018 and the Canon EOS R6 in 2020. He has used both cameras to shoot TV commercials broadcast on Sky TV, promotional business videos, videos of events and functions, and YouTube creator content. He has also won several international awards for his advertising and promotional work. You can meet him by visiting his “video booth” at HashTag Business Events across the country.
Recent Posts
You're Using the Canon RF 50mm f/1.8 WRONG! Here’s How to Fix It
If you’ve recently picked up the Canon RF 50mm f/1.8 STM—affectionately known as the Nifty Fifty—you might be confused by that strange switch on the side of the lens. It doesn’t say AF/MF...
Recently, I shot several customer testimonial videos in 4K for a client when the overheating warning on my Canon EOS R6 appeared. In fact, it appeared three times in five sessions during the day of...


