
DIY Video Studio is supported by its readers who use the affiliate links or ads on this site. As an Amazon Associate, I earn from qualifying purchases. Thank your support if you use any of the links.
Author: Tosh Lubek First published: 17th August 2018 Updated: 19th December 2023
Want to conquer YouTube but you don’t have lots of time? You’re not alone. Consistent publishing is key, but finding the hours for vlogging![]() can feel like battling a boss in your favorite game.
can feel like battling a boss in your favorite game.
Don’t worry, video warriors! This post arms you with 15 time-saving hacks to skyrocket your video production productivity and unleash your inner Spielberg (minus the dinosaur costume, probably).
1. Build a permanent video studio setup at home
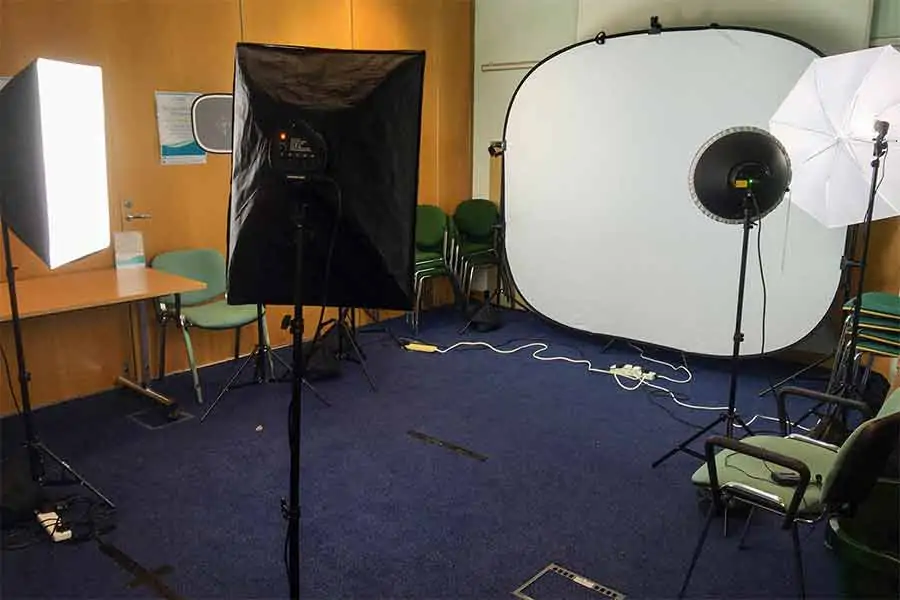
Ditch the setup/teardown struggle! Build a permanent home video studio![]() in a spare room and record on demand. No more dampened enthusiasm – jump in when inspiration strikes and let your passion shine through. A dedicated space for creating videos is like a primed paintbrush, ready to fuel your creativity and propel your audience growth. Plus, the more you use it, the smoother and proficient you’ll become. That’s a great win-win!
in a spare room and record on demand. No more dampened enthusiasm – jump in when inspiration strikes and let your passion shine through. A dedicated space for creating videos is like a primed paintbrush, ready to fuel your creativity and propel your audience growth. Plus, the more you use it, the smoother and proficient you’ll become. That’s a great win-win!
2. Create a temporary video studio
Often, a permanent studio is out of the question. But if you have some space you can use occasionally, you can create a temporary pop-up studio. Since the setup is the same every time, you’ll be able to build it quickly, since you’ll know where everything goes.
In terms of creating a set, I’d suggest two options:
- Office or desk space.
- A lounge
An office is ideal if you’re going to shoot tutorials that are computer-based.
The second option for a temporary studio is your lounge (or another large enough domestic room for that matter). Clear furniture for a backdrop, lights, and camera. Don’t worry about the untouched corners – framing hides the mess!
3. Only use the gear you need
Are you longing to get lots of video gear? Before a new tripod tempts you, consider this: more stuff = more setup time. Assess your actual needs! Can you get away with just using a smartphone and natural light? If you’re filming yourself, try to avoid using more gear than a camera, LED light(s), microphone, and backdrop.
4. Use lights that are quick to set up
My old softbox setup looked impressive, but setting it up was a nightmare. Three lights with endless parts – often I never needed the third one for a “hair light”! For quick shoots, LED lights became my savior.
Softboxes? A whole puzzle of bulbs, diffusers, and bulky hoods. Screw in 15 bulbs each time? No thanks! LEDs? Screw them onto a stand, plug them in, and boom – instant studio. That saved me precious minutes, every time.
So, if you value convenience and speed, go LED. If you want to save even more time, get an LED ring light (you’ll only need one light). More time for creativity, less time wrestling with soft boxes and lightbulbs!
5. Batch Recording Bonanza: More Videos, Less Fuss
If you want to improve your video production productivity, use batch recording as your secret weapon! Here’s how:
- Write scripts in advance, or at least plan what you are going to say in each video.
- Set aside either a day or half a day for a recording session and record as many of those videos as possible in one go.
- Do everything you can to make that possible, including avoiding distractions due to phone calls and social media.
- Edit the footage when you want, although the sooner the better. To save time, hire a video editor on Fiverr.
- We all tend to get better with practice. After a practice read-through, you’re more likely to get to the end of the script without fluffing your lines.
- Start with recording shorter videos, you’ll find them easier to do.
So, ditch the daily grind and embrace batch recording! More videos, less stress, endless creative possibilities.
6. Forget the green screen
Ditch the green screen dream! It’s a time-sink for non-professional productions. Focus on sharing knowledge and marketing, not mastering chroma keying. Capturing good green screen footage takes time if you want to make your life easy when it comes to editing. Save time, create more, and boost your revenue – skip the green screen unless essential or if you’re just going to appear in the corner of the screen (no one will notice the imperfections)!
7. Use a script
Don’t try to “wing it”! Use a script or even a set of bullet points for video success. Sure, some naturals can fly by the seat of their pants, but for most, it’s a recipe for rambles and lost focus. You owe your viewers clarity and value, and ad-libbing often misses the mark.
Enter the script or bullet point list: it’s your roadmap to covering key points, sounding informed, and controlling video length. You want to avoid aimless rambling. Respect your audience: answer their questions and anticipate their next ones. A focused script keeps you on track, your viewers engaged, and your editing time in check.
So, script your journey, not just your starting point. You’ll thank yourself (and your viewers) later!
8. Don’t try learning your script off by heart

Forget script memorization! Break it down with the “Chocolate Chunk” method:
- Chunk it Up: Write your script in bite-sized sections on a flip chart.
- Record & Clap: Memorize and record one chunk at a time. Clap twice after a good take.
- Rinse & Repeat: Move on, memorize the next chunk, record, clap, repeat.
- Edit Magic: In your video editor, identify good takes by the loud claps and edit them together.
This method eases script anxiety, speeds up recording, and lets you cut with ease. Win-win-win!
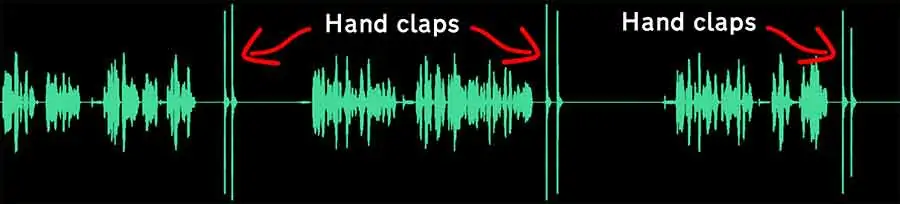
When you import your footage into your video editor, look at the audio track (see below). The handclaps will show in the audio as tall spikes. This tells you the recording just before the claps is a good take. You can then cut out the rubbish and join your good takes together.
9. Use a teleprompter to make videos quickly

If you have a script, skip memorizing it! Use a teleprompter, but ditch the pricey teleprompter setups. Here’s how:
- Download a teleprompter app onto your tablet or phone.
- Mount the tablet just above your camera that’s 2.5-3m away (at that distance, viewers won’t notice your gaze shift from the camera lens.
- If possible, get a remote control for the teleprompter app.
- Do a practice run-through so you appear natural on the recording.
10. Get some help behind the camera
If you find working solo a struggle, get some help. A colleague or friend might be willing to operate the video gear. Alternatively, recruit a college film student to handle the tech while you focus on content. Frequently they’ll work for free if they can use the video in their showreel.
11. Create and reuse a standard end or outro
Save time by recording a standard outro that can be used in every video. This could be a branding statement or a call to action, such as “Remember to like and subscribe” etc.
12. Shoot and edit on your iOS device
Did you know you can shoot and edit your video on your smartphone, whether it’s an iOS or Android device? By editing on a mobile device, you can create videos anywhere and at any time that suits you.
Whether you are using an iPhone or Android phone, you’ll find plenty of video editor apps. On my iPhone and iPad I use iMovie for iOS and LumaFusion to edit my video. On my Android phone, I like Filmora and Adobe Premiere Rush.
If you are happy to use your mobile device to film and edit your video, you have the potential to record more videos.
13. Repurpose existing content
Repurpose content, and boost efficiency! It’s one of the fastest ways of producing video content. Turn your existing writing, podcasts, graphics, or even presentations into engaging videos:
- PowerPoint magic: Import slides, add voiceover, voila! A Video Sales Letter (VSL) or explainer video on your desktop, laptop, or even iPad. Bonus: produce directly in PowerPoint and export as MP4.
- Podcast to video: Craft slides that complement your audio and voila! A visual podcast ready to rock.
- Blog to camera: Read your posts on-screen, overlay images, and boom! Video blog perfection. For reviews, add product B-roll footage for extra punch.
No more starting from scratch. Breathe new life into your content and dominate the video game!
14. Try one-take recording
Is perfection paralysis holding you back? Forget perfection, you’ll never achieve it because you’ll always find something to criticize! Your audience wants content, not flawless takes. So do this. Record, publish, iterate, and improve in the next video. One-take wonders (stumbles and all) work fine for vlogs and lectures, just avoid rambling.
Once you’re done recording, trim the start and end, publish, and repeat. Speed is your friend.
15. Make framing yourself easy
If you are recording videos on your own, you will have the problem of framing yourself correctly. Unless you can see your screen, you’ll have to use a trial-and-error method until the framing is right. It’s a method that does work but it takes time. If we can shave off some of that time you can use that time to film more. So, what you need is to see yourself.
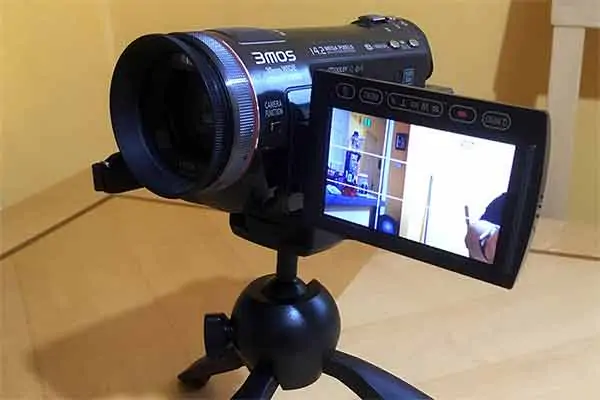
If you’re a camcorder user, you’re probably in luck because there’s a good chance you will have an articulating screen. That’s one that can be folded out and be rotated through 180 degrees, so you can see yourself in front of the camera. It’s even possible your camcorder has an app that allows you to see the camera output through a WIFI connection.
If you are going to use a DSLR, choose one with an articulating screen. The other option, like many camcorders, is to use a companion app. Whether it’s an articulating screen or an app on your phone, you’ll be able to frame yourself correctly.
If you prefer iPhone videography with the rear-facing camera, consider getting the FiLMiC Pro camera kit![]() . Install FiLMiC Pro on your iPhone and FiLMiC Remote on another iOS device. You’ll be able to see yourself on the second iOS device as well as control the FiLMiC Pro camera app. Another option is to install Reflector 3
. Install FiLMiC Pro on your iPhone and FiLMiC Remote on another iOS device. You’ll be able to see yourself on the second iOS device as well as control the FiLMiC Pro camera app. Another option is to install Reflector 3![]() by Air Squirrels on your desktop or laptop and mirror your iPhone’s screen to your computer. If you are an Android user, you can screencast your phone’s screen. Again, adjust your position until your framing is correct.
by Air Squirrels on your desktop or laptop and mirror your iPhone’s screen to your computer. If you are an Android user, you can screencast your phone’s screen. Again, adjust your position until your framing is correct.
Whatever you do to enable seeing yourself, once you have finalized your framing remember to look at the camera’s lens.
Tosh Lubek runs an audio and video production business in the UK and has been using the Canon EOS R since it was released in the Autumn of 2018 and the Canon EOS R6 in 2020. He has used both cameras to shoot TV commercials broadcast on Sky TV, promotional business videos, videos of events and functions, and YouTube creator content. He has also won several international awards for his advertising and promotional work. You can meet him by visiting his “video booth” at HashTag Business Events across the country.
Recent Posts
Most people use sandbags the wrong way. Here’s how to hang them properly on a light stand for maximum stability and safety — plus what to fill them with.
You're Using the Canon RF 50mm f/1.8 WRONG! Here’s How to Fix It
If you’ve recently picked up the Canon RF 50mm f/1.8 STM—affectionately known as the Nifty Fifty—you might be confused by that strange switch on the side of the lens. It doesn’t say AF/MF...