
DIY Video Studio is supported by its readers who use the affiliate links or ads on this site. As an Amazon Associate, I earn from qualifying purchases. Thank your support if you use any of the links.
Author: Tosh Lubek First Published: 7th August 2018 Updated: 19th December 2023
Learning how to manage iPhone storage allows you to make more efficient use of your iPhone’s memory and shoot more videos. These nine tips will free up valuable storage space on your iPhone.
- Backup and delete.
- Use iPhone external storage.
- Optimize your camera settings.
- Can you use a photo instead of a video clip?
- Prepare a shot list and stick to it.
- Record each take as a separate clip.
- Review your clips and delete them.
- Trim your clips.
Here are the eight strategies you can use to make sure you make the most of your iOS device’s storage. Allowing you to shoot more usable clips for your finished videos.
1. Backup and delete
- Backup & Delete: Save your essential music, photos, videos, and app data, then clear out the clutter! Tap Settings > General > iPhone Storage to see app usage and follow the handy “Recommendations.”
- Tame Temporary Hogs: Large apps you rarely use? Back them up, delete them for now, and reclaim precious space!
Here’s a screenshot of my iPhone’s storage.
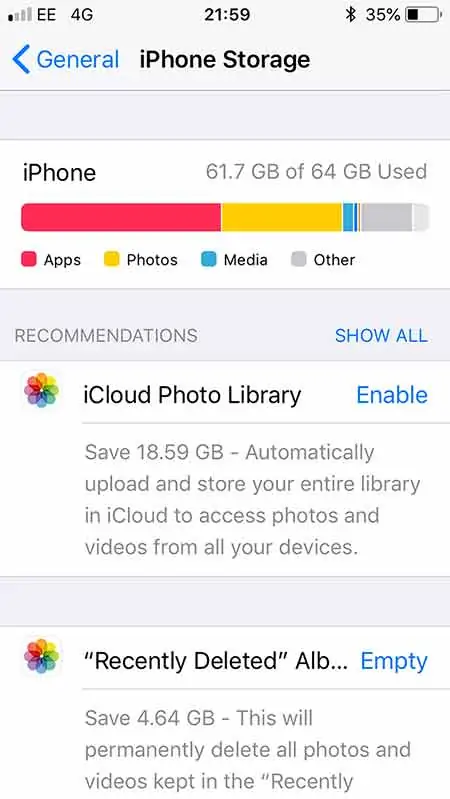
You can see my 64GB iPhone is crying for mercy! I’ve used 61.4GB! Luckily, it offered a lifeline: 19GB awaits if I embrace iCloud Photos!
Time to ditch some video weight too, but remember, any images and videos you delete on an iPhone need an extra farewell party. You must go to “Recently Deleted” in the Photos app, and clear them from there for a space-saving send-off.
Remember, before deleting any files, copy them to your iCloud storage, your computer, or an external flash drive. The latter is something I’ll talk about next.
2. Use iPhone external storage
Boost iPhone storage with lightning flash drives! These tiny titans, available in 16GB – 2TB capacities, plug into your lightning port and use companion apps to transfer photos and videos. This will help free up iPhone space. Once transferred, plug the drive into your computer and transfer the files for safekeeping or editing.
Popular options include SanDisk iXpand (64GB-256GB) and OMARS USB 3.0, both with free apps and direct 1080p video recording (though manual controls are limited). Get one of these and say goodbye to your iPhone storage woes!
I have a couple of these external iPhone flash drives, as you can see in the images below.
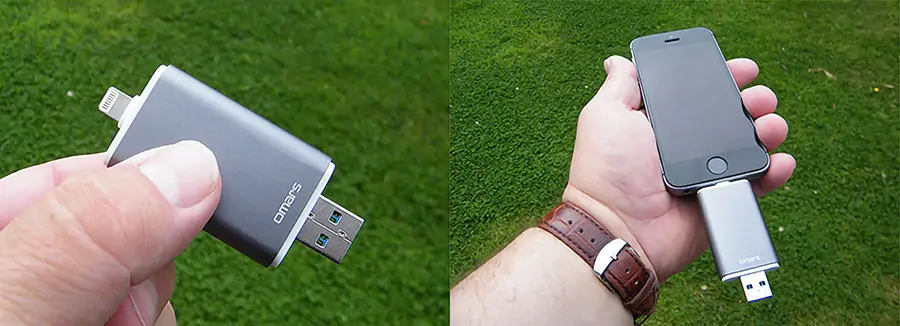

- The all-metal casing 2-in-1 flash drive with Lightning and USB Type-C connectors.
- Seamlessly move content between your iPhone, iPad Pro and USB Type-C devices, including Android…
- (1) For iPhone, iPad Pro and iPod compatibility, see SanDisk Support ixpand compatibility web page….
- Automatically back up your iPhone photos, videos and more.(2). (2)iXpand Drive app required (except…
Last update on 2026-03-13 / Affiliate links / Images from Amazon Product Advertising API
3. Optimize your camera settings
Whether you are using the native camera app or the much better FiLMiC Pro, choose the most appropriate camera settings. If you know you do not need the highest video quality, you can reduce your video settings and shoot for longer.
If you are recording a piece-to-camera video or vlogging, you probably don’t need the highest quality video. You’ll probably be OK with 1080p HD at 30fps. The resolution and quality will be determined by what you plan to do in post-production.
For green screenshots or where you will be color grading your clips, you’ll want to bump up the resolution and data rate. But for short videos uploaded straight to social media, a lower quality may be fine.
4. Does it have to be shot as video?
Where possible, skip video clips for stills!
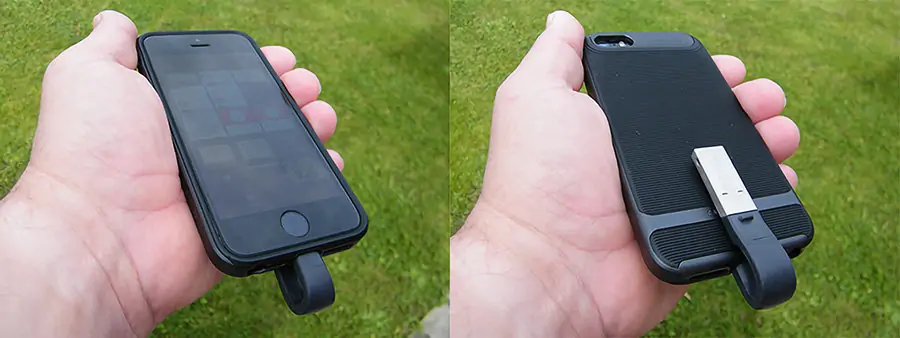
If your subject isn’t moving, use an image instead. Photos take up much less space and offer higher resolution than video. This makes it much easier to zoom in and apply the Ken Burns effect. But remember images and videos have different aspect ratios (images are squarer than videos). Frame your images for video cropping, leaving space at the top and bottom that can be cropped once you add the image to your video timeline. This allows the image to fill the video frame. The pair of images below show what I mean.

When using photos in your video timeline you will need to crop the top and bottom of your photo. It will then match the 16:9 aspect ratio of your other video footage.
5. Prepare a shot list
If you don’t have a script, have a structure for your video. Then create a list of necessary shots. That will help you limit the number of shots to just those you need.
The shot list will help save on your iPhone’s storage but also bring other benefits.
A shot list will:
- Ensure you get all the shots you need for your finished video.
- Speed up editing because you won’t have to review clips you don’t need.
- Reduce the computer hardware resources used when editing, allowing your video project to run more smoothly.
- Save storage space, both on your iPhone and computer hard disk.
6. Record each take as a separate clip
To avoid massive creating massive storage-hogging video files, stop recording after each take instead of filming continuously. Editing marathon video clips can be slow and painful!
7. Trim your clips
Whether you’re using the iPhone Camera app or Filmic Pro, trim your clips before and after the action to remove unnecessary footage. To do this, drag the handles at the start and end of the clip, but ensure you keep about a 1-second buffer at the start and end to allow for transitions in your editing! This saves storage without compromising edits.
8. Review and delete
At convenient times during your video shoot, review your footage. Ditch bad takes to save space, but keep those funny clips! Blooper reels can charm viewers and build genuine connections. So, curate your takes: save the best, consider the laughs, and delete the rest.
9. Remove Apps that are large or you don’t use
It’s easy to install an App, try it out, and just leave it unused on your iPhone. The trouble is that it can take up valuable storage space.
Go to Settings > General > iPhone Storage.
Scroll down until you see a list of all your apps. Not only will you see your Apps but also the amount of storage used and when you last used the App. You’ll soon find the Apps you have never used or haven’t used in a long time. Click on the apps that might be likely candidates for removal. You will see the size of the App and the size of any documents and data.
You have two choices, offload the App or Delete the App. Offloading the App will recover the space used by the App but keep the documents and data. Later you can reinstall the App and again access your documents and data. But if you delete the App all the related documents and data will also go along with the App.
Summary
Remember, thinking about your iPhone storage is an important part of the iPhone video production process. Your storage should be treated like any other precious and limited resource.
If you are running out of iPhone video storage, use an external memory stick. It plugs into the iPhone’s lightning socket to back up your files. File transfer is relatively quick, and you can even play and review the files directly from external storage. That feature might be extremely useful if you are making videos as a team. You can carry on shooting while a colleague takes your footage away for review and editing.
If you have a large-capacity iOS device, you may not need to worry about running out of storage. However, you may still improve your video production experience by adopting some of the above strategies.
For Apple support on checking your iPhone storage click here![]() .
.

About the author: Tosh Lubek is a multi-award-winning broadcaster, writer, and video producer, with 40 years of experience in professional broadcasting and has been using Canon video and stills cameras since 2010. He has worked with radio and TV broadcasters, advertising agencies, and direct clients on a variety of projects including radio and television advertising, online video production, corporate videos, award ceremony motion graphics, and theme park sound design. Tosh has won numerous awards, including a Radio Academy Awards Gold Sony, a Gold, Silver, and Bronze World Medals in the New York Festivals International Advertising Awards. Since about 2007 he has been creating YouTube videos. Tosh has been a sponsor of the “video booth” at HashTag Business Events across the UK.
Recent Posts
Most people use sandbags the wrong way. Here’s how to hang them properly on a light stand for maximum stability and safety — plus what to fill them with.
You're Using the Canon RF 50mm f/1.8 WRONG! Here’s How to Fix It
If you’ve recently picked up the Canon RF 50mm f/1.8 STM—affectionately known as the Nifty Fifty—you might be confused by that strange switch on the side of the lens. It doesn’t say AF/MF...