
DIY Video Studio is supported by its readers who use the affiliate links or ads on this site. As an Amazon Associate, I earn from qualifying purchases. Thank your support if you use any of the links.
Author: Tosh Lubek Published:
For the purposes of transparency, Maono sent me a review sample of the PD400X, however, this review is wholly independent.
The PD400X was launched on Kickstarter in the summer of 2022, meaning it’s more than a year since this microphone came to the market and pre-launch samples were provided to other reviewers. That might explain why my experience of the PD400X differs on some points, compared to those early reviewers. I assume Maono listened to early feedback and made minor improvements. For example, I noticed that some early reviewers mentioned that the mute button could be a little unresponsive, that certainly wasn’t my experience with my copy of the PD400X. I also found the pop rejection to be a little better than in the reviews, and the supplied foam windscreen looks different.
You can watch my YouTube review of the PD400X here. It’s about 25 minutes long, but you will hear what this microphone sounds like in both USB and XLR modes. I also dive into the free Maono Link audio processing software. But you’ll also get all the highlights in this article, which is a shorter read.
Although I point out a few negative aspects of this microphone in the video and this article, they are not serious issues and my overall impression of the PD400X is that it is worthy of serious consideration.
If you like the sound of this dynamic cardioid microphone and wish to buy it, use this link to the Maono PD400X webpage and use coupon code TOSHLUBEK to get a 10% discount.

What comes in the box
The PD400X comes in a substantial box with good internal padding. It contains the following.
- PD400X microphone
- Metal yoke mount (pre-fitted to mic)
- Metal circular desktop stand base
- USB mic cable
- XLR mic cable
- Foam windscreen
- User manual
Technical Specifications
- Mic Capsule: Dynamic
- Polar Pattern: Cardioid
- Audio outputs: XLR & USB-C
- Sampling rate: 48kHz
- Bit Depth: 24bit
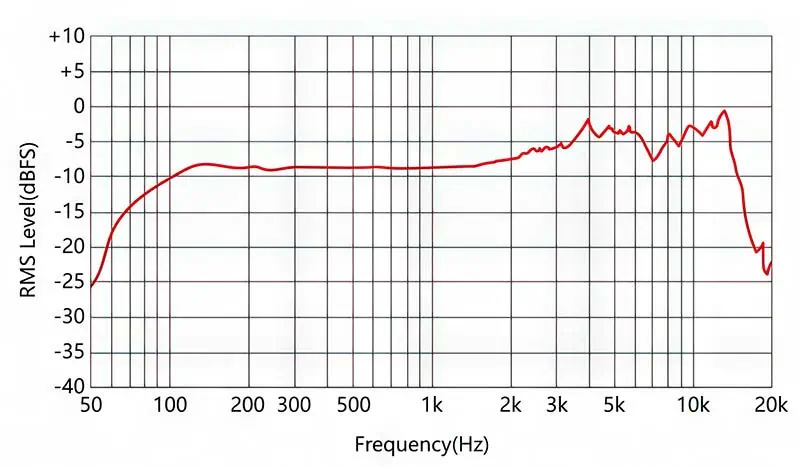
- Frequency response: 40Hz-16kHz
- Mic Gain Range: 0 to +42dB
- Sensitivity (XLR): -51.2 dBV/Pa
- Sensitivity (USB): -8.5dBFS/Pa (Max)
- SPL: >130dB
Maono PD400X Dynamic Microphone Overview
The PD400X is a dual-output dynamic cardioid microphone with classic broadcast mic styling. The body is all-metal and has a little bit of heft to it, making it feel robust. The grille is also metal and is strong enough to resist deformation from a thumb press.
Just below the grille, and on the side of the body, there’s a capacitive touch mute or tap-to-mute switch. This works well, although I’ve occasionally managed to accidentally mute the mic when handling it or reaching around to use the smart knob. When the mic is live, a green microphone icon lights up, when muted the icon turns from green to red. Some reviewers of the pre-launch microphone mentioned the capacitive mute switch behaved inconsistently, but that was not my experience. The mic now mutes/unmutes precisely with every tap, so I have no issues here.
Just below the mute, there’s the smart knob or multifunction knob. Depending on the number of presses determines its function. You then turn the knob to adjust the chosen function. Note that there are no end stops on the smart knob, so you can turn it in either direction endlessly. But when you reach the min/max of each function further turning will have no further effect.
Here’s how to access each of the three smart knob functions.
- Mic gain mode: 1 press of the smart knob
- Headphone volume mode: 2 presses of the smart knob
- Monitor mix mode: 3 presses of the smart knob
In each mode, the 9 LEDs around the smart knob will light up to indicate the mic gain, headphone volume, or the monitor mix (the balance between the mic and computer playback in your headphones).
After 3sec of not adjusting the smart knob, the ring of indicator LEDs returns to displaying the microphone’s output level. A correct level is represented by the seven green LEDs. The two orange LEDs indicate an overload, and the single red LED shows the signal is severely overloaded.
Although the ring of LEDs on the side of the microphone looks cool, you’ll find it difficult to see the level clearly since the PD400X is an end-address microphone (you speak into the end and not the side). However, if you’re using the mic in YouTube or social media videos the moving LED levels will look cool for your viewers.
On the bottom or rear of the microphone is where you’ll find all the outputs and an EQ button (with indicator LEDs).
These include the USB-C and XLR outputs and a 3.5mm headphone output for zero-latency monitoring of your voice and the computer playback. The small pushbutton lets you toggle between four EQ presets. These are the same as the EQ presets you’ll find in the Advanced section of the Maono-Link software. There are three LEDs beside the push button that indicate the current EQ setting, with the following meaning.
- 1st LED: Flat
- 2nd LED: High Pass filter
- 3rd LED: Presence Boost
- 2nd & 3rd LEDs: High Pass filter + Presence Boost
WARNING: This microphone’s controls and headphone monitoring only work when connected in USB mode. Do not expect them to work when you use the PD400X as an XLR microphone. You’ll need to adjust the microphone level on your audio interface or mixer, and any EQ and processing will need to be applied on your computer. You will also need to take your headphone monitoring from your audio interface or mixer.
TOP TIP: You can record from the USB and XLR outputs simultaneously. So, even if you plan to only record from the XLR output, you can still connect the microphone to the USB port on your device (computer or mobile) to get the benefit of zero-latency headphone monitoring directly from the microphone. This can be useful if your recording location is not close to your audio interface, mixer, or recorder.
The Maono PD400X comes with a ready-fitted metal yoke mount. It has two tightening knobs on either side and the mount is a standard 5/8th inch mic thread. A circular metal desktop stand base is also included that can be screwed onto the yoke mount.
Mounting the Maono PD400X
Despite a desktop stand being provided, I do not recommend using it. Although Maono has added thin rubber pads to the underneath of the circular desktop stand base, these have minimal effect in isolating the microphone from bumps and knocks. Furthermore, when the microphone is placed on the desktop stand it is too low.
Instead, ditch the desktop stand base and yoke, and mount the microphone on a separate mic stand with a shock mount. When looking for a shock mount you’ll need one that can accommodate a mic with a 57mm diameter body. Alternatively, get a large mic clip, as I have done, and use it with a mic stand that is not in direct contact with your desk. This way you’ll avoid picking up the sound of bumps and keyboard noises transferred through your desk to the microphone body.
Maono PD400X microphone cables
Since this is a dual-output microphone, the Maono PD400X comes with both USB and XLR cables. They are of good enough quality, but they’re not of equal length. The XLR is 3m long, while the USB cable is 1.5m long. That makes sense since the mic will be close to a computer in USB mode but probably further away from an audio interface or mixer when used as an XLR mic.
The connectors on the USB cable are interesting. One end is a standard USB-C connector to plug into the USB output on the microphone. But the other end is a USB-C with a detachable USB-C to USB-A adapter. Since the adapter is permanently connected to the cable by a plastic tag, it’s not going to get lost. So, if you’re going to move the microphone between computers, the cable will always fit the USB port.
Maono PD400X Microphone USB Setup
In most cases setting up the PD400X as a USB microphone is going to be easy and uneventful. All you need to do is to connect the microphone to your device and the microphone should be recognized and selected as both your audio Output and Input.
If that does not happen, click on your Windows Start button and choose Settings > System > Sound.
In the Output section ensure that Speakers PD400X Podcasting microphone is selected. This will ensure you can monitor your audio on headphones plugged into the microphone.
Then look in the Input section and ensure that Microphone PD400X Podcasting Microphone is selected.
By default, the recording format of the microphone should be set to a sampling rate of 48kHz and a bit depth of 24bit, which is the best quality for this microphone. But if you don’t need this level of quality, you can change it in the audio settings. In the Input section of the Sound settings click on the part for the PD400X microphone to open its properties. Now click on the dropdown menu to see the following options.
- 1 channels, 16 bit, 44100Hz (CD Quality)
- 1 channels, 16 bit, 48000Hz (DVD Quality)
- 1 channels, 24 bit, 44100Hz (Studio Quality)
- 1 channels, 24 bit, 48000Hz (Studio Quality)
If the audio is to be included in a video, choose one of the 48000Hz options. If the recording is for an audio-only podcast, then a sampling rate of 44100Hz should be fine. However, it’s always a good idea to record your source material at the best quality and then downsample if required.
Maono PD400X Microphone XLR Setup
Using the PD400X as an XLR microphone is straightforward. Connect the microphone to an audio interface, mixer, or digital recorder using the supplied XLR cable.
Once connected to your equipment you’ll need to select the microphone.
On your computer, you’ll need to go into your sound settings and choose your audio interface or mixer as an input. You’ll then need to adjust the input level for your microphone’s channel on your audio interface or mixer. On a digital audio recorder, you’ll need to select and arm the input you’ve plugged the microphone into, then set the input level.
Be aware that in XLR mode you will not have access to many of the features that are available in USB mode. These include the smart knob and EQ preset button functionality. Nor will the LED lights work on the microphone’s body, and you won’t be able to use headphone monitoring from the base of the microphone. Furthermore, in XLR mode you will not be able to use the Maono Link mic software to process the audio.
Many dynamic microphones are notorious for having a low output level, however, the Maono PD400X is not bad in this respect. When plugged into my Zoom H5 recorder, I was able to peak at -12dB when speaking at 6 inches from the mic and the recording level dial turned to about 6.5 (out of 10). This was perfectly acceptable, but by using an Imperative Audio FETPre inline mic preamp I was able to turn the record level dial down to just a little above 4 and again peak at -12dB.
Although an inline preamp is not essential, it’s a potential way of improving the audio from the PD400X.
Making the PD400X shine with the Maono Link software
If you want to get the most out of this microphone, with the least amount of effort, then you should download and install the free Maono-Link software. It’s not essential to install the software, and you can use the microphone without the software. I have a separate article about the software, but I’ll mention a few details here.
Maono-Link is available for Windows, Mac, and Android. But like the controls on the microphone, the Maono Link software is only effective if you’re using the PD400X as a USB microphone. If you’re using it in XLR mode, you’ll have to polish your audio during post-production in your DAW.
The software offers you two operating panels, Standard and Advanced. For most users, the Standard panel will give enough control over the microphone and its sound. For more experienced users the Advanced panel provides more control, including the ability to apply and fine-tune a limiter and compressor.
If you have experience using the MOTIV software for the Shure MV7 microphone you will notice that there are similarities between it and the Maono-Link software. Both offer a good amount of control and audio processing capabilities. Each software package is very good and helps bring out the best from respective microphones.
Conclusion: Should you buy the Maono PD400X
Having used the Maono PD400X for a few weeks now, would I recommend it? That’s a simple question to answer. Yes, I would. I think it normally costs around $140-$150, and it’s worth certainly worth that.
Maono seems to be pitching the PD400X as a competitor to the Shure MV7, which costs about $100 more. In many respects, Maono’s microphone has many of the features of the Shure MV7. Although I think the Shure microphone has the edge over the PD400X, I certainly don’t think it’s almost twice as good, as the price difference might suggest.
There’s not enough between these two microphones for your audience to notice a difference. More importantly, I don’t think they would even care about what mic you’re using provided it sounds good. In my opinion, the Maono PD400X looks and sounds good enough for any podcast or live stream. It also does an excellent job if you need to cut down background noises.
If you want to take full advantage of what the PD400X can offer I would tend to use it in USB mode. This way you’ll get full access to all the “bells and whistles” of those on-mic controls and the benefits of the Maono-Link software.

About the author: Tosh Lubek is a multi-award-winning broadcaster, writer, and video producer, with 40 years of experience in professional broadcasting and has been using Canon video and stills cameras since 2010. He has worked with radio and TV broadcasters, advertising agencies, and direct clients on a variety of projects including radio and television advertising, online video production, corporate videos, award ceremony motion graphics, and theme park sound design. Tosh has won numerous awards, including a Radio Academy Awards Gold Sony, a Gold, Silver, and Bronze World Medals in the New York Festivals International Advertising Awards. Since about 2007 he has been creating YouTube videos. Tosh has been a sponsor of the “video booth” at HashTag Business Events across the UK.
Recent Posts
Most people use sandbags the wrong way. Here’s how to hang them properly on a light stand for maximum stability and safety — plus what to fill them with.
You're Using the Canon RF 50mm f/1.8 WRONG! Here’s How to Fix It
If you’ve recently picked up the Canon RF 50mm f/1.8 STM—affectionately known as the Nifty Fifty—you might be confused by that strange switch on the side of the lens. It doesn’t say AF/MF...