
DIY Video Studio is supported by its readers who use the affiliate links or ads on this site. As an Amazon Associate, I earn from qualifying purchases. Thank your support if you use any of the links.
Author: Tosh Lubek Published: 16 November 2023 Updated: 20 November 2023
For full disclosure, Maono provided me with a sample of their PD400X dynamic cardioid microphone for testing. However, they have not paid for this article, nor have they any control over my opinion of the microphone.
If you own a Maono PD400X dynamic cardioid microphone and use it in USB mode, you should get the Maono-Link software. It allows you to control your PD400X from a computer or mobile device, along with providing real-time audio processing.
However, it’s not mandatory to install and use the software. The microphone’s smart knob allows you to control, certain things, and there’s a button on the base of the microphone that lets you choose between the four EQ presets. What you won’t be able to do is add limiting and compression in real-time to your audio.
You can watch the video overview of the Maono Link software below or check out the main points in this article.
VIDEO COMING SOON
If you like the sound of this dynamic cardioid microphone and wish to buy it, use this link to the Maono PD400X webpage![]() and use coupon code TOSHLUBEK to get a 10% discount.
and use coupon code TOSHLUBEK to get a 10% discount.

Download Maono-Link Software
The Maono-Link software can be downloaded from the Maono website using this link![]() . The download page should look like the following screenshot.
. The download page should look like the following screenshot.
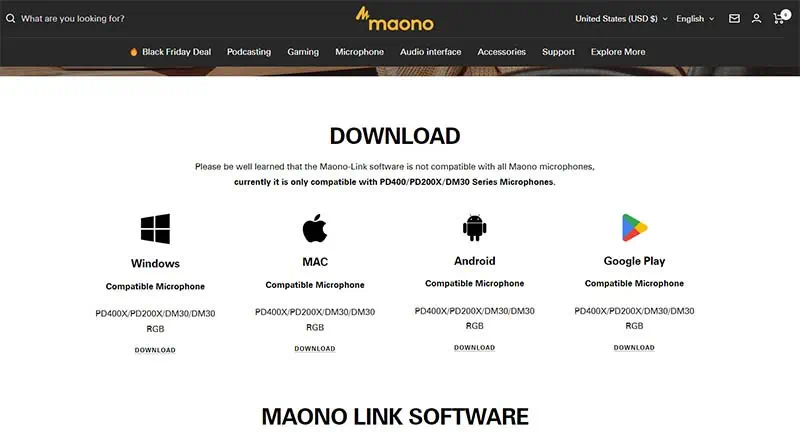
You can see that the Maono-Link software is not compatible with all Maono microphones. The compatible microphones currently include the Maono PD400, PD200X, and DM30 Series. This may change over time, so please check the Maono software download page for the latest updates on microphone compatibility.
Choose the download for your operating system. At present, the Maono-Link software can be used on Windows, Mac, and Android.
So, in addition to being able to use your microphone and software on your desktop and laptop computers, you can also record on a mobile device.
Launching the Maono-Link software for the first time
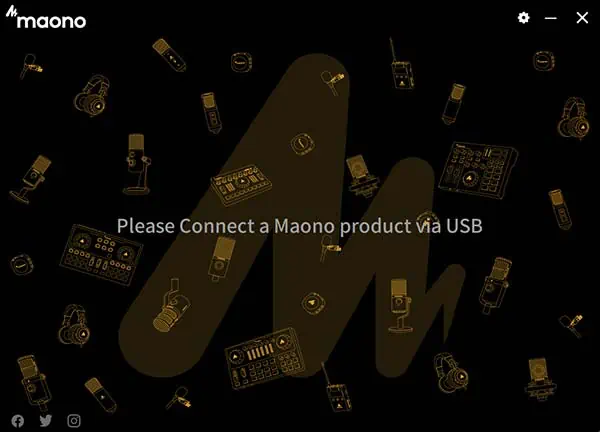
Once you have installed and launched the software, if your Maono PD400X microphone is not connected to your computer you will see this notice asking you to go ahead and connect using the supplied USB cable.
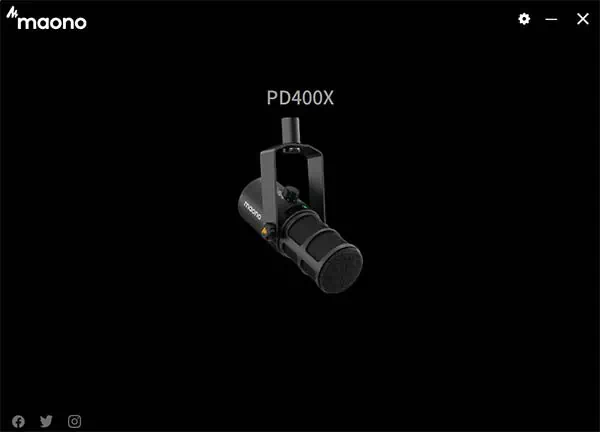
Once your compatible Maono device has been connected to your computer and recognized, an image of it will be displayed on the software’s splash screen. This guide assumes you are using the PD400X dynamic microphone, but it could be another Maono product. To enter the microphone control screen, click on the image of your microphone.
Once the software has launched to the main interface you will see there are two sides or panels. The left is for Standard mode, and the right is for Advanced mode. When you open the software, you’ll initially be in Standard mode, with the Advanced panel grayed out. You can change between Standard and Advanced modes by clicking on the Standard or Advanced buttons at the top left of the interface.
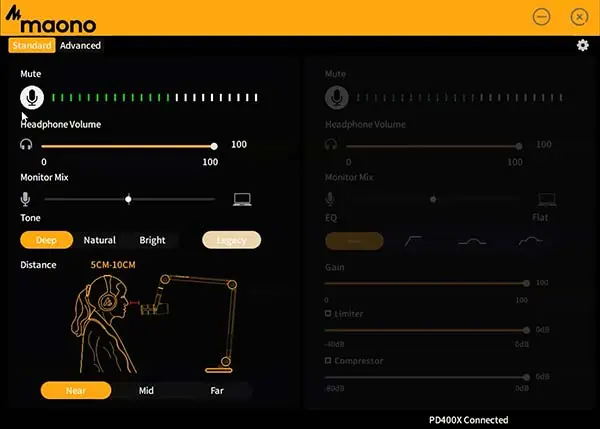
Maono-Link Standard Panel
The Standard panel gives you access to a few different microphone controls and processing presets. Most can be adjusted using the controls on the microphone, but it is easier to use the controls in the software.
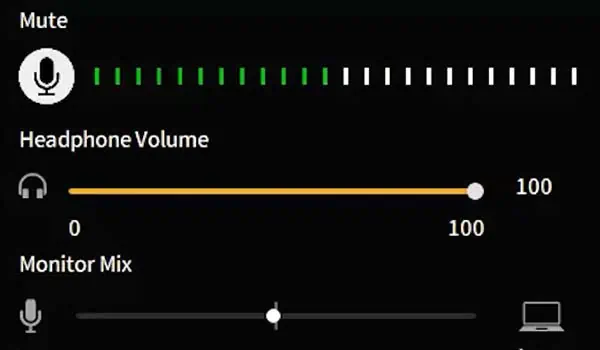
Mute Button and Level Meter
Below Standard / Advanced you will see a microphone icon and audio level meter. You can mute and unmute the microphone by clicking on the microphone icon. While the level meter is a visual indication of your microphone’s output level.

The meter is divided into green, amber, and red zones. Unfortunately, the divisions do not give you an indication of your level in dB, but it is a good guide to getting the correct level. It is split into three sections. From left to right, the divisions will light up as Green, Yellow, and Red.
Ensure the meter stays in the green, peaking just a little under the yellow.
Peaking in the yellow section means the audio is overloading.
Peaking in the red means the audio is severely overloading.
Headphone Volume
The next control is the headphone volume slider. This controls the volume of the headphone output from the microphone.
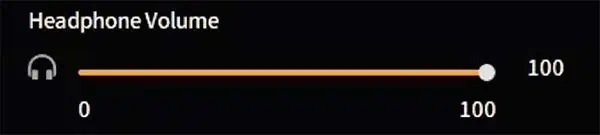
The Headphone Volume slider can be dragged between 0 (minimum) and 100 (maximum) to adjust the volume in your headphones.
Monitor Mix
The position of the Monitor Mix slider controls the balance in your headphones of the mic output and the sound from the computer.

To just hear yourself, drag the slider to the left.
To just hear the computer output drag the slider to the right.
To hear the mic and computer output balanced equally put the slider in the middle.
Tone
This section controls the EQ that is applied to the microphone output. Four presets are available, which are Deep, Natural, Bright, and Legacy.

Deep boosts the lower frequencies, and I suspect some compression is also applied. The Deep preset gives a warm and rich tone to your voice that compliments a close mic technique.
Natural is more of a flat EQ setting and less or no compression.
Bright boosts the treble frequencies in the output, giving your voice more presence.
Legacy isn’t defined in the documentation. I have asked Maono what they mean by Legacy and will update this as soon as I hear back from them.
Distance
The Distance section controls the microphone gain based on your distance from the mic. You can choose between Near, Mid, and Far. The further you are from the microphone the greater the mic gain setting. You’ll see an illustrative graphic with a distance guide depending on which preset button you choose. The three settings are as follows.
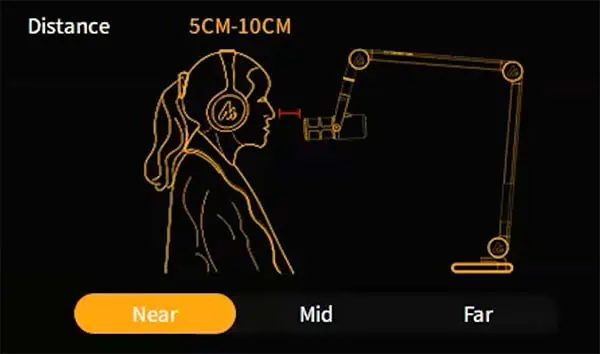
Near: When you are 5-10cm (2-4 inches) from the end of the microphone.
Mid: When you are 11-30cm (4-12 inches) from the end of the microphone.
Far: When you are 31-60cm (12-24 inches) from the end of the microphone.
Maono-Link Advanced panel
To access the Advanced panel, click on Advanced at the top of the interface. The Standard panel will become greyed out and the Advanced panel on the right will become active. The Advanced panel gives you more control over the microphone and gives you access to a limiter and compressor, as you can see in the image.

The first three items on the panel, the Mute button & level meter, Headphone volume, and Monitor Mix are the same as in the Standard panel, so I’ll skip these to avoid repetition. The first new section is EQ, which replaces the Tone presets.
EQ Section
UPDATE: Since reviewing this software, Maono has been in touch with me to say that the EQ section in the Advance panel has been refined in the latest update, and now provides 3 and 7 frequency band customization. You will need to update the PD400X firmware to version 1.2.0 or above and the software to version 2.2.1 or above. I have written a step-by-step guide giving full details of how to upgrade. you can read it here.
The EQ section includes four preset buttons. These are Flat, High Pass Filter, Presence Boost, and finally, High Pass Filter + Presence Boost. If you ensure you update the software and microphone firmware you will also see the Custom button.
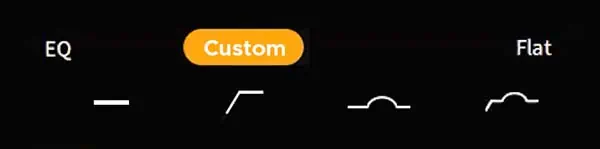
Flat does not apply any EQ changes to the microphone.
High Pass Filter rolls off low frequencies. The documentation does not mention what frequencies are cut, but I suspect it’s about 150Hz and lower.
Presence Boost gives a boost to frequencies in the 4-6kHz range.
High Pass Filter + Presence Boost combines these presets in one.
Custom gives you access to the Standard (3 band) or Advanced (7 band) EQ customization.
Gain
In the Advanced panel, you have greater control of the mic gain by using a slider from 0 to 100.
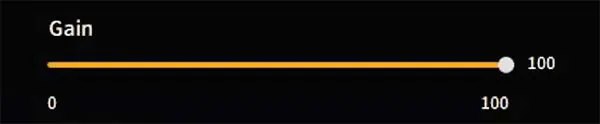
As a rough guide, when I speak in my normal voice at about 15cm (6 inches) from the PD400X microphone and have the mic gain set to 75, the waveform peaks at around -12dB when recording into Adobe Audition on my laptop.
Limiter and Compressor
Lastly, we come to the Limiter and Compressor. I’m covering these together since they are similar in the way they function. Each effect has the same controls in the Advanced panel. So, you’ll see a slider, a check box, and three dots to access a settings menu.
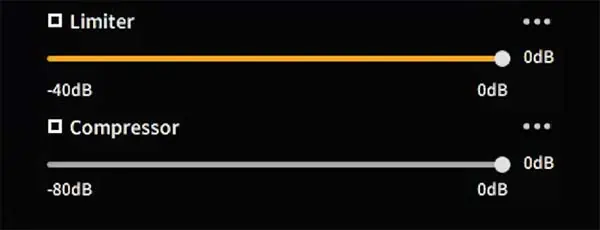
To activate the effect you want, click the check box above and to the left of the slider. You’ll then see one or the other of these settings screens.
The Limiter and Compressor sliders in the Advanced panel adjust the threshold level at which the compressor and limter start processing the audio signal. Any audio below the threshold is effectively ignored by the effect, any signal that exceeds the threshold will be processed.
However, you can go deeper into the control of these two effects. On the right and just above each slider you will see three dots. Click on these to enter the settings screen for the Limiter or Compressor, you then see one of the following screens.
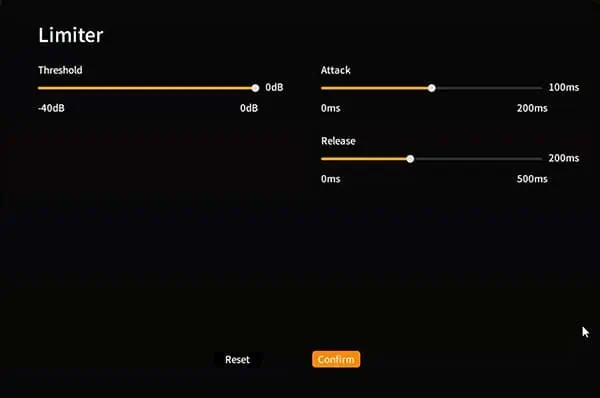
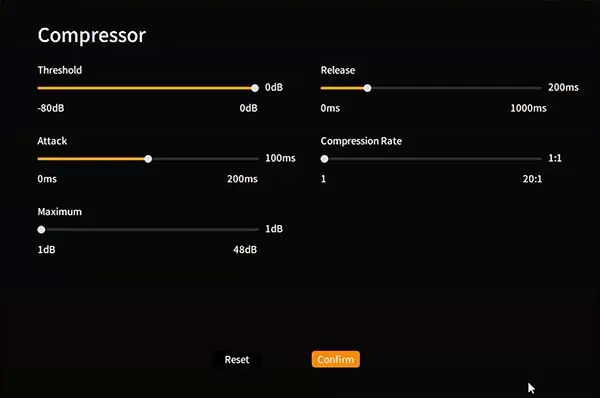
You’ll notice that they look similar, each having sliders for Threshold, Attack, and Release. However, the Compressor setup also includes a couple of other sliders, the one of most interest being the compression ratio, although the software calls it the compression rate.
The Limiter, as the name suggests, limits the peak level of your audio. This can be useful in preventing clipping in your audio if you suddenly start speaking more loudly than normal. Try dragging the Limiter slider a little to the left and watch the audio meter while speaking. You should notice your peak level is gradually brought down. If you drag the slider too far to the left your level will become greatly reduced.
The Compressor is like the Limiter. It’s basically used to reduce the dynamic range of the audio, or in other words, it pulls down the peaks in the audio.
The compression ratio defines how the reduction in the dynamic range works. The first number of the ratio represents the increase in the input level of the audio and the second number is the resultant increase in the output level. So, with a compression ratio of 2:1, for every 2 dB rise in the input, the output increases by only 1 dB. As the compression ratio increases, the dynamic range will decrease. The result, assuming you let the output audio peak at the same level as before, results in your voice sounding “bigger”, louder, and boomy. This can also help your voice cut through the mix if you are speaking over backing music.
The Attack in the settings determines how quickly the Limiter/Compressor takes effect.
The Release is how quickly the Limiter/Compressor stops affecting the input signal.
In general, you can leave the Attack and Release settings at their default values. But if you want a “brick wall” effect you can bring the Attack down so it reacts almost instantly to the rise in the input signal. Overdoing these adjustments, along with choosing an extreme compression ratio, can make your audio sound too processed. However, if you’re recording an instrument, this might be the effect you are looking for.
Do not let the worry of messing up the Limiter and Compressor settings stop you from experimenting. You can always get back to the original settings by clicking on the Reset button at the bottom of the screen. But to go with your changes click the Confirm button.
Conclusion
So, what do I think of using the Maono-Link software with the PD400X dynamic microphone?
The software is quite good, with an option for basic and advanced use. So, whatever your skill level, you should be able to get good audio from the microphone.
Although I was impressed that in the Advanced panel, Maono included separate setup screens for the Limiter and Compressor, initially I was disappointed that the EQ section only included four presets. In fact, Maono has now updated the software to also include 3 and 7-band EQ customization. However, you will need to use software version 2.2.1 or above and the microphone firmware is version 1.2.0 or above.
In conclusion, a big thumbs up for the Maono-Link software, and that Maono has updated the Advanced EQ section to include customization.

About the author: Tosh Lubek is a multi-award-winning broadcaster, writer, and video producer, with 40 years of experience in professional broadcasting and has been using Canon video and stills cameras since 2010. He has worked with radio and TV broadcasters, advertising agencies, and direct clients on a variety of projects including radio and television advertising, online video production, corporate videos, award ceremony motion graphics, and theme park sound design. Tosh has won numerous awards, including a Radio Academy Awards Gold Sony, a Gold, Silver, and Bronze World Medals in the New York Festivals International Advertising Awards. Since about 2007 he has been creating YouTube videos. Tosh has been a sponsor of the “video booth” at HashTag Business Events across the UK.
Recent Posts
Most people use sandbags the wrong way. Here’s how to hang them properly on a light stand for maximum stability and safety — plus what to fill them with.
You're Using the Canon RF 50mm f/1.8 WRONG! Here’s How to Fix It
If you’ve recently picked up the Canon RF 50mm f/1.8 STM—affectionately known as the Nifty Fifty—you might be confused by that strange switch on the side of the lens. It doesn’t say AF/MF...