Author: Tosh Lubek Published: 6th March 2024
DIY Video Studio is supported by its readers who use the affiliate links or ads on this site. As an Amazon Associate, I earn from qualifying purchases. Thank your support if you use any of the links.
For over 40 years, I’ve worked in broadcasting, from the production booth to the microphone itself. Although the way audio is captured has evolved, one constant remains: the need to record clear, high-quality audio recordings, especially regarding phone calls.
Whether you’re interviewing someone over the phone for a podcast, or simply want to preserve a personal conversation, relying on phone call recording apps doesn’t cut it. The results can be low quality and be a pain in post-production.
But I’ve got a game-changer for recording phone calls for you: the Zoom H5 recorder. This recorder, with its multiple inputs, lets you record phone calls with good sound quality, and with great flexibility.
This setup lets you record the audio from you and the caller onto the H5, but also lets you and the caller hear each other. So, let’s see how you can use the Zoom H5 to record your phone calls like a pro!
DISLAIMER: This article is for entertainment/educational purposes only. In some countries/regions you might need the consent of the other party to record a phone conversation. Consult a legal professional if you need advice. This video provides information about recording phone calls in order to facilitate creating podcasts/YouTube videos or saving precious personal memories. Always make sure the other party is aware that you are recording the conversation.
The Equipment You’ll Need to Record Your Phone to a Zoom H5
Let’s gather what’s necessary to record your audio.
I’ve been using professional equipment for decades, and in radio studios, you’d have an expensive Telephone Balance Unit (TBU) as an interface between the phone system and the studio mixer. But this setup is simple and affordable, especially if you already have a Zoom H5 recorder.
Here’s what you need.
- Compatible phone with a USB-C port, be it an Android or iPhone. (Please note, that not all mobile phones can pass audio through the USB-C port. Check that your phone can do so. I’m using a Samsung A53-5G and I’ve not experienced any issues).
- Zoom H5 recorder.
- USB-C to 3.5mm headphone adapter.
- 3.5mm male to dual 3.5mm female headset Y-Splitter.
- 3.5mm TRS Aux cable, at least about 1m long.
- 3.5mm TRS to ¼” TS jack adapter.
- Headphones with a 3.5mm TRS jack.
- Two self-powered Lavalier Microphones.
If you only have 1 Lavalier microphone, you can adapt this setup and use the XY mics on the H5 or an XLR mic plugged into input 2 to record your voice on the H5. But in most situations, I suggest using two Lav Mics: one to record your voice and the other to let the caller hear your voice through the phone.
I recommend the BOYA BY-M1 Lav Mic (Amazon affiliate link). Although it might not be as good as some much more expensive Lav Mics, it is cheap (under $15 on Amazon), sounds OK, has a relatively high output level, and is self-powered. Furthermore, it comes with a 3.5mm TRS to ¼” TS jack adapter, so that’s one less item you need to source.
If you do not have the gear and accessories mentioned above, here are links to the items on Amazon.
- 3.5mm male to dual 3.5mm female headset Y-Splitter
(Amazon affiliate link).
- USB-C to 3.5m
m headphone adapter
(Amazon affiliate link).
- 3.5mm TRS AUX cable
(Amazon affiliate link).
- BOYA BY-M1 Lav Mic
Includes 3.5mm TRS to ¼” TS jack adapter (Amazon affiliate link).
- Zoom H5 recorder
(Amazon affiliate link).
There you have it! That’s all you need to make your phone call recordings sound professional.
How to Set Up Recording Your Phone to a Zoom H5
The audio from the first Lavalier microphone and the phone can be recorded to almost any of the four tracks on the H5. But I’ll show you how to record your audio with the first Lavalier microphone to the L&R tracks on the H5, and the phone caller’s audio to Input 1 on the base of the H5.
First, we’ll connect the phone to Input 1 on the H5 to record the caller.
Step 1
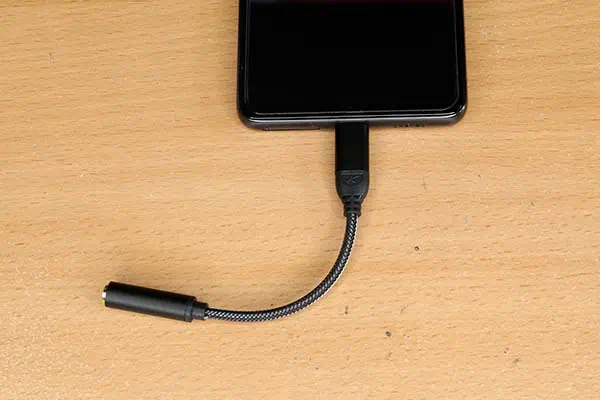
Plug the USB to headphone adapter into the phone’s USB port.
Step 2
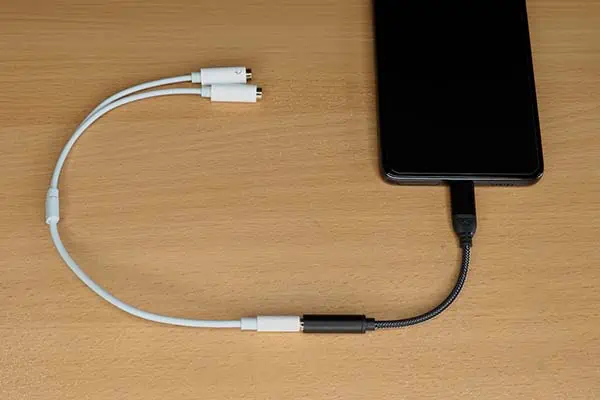
Plug the 3.5mm male to dual 3.5mm female headset splitter into the headphone adapter.
Step 3
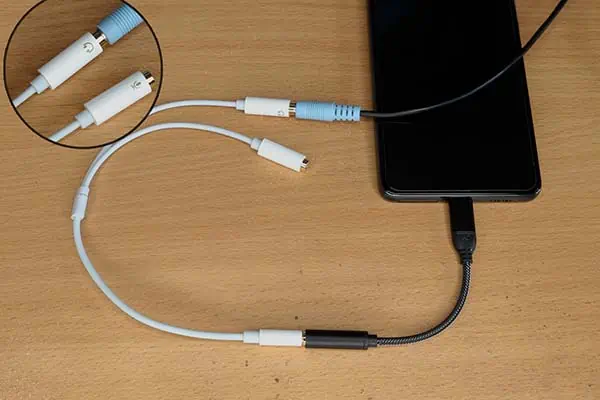
Attach one end of the auxiliary cable to the headphone leg of the Y-Splitter (it usually has a headphone symbol printed on it).
Step 4
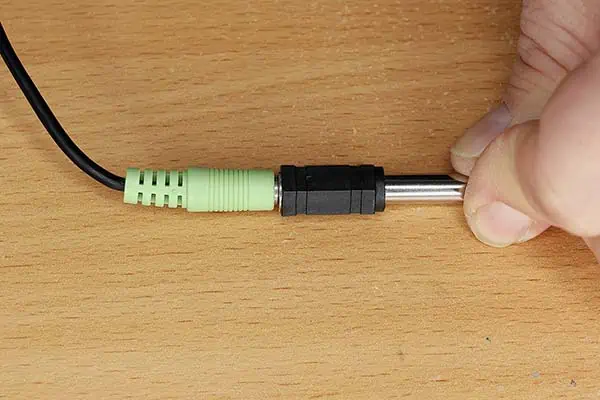
Insert the other end of the auxiliary cable into the 3.5mm TRS to ¼ inch TS jack adapter.
Step 5
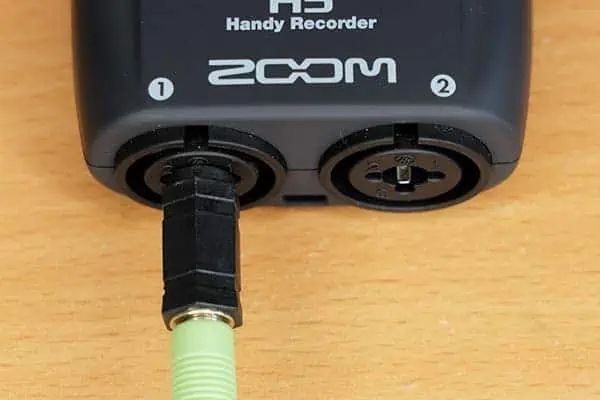
Plug the 3.5mm to ¼ inch jack adapter into the TRS socket of Input 1 on the Zoom H5.
That’s the setup to record your phone caller on the Zoom H5. Next, let’s connect one of the Lav Mics to the H5 to record your voice.
Step 6
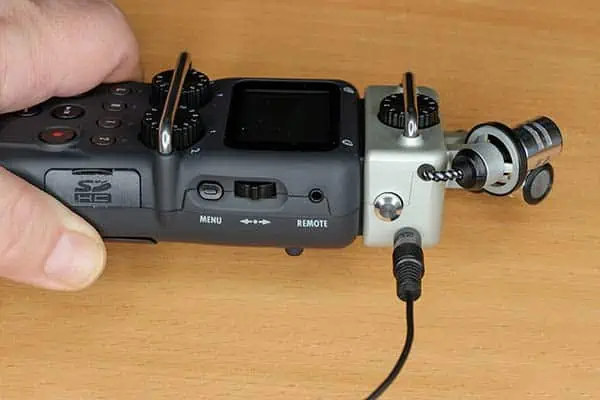
Plug the 3.5mm jack of one of the Lav Mics into the mic input socket on the right side of the XY mic capsule.
Step 7
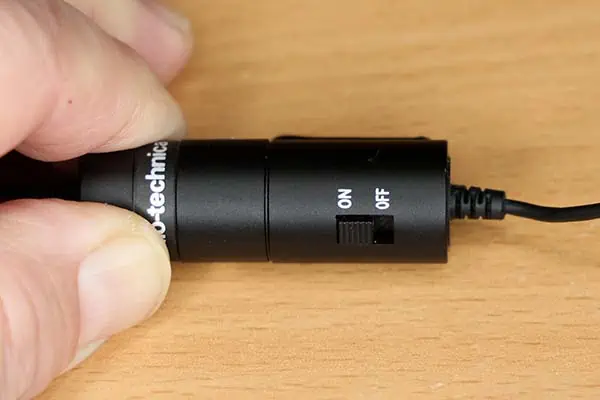
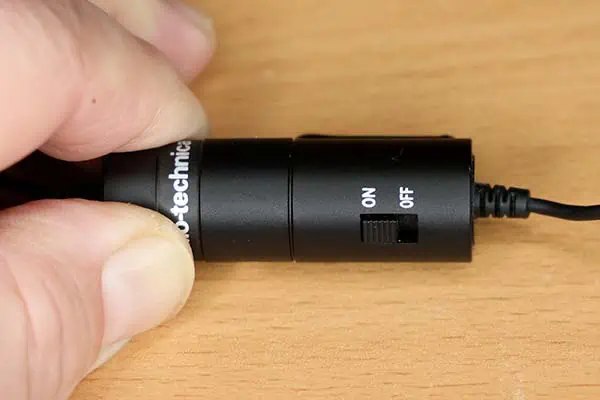
Assuming you’re using a self-powered Lav Mic, like the BOYA BY-M1, slide the power switch on the battery compartment to the “ON” position, and skip Step 8. If you’re using an unpowered Lav Mic, like the Rode Lavalier GO, you’ll need to turn on Plugin Power in the H5 menu.
Step 8
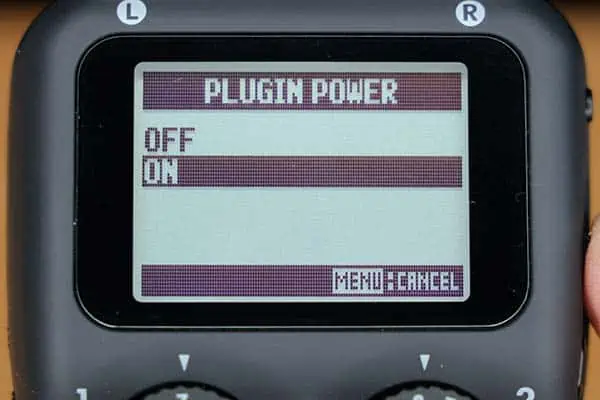
To switch on Plugin Power, press the Menu button on the H5. Scroll down, select IN/OUT, and press the scroll button. Then scroll down to PLUGIN POWER and press the scroll button. Then select ON and press the scroll button. Exit the menu by pressing the Menu button a couple of times.
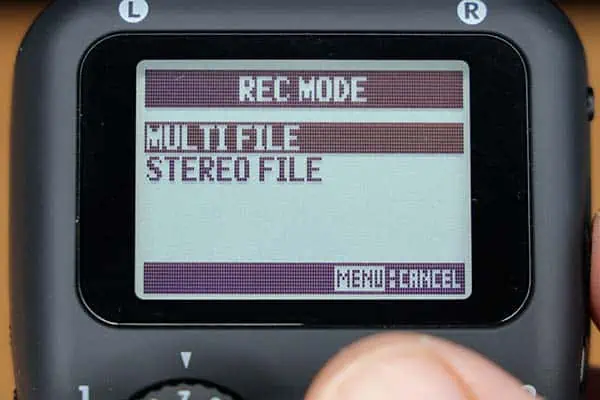
Since you’ll be recording your voice on the L&R tracks and the caller on track 1, the H5 Record Mode needs to be in Multi File Mode. So, if you’re in Stereo Mode, and that’s the case if you can only see two level meters on the screen, the next step will change the Record Mode.
Step 9
Press the menu button, scroll down and select REC MODE, then press the scroll button. Choose MULTI FILE, then press the scroll button. You should then be returned to the Play and Record screen.
Step 10
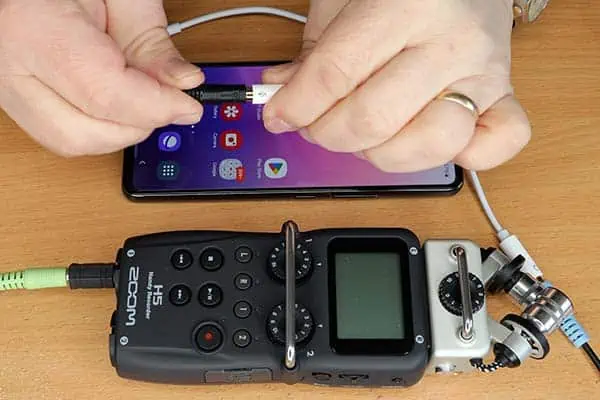
Plug the Lavalier Microphone used to let the caller hear your voice into the microphone socket of the Y-Splitter connector that goes to the phone.
Step 11
Turn the Lavalier Microphone’s power on by sliding the power switch to “ON”.
Step 12
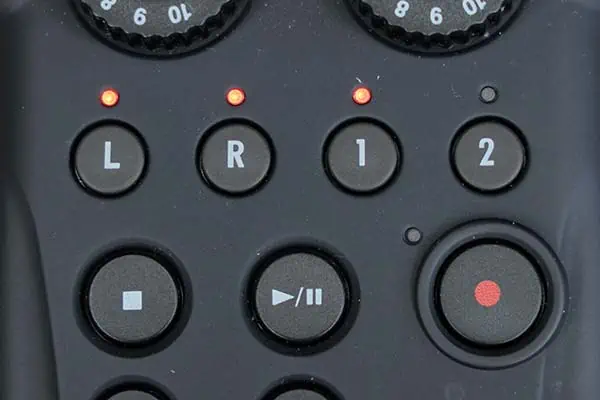
Activate tracks L&R, by pressing one of those track buttons. The two LED lights will come on. Then press track button 1, so the red LED above the button lights up.
Step 13
To control the caller’s audio level, use a combination of the phone’s volume control and the input level dial on the XY mic capsule. To adjust your recording level, use the Input 1 level dial.
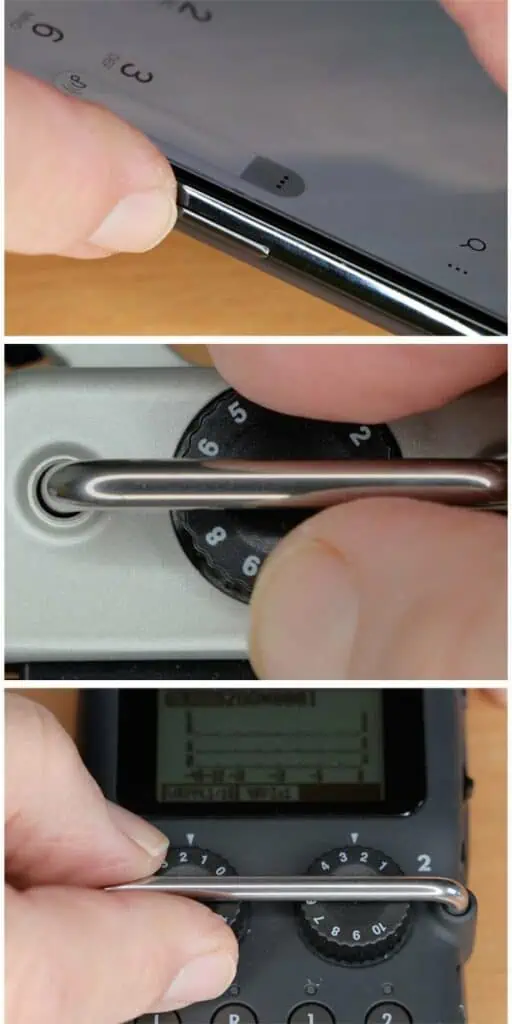
Congratulations! You’re now ready to record a phone conversation. So press the record button and start recording.
Test Phone Call Sample
They say seeing is believing, but in this case, I think you need to hear that this works. So, I asked my wife to call me from her phone, and I recorded the brief conversation.
There you go. You’ve seen the setup and heard the result. But let’s look at the benefits of recording your phone this way.
Benefits of recording your call on an H5
Now that we’ve got everything ready to record, let me talk about what this setup unlocks. First, the sound quality is going to be as good as it gets. Of course, the caller will sound like they’re on a phone, but that’s to be expected, just as it would be in a professional radio studio that uses a Telephone Balance Unit.
But by recording with a Zoom H5 you’ll also have way more control than by using a phone call recording app. Many phone call recording apps only allow you to record certain calls, like those from unknown numbers. Another drawback is that both sides of the conversation are recorded on the same track. On the Zoom H5 the voices are recorded to separate tracks, making processing the audio a breeze.
For instance, if your level and the caller’s level don’t match, having the recordings on separate tracks, means you can boost one to match the other in one quick operation. If however both sets of audio are on the same track, you’ll have to go through the whole recording, making volume changes to each section. Believe me, that can be a long and tedious job.
Pro Tip: Avoiding RF Interference
Before I wrap it up, I want to share a quick tip to improve your recordings. If notice electronic buzzing on your recording, it’s probably radio frequency (RF) interference.
It’s easy to avoid, simply keep your phone at least two to three feet away from the Lavalier microphone. That’s why I recommended using an AUX cable that’s about 3ft (1m) long. Since you don’t need to use the handset after accepting the call, you can leave the handset off to one side while you chat.
Conclusion
There you have it! How to use a Zoom H5 to get high-quality audio recordings when recording a phone conversation. The method, with a little adaptation, also allows you to record with up to three callers, giving you great high-quality audio to edit in post-production editing because each speaker is on a separate track.
Whether you’re a seasoned broadcaster, a podcasting pro, or simply someone who wants to capture important phone conversations, this method empowers you to take control of your audio. However, ensure you comply with the law. I’m not a lawyer and I’m not giving you any legal advice. If you need legal advice, check with someone qualified to give it.
If you’ve found this useful, please share the article. Also, feel free to explore this website, it’s a treasure trove of audio, video, and photography tips and tricks.
About the author: Tosh Lubek is a multi-award-winning broadcaster, writer, and video producer, with 40 years of experience in professional broadcasting and has been using Canon video and stills cameras since 2010. He has worked with radio and TV broadcasters, advertising agencies, and direct clients on a variety of projects including radio and television advertising, online video production, corporate videos, award ceremony motion graphics, and theme park sound design. Tosh has won numerous awards, including a Radio Academy Awards Gold Sony, a Gold, Silver, and Bronze World Medals in the New York Festivals International Advertising Awards. Since about 2007 he has been creating YouTube videos. Tosh has been a sponsor of the “video booth” at HashTag Business Events across the UK.
Recent Posts
You're Using the Canon RF 50mm f/1.8 WRONG! Here’s How to Fix It
If you’ve recently picked up the Canon RF 50mm f/1.8 STM—affectionately known as the Nifty Fifty—you might be confused by that strange switch on the side of the lens. It doesn’t say AF/MF...
Recently, I shot several customer testimonial videos in 4K for a client when the overheating warning on my Canon EOS R6 appeared. In fact, it appeared three times in five sessions during the day of...


