
DIY Video Studio is supported by its readers who use the affiliate links or ads on this site. As an Amazon Associate, I earn from qualifying purchases. Thank your support if you use any of the links.
Most cameras will allow you to shoot in either auto or manual mode. Auto is excellent when you’re getting started with DSLR or Mirrorless photography, but you’ll eventually move to manual control if you want to unleash your creative potential. Fortunately, it doesn’t have to be a huge leap from full auto to full manual. You can go halfway with aperture-priority or shutter-priority auto exposure. In fact, for many photographers, that’s as far as they need to go when it comes to extra control of their camera.
In this article, I explain what the three camera settings are, how they work together, and in what order to set them when setting your exposure.
What are the 3 most important camera settings?
The three most important camera settings are Aperture, Shutter Speed, and ISO. The aperture and shutter speed determines how much light reaches the film or digital sensor. The ISO is the film sensitivity or amount of digital gain. When they are in balance, the image is properly exposed.
These three settings are inseparable and are frequently linked together in what is known as the Exposure Triangle, as shown in the following diagram.
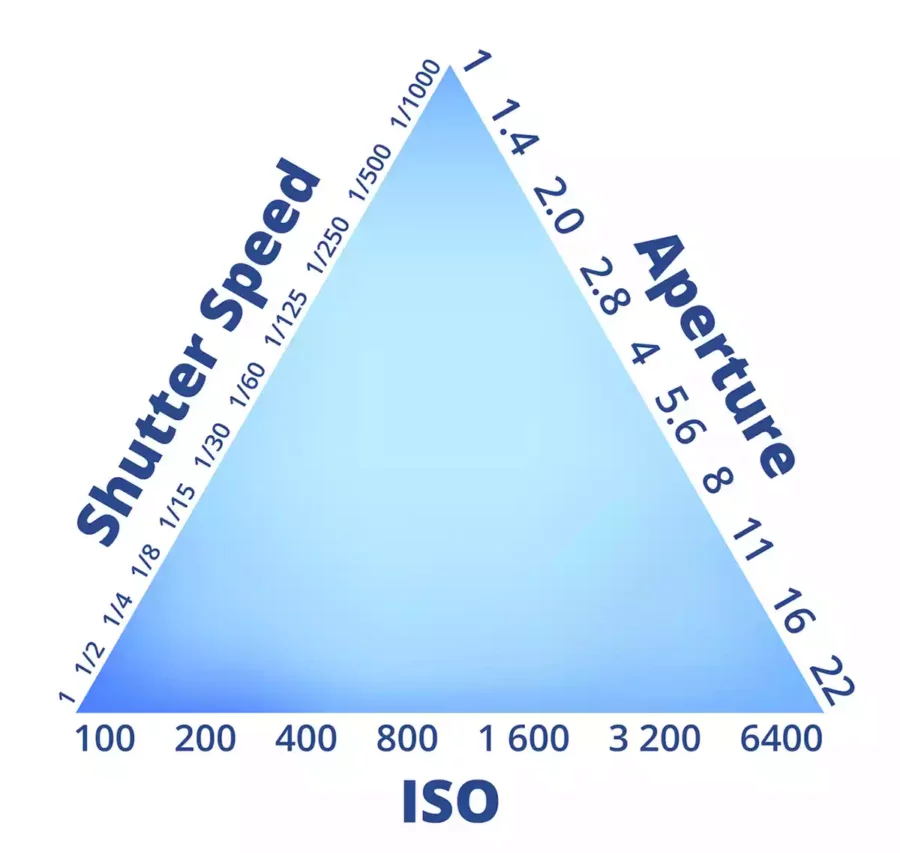
The sides of the exposure triangle represent the aperture, shutter speed, and ISO.
Where these three settings overlap in the triangle represents a well-exposed image.
However, the exposure triangle is only an analogy and not a perfect representation of how the settings work together. On the diagram of the exposure triangle, I have included values for the aperture, shutter speed, and ISO, but these are purely to illustrate that each side of the triangle goes from a small to a large value.
The actual values on the triangle would depend on the prevailing lighting conditions, plus the type of camera and lens. Even so, the exposure triangle reminds us that the three settings are linked. It also helps us visualize how changing one setting will require changes in one, or both, of the other two settings.
The ideal exposure for an image would be when these three settings overlap to produce an image that is not too bright or too dark. An image that is too bright would be overexposed, and an image that is too dark would be underexposed.
Before moving on to choosing your camera settings, let’s quickly understand what these three basic settings are.
What is the aperture or f-stop on a camera?
Aperture is the opening of the lens, and its size determines the amount of light that can enter the camera. A large aperture (small f-number) will produce a bright image with a shallow depth of field. Whereas a small aperture (large f-number) will produce a darker image but with more of the scene in focus.
In some situations, and depending on the lens being used, stopping down the aperture may also slightly increase the contrast. But it is the narrow depth of field created by using a wide aperture that can dramatically affect the image aesthetics and help emphasize part of your food setup and isolate it from the supporting cast of food props and backdrop.
What is Shutter Speed on a camera?
The shutter speed is the length of time the camera lets light fall on the sensor, thus controlling the brightness of the image. But it also affects motion, fast shutter speeds will freeze motion and enhance image sharpness, while slow shutter speeds can produce motion blur, emphasizing movement.
The range of shutter speeds available to you will depend on the camera you are using. The shutter speed on an entry-level DSLR will range from 30sec to 1/4000sec, while a high-end DSLR will have a minimum shutter speed of 1/8000sec. Meanwhile, a mid-range smartphone will have a shutter speed range of between 10sec and 1/6000sec.
What is the ISO setting on a camera?
When cameras used film, ISO referred to its sensitivity, but in the digital era, the ISO is the amount of gain the camera applies to the image sensor signal. Although you can boost or reduce the brightness in post-processing, using the correct ISO produces the best colors and noise levels.
Since the ISO refers to the amount of amplification that the camera applies to the signal, changing the ISO affects the image brightness. A higher ISO will brighten the image, whereas a lower ISO will darken the image.
However, to brighten an image it would be better to let more light into the camera by using a larger aperture or by keeping the shutter open for longer, rather than increasing the ISO. This is because the signal from the sensor is a mix of the image signal plus electronic noise.
When a lot of light is let into the camera the image signal will be much greater than the electronic noise. So, the image is bright and appears noise-free. But if less light is let into the camera and a higher ISO is used to amplify the weak light signal, the image will appear noisy (have lots of grain).
In what order should my camera settings be set?
The order depends on the look you are going for, but generally, adjust the most important setting first. So, if controlling the depth of field, first set the aperture and then the shutter speed and ISO. If freezing motion, set the shutter speed, then the aperture and ISO.
But because aperture, shutter speed, and ISO work together, the exact order that you set them is unimportant, it’s their combination that matters. So let me give you a few real-world examples.
Portrait photography: In portraiture, the subject is separated from the background by using a shallow depth of field. So, use either manual or aperture priority mode. Choose an aperture of f/1.2-f/2.8. Then an ISO of between 50 and 400. Finally, if in Manual mode, adjust the shutter speed to give the correct exposure.
Landscape photography: In landscape photography, you use a large depth of field, so first choose an aperture of about f16. Then set the ISO to around 100 for less noise, better colors, and more dynamic range. Finally, choose a suitable shutter speed, perhaps as low as 1/10th of a sec.
Astrophotography: With untracked shots, where stars appear like points rather than trails, the shutter speed is chosen first to freeze the movement of the stars. This can be between 1-30sec depending on the lens focal length. Then the ISO is set to show the maximum number of stars without the sky appearing too bright. Finally, the lens is set to its maximum aperture or one-stop lower.
Tosh Lubek runs an audio and video production business in the UK and has been using the Canon EOS R since it was released in the Autumn of 2018 and the Canon EOS R6 in 2020. He has used both cameras to shoot TV commercials broadcast on Sky TV, promotional business videos, videos of events and functions, and YouTube creator content. He has also won several international awards for his advertising and promotional work. You can meet him by visiting his “video booth” at HashTag Business Events across the country.
Recent Posts
Most people use sandbags the wrong way. Here’s how to hang them properly on a light stand for maximum stability and safety — plus what to fill them with.
You're Using the Canon RF 50mm f/1.8 WRONG! Here’s How to Fix It
If you’ve recently picked up the Canon RF 50mm f/1.8 STM—affectionately known as the Nifty Fifty—you might be confused by that strange switch on the side of the lens. It doesn’t say AF/MF...