
DIY Video Studio is supported by its readers who use the affiliate links or ads on this site. As an Amazon Associate, I earn from qualifying purchases. Thank your support if you use any of the links.
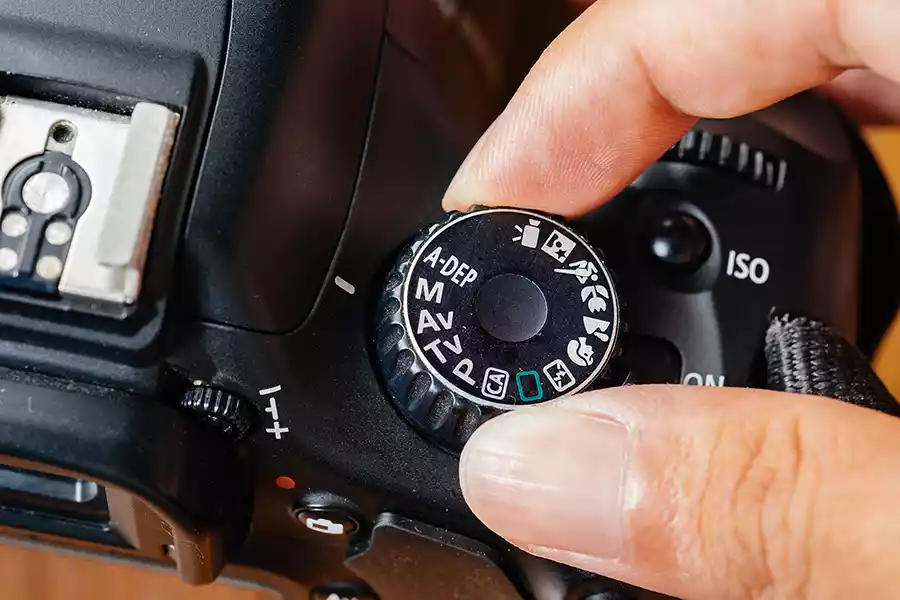
DSLR and Mirrorless cameras have five main modes: These are Aperture Priority (Av or A), Manual (M), Bulb (B), Program (P), and Shutter Priority (Tv or S). There may also be additional modes, recent Canon cameras also have Flexible Priority (Fv), and Scene Intelligent Auto (A+).
I’ll go through each of these camera modes, explaining what they do, and when you might want to use them.
Exposure modes on your camera and how to use them
Aperture Priority AE mode
Aperture Priority AE mode allows you to change the aperture value while the camera sets the shutter speed, and possibly the ISO value, to give you the standard exposure that matches the brightness of your subject.
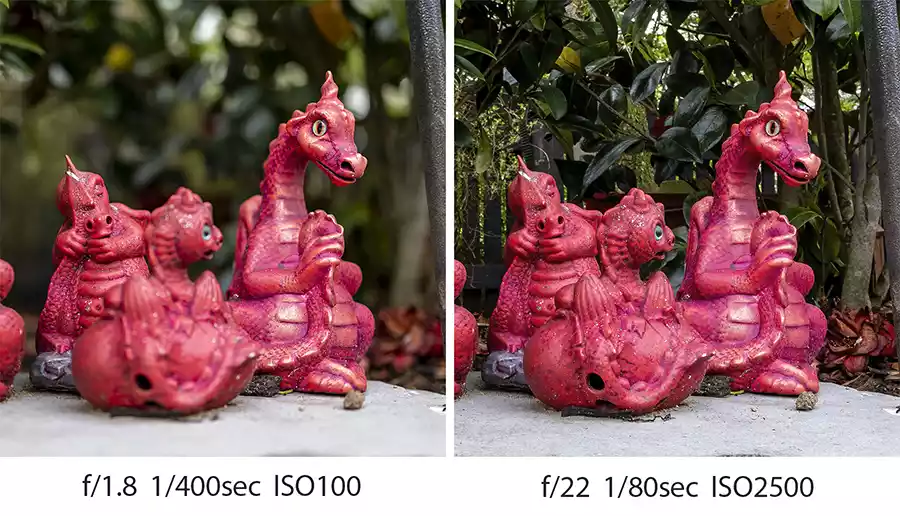
A larger aperture opening (smaller f-number) corresponds to a shallow depth of field, resulting in more of the foreground and background appearing to be out of focus and blurry. However, a smaller aperture opening (larger f-number) corresponds to a wider depth of field, and more of the foreground and background will appear to be within acceptable focus.
You can see the effect of changing the aperture on the depth of field in the two dragon images below. The image on the left was taken with an aperture value set to f/1.8 while the one on the right was taken with the aperture value set to f/22.
If you make a change to the aperture value, the camera will automatically make the opposite change in shutter speed, so that the standard exposure of the subject will be maintained. For example, if you change the aperture value from f/4 to f/5.6, the camera will double the length of time that the shutter is open, so if the shutter speed had been 1/250sec it will become 1/125sec.
How to shoot in Aperture Priority AE
Step 1: Turn the mode dial on the camera to AV or A (depending on your make of camera).
Step 2: Change the aperture value to the f-number you want.
Step 3: Frame your subject and focus on them with a half-press of the shutter button. This will automatically set the shutter speed.
Step 4: Check the display on the back of the camera or EVF. If the shutter speed value is NOT blinking, fully press the shutter button to take the image.
Note that if the shutter speed value is blinking, the required value is outside of the possible range of your camera.
For example, if the shutter speed value is blinking 30” this means that the required shutter speed would need to be more than 30sec. In this case, open the lens aperture and/or increase the ISO, until the shutter speed value stops blinking.
If the shutter speed value is blinking 1/4000 or 1/8000sec (depending on your camera’s minimum shutter speed), this means that for your chosen aperture the camera would need to set a shutter speed that is shorter than the faster shutter speed available on the camera. If this is the case, reduce the aperture value and/or the ISO, until the shutter speed value stops blinking.
Shutter Priority AE mode
Shutter Priority AE mode allows you to change the shutter speed while the camera sets the aperture value, and possibly the ISO value, to give you the standard exposure that matches the brightness of your subject.
A faster shutter speed enables you to freeze the motion of a moving subject and will prevent the appearance of motion blur. However, a slower shutter speed allows you to create motion blur for a moving subject, giving the impression of movement.
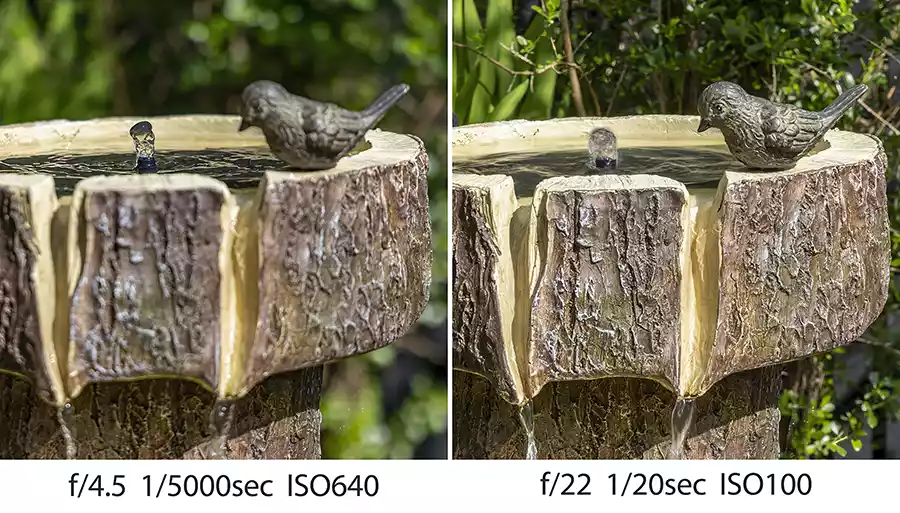
You can see the effect of changing the shutter speed on the movement of water in the two images of the water feature below. The image on the left was taken with a shutter speed of 1/5000sec, while the one on the right was taken with a shutter speed of 1/20sec.
If you make a change to the shutter speed, the camera will automatically make the opposite change to the aperture value, so that the standard exposure of the subject will be maintained. For example, if you reduce the time the shutter is open by half, say from 1/125sec to 1/250sec, the camera will double the area of the aperture opening, which corresponds to decreasing the aperture value by one stop (e.g., f/5.6 > f/4).
Therefore, in the sample images, when I used a fast shutter speed to freeze the motion of the water, the depth of field became shallower, making more of the foreground and background appear out of focus or blurry.
How to shoot in Shutter Priority AE
Step 1: Turn the mode dial on the camera to TV or S (depending on your make of camera).
Step 2: Change the shutter speed to the value you want.
Step 3: Frame your subject and focus on them with a half-press of the shutter button. This will automatically set the aperture value.
Step 4: Check the display on the back of the camera or EVF. If the aperture value is NOT blinking, fully press the shutter button to take the image.
Note that if the aperture value is blinking, the required value is outside of the possible range of your camera.
For example, if the lowest aperture value is blinking, this means the image is underexposed because your lens does not have a large enough aperture opening (small enough aperture value). In this case, choose a slower shutter speed, and/or increase the ISO, until the aperture value stops blinking.
If the highest aperture value is blinking, this means the image is overexposed because your lens cannot close to a small enough opening (large enough aperture value). If this is the case, choose a faster shutter speed and/or reduce the ISO, until the aperture value stops blinking.
Manual Exposure Mode
Manual Exposure mode allows you to set the aperture value, shutter speed, and ISO value.
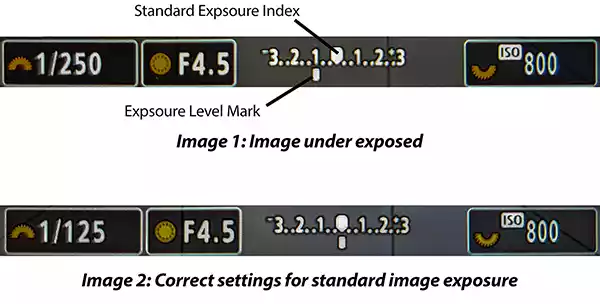
Unlike the AV or TV modes, the camera will not make any changes to give a standard exposure that matches the brightness of your subject. You need to do this yourself by either using a commercially available exposure meter or by referring to the exposure level indicator displayed by the camera.
The Exposure Level Indicator shows how close you are to the standard exposure, which is shown as the zero level on the indicator. Your current exposure level is indicated by the Exposure Level Mark, below the line of divisions on the exposure level indicator. If the mark is to the left, this indicates underexposure. If the mark is to the right, this indicates overexposure. For standard exposure, you must change one or more of the exposure settings to move the exposure level mark to the middle of the exposure level indicator, as shown in the following image.
You might also like my article: 5 ways to get perfectly exposed images in your photography
How to shoot in Manual Exposure Mode
Step 1: Turn the mode dial on the camera to M.
Step 2: Change the ISO to the desired level, about 100 for normal or bright conditions or higher if you are shooting in low light conditions.
Step 3. Choose your aperture value and shutter speed based on the look you are trying to create.
Step 4: Frame your subject and focus on them with a half-press of the shutter button.
Step 5: Check the camera’s Exposure Level Indicator to confirm whether you need to make any exposure changes to achieve the standard exposure level.
Step 6. If the Exposure Level Indicator shows that your manual settings give the standard exposure level, fully press the shutter button to take the picture.
Bulb or Long Exposure Mode
Bulb or long exposure mode allows you to keep the shutter open for as long as you want, provided you keep the shutter button fully pressed down.
Bulb mode is intended for use with long exposure photography. This can include astrophotography, firework photography, light-painting, night photography, water long-exposure photography, and weather photography. Essentially it applies to any type of photography that requires the shutter to be open for longer than in standard daytime or flash photography. If you are just starting your photography journey, you probably will not need to use Bulb Mode yet.
Here are a couple of sample images that show what can be done by using this camera exposure mode. On the left, the long exposure has captured the star trails around the north celestial pole, and on the right, the long exposure makes flowing water take on a misty and magical form.

How to shoot in Bulb or Long Exposure Mode
Step 1: Turn the mode dial on the camera to B.
Step 2: Set the required ISO. This could be as high as 1600 – 6400 for astrophotography.
Step 3. Choose the aperture value you require.
Step 4: Focus and frame your subject.
Step 5: Take the picture by pressing and holding down the shutter button. Note that the exposure will stop if you let go of the shutter button.
Note that having to keep the shutter button pressed down for the duration of the exposure can cause problems, such as camera shake. With long exposure photography, it is usually better to mount the camera on a tripod and use the camera’s Bulb Timer or a remote shutter release or wireless controller.
Program AE Mode
Program AE mode only allows you to change the ISO value. The camera will automatically set the aperture value and shutter speed to obtain the standard exposure matching the brightness of the subject.
Program mode is NOT “almost full auto”, since you can also alter the autofocus method, metering mode, and many other camera functions.
However, program mode is perhaps one of the least used, since there are not many situations where the ISO is the sole priority of the photographer.
How to shoot in Program AE
Step 1: Turn the mode dial on the camera to P.
Step 2: Frame your subject and focus on them with a half-press of the shutter button. This will automatically set the shutter speed and aperture value.
Step 3: Check the exposure values on the camera’s display or EVF. If the shutter speed and aperture values are NOT blinking, compose your shot, and fully press the shutter button to take the image.
Note that if the shutter speed value and aperture value are blinking, the camera is unable to set them because they require a value outside of the possible range of your camera.
For example, if the shutter speed value is blinking 30” and the lowest possible aperture value is blinking, this means the image is currently underexposed. If this is the case, increase the ISO value until the exposure values stop blinking, or use a flash.
If the shutter speed value is blinking 1/4000 or 1/8000sec (depending on your camera’s minimum shutter speed) and the highest aperture value is blinking, this means the current image is overexposed. If this is the case, choose a lower ISO value or fit an ND filter to the front of the lens.
Flexible Priority AE (available on some Canon cameras)
Flexible Priority AE mode allows you to set the aperture value, shutter speed, and ISO either manually or automatically, and combine the settings with your desired exposure compensation.
You could say that having control over each of these parameters in flexible-priority mode is equivalent to taking pictures in AV, TV, P, or M modes.
How to shoot in Flexible Priority AE
Step 1: Turn the mode dial on the camera to FV (only available on some Canon cameras).
Step 2: Select your required aperture value, shutter speed, and ISO. Note that one or all of these can also be set to Auto. If any of the exposure settings are set to Auto, “Auto” will be displayed for that setting. To check the actual value of the setting press the shutter button halfway.
Step 3: Set the amount of exposure compensation required.
Note that if the exposure values are blinking this indicates that there is a risk of the image being either underexposed or overexposed. In this case, make your adjustments until the value stops blinking.
Step 4. Fully press the shutter button to take the picture.
Which camera mode is best for photography?
Aperture Priority AE mode is probably the best for control over the exposure, especially if you are shooting in low light, or need to control the depth of field. Both these aspects are often more important than freezing or blurring motion in Shutter Priority AE, or only being able to set ISO in Program AE.
Which is better Aperture Priority or Shutter Priority?
Your choice of camera mode depends on your subject and the look you want to create. If you want to create background blur, choose Aperture Priority since you can control the depth of field. But if you want to freeze or blur movement, choose Shutter Priority.
When should you shoot in Program mode?
The Program mode is a step up from full Auto but one of the least used camera modes. If all that matters to you is the ability to control the ISO, then try Program mode. You can set the ISO you need, and the camera will choose the shutter speed and aperture based on the brightness of your subject.
Since Program mode automatically chooses the aperture and shutter speed you may think that it is almost the same as the fully automatic modem, but this is not the case. While Program AE takes control of the aperture and shutter speed, you can change other settings, such as autofocus and metering methods.
Using Shutter Priority to enhance the subject
Shutter Priority can freeze or emphasize motion. If you want to capture an instant in time or make your image appear sharper, using Shutter Priority is an option. If that’s what you want to do, dial in a shutter speed of around 1/2000th or higher and you’ll be good to stop most motion and see more detail. That very much applies if you are a bird photographer because you want to capture pin-sharp images that show every detail.
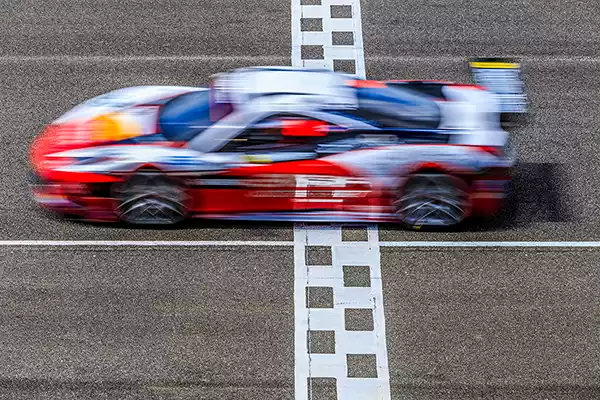
That can also apply to motorsport. A fast shutter speed can freeze the action as a car goes around a turn with clouds of dust and stones caught in mid-air. But you can also use a slow shutter speed in motorsport photography. In the following image, the motion blur of the car juxtaposed against the pin-sharp finishing line emphasizes the speed of the car.
But remember, changing your shutter speed will impact the aperture and ISO you will need to use to get a correctly exposed image. When using fast shutter speeds, you’ll need a fast lens, otherwise, you’ll have to bump up the ISO, which will introduce noise. However, that’s not the only effect you can experience. Remember the two shots of the water from earlier on? Here they are again.
Notice that when I reduced the shutter speed to 1/5000th of a second, the camera automatically made the opposite change to the aperture value to maintain the standard exposure of the subject. However, this wider aperture created a shallower depth of field. You can see that the foreground and background in the image now look blurrier.
Should I always shoot in manual mode like professional photographers?
Manual mode isn’t always the best mode to choose.
If you are relatively inexperienced you might find it a tough mode to start with. Also, if the scene is changing rapidly, you may not have time to adjust your settings when using full manual mode. But if the scene is more or less static, and you have time to adjust the settings, Manual mode is a good choice.
For example. Wedding photographers generally have time to set up classic set-piece shots, and even have the camera on a tripod, so a Manual mode is a great option. But for informal wedding shots, which cannot be planned, an auto or semi-auto mode, makes much more sense since the photographer must react quickly.
Final thoughts
Of all the exposure modes on my Canon EOS R and R6 camera, the two I never use are Scene Intelligent Auto (A+) and Program (P). In both cases, I want more control over how my images look than they can offer. In the case of Program mode, I really haven’t come across a situation where I only want to control the ISO. Of the remaining modes, my order of preference is as follows. 1) Flexible Priority (Fv): because it is the equivalent of most of the other modes, however, it is only on recent Canon cameras. 2) Bulb: because I do a lot of astrophotography and take hundreds of long exposure shots. 3) Manual: because I like the control when I go out for bird photography. 4) Aperture-priority: because I like to be able to control the depth of field. 5) Shutter-priority: because sometimes I need to freeze the action in the shot. Your order of preference will probably be different from mine if you are interested in other areas of photography, but even so, I think it is useful to understand the various exposure modes because you will then be prepared for any eventuality.
Sources: 1![]()
Tosh Lubek runs an audio and video production business in the UK and has been using the Canon EOS R since it was released in the Autumn of 2018 and the Canon EOS R6 in 2020. He has used both cameras to shoot TV commercials broadcast on Sky TV, promotional business videos, videos of events and functions, and YouTube creator content. He has also won several international awards for his advertising and promotional work. You can meet him by visiting his “video booth” at HashTag Business Events across the country.
Recent Posts
Most people use sandbags the wrong way. Here’s how to hang them properly on a light stand for maximum stability and safety — plus what to fill them with.
You're Using the Canon RF 50mm f/1.8 WRONG! Here’s How to Fix It
If you’ve recently picked up the Canon RF 50mm f/1.8 STM—affectionately known as the Nifty Fifty—you might be confused by that strange switch on the side of the lens. It doesn’t say AF/MF...