
DIY Video Studio is supported by its readers who use the affiliate links or ads on this site. As an Amazon Associate, I earn from qualifying purchases. Thank your support if you use any of the links.
In this article, I explain how to use five methods to get the perfect exposure for your photography images. These includes:
- Histogram method
- Using a semi-automatic exposure camera mode
- Exposure calculator app method
- Using your camera’s Exposure Level Indicator in Manual mode
- The Sunny 16 Rule
As you can see, I’ve not included using a handheld light meter, since I don’t think most ordinary photographers use them these days. But if you want a sixth method of setting the correct exposure, get and use a light meter.
But first, let us take a quick look at camera exposure.
The correct exposure for a properly exposed image
Because aperture, shutter speed, and ISO work together to determine the exposure, there isn’t just one combination of settings for every exposure. In fact, for any exposure there will be many different combinations, the total number being determined by the range of available settings on the camera and lens.
For instance, the following four sets of aperture, ISO, and shutter speed will all produce an image with the same exposure.
| Aperture f-stop | ISO | Shutter Speed |
|---|---|---|
| 1.8 | 100 | 1/5000th |
| 16 | 400 | 1/250th |
| 10 | 800 | 1/1250th |
| 16 | 12800 | 1/8000th |
However, although the exposure will be the same with all of these setting combinations, the images may look quite different, due to the way that aperture, shutter speed, and ISO affect the look of the image.
For instance, as the f-number increases, the background blur decreases. Also, as the ISO increases, so does the image noise, and as the shutter speed increases, any apparent motion blur will decrease. I can demonstrate what I mean in the following two sample images that were taken using the first and last set of camera settings above.
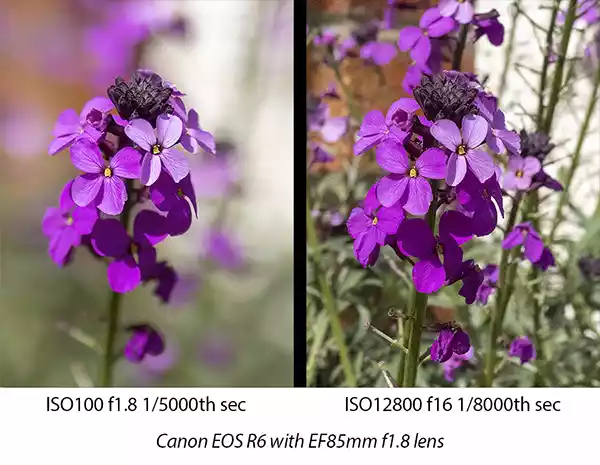
Both images are of the same subject taken under the same lighting conditions. The one on the left has a blurred background because the f1.8 aperture produced a shallow depth of field. But the image on the right has a much deeper depth of focus because an aperture of f16 was used. It’s also much noisier because of the high ISO of 12,800.
So, what are the correct exposure settings to use?
Let us look at the exposure triangle that shows how aperture, shutter speed, and ISO are linked. I have added a note of how each of these settings affects the look of the image. The actual values on each side of the triangle should only be taken to mean each setting has a low and high end and should not be taken literally.
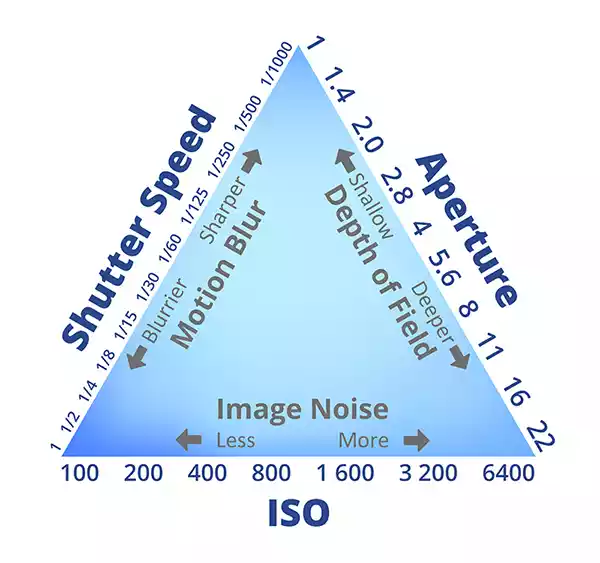
From the exposure triangle, you can see how our choice of settings will affect the image.
A slow shutter speed will make motion appear blurred, while a higher shutter speed will make the image seem sharper by freezing motion.
A small f-number will create a blurry background, but a high f-number will keep more of the scene in focus.
A low ISO, such as 100, will produce a clean image without noise, but increasing the ISO will introduce noise into the image.
So, the correct exposure setting is the one that will produce a good exposure along with the image aesthetic you are after. But most of the time your aim is to keep the ISO reasonably low. Although the latest mirrorless cameras handle noise very well, and noise reduction filters such as Topaz DeNoise![]() can do a great job of removing image noise on your computer.
can do a great job of removing image noise on your computer.
5 methods to set your exposure
Having had a quick look at settings and exposure, let’s now go into the five methods you can use to set the correct exposure.
1. Using your histogram for perfect exposure
One of the best ways to nail your exposure is to use the histogram display on your camera if your camera has it. If you don’t see it on your display, you may need to enable it you’re your camera’s menu.
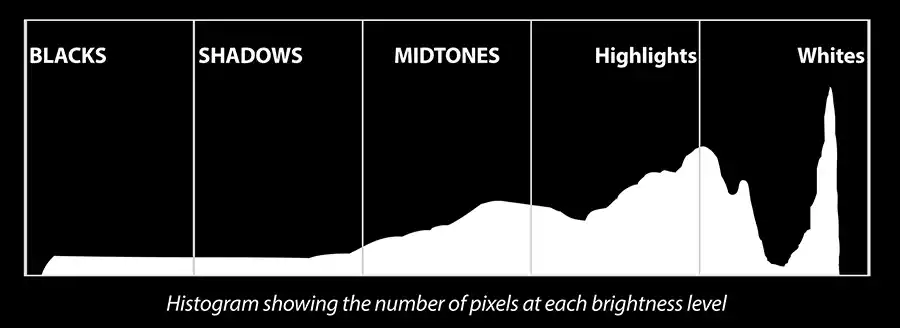
The histogram is a graph of the number of pixels in your image at each level of brightness between black (0% brightness on the left) and white (100% brightness on right). As you move from left to right, the height of the graph represents the relative number of pixels in the image of that brightness level.
As you can see in the following graphic, the brightness levels, from left to right, go from Black > Shadows > Midtones > Highlights > Whites.
Ideally, avoid having the graph touch the extreme left or right of the histogram. If it does there’s a chance that clipping will occur, resulting in an under or overexposed image and potentially a loss of data.
Underexposed images
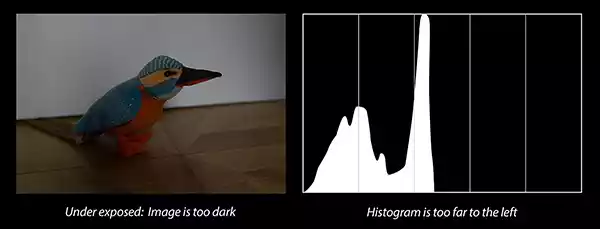
In this graphic, you can see that the image is dark and under-exposed. The corresponding histogram in the camera’s viewfinder or rear screen shows that the pixels in the image are over to the black and shadow end, with the white background in the image appearing as a peak in the lower mid-tones.
If the image were even darker, more of the left side of the graph would be touching the left side of the histogram. This would mean we would have clipping in the blacks, where every dark tone close to black would be recorded as black and we would be losing image detail.
Over-exposed images
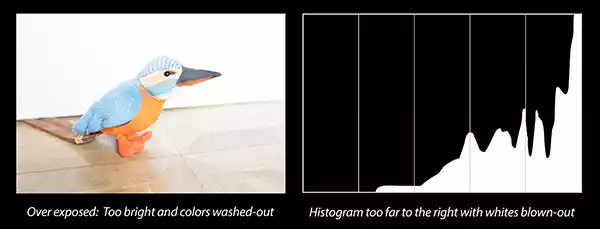
In this graphic, you can see that the image is too bright and overexposed. Many areas are registering as “white” (the peak against the right side), even if they should be blue, orange, and brown.
This is because the camera can only record a specific number of levels of brightness. If it’s an 8-bit image, such as a jpeg, each of the red, green, and blue channels only has 256 possible levels of brightness (0 to 255). If we let too much light into the camera, the sensor can’t tell the difference between a white pixel and a very bright color pixel.
The result is clipping at the white end of the histogram and the image appears overexposed with washed-out colors. Truly bright areas in the image, such as the white background in the bird image or the sky in an outdoor image, may become blown out with detail being lost.
Correct exposure
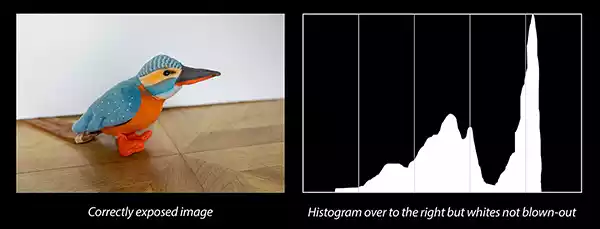
In this graphic, you can see that the image is correctly exposed, and the histogram is no or very few pixels that are pushed up against the extreme blacks or whites. This being the case, there’s no clipping, and no image data, or detail, is being lost.
In the image, I have adjusted the camera settings to keep most of the pixels in the middle or exposed for “middle gray”. The result is that colors appear bright and saturated, and detail is retained in the image.
Depending on the situation, you may wish to set your exposure settings, so the histogram is “exposed to the right”, but without hitting the right edge. That way you will capture the maximum amount of image detail.
2. Using semi-auto exposure modes for perfect images
DSLR and Mirrorless cameras have some semi-automatic modes that can help you get the right exposure most of the time. These include Aperture Priority (Av or A), Shutter Priority (Tv or S), and Program (P).
Although learning how to shoot in Manual mode is a great idea, and the preferred option for many professional photographers, modern cameras effectively contain a computer and software that are designed to help you take perfect images. So, let’s see how the modes on your camera can help you.
Each mode has its merits, but Aperture-Priority is probably the most used since it is good for low light shooting and when you need to control the depth of field. But Shutter-Priority is useful when you need to freeze motion or create motion blur.
In each case, priority is given to the associated setting. So, for Aperture-Priority (AV) it’s the f-number, Shutter-Priority (TV) it’s the shutter speed, and in Program Mode it’s ISO. However, in AV and TV modes you can also set the ISO or turn the ISO to Auto. In each mode, you will also have access to exposure compensation to fine-tune, or correct, the suggested exposure.
So, by using one of these semi-automatic exposure modes you have control over how your images look, but with only one or maybe two settings to worry about.
For more details on Aperture Priority and Shutter Priority camera modes see my article, Camera modes and which one is best for your photography.
3. Using an exposure calculator app to get standard exposure
The three camera settings work together to set the exposure and there are many combinations that will produce an image with the same exposure. Using this knowledge, you can get the look along with the correct exposure.
So how do you do it?
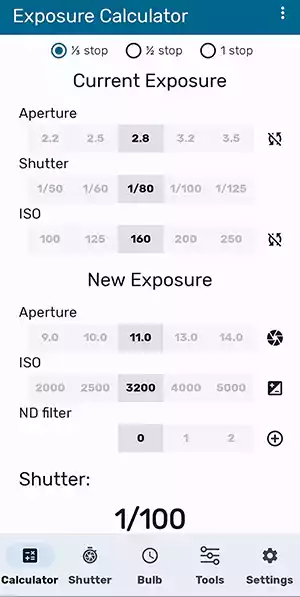
First, install an exposure calculator app on your phone. The one I use is Exposure Calculator from the Google Play Store. Next, set your camera to auto mode, frame the shot you want, and take the image. Display the shot on the back of your camera so that you can see the settings that were used.
Now open the exposure calculator app and input the settings your camera used. Next, enter the actual aperture and ISO you want to use: a small f-number for a shallow depth of field or a high f-number for more of your image to be in focus. For your ISO, choose the lowest value that will give you a suitable shutter speed. Remember, a slow shutter speed can produce motion blur and camera shake, while a high shutter speed can prevent camera shake and freeze motion.
As an example, I took an image of a garden water feature, using the camera’s auto exposure mode, which is the middle image below.
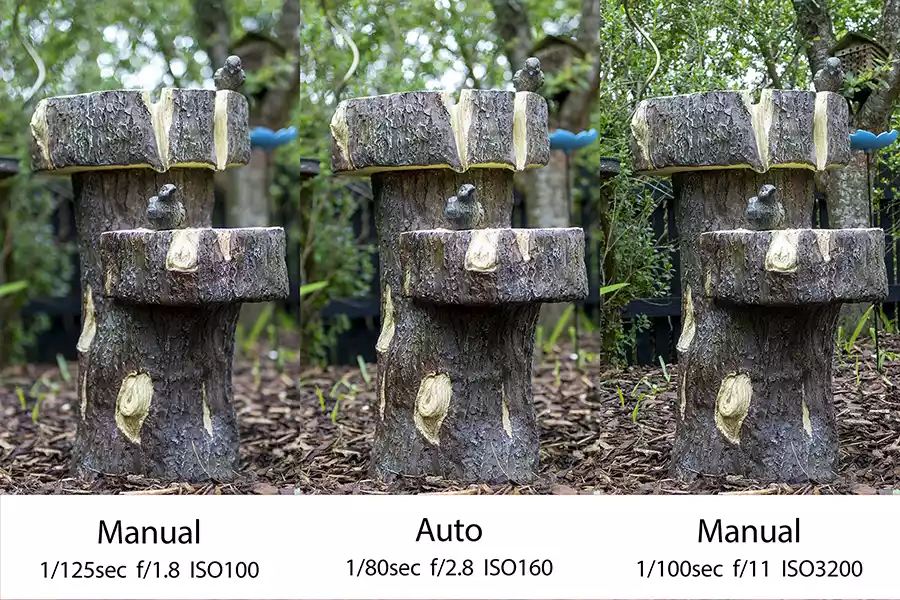
You can see the camera used a shutter speed of 1/80sec, an aperture of f/2.8, and an ISO of 160.
For the image on the left, I wanted the maximum background blur by using the largest aperture on the lens (f/1.8) and an ISO of 100 for little or no image noise. The app indicated I should use a shutter speed of 1/125sec in order to get the same exposure as in the original image. You can see this is the case and I have the extra background blur I wanted.
For the image on the right, I wanted more of the background to be in focus, but since the sky was overcast, I didn’t want too small an aperture otherwise I’d need a very high ISO and/or a long shutter speed. I compromised with an aperture of f/11 and adjusted the ISO value until the app displayed a reasonable shutter speed of 1/100sec, that would be OK for a handheld shot. You can see that the right-hand side image does have a wider depth of field, as I wanted, and the exposure is the same as in the auto-exposure shot.
4. How to get a correct exposure in Manual mode
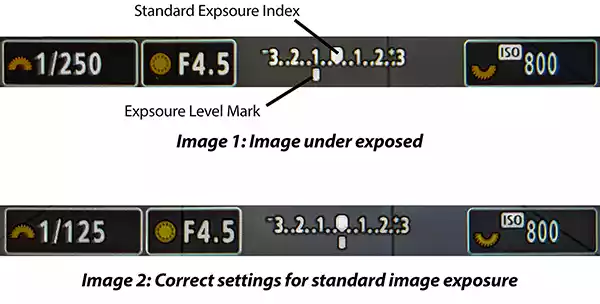
Even if you are in manual mode the camera will help you with your exposure settings. What you need to do is first select your camera’s Manual mode and then use the Exposure Level Indicator. On my Canon EOS R6, it is displayed on the rear screen and in the EVF between the current aperture and ISO settings.
The Exposure Level Indicator is a line of divisions between -3 and +3, with what the camera thinks is the standard exposure at zero, marked by the Standard Exposure Index (shown on the two images below.
The Exposure Level Mark below the line of divisions shows the current exposure on the Exposure Level indicator shows the current exposure level. If you can’t see the exposure level mark half-press the shutter button and it should appear on the indicator.
In Image 1 below, the exposure level mark is at -1, meaning the image is under-exposed by 1 stop. To achieve standard exposure the setting needs to be adjusted to move the exposure level mark to the right by 1 stop. That is the equivalent of letting in twice the amount of light. In Image 2 you can see I doubled the length of time the shutter is open to let in twice the amount of light, by changing the shutter speed from 1/250sec to 1/125sec. However, I could have doubled the ISO or changed the f-number from f/4.5 to f/3.2. Once you have the correct exposure the exposure level mark will be at the same position as the standard exposure mark.
One thing I should mention is that the exposure level indicator shows the correct exposure most of the time. But sometimes you will need to apply a small correction. For example, if you are taking a shot of a flying bird or aircraft, the camera will be fooled by the bright sky background into thinking the image is overexposed.
To get the bird or aircraft correctly exposed you’ll need to move the exposure level mark over to the right to about the +1 position. Of course, the opposite is also true. If you are shooting a subject against a dark background, you may need to move the exposure level mark to the left.
5. Using the Sunny 16 Rule for correct image exposure
The Sunny 16 Rule estimates the correct exposure settings for daylight photography. Since it is based on incident light, it does not require a light meter. The basic rule states, “On a sunny day set the aperture to f/16 and shutter speed to the reciprocal of the film speed or ISO, for a subject in direct sunlight.“
However, it is important to realize the rule is not exact and is not as accurate as using the meter on your camera. Even so, it will get you close to the correct exposure. Once you are there you can make any necessary corrections or bracket your shots to make sure you have options when you get your images onto a computer.
As an example of applying the Sunny 16 Rule, on a sunny day you could use the following settings.
Aperture f/16, ISO 100, & Shutter Speed 1/100sec (or 1/125sec on some cameras)
Aperture f/16, ISO 200, & Shutter Speed 1/200sec
Aperture f/16, ISO 400, & Shutter Speed 1/400sec
Aperture f/16, ISO 800, & Shutter Speed 1/800sec
If you want to alter the combination of shutter speed and aperture you can easily do that. In general, when you increase the aperture by one stop (e.g., f/16 > f/11, or f/11 > f/8, etc.) halve the exposure time (e.g., 1/20sec > 1/100sec), and vice versa.
The Sunny 16 Rule dates from the days of film photography, but it can still be used in the digital era. However, you will have noticed that you are to set the shutter speed to the reciprocal of the film speed or ISO. That leaves you asking, “what should your ISO be in full sunlight?”
The Sunny 16 Rule is for photography under sunny conditions, so a low ISO of 100 would be appropriate. However, if higher shutter speeds are needed, perhaps to freeze motion, an ISO of 200 or 400 could be used. Since the aperture is fixed at f/16, the ISO and shutter speed just need to balance each other.
Unfortunately, most places don’t have 365 days of sunshine, so there is a more general version of the sunny 16 rule that can be used under alternative sky conditions. The general Sunny 16 Rule becomes, “Set the shutter speed to the ISO and aperture to the table.”
The table in question is shown below.
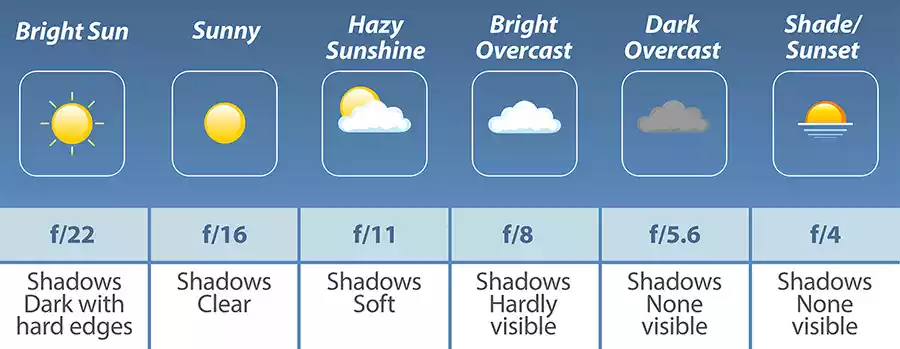
Although the Sunny 16 Rule is a throw-back to the film era of photography, it can still be useful for the digital photographer. Unfortunately for me, the rule often leads to me underexposing my subject by two-thirds to one stop. To be honest, I think this is to do with my northerly latitude making the sun a little weaker because it is lower in the sky, especially in early spring or late autumn. But knowing this, I can compensate by increasing one of the settings by about two-thirds of a stop.
Final thoughts
If you are just starting out in photography, getting your exposure right is a lot easier with a digital camera than with a film camera. I recently found some slides that I took in the mid-1990s with my first film DSLR and I was surprised how many shots were under-exposed. I was new to DSLR photography and didn’t know what I was doing, and with only 36 images per roll of film, learning from my mistakes was an expensive process. Now with digital cameras, you can instantly see whether you were at least close enough.
If you want a quick and easy way of taking great-looking images that gives you some control over the look, I would choose either aperture priority or shutter priority. But if I have more time to get the exposure right, I’ll use the histogram to check that I’m making the maximum use of the available light without blowing the whites. The camera’s exposure level indicator is also useful when in manual mode, but you need to be aware of any backlight. Using an exposure calculator app can be useful when setting the exposure, if you don’t want to do the math in your head or if you need to change two out of the three settings. Finally, the Sunny 16 Rule is simple and easy to use. I haven’t found it to be perfect every time, but it certainly gets you close enough that it’s easy to correct with minor adjustments.
Tosh Lubek runs an audio and video production business in the UK and has been using the Canon EOS R since it was released in the Autumn of 2018 and the Canon EOS R6 in 2020. He has used both cameras to shoot TV commercials broadcast on Sky TV, promotional business videos, videos of events and functions, and YouTube creator content. He has also won several international awards for his advertising and promotional work. You can meet him by visiting his “video booth” at HashTag Business Events across the country.
Recent Posts
Most people use sandbags the wrong way. Here’s how to hang them properly on a light stand for maximum stability and safety — plus what to fill them with.
You're Using the Canon RF 50mm f/1.8 WRONG! Here’s How to Fix It
If you’ve recently picked up the Canon RF 50mm f/1.8 STM—affectionately known as the Nifty Fifty—you might be confused by that strange switch on the side of the lens. It doesn’t say AF/MF...