
DIY Video Studio is supported by its readers. Please assume links on this site are affiliate links or ads, and that I get commissions for purchases made through these links. As an Amazon Associate, I earn from qualifying purchases. Thank you if you use any of the links.
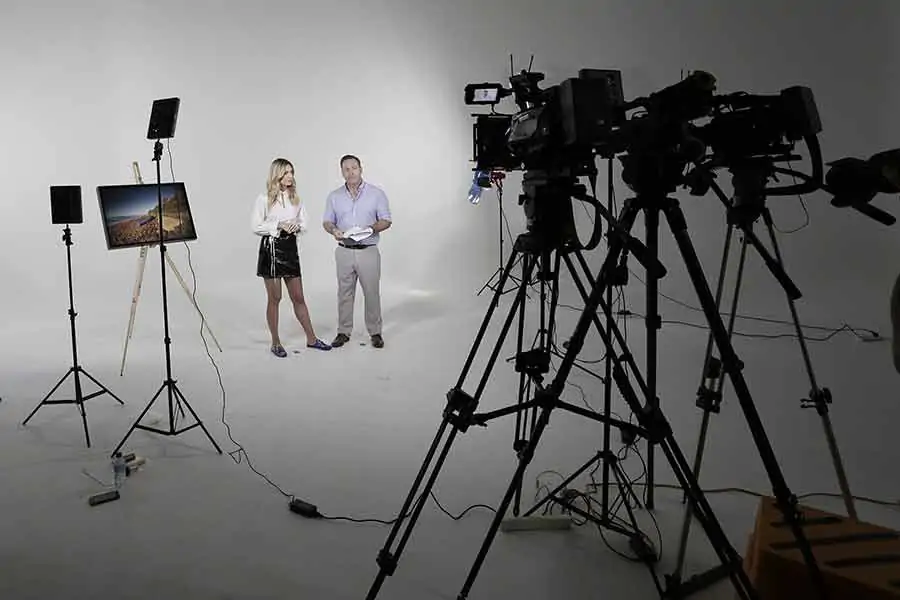
Many experienced YouTubers seem so natural in front of the camera and most of them aren’t using a teleprompter. That doesn’t mean you shouldn’t be using a teleprompter. In fact, if you’re just starting out as a YouTuber then a teleprompter could be ideal since it can boost your confidence in front of the camera.
However, not everyone has a few hundred dollars left in their budget for teleprompter hardware after buying a camera, lights, and a backdrop. If that resonates with you, what are the alternatives to teleprompters for YouTube videos?

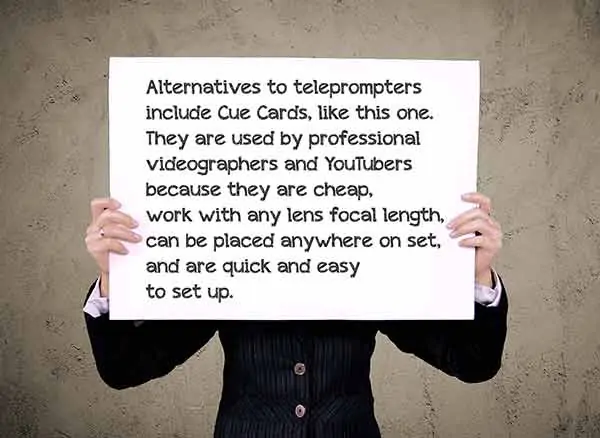
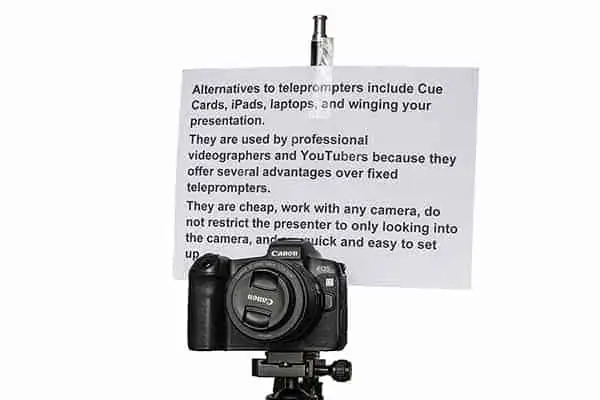
Alternatives to teleprompters include Cue Cards, iPads, laptops, and winging your presentation. They are used by professional videographers and YouTubers because they offer several advantages over fixed teleprompters. They are cheap, work with any camera, do not restrict the presenter to only looking into the camera, and are quick and easy to set up.
I’ll go into more detail about each of these alternatives to using teleprompter hardware to record YouTube videos. Some may require the purchase of an item or two, but you won’t be spending much money.
Why do alternatives to teleprompters work?
Apart from winging your presentation, all these methods work because you are giving the viewer the impression that you’re looking into the camera’s lens when in fact you are not.
When you use a teleprompter, you’re looking directly into the lens, so the viewer’s perception is that you are looking and engaging directly with them.
However, here’s the trick you’ll use.
If you position the cue card, iPad, or laptop screen as close as possible to the lens, and move far enough away, the difference in your eye-line between looking into the lens and looking at the text will be very small. If you are at least 6-10ft back, the difference is so small that the viewer will not notice any difference at all.
Now I’ve explained why these alternatives work, let’s take a detailed look at each method.
How to read a script without a teleprompter by using Cue Cards
Cue Cards![]() , also known as Note Cards, are nothing new when it comes to helping performers remember their lines in front of the camera. They are cards that either have the speaker’s lines written on them or bullet points that help the speaker remember what they have to say next.
, also known as Note Cards, are nothing new when it comes to helping performers remember their lines in front of the camera. They are cards that either have the speaker’s lines written on them or bullet points that help the speaker remember what they have to say next.
The use of cue cards is known to date back to the 1930s and are still used in film and TV production. They are typically held off-camera for the actor or presenter to read. In video content where the presenter isn’t looking directly into the camera, cue cards are still useful.
So why use cue cards instead of a teleprompter?
Cue cards are much more flexible than teleprompters since they can be placed anywhere on set for the presenter to read. However, teleprompters tend to be fixed in front of the camera.
When using cue cards for YouTube videos an assistant normally holds each card close to the camera lens so that the presenter’s eye line looks close to that of them looking into the camera. The assistant will switch each card for the next one as the presenter completes the text on each cue card.
To create your cue cards, print your script on sheets of paper in two or three-sentence chunks. If the paper is relatively lightweight the cue card assistant will be able to read the script (in reverse) through the paper. This will allow them to anticipate when the pages need to be switched so the presenter to continue reading from one page to the next.
A word of warning. Using cue cards involves printing many pages, so if you have a long script, you’ll use a lot of paper and ink.
Using cue cards with an assistant
What you will need.
- 1x Cue card assistant
- Enough printer paper or thin card for the number of cue cards you need
- 1x Roll of Duct tape
So, how do you use cue cards in your YouTube video? Just following these steps.
- Write your script as normal in your favorite word processor.
- Create a new document with the orientation set to landscape.
- Reduce the size of the margins, header, and footer to maximize the useable space on each page.
- Paste your script into the new document and change the font to something that is easy to read. I like using Arial or Calibri.
- Change the font size to between 30 and 40. The correct size for you will depend on how far away you have the camera. I normally use a point size of 36.
- Enable page numbering so you don’t lose track of the script order.
- Edit the script so you have two or three complete sentences filling each page. Don’t split sentences across pages.
- Now check the script for any mistakes or typos.
- If everything is OK go ahead and print your cue cards.
- Set up your camera so the lens is at approximately the same height as your eye level.
- Make sure you have enough distance between you and the camera so that there is little apparent difference between your eyeline looking at the cue cards and your eyeline if looking directly into the camera. When using a focal length of 35-70mm I would leave about 6-10ft.
- When you’re ready, press record and start reading the script but remember to put “life” into your read. Stress important words, use inflection, and don’t be afraid to use pauses for dramatic effect. Larger than life is frequently just right on playback. If you can manage, keep going as your assistant switches between cue cards. If you can manage to read the entire script that’s great, but don’t worry if you only want to record in short chunks that can be cut together in the edit.
- If you want, record a few takes of each section, adding a triple hand clap after each good take. The hand claps will appear in your editor’s audio track as a triple spike, making it easy to find your good takes.
Once you’ve recorded all the script import the footage into your video editor. Look for those triple claps in the audio track to locate the good takes, remember the claps are at the end of a good take. You can then cut out all the takes in between the good ones. Then cut together the remaining footage, leaving just enough space to make the gap in your speech sound natural.
Using cue cards on your own
In this variation of the cue card method for YouTube videos you’ll be working on your own. That will make the process a little more time-consuming since you will have to switch over the cue cards yourself.
However, if you’re feeling nervous in front of the camera this method might work well for you. You’ll be recording the video in short easy to read sections that will be edited together later. It will be a less stressful experience in front of the camera. Therefore, you should find filming to be more enjoyable and that should show in your performance.
What you will need.
- Enough printer paper or thin card for the number of cue cards you need
- 1x Roll of Scotch tape
- 1x Roll of Duct tape
- 1x Tripod light stand
The first part of the process is broadly the same as before, but I’ll include the details again.
- Write your script as normal in your favorite word processor.
- Create a new document with the orientation set to landscape.
- Reduce the size of the margins, header, and footer to maximize the useable space on each page.
- Paste your script into the new document and change the font to something that is easy to read. I like using Arial or Calibri.
- Change the font size to between 30 and 50. The correct size for you will depend on how far away you have the camera. My preferred point size is 36.
- Enable page numbering so you don’t lose track of the script order.
- Edit the script so you have two or three full sentences filling each page. Don’t split sentences across pages. If that means not filling a page, that’s fine.
- Before printing anything, ensure you check the script for any mistakes or typos. If everything is OK go ahead and print your cue cards.
- Set up your camera so the lens is at the same height as your eye level.
- Move back from the camera until the difference between your eye-line while looking at the cue cards and your eye-line while looking into the camera is negligible. When using a focal length of 35-70mm I would leave about 6-10ft between you and the camera.
- Using the Scotch tape, stick the first cue card to the top section of the tripod light stand. Then place the light stand as close behind the camera as possible and adjust the height so that the last line of text is just visible able the top of the camera.
- Using your camera’s flip-out screen, an external monitor, or just trial and error, frame yourself correctly. When you’re framing looks good mark the position of your feet on the floor with duct tape. If you stand on the same mark in every take your framing will be the same each time.
- When ready, press record and start reading the script. Remember to put “life” into your read. Stress important words, use inflection and don’t be afraid to use pauses for dramatic effect. Larger than life is frequently exactly right when you watch the playback.
- For each cue card, start and end with the same facial and body position, holding the pose for one or two seconds. This will help smooth the jump cuts when you edit all the clips together. Record a few takes of each cue card, adding a triple hand clap after the best take. The handclaps will appear in your editor’s audio track as a triple spike, making it easy to locate your good takes.
- Now repeat for each cue card until you’re done. Although you can leave your camera rolling throughout, you will save your battery power and keep the total video file size down if you stop recording between cue cards.
How to read a script without a teleprompter by using an iPad or Tablet
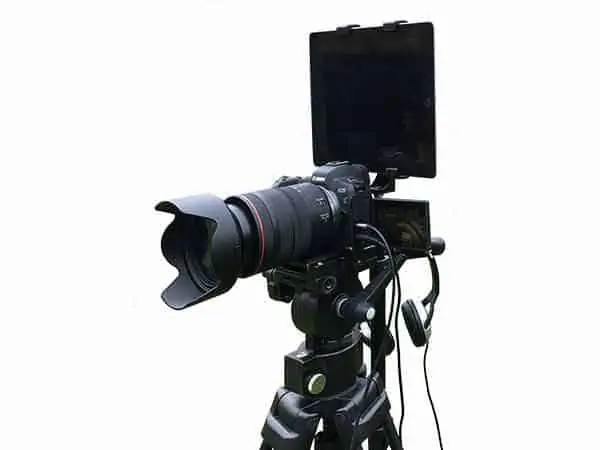
Although the cue card method normally involves writing out the script on card or paper, you could try a high-tech alternative. If you compare the photograph in this section against the image in the previous cue card section you’ll realize the only difference is we’ve replaced the cue card with an iPad.
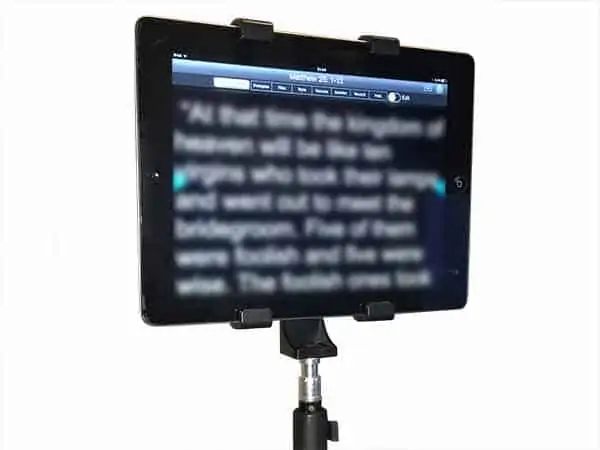
If you have an iPad, Android tablet, or a large phone you can have a teleprompter without having to buy any teleprompter hardware. What you will need to get is a light stand, a tablet tripod adapter, and also download a free (or paid-for) teleprompter app.
This method also has the benefit of not wasting paper and printer ink. So, not only is it more environmentally friendly, but it will also save you money over time.
What you will need.
- 1x Tablet
- 1x Light stand
 or tripod
 - 1x Tablet tripod adapter
- 1x Teleprompter app
This alternative to using a physical teleprompter makes use of putting a teleprompter app onto an iPad, or Tablet. The iPad is then mounted close to the camera lens, in terms of the presenter’s line of sight.
Typically, the iPad is mounted on a tripod or light stand and placed to the side or above the camera. However, you could also place the iPad just below the camera lens, but when doing do I prefer to raise the camera tripod a little higher than normal.
I have had success with inexpensive plastic tablet adapters like the IPOW iPad tripod mount![]() . However, prefer the Ulanzi aluminum cold shoe tablet adapter
. However, prefer the Ulanzi aluminum cold shoe tablet adapter![]() , which feels much sturdier. The base combines a ¼”-20 tripod thread and Arca-Swiss style quick release plate, increasing the mounting options. It also includes a cold shoe mounting point on the top edge. This is for accessories like a mini shotgun mic. The Ulanzi mount can hold any tablet from an iPad mini4 up to a 12.9” iPad Pro, with an opening width of 131mm to 253mm.
, which feels much sturdier. The base combines a ¼”-20 tripod thread and Arca-Swiss style quick release plate, increasing the mounting options. It also includes a cold shoe mounting point on the top edge. This is for accessories like a mini shotgun mic. The Ulanzi mount can hold any tablet from an iPad mini4 up to a 12.9” iPad Pro, with an opening width of 131mm to 253mm.
To use this teleprompter alternative, here’s what to do.
- As before, use your preferred word processor to write your script. In an emergency, you could write your script in the teleprompter app’s editor, but I don’t recommend this unless you are using an external Bluetooth keyboard.
- If you’ve used a word processor on your computer, you’ll need to transfer the script to your tablet. Some teleprompter apps can be linked to your Dropbox, but I just paste the text into the body of an email and send it to myself. This is the method I recommend since it works with any teleprompter app.
- Open the email on your iPad or tablet copy the text.
- Next, open the teleprompter app on your iPad or tablet and create a new script document. The method may vary depending on the app you have. However, many will have a “+” icon that you tap to open a new script document.
- You’ll need to give your script a name and then paste the text of your script into the body of the document. Then make sure you save the script document.
- You can now load the script document into the teleprompter window in readiness for recording.
- If the teleprompter app has a remote-control option, you may want to set it up now. If there is no remote-control option set a start delay in the settings, this will give you time to get into your presentation position after starting the script. If your teleprompter does not have a delay option, you can simulate one by adding a few line-returns at the start of the script.
- Attach the tablet tripod adapter to the threaded tip of the light stand or to a tripod. Now secure the iPad or Android tablet in the adapter.
- Place the iPad and stand either behind or beside the camera, with the screen as close to the lens as possible.
- With everything in place and your camera setup and recording, start the script in the teleprompter app and take up your presenting position. When the text appears around half-way up the screen start reading and deliver the script to the camera. If your teleprompter app has a loop option, you can use it in order to record a few takes since your second or third take is likely to be better than the first one.
When I don’t have a physical teleprompter available the iPad method is my preferred substitute. It’s simple to set up and the results usually work very well. Another bonus is that if you start with the iPad method when you can afford the teleprompter hardware you can add the iPad to the hardware as your display.
How to read a script without a teleprompter by using a laptop
This is a variation of the tablet method that uses a laptop to display several lines of text for you to read.
What you will need.
- 1x Laptop
- 1x Remote control PowerPoint clicker
- 1x Laptop tripod stand or a table and pile of books
- 1x Word processor or presentation software
Put your script on a laptop and mount the laptop in a way that puts the screen just below the camera lens. This may involve a proper laptop stand or a small table and a pile of books. Alternatively, you could put your laptop behind the camera and raise it up so that the screen, and your script, appear just above the camera.
To save getting up to advance the script you can use a Bluetooth mouse to scroll the script forwards.
Although you can display your script in a word processor you may find it easier to create presentation slides that are the equivalent of cue cards using software like PowerPoint or Google Slides. To advance the virtual cue cards use a Bluetooth mouse, although I found that using a wireless presentation clicker![]() is easier and cheaper.
is easier and cheaper.
- As with the cue cards, set up your camera about 8-10ft in front of you. This will make the angular eyeline shift between the camera lens and the laptop screen small so that the viewer will not notice you are not looking directly into the camera lens.
- Set up the laptop tripod stand in front of the camera, with the top about a foot lower than your camera lens.
- Set your laptop flat on the stand and tilt up the screen so it faces where you will be standing to present.
- Carefully adjust the height of the stand so that the top edge of the laptop’s screen is just below the camera lens.
- Start PowerPoint (or whatever app you wish to use) and load your cue cards presentation.
- Start recording on your camera and take up your position where you will be presenting.
- Present the script using each cue card slide. Do a few takes of each presentation slide until you have nailed the delivery. Then do a triple hand clap to indicate that the last take was a “keeper”. Remember to start and end each slide in your neutral head and body position and include a second or two in each pose.
Even though you are not using a teleprompter, you should try to adopt the appropriate presentation tips I have outlined in my article How to read a script while looking into the camera.
Once you’ve transferred the video file to your computer for editing, look for the spikes in the audio track to locate the end of each good take. You can then delete the takes in between and edit your keepers together.
Winging your video delivery without a teleprompter
Some YouTubers are so compelling when they speak on camera. They make it seem as if they can easily entertain, inspire, and speak directly to their viewers. That’s one of the reasons why they acquire thousands or even millions of subscribers, people find they like watching.
You’ve already figured out that although their performance seems so effortless, it’s not easy to do.
That might be the case, but don’t think that some people appear comfortable and easy in front of the camera solely because it comes naturally to them. I believe the ability to wing it on camera is a skill that can be learned.
It’s not about trying to be yourself and hoping that will make everything in your video turn out fine.
To successfully wing it in your video you need to hook your audience.
But how do you do that?
Consider who is your audience and then either open with an interesting or controversial statement or lead with a great anecdote that everyone can relate to. People love stories, especially if they can imagine themselves in it.
Once you’re ready to record I’m sure you’ll find your hook or anecdote easy to recall, but how do you remember the rest of your presentation?
You should prepare a list of sub-topics that logically run from one to the other. That list will not only keep you on track but will also remind you of what you need to say.
Write the list down and attach the notes beside the camera. You’ll be able to read them, and your occasional glances away from the camera will look natural as if you’re thinking about what you’re going to say next. Previously I’ve said you should maintain eye contact with your audience, but don’t overdo it. You don’t want your attempt at maintaining teleprompter eye contact to become a creepy stare.
You have your list to keep you moving forward and on track. Now incorporate examples to illustrate your key points and keep your audience engaged and entertained. For maximum effect demonstrate what you’re talking about with props or b-roll video clips.
Think of it as a show and tell presentation at elementary school. Not only will your audience appreciate it, but you’ll also find it easier to speak naturally because you’re interacting with something.
Finally, practice and hone your delivery. If possible, practice in front of a small group of family, friends, or colleagues. You’ll get a feel of what works and what needs improving.
In summary, think of an opening that will make your viewers take notice. Make a list of sub-topics of what you want to cover. Include props or b-roll that you can talk about. And practice.
Your delivery will appear as if you’re winging it, but both you and I will know the secret to you speaking engagingly off-the-cuff is preparation.
Summary
There you go, you now have four or five methods you can use as alternatives to teleprompters for YouTube videos. They include cheap and cheerful cue cards, which you could even write out with a marker pen, to more sophisticated solutions using your iPad or tablet. The reason they work is that you can trick the viewer into thinking you are looking at them by looking into the camera’s lens, whereas you’re looking slightly off to one side (or above or below).
These solutions are cheaper than buying quality teleprompter hardware and avoid some of the restrictions of a teleprompter. For instance, teleprompters are fixed in front of the camera, but the alternatives can easily be placed anywhere on the set. A handy feature to have when recording interviews.
Good luck with your video project. If you found this article useful, please consider sharing it because that would help me out.
You might also like…
- How to read a teleprompter without moving your eyes
- Do YouTubers use teleprompters for their videos?
- How do you read a script naturally from a teleprompter?
- Can you use your phone as a teleprompter? Best products and Apps
- How to read a script while looking into the camera
- What is a teleprompter and how it works?
Tosh Lubek runs an audio and video production business in the UK and has been using the Canon EOS R since it was released in the Autumn of 2018 and the Canon EOS R6 in 2020. He has used both cameras to shoot TV commercials broadcast on Sky TV, promotional business videos, videos of events and functions, and YouTube creator content. He has also won several international awards for his advertising and promotional work. You can meet him by visiting his “video booth” at HashTag Business Events across the country.
Recent Posts
Most people use sandbags the wrong way. Here’s how to hang them properly on a light stand for maximum stability and safety — plus what to fill them with.
You're Using the Canon RF 50mm f/1.8 WRONG! Here’s How to Fix It
If you’ve recently picked up the Canon RF 50mm f/1.8 STM—affectionately known as the Nifty Fifty—you might be confused by that strange switch on the side of the lens. It doesn’t say AF/MF...
