
DIY Video Studio is supported by its readers. Please assume links on this site are affiliate links, and that I get commissions for purchases made through these links. As an Amazon Associate, I earn from qualifying purchases. Thank you if you use any of the links.
In one of my other articles, I explained how to use a Blue Yeti microphone to record good-quality audio onto an iPhone or iPad. That involved connecting the Yeti to the iOS device using a USB to lightning Camera adapter. But what if you want to connect a Blue Yeti to a Camera? Even if your DSLR or Mirrorless camera has a USB port it’s probably for charging, controlling the camera, or transferring images. So, if you cannot connect your camera to the Yeti with the USB cable, what can you do?

To connect a Blue Yeti to a camera, use a 3.5mm TRS-to-TRS audio cable between the headphone socket on the Yeti and the mic in the socket on your camera. Next, connect the Yeti to your PC using the USB cable, and in Windows sound settings make the Yeti both your recording and playback device.
That’s basically all you need to do. But stick with me, because I’ll go into the details you need to know to connect your Blue Yeti to your camera properly.
What you need to connect a Blue Yeti to a camera
When you need to connect a Blue Yeti to a camera, you will need the following:
- Your camera. This can be a DSLR, Mirrorless, or Video camera with a mic-in socket.
- 1x min-USB to USB 2.0 cable.
- 1x Audio cable with 3.5mm TRS jacks.
- 1x Laptop or desktop computer.
- 1x Headphones for monitoring your audio (if your camera supports headphones).
Unfortunately, you cannot make this work without connecting the Yeti to a computer using the USB cable. The PC doesn’t just provide power. If that were the case, you could plug the Yeti into an adapter or power bank. The reality is that the computer also provides software support for the Yeti. Without it, no audio will be sent to the headphone socket on the base of the Yeti.
So, if you haven’t done so already, connect the Blue Yeti to your computer.
I would make one point here. Ensure the computer is a quiet one. If it has a noisy cooling fan you may need a longer USB cable so you can move it away from the Yeti to prevent the noise from being picked up.
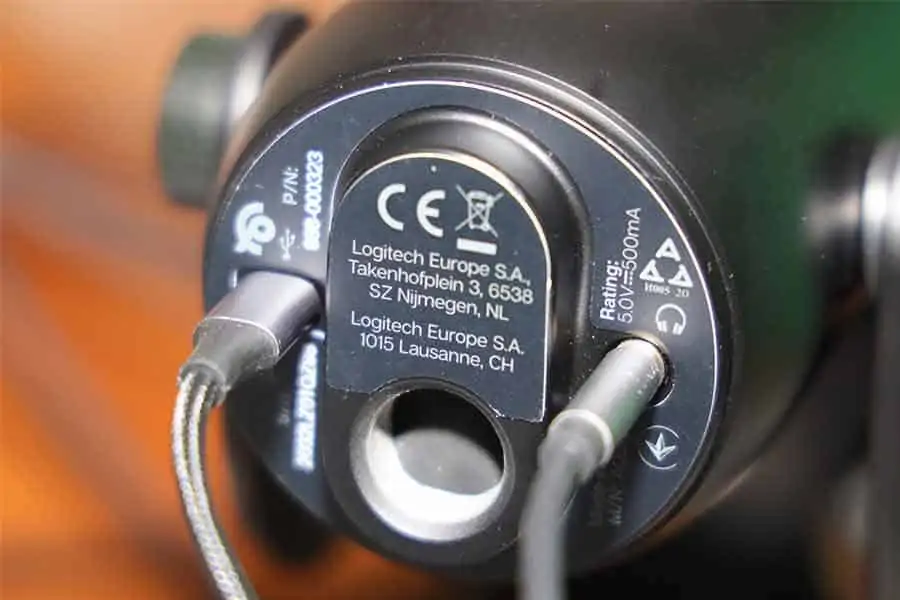
With the PC and Yeti connected you can move on to the next step. Plug one end of the audio cable into the 3.5mm TRS socket on the base of the Yeti. Make sure the jack is fully inserted so the connection is properly made.
The jack on the other end of the audio cable should be inserted in the mic in the socket on the camera. Usually, it’s under a protective flap on the side of the camera. On my Canon EOS R, all the input/output ports are on the left side of the camera (looking from the rear).
If your camera has a headphone output plug in your headphones. Fortunately, my EOS R has a headphone socket, but many other cameras, like the Canon EOS M50, don’t. The reason it is worthwhile monitoring your sound is that when you get your files onto your computer to begin editing, at that point it’s too late to discover the sound wasn’t quite right.
Next up, you need to get the sound settings sorted in Windows (or on your Mac).
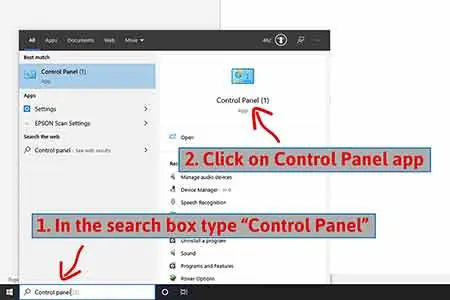
In the Windows query window, type, “Control Panel”. The Control Panel app should be at the top of the panel that opens, so click on it.
Then click on Hardware and Sound.

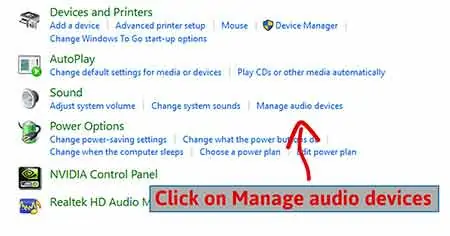
When Hardware and Sound opens, click on Manage audio devices, Sound, or the speaker icon. Clicking anywhere to the right of the speaker icon will take you to the Sound panel.
There are two things you need to do in the Sound panel. First, select the Recording tab and scroll down the list until you find Yeti Stereo Microphone and select it. You then want to click on the Set Default button.
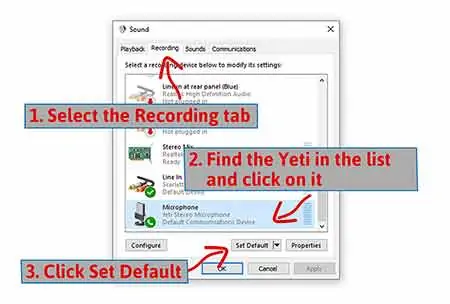
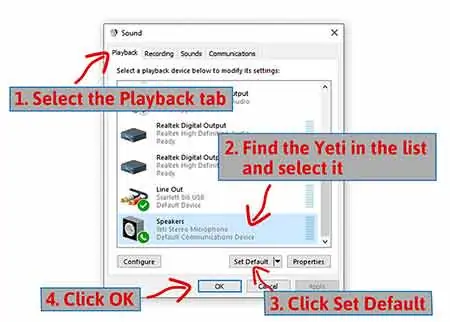
Now click on the Playback tab and find the Yeti in the list, select it and click Set Default.
Switch on your camera and set your sound recording to Manual. This will probably be somewhere in the Menu settings. On the Canon EOS R press the Menu button and then go to the first of the red camera menu screens. Select Sound Recording and put it into manual mode.
Takedown the level so it’s quite low, probably about a quarter of the way up from minimum. You will eventually control the audio level using either the Gain knob on the Yeti or the volume slider in your computer’s settings.
When recording you want the audio to peak at around –12dB. That will leave you a little “headroom” to accommodate the occasional louder parts in natural speech.
You don’t want the audio to hit the extreme right of the audiometer, which represents a level of 0dB. If the audio peaks (hits the red end stops) you run the risk of your audio being clipped and distorted. Essentially, you are feeding in too much signal for your camera to record, losing the data that accurately describes your audio. It’s the sound equivalent of overexposing the shot so that all the details in the highlights are lost and end up looking pure white.
WARNING: If the light on the Yeti’s mute button is flashing red, the Yeti is muted and you won’t be sending any audio signal to the camera. Make sure the light is solid red.
Blue Sherpa companion app
Although you can control the level of the audio from the Yeti using the Gain knob, you might like to use a virtual slider. If you haven’t already got the Blue Sherpa app on your PC visit the Blue Microphone’s website and download the Blue Sherpa app![]() .
.
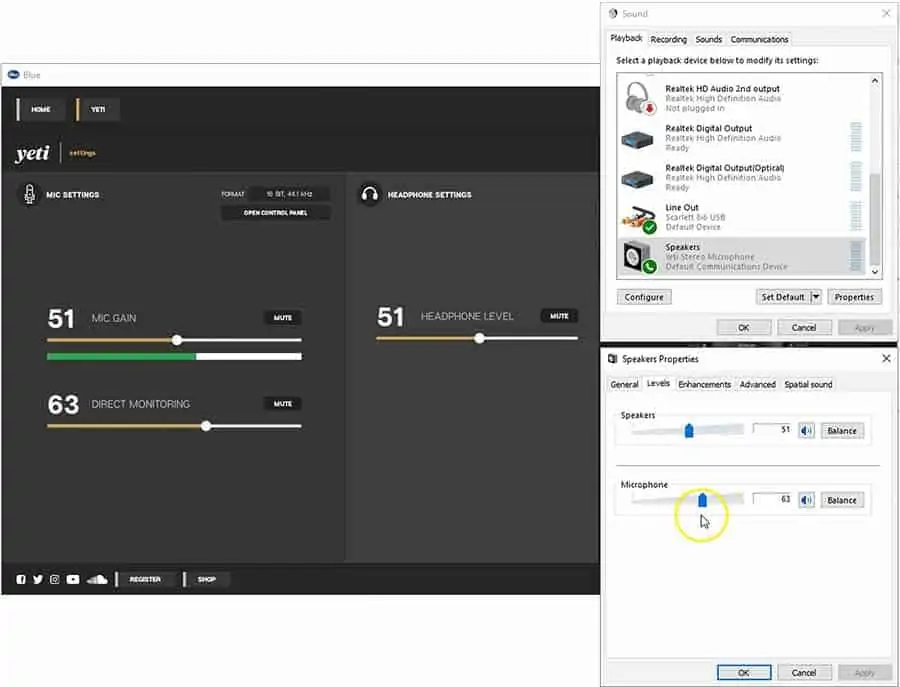
The Sherpa app mirrors the Speakers and Microphone sliders in the Windows Sound Speakers properties panel, making them much quicker and easier to access. To adjust the audio input level into your camera use the Direct Monitoring slider in the Sherpa app or the Speakers slider in the Windows Speakers Properties panel.
But as well as allowing you to use virtual sliders, Sherpa also makes it easy to register your Yeti and check for and install firmware updates.
For more details about downloading and using the Blue Sherpa app with the Blue Yeti read my article Blue Sherpa Software: How to download, install and use with Yeti.
The following video summarizes what you need to do.
You might also like…
- Best Cardioid Microphone Alternatives to Blue Yeti
- Blue Yeti microphone instructions: How to position your mic
- Blue Sherpa Software: How to download, install and use with Yeti
- What are the best Blue Yeti microphone patterns to use
- Do I need Blue Yeti drivers for Windows 10

- How to connect Blue Yeti or USB mic to Samsung Android Phone
Frequently Asked Questions about the Blue Yeti…
What cable does Blue Yeti use?
The Blue Yeti comes with a regular mini-USB to USB 2.0 cable that is 78-inches or 2m long. The mini-USB plug connects to the USB port on the base of the Blue Yeti. The USB 2.0 connector is inserted into one of your computer’s USB ports. If you need a longer USB cable you can easily get a standard mini-USB to USB 2.0 cable from Amazon.
Do you need a pop filter for a Blue Yeti?
The Yeti does not come with a pop filter and it is not necessary if you practice a careful mic technique. However, pop filters are not very expensive and worth getting. Most cheap foam filters only protect mics from moisture, so they are useful in prolonging the life of your Yeti. Dead cat pop filters are great but it’s the circular nylon or metal mesh type of pop filter that is probably the best for use in a studio or at your desk.
Is Blue Yeti a condenser or dynamic mic?
The Blue Yeti is a USB condenser microphone. As is typical of condenser microphones, the Yeti is very sensitive to sound, which seems to surprise many inexperienced microphone users. It is not overly sensitive to background noise, but you need to be aware that it should be 4 to 10-inches from your mouth. If you are recording in a very noisy environment, you may be better off using a dynamic microphone for vocals, where the sensitivity falls away quickly with distance.
Does the Blue Yeti have a headphone jack?
The Blue Yeti does have a 3.5mm headphone jack output. If you set up the Yeti as both a microphone and speakers in your computer’s sound settings, you can monitor both the Yeti and the audio playing on your computer. The Yeti’s 3.5mm headphone output also allows you to connect it to other devices, such as a camera or external audio recorder.
Why is my blue yeti mute button blinking?
If the mute button on your Blue Yeti is blinking it means your Yeti has been muted because the mute button has been pressed. If the mute button’s red light is solid red, the Yeti is unmuted. Be warned you can mute the Yeti in the Blue Sherpa companion app or Windows Speaker Properties, but the mute button will not flash red.
How much power does a Blue Yeti use?
Unlike most other condenser microphones, the Blue Yeti does not need phantom power. The Yeti gets the required 150mA at 5V from the USB port on your computer, or from your iPhone or iPad when connected using a USB to Lightning Camera Adapter.
What is the front of a Blue Yeti microphone?
The front of a Blue Yeti is the side that has the Blue logo. Since the Blue Yeti is a Side Address microphone you should speak into it from the side where you see the Blue logo. This applies when using most of the microphone patterns or modes on the Yeti. But when using the omnidirectional pattern, you can be at any position around the microphone.
What does pattern mean on blue yeti?
The pattern on a Blue Yeti is defined by the shape of the space around the microphone where it is most sensitive to sound. In the Cardioid pattern, it is like a heart. The Stereo pattern is similar, but the direction of the sound is also registered. Bidirectional is like a figure of eight, with the lobes stretching in front and behind the Yeti. But the omnidirectional pattern is like a circle, with the Yeti equally sensitive to sound in all directions.
Tosh Lubek runs an audio and video production business in the UK and has been using the Canon EOS R since it was released in the Autumn of 2018. He has used the camera to shoot TV commercials for Sky TV, promotional business videos, videos of events and functions, and YouTube creator content. He has also won international awards for his advertising and promotional work. You can meet him by visiting his “video booth” at HashTag business events across the country.
Recent Posts
Most people use sandbags the wrong way. Here’s how to hang them properly on a light stand for maximum stability and safety — plus what to fill them with.
You're Using the Canon RF 50mm f/1.8 WRONG! Here’s How to Fix It
If you’ve recently picked up the Canon RF 50mm f/1.8 STM—affectionately known as the Nifty Fifty—you might be confused by that strange switch on the side of the lens. It doesn’t say AF/MF...