

DIY Video Studio is supported by its readers. Please assume links on this site are affiliate links, and that I get commissions for purchases made through these links. As an Amazon Associate, I earn from qualifying purchases. Thank you if you use any of the links.
The Blue Yeti is a multi-pattern USB microphone. It uses three microphone capsules to deliver four different microphone polar patterns or modes.
The four Blue Yeti microphone patterns or modes are Bidirectional, Cardioid, Omnidirectional, and Stereo. Each Blue Yeti pattern changes the microphone’s direction of maximum sensitivity and the direction or directions of maximum sound rejection. Each polar pattern is ideal for specific uses, making the Blue Yeti a very versatile USB microphone.
These four microphone polar patterns, coupled with the fact that the Yeti is a USB condenser microphone, makes it useful for a wide variety of applications.
Whether you are recording directly to your computer or streaming online the Yeti provides you with many creative possibilities. There isn’t one single best microphone because each one is best for a specific purpose. Stick around and I’ll explain when you should use each one.


Last update on 2025-10-11 / Affiliate links / Images from Amazon Product Advertising API
What does PATTERN mean on a Blue Yeti?
The pattern, or mode, on a Blue Yeti microphone, refers to the direction in which it is sensitive to sound. This isn’t specific to the Yeti; every microphone can be put into certain pattern categories. There are in fact a few more than the four that are available on the Yeti, such as super-cardioid and hyper-cardioid.
Probably because the Yeti originally appealed to computer audio hobbyists the terms “mode” and “pattern” were used for simplicity. However, it should really be referred to as the microphone’s “polar pattern”, which is the term used by professional audio engineers. I’ve even heard some refer to the “polarity” of the microphone.
Whichever term is used, it really refers to the pick-up pattern of the microphone. That determines how and when you will use it.
The Blue Yeti Bi-directional pattern is ideal for interviews

The bidirectional pattern has two lobes of sensitivity. One extending from the front and the other in the opposite direction from the rear of the Yeti. It’s easiest to imagine the pattern to be a figure of eight, which is why the pattern symbol looks like the number 8.
The position of those two lobes is where the microphone will be most sensitive. The sensitivity will fall off as you move around to the sides of the microphone and reach a minimum when you have moved through 90° or speaking into the side of the Yeti.
The bidirectional pattern is useful when you have two sound sources, this might be the case if you are interviewing someone, recording a two-person podcast, or perhaps a vocal or instrumental duet. Place one person in front of the mic and the other person on the opposite side.
The sensitivity is equal to the front and rear of the microphone. Therefore, you need to make sure both sound sources are equally loud. If you are interviewing someone, you’ll need to make sure you are both of you are speaking at about the same level.
The Blue Yeti Cardioid pattern is ideal for voiceovers

The Blue Yeti cardioid pattern is like a heart-shaped balloon that extends to the front of the microphone. Maximum sensitivity is directly in front of the Yeti where the audio will have the best clarity. The mic is also reasonably sensitive off to the right and left but it rapidly falls off as you move round to the rear of the microphone.
The rear is where the maximum amount of sound rejection occurs. So, if you want to minimize a sound in the background, make sure that the noise source is behind the Yeti. This could be your computer keyboard or perhaps a fan. The cardioid pattern won’t completely eliminate the sound but the mode can help minimize the sound.
The cardioid pattern is most often used when recording a voiceover, one-person podcast, game streaming, YouTube videos. It can also be useful for online meetings on Zoom, Skype, Teams, etc.
If you want to classify what the cardioid pattern sounds like, it’s most like the audio you’d get from a radio station. So if you fancy being a radio presenter or DJ, turn the mode to cardioid.
The Blue Yeti Omnidirectional pattern is ideal for conference calls

The omnidirectional pattern enables the Yeti to “hear the room”. This mode makes the Yeti sensitive to sound from all directions, making it ideal for recording multi-person round table discussions or interviews, and conference calls. It can also be useful for field recording, events, and even recording small bands or orchestras.
The symbol for the omnidirectional pattern is that of a circle, which is a good visualization of the microphone picking up sound from all directions. More so than any other pattern, the omnidirectional mode produces audio that most closely represents a natural room sound.
Although this mode captures sound from all directions the microphone does not create any sense of where the sound is coming from. It’s a mono soundscape, so wherever you are around (and above) the Yeti, you will sound the same to the listener.
The Blue Yeti Stereo pattern is ideal for recording choirs

The symbol for the stereo pattern is two overlapping rings but this mode is a little like the cardioid pattern but with spatial information. In a sense, it lets you get inside your listener’s head. The Yeti represent your position around the microphone within that stereo space between the listener’s ears.
A little like the cardioid pattern, the Yeti in stereo mode records well from the front and off to the sides.
So, when should you use the Yeti’s stereo mode?
The stereo pattern is useful when you want to record not only the sounds around the microphone but also their relative positions around the microphone. This might be a vocal performance, choir, a small acoustic band, a radio drama performance, or even a soundscape.
Where you probably don’t want to use the stereo pattern is when recording a voiceover, podcast, or for a Zoom conference call. There are two reasons why this might be the case.
First, it can really mess with the listener’s head if you move around.
The second is more of a practical consideration. I’ve been hired by many clients to provide audio or video training in their home or office video studio. You would be amazed how often I have found a setup that only records on one channel.
This can be a real problem if you record using a stereo mic and move around. If recorded correctly the person would appear to move around in the stereo picture. But if only one channel is recording then the voice will appear to get quieter and then louder.
So although stereo may produce some fun results, you probably won’t use it much when recording yourself.
How do you change the Blue Yeti pattern?
Changing between the Blue Yeti patterns is easy. Look at the rear of the Yeti and you’ll see two dial knobs. The top one is marked GAIN, and the lower one is marked PATTERN. Use the lower of the two knobs to select the pattern you require.
MODES ON YETI: From left to right, the patterns are Stereo, Omnidirectional, Cardioid, and bi-directional.
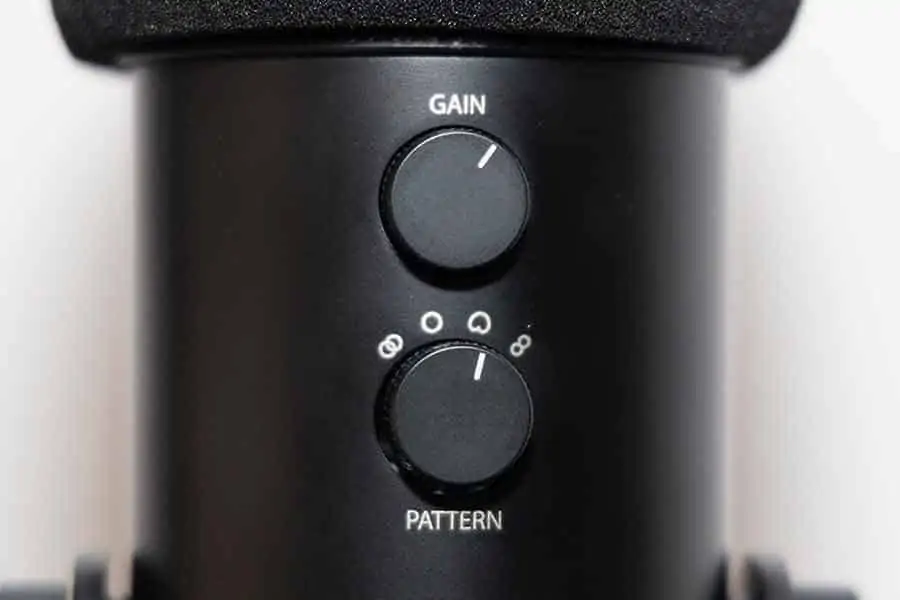
To select the pattern you need, check the pattern symbol in the Blue Yeti pattern quick guide table below for the pattern you require. Then turn the pattern selection knob so the line on the knob points at the matching pattern symbol on the Blue Yeti.
You may find that the pattern selection knob is quite stiff to turn. Just give it a little extra push and you can then change between pattern positions.
The pattern quick guide table is a speedy way to understand which pattern you should use for your specific application, and from which direction the Yeti will pick up the clearest sound. Think of the table as the default go-to setup but don’t be afraid to experiment once you understand the basics.
Blue Yeti pattern quick guide table
| Mic Pattern | Pattern Symbol | Maximum sensitivity direction | Typical application |
| Bidirectional or Figure-of-Eight | | Directly in front and behind | Interview Instrumental duet Vocal duet Two-person podcast |
| Cardioid | | Directly in front | Game streaming Online meeting One-person podcast Voiceover YouTube Course creation |
| Omnidirectional | | All around | Conference call Multi-person interview Field recording Event Orchestra |
| Stereo | | Front side, from left to right | Vocal performance Choir Acoustic group Radio drama |
If you are recording or streaming when changing between patterns, you’ll notice a high-level click in the sound output. It will appear in your recording as a high peak or transient spike. When going between stereo and omnidirectional you may also notice a brief dip in level.
It’s not a fault on your Yeti. That’s just the way it is, and you’ll get the same kind of effect in lots of other audio gear where you have a switch. The best way to avoid this is to set your pattern correctly before you start a live recording or stream. Using the pattern change knob while live will result in an objectional audible spike.
YETI TIP: If you do have to change patterns mid recording/stream, take your mic gain down first, change the pattern, and take the mic gain back up.
Is the Blue Yeti a mono or stereo microphone?
The Blue Yeti is a stereo microphone, where the output has a definite left and right. However, only when the stereo pattern is selected will the output include the left-right position information of the sound source.
When recording in bidirectional, cardioid, and omnidirectional modes the right and left channels will be about the same. Although in practice there may be a slight difference between the level of the right and left channels. In my experience, when the Mic Gain is set to 100% the right channel is about 3dB higher than the left.
This 3dB of a difference is not worth bothering about in most cases. However, you can use the pan or balance control in your audio recording software to place your voice or instrument to be straight down the middle.
You may also want a mono signal or recording to halve the file size. Even though the left and right of a stereo file maybe the same and appear to be mono as far as the user is concerned, it will still require twice the amount of data than a true mono file.
If you are using OBS streaming software, you can right-click anywhere in the Audio Mixer window and choose Advances Audio Properties. You can then select the Mono checkbox on the channels of your choice.
You might also like…
- How to connect and use a Blue Yeti to an iPhone or iPad

- Do I need Blue Yeti drivers for Windows 10
- How to setup and use a Blue Yeti microphone
- How to stop Blue Yeti from picking up keyboard sound
- Best microphone for better Zoom calls
- Do I need Blue Yeti drivers for Windows 10
- Blue Sherpa Software: How to download, install and use with Yeti
Tosh Lubek runs an audio and video production business in the UK and has been using the Canon EOS R since it was released in the Autumn of 2018. He has used the camera to shoot TV commercials for Sky TV, promotional business videos, videos of events and functions, and YouTube creator content. He has also won international awards for his advertising and promotional work. You can meet him by visiting his “video booth” at HashTag business events across the country.
Recent Posts
Most people use sandbags the wrong way. Here’s how to hang them properly on a light stand for maximum stability and safety — plus what to fill them with.
You're Using the Canon RF 50mm f/1.8 WRONG! Here’s How to Fix It
If you’ve recently picked up the Canon RF 50mm f/1.8 STM—affectionately known as the Nifty Fifty—you might be confused by that strange switch on the side of the lens. It doesn’t say AF/MF...