
We’re an affiliate: We hope you love our articles and the products we recommend! Just so you know, when you buy through links on this site, we may earn an affiliate commission. Thank you if you use our links, we really appreciate it!
Whether you are using a headset microphone, or a studio microphone pops (plosives) can ruin your audio. So, in this article, I’ll show you how to stop microphone popping.
There are several techniques you can use to stop microphone popping. Some involve buying extra gear while others just require a change to the way you use your microphone.
- Use a physical pop filter between you and the front of your microphone.
- Turn on your microphone’s low-cut (bass-cut) filter.
- Move further from the microphone.
- Speak across the microphone rather than directly into it.
- Adjust the way you enunciate your consonants.
- Use an omnidirectional microphone.
- Try the old favorite of using your fingers or pencils between your mouth and the microphone.
Pops and blasts on a microphone are caused by plosives, typical of the consonants in your speech that are formed by stopping the air with your lips or tongue followed by a sudden release of breath. This occurs notably on consonants such as P, B, T, and K.
The resultant explosive rush of air hits the microphone’s diaphragm, causing a significant deformation instead of the small vibration caused by normal sounds. That large movement then becomes an audible “thump” in the sound from the microphone.
How to stop microphone popping
1: Stop audio popping with a microphone pop filter
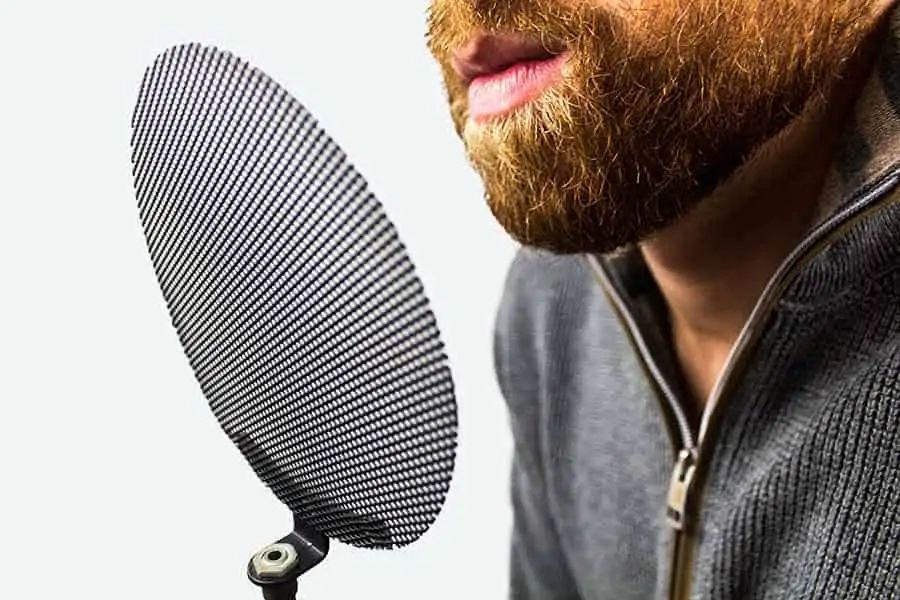
This method is commonly used in recording studios for vocals, by voiceover artists, podcasters, and vloggers on YouTube.
There are basically two types of mesh pop filter, metal mesh, and nylon mesh. The two prevent pops and blasts in separate ways, but the goal is the same, to get rid of those plosives.
Place the filter a few inches in front of the microphone. The pop filter is often on a gooseneck that clamps to the mic stand. Now position yourself about 4 to 10-inches in front of the pop filter.
If you don’t know what a pop filter is or want to learn about the diverse types of pop filters, I would recommend you read my article, What is a microphone pop filter![]() .
.
2: Use the bass-cut on your microphone
Many more professional microphones include a few extra switches somewhere on their body. This may be an on-off switch, a pad (to reduce the output signal), a switch to change the polar pattern, and a low-cut switch. It’s the last of these that you want to use in your battle against audio popping.
Most of the energy in plosives is in the low-frequency end of the sound spectrum. You can, therefore, reduce or eliminate the audio pops by cutting those low-frequency sounds. That’s where the low-cut switch comes in.
Typically, the low-cut filter (it might also be called a high-pass filter) will roll off frequencies below 80 or 100Hz. But obviously, this is a catch-all solution. By using the low-cut filter, you will cut or reduce the bass frequencies in the audio pops, but you’ll also cut some low-frequency sounds that you might want to keep.
If you’re not sure whether you have a low-cut switch on your microphone, look for a switch that has a symbol of a rising line and then a flat top, as I show in the image below.

This shape represents an ideal frequency response graph, showing the roll-off of the lower frequencies on the left-hand side. If you see a switch with such a symbol, slide it over towards the symbol and you’ll cut or roll-off those low frequencies.
3: How to stop microphone popping by moving away from the mic
This is a technique that comes free of charge and just relies upon the way you use your microphone.
As your plosive breath blasts emerge from your mouth, the resistance of the surrounding air and turbulence reduces the speed of the blast, as well as spreading it out.
But be warned that changing your mic to mouth distance will change the sound. If you move too far away from the microphone you will begin to sound “off-mic” or distant. Try and keep between 6 to 12-inches from the microphone.
4: Stop pops by speaking across and not into the microphone
This is another zero-cost solution. It’s all about how you work with your microphone.
Essentially try to avoid speaking directly into the microphone since your plosive breath blasts will be directed straight at the mic’s diaphragm.
The sound of your voice spreads out from in all directions in front of you. So, if you turn your head slightly to the side as if you are looking just past the microphone. Now those plosive blasts will miss the microphone’s diaphragm without causing any harm on your Ps and Bs.
Alternatively, move your microphone.
Adjust the microphone’s position so it’s at an angle of about 45-degrees relative to you and then move it slightly up, so it’s above you.
The result, again, is that you will be speaking past the front of the microphone and any wind blasts won’t strike the mic’s diaphragm.
Basically, you are trying to point the microphone at your mouth and not your mouth at your microphone.
Now if you are using a headset microphone you can use this technique to stop your microphone popping.
It may seem obvious to bring the mic arm up so the microphone is directly in front of your mouth but don’t. With the mic in line with your breath, you are more likely to create popping. Angle the mic arm down below your mouth and you should be good to go.
5: Control your plosives with your diction
This method of stopping microphone popping involves controlling your diction so that your Ps and Bs are less “explosive”.
It will involve practice to soften those plosives, but it is possible. Every experience voiceover professional will have learned how to make those consonants sound fine without producing an excessive breath wind.
Hold back on the “explosive” part of the consonant so that isn’t voiced as much. Think of the way you say “Peter” and “Map”.
Peter starts with P and can cause that explosive blast of air. But “Map” ends with P but it’s not voiced to the same extent. You already soften those consonants when they are at the end of the word, so use that knowledge to apply that softening effect when the P or B is at the start.
6: Try an omnidirectional mic instead of a unidirectional mic
Some mics are more prone to popping than others and frequently this is related to whether they are omnidirectional or unidirectional.
Omnidirectional microphones pick up sound equally well from all directions. Meanwhile, unidirectional are much more selective about the direction from which they pick up sound. That selectiveness is usually because of having extra ports, or slots, cut into the tube of the microphone.
Those extra ports are extra openings for breath wind to enter the microphone and strike the diaphragm. As I have already said, that’s what causes the pop or “thump” in the sound.
Although you can force an omnidirectional microphone to pop, it is more resistant to popping than a unidirectional microphone.
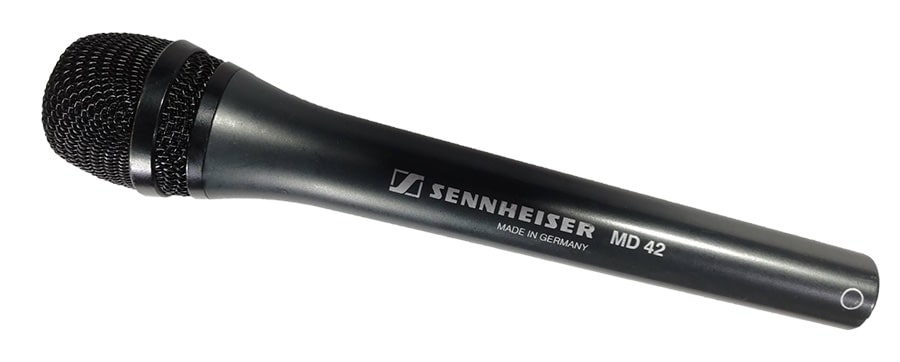
A good example of an omnidirectional microphone is the handheld Sennheiser MD-42 reporters’ microphone, which I’ve shown above. It is designed to avoid noise, which will help with reducing plosives.

- Omni-directional pick-up pattern ensures excellent speech intelligibility without having to point...
- Protective sound-inlet basket lines the metal capsule and protects against wind noise
- Shock mounted capsule and metal housing virtually eliminate handling noise
- Rugged metal housing provides durability
Last update on 2025-10-20 / Affiliate links / Images from Amazon Product Advertising API
Source: Shure Microphones![]()
7: Break up the wind flow with a finger or pencil
Yes, I know this one sounds weird, but stick with me because audio engineers have been doing this one for years. The first time I heard this hack was over thirty years ago from an experienced studio engineer. Essentially hold a thick pencil, pen, piece of dowel, or your fingers vertically an inch or two in front of your mouth. If you are using a microphone with a large grill, you can fix the pencil to the outside of the grill using an elastic band.
This still probably sounds like a gag but really, it’s not.
The traditional answer people give you to why this works is that the pencil breaks up the wind blast from your mouth, diverting it off to the right and left of the pencil. However, that’s not really what’s happening.
In the wake behind the pencil, the airflow forms eddies and the speed of the air going forward drops significantly.
To show how effective this can be, hold the palm of your about 8-inches in front of your mouth and blow steadily. Now, slowly, move a pencil or the index finger on your other hand, held vertically, from right to left about 2-inches in front of your mouth. When the pencil, or your finger, is directly in front of the mouth the wind flow on your palm should feel much lighter.
Now that you know the theory, you can put the pencil hack into practice and stop those pops on your Ps and Bs.
Tosh Lubek runs an audio and video production business in the UK and has been using the Canon EOS R since it was released in the Autumn of 2018. He has used the camera to shoot TV commercials for Sky TV, promotional business videos, videos of events and functions, and YouTube creator content. He has also won international awards for his advertising and promotional work. You can meet by visiting his “video booth” at HashTag business events across the country.
Recent Posts
Most people use sandbags the wrong way. Here’s how to hang them properly on a light stand for maximum stability and safety — plus what to fill them with.
You're Using the Canon RF 50mm f/1.8 WRONG! Here’s How to Fix It
If you’ve recently picked up the Canon RF 50mm f/1.8 STM—affectionately known as the Nifty Fifty—you might be confused by that strange switch on the side of the lens. It doesn’t say AF/MF...
