
DIY Video Studio is supported by its readers. Please assume links on this site are affiliate links, and that I get commissions for purchases made through these links. As an Amazon Associate, I earn from qualifying purchases. Thank you if you use any of the links.
Since the Blue Yeti is a plug’n’play USB microphone your computer’s operating system will automatically install it. There’s no need for installation software and no need for drivers since. In short, there’s no need to download any Blue Yeti software to get your Blue Yeti working.
However, Blue Microphones![]() has released Blue Sherpa a companion app for the Blue Yeti family of microphones that you may find useful.
has released Blue Sherpa a companion app for the Blue Yeti family of microphones that you may find useful.


- Custom three-capsule array: This professional USB mic produces clear, powerful, broadcast-quality...
- Onboard audio controls: Headphone volume, pattern selection, instant mute, and mic gain put you in...
- Four pickup patterns: Flexible cardioid, omni, bidirectional, and stereo pickup patterns allow you...
- Blue VOICE software: Elevate your streamings and recordings with clear broadcast vocal sound and...
Last update on 2026-03-13 / Affiliate links / Images from Amazon Product Advertising API
In this article, I’m concentrating on using the Blue Sherpa app with the Yeti. It is based on my own experience of downloading the software and how it has worked with my Yeti. So hopefully, this article will be representative of what you can expect.
In all honesty, the Blue Sherpa software is more useful if you have one of the other Blue microphones, like the Nano and especially the Yeti X. None-the-less, I think you’ll find the app useful addition to your BlueYeti, even if it is not exactly vital.
What is the Blue Sherpa App?
The Blue Sherpa software is an optional download from the Blue Designs website. Everything that Blue Sherpa can do with your Yeti, you can already do within Windows. But using the app does makes things a little easier, allowing you to get the most out of your Yeti USB microphone.
So, what does Blue Sherpa do for the Yeti owner?
The Blue Sherpa can be used to download and install the latest firmware updates directly to your Yeti microphone. You can also adjust the Mic Gain, plus the Direct Monitoring and Headphone Level of your Blue Yeti.
Although you can do that using the gain and headphone level knobs on the Yeti, doing it in software means there’s no handling noise as you fumble with the microphone knobs, and you can be more exact with your settings.
- Broadcast studio-grade design with enclosed aluminum construction and internal springs.
- Hidden channel cable management system for sophisticated on-camera looks.
- Hand-tightened friction hinges for smooth, quiet operation.
- 32-inch reach and 360-degree rotation.
Last update on 2025-10-11 / Affiliate links / Images from Amazon Product Advertising API
How to get the Blue Sherpa software download
The Blue Sherpa app is a free download from the Blue Designs website, which is available for Windows 7, 8.1, 10, and macOS 10.11 or higher. Here’s a link to the Blue Sherpa app![]() download page.
download page.
You have a choice of Windows or Mac versions of the app, so download the version of the software you require.
When the download is complete run the InstallAware Wizard software, by double clicking on it.
It’ll ask you the usual stuff, like your language, whether you wish to go with the software license agreement, where you want it installed, etc. Just follow the on-screen instructions and click on Next several times.
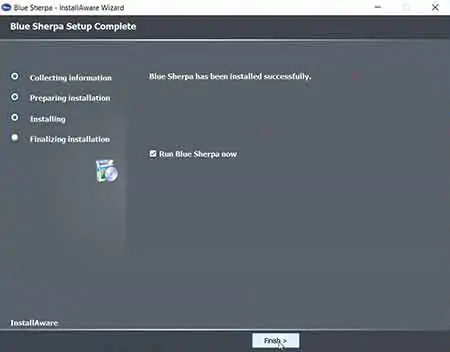
At the end of the installation, check the box to run the software and click on Finish.
The Blue Sherpa app will open, and you’ll see the Home screen.

- Blue Compass PREMIUM MICROPHONE BOOM ARM is not included and sold separately.
- Blue Radius III custom shockmount is designed especially for Yeti and Yeti Pro Microphones,...
- Elevate your audio recordings with Radius III custom shockmount to shield your microphone from...
- This universal mic shockmount cradles the mic in style and features a new streamlined, lightweight...
Last update on 2025-10-11 / Affiliate links / Images from Amazon Product Advertising API
How to use the Blue Sherpa app
When used with a Blue Yeti, the Sherpa app lets you access a few different screens. These are the Home, Yeti, and Settings screens. Although you can also register your Yeti.
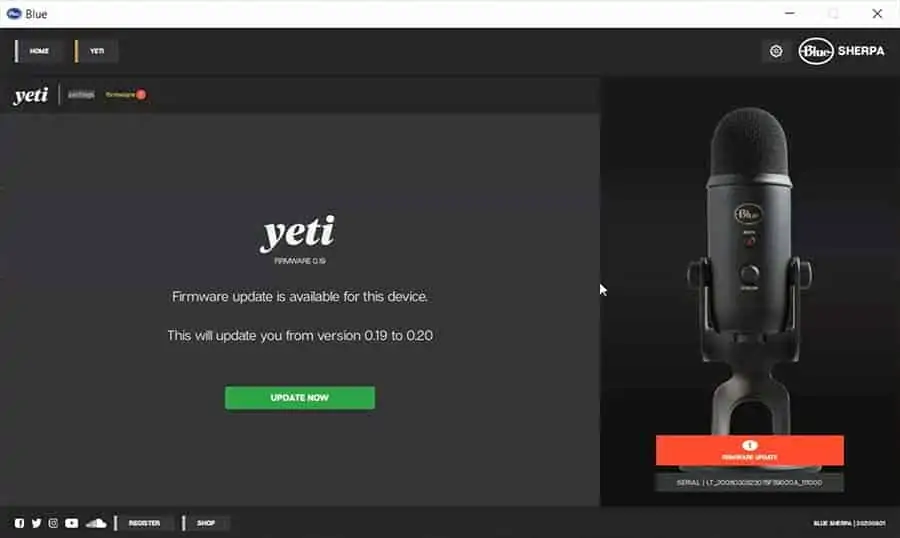
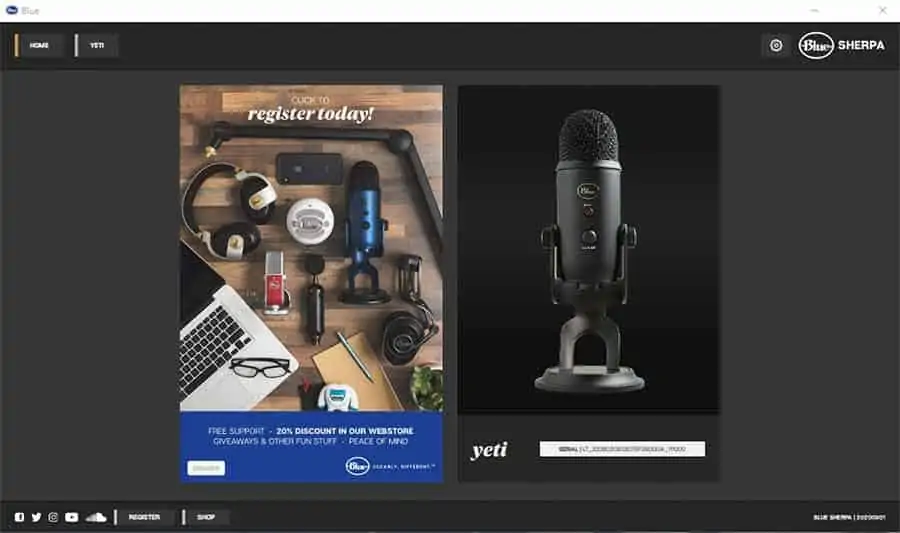
Blue Sherpa Home screen with Blue Yeti firmware update
Assuming your Yeti is plugged into one of your computer’s USB ports you should see the Sherpa app Home page display an image of your Yeti and its serial number.
If your Yeti is due a firmware update, you’ll see an orange button in the corner of the Yeti image inviting you to update the mic’s firmware.
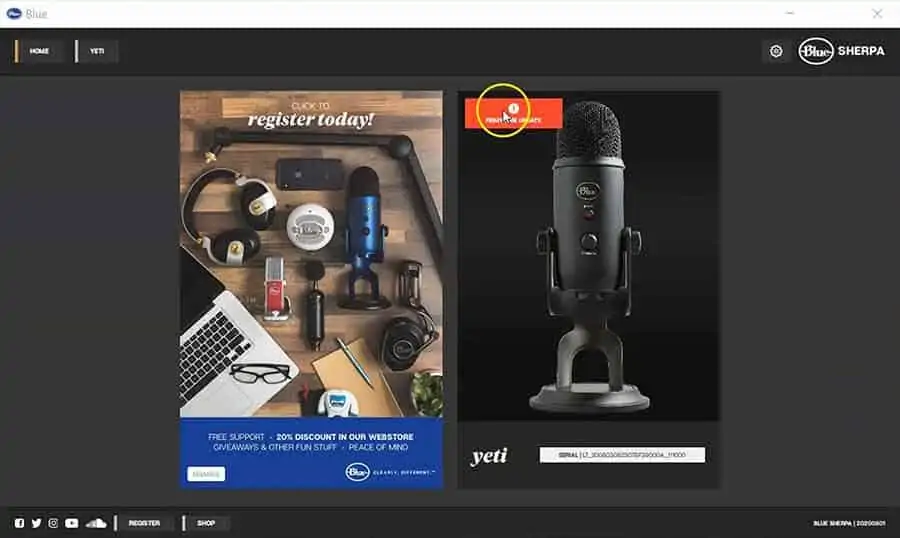
To proceed with a firmware update, click the orange button. The left-hand panel changes to show the details of your Yeti’s current firmware version and the version number of the available update.
All you need to do is click on the big green button to start the hardware update.
If everything has gone well, which it did with my Yeti, you’ll see a notice saying the update is complete and that your device has been updated to the latest version. You can then click OK to move on and control your Yeti remotely.
Unfortunately, it was at this point where things went wrong for me. Instead of seeing the normal Home panel or the Yeti, I got the “Oh no!” message. If this also happened to you, jump ahead to see how I solved the Blue Sherpa app not detecting the Yeti mic.
Blue Sherpa Yeti controls screen
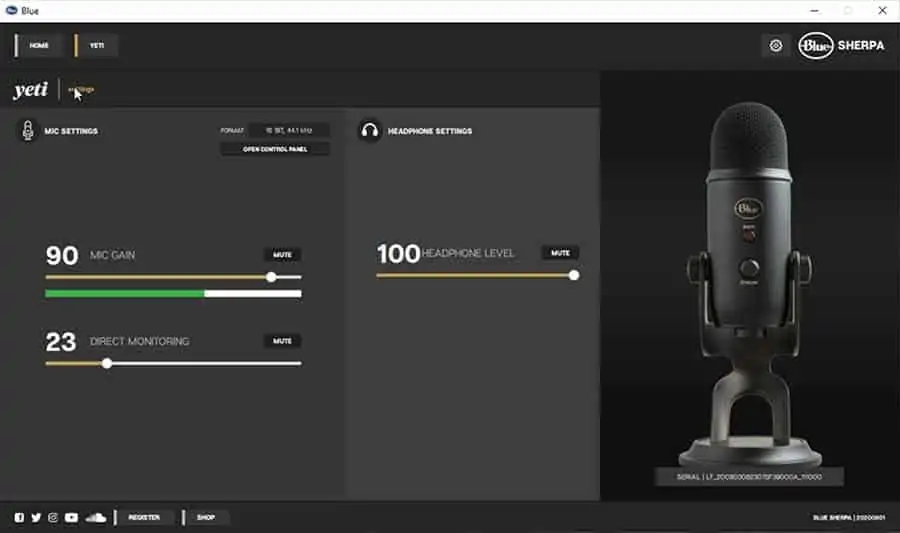
The Sherpa Yeti control screen is split into two halves, the Mic Settings and the Headphone Settings.
Mic Settings
The first thing you can access from the Yeti control screen is the audio format. It may be set to 16bit,44.1kHz, which is fine for most audio recordings. But if you are creating video content you may wish to choose 16bit, 48kHz, since that is the normal standard for video.
Audio Format
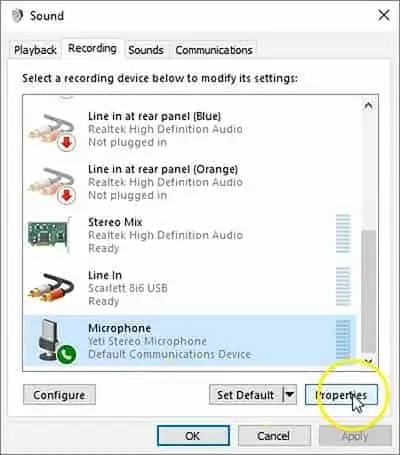
To change the audio format, click on the Open Control Panel button below the current format window.
The Windows Sound panel will open in the Recording tab. Find and select your Blue Yeti amongst the available recording devices and click on the Properties button.
When Microphone Properties opens, click on the Advanced tab. This is where you can change the sample rate and bit depth.
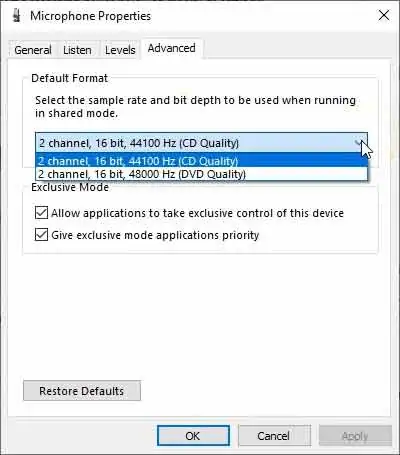
The current selection will be displayed, as you can see in the image above, but if you click on the down arrow you will see that you also have the option of “2 channel, 16 bit, 44100 Hz (CD Quality)” and “2 channel, 16 bit, 48000 Hz (DVD Quality)”. Choose the option you want, then click Apply, and then OK.
Mic Gain
This brings us to the MIC GAIN slider in Sherpa.
If you still have the Windows Microphone properties panel open, click on the Levels tab. You will see a slider for the microphone’s level or gain. This slider mirrors the MIC GAIN slider in Sherpa. In the screengrab below you can see that the MIC GAIN in Sherpa is at 51%, the same as the Microphone level on the Levels tab in the Windows Microphone properties.
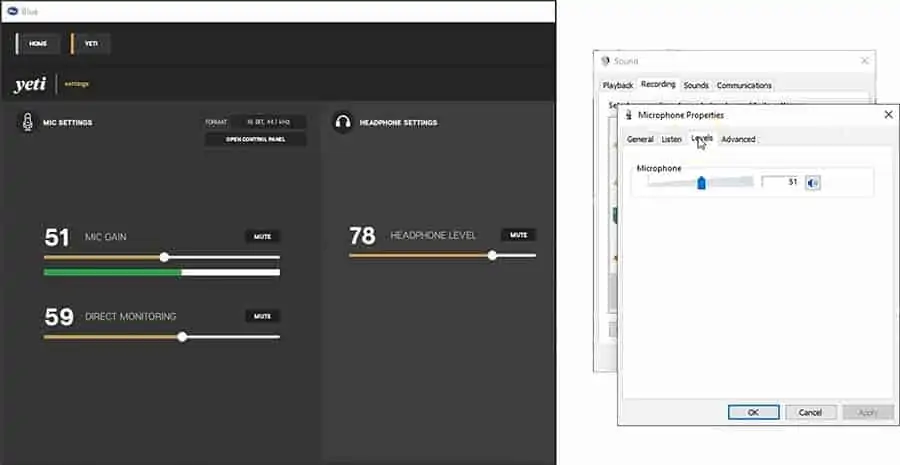
So, if you grab the handle on one of the sliders and adjust it, you will see the other move in unison. Also, notice that if you click the microphone Mute button in Sherpa the speaker icon in the Levels tab of the Microphone properties will also show as muted. It of course also works the other way round.
Direct Monitoring
Back in Blue Sherpa, the next slider is for DIRECT MONITORING.
This allows you to monitor the output from the Yeti, irrespective of the setting on the MIC GAIN. So, whatever level you are sending to your recording app, you can independently set the level you hear in your headphones by using this slider.
There is also a MUTE button to mute the direct monitoring in your headphones.
A problem you may encounter is that you might think your Blue Yeti microphone is “live” because you can hear the mic output in your headphones, but in reality, the mic gain is muted. The opposite may also be true. If you have muted the Direct Monitoring. Your Yeti will be “live” but you’ll not hear the output in your headphones.
If you are familiar with a DJ sound mixing desk, either from a nightclub or radio studio the setup will be a familiar one. The Direct Monitoring is like the PFL (Pre-Fade Listen) selector that lets you hear a sound source before making it live.
TIP FROM MY RADIO DAYS: Treat EVERY microphone as if is a LIVE MIC
Headphone Settings
Initially, you may think the Headphone Level slider in the Blue Sherpa’s Headphone Settings has absolutely no effect. That was also my first impression, but that’s not actually the case.
Headphone Level
The Headphone Level slider will have no effect if you have not selected the Yeti as your systems speaker. So if you are using your PC’s internal soundcard, or an external audio interface, the Headphone Level slider will have no effect at all.
However, if you go back to the Playback tab of the Windows Sound panel and select the Yeti as your speakers, suddenly the Headphone Level slider in Sherpa will affect the sound in your headphones plugged into the Yeti.
Your Blue Yeti is in fact more than just a sound source, it’s also a soundcard for your PC. So you can listen to the audio from apps on your computer through the headphone socket on the Yeti.
In the Playback tab of the Windows Sound panel click on the Yeti as your speakers and then click the Properties button. This opens the Speakers Properties panel, where you should click the Levels tab.
You will now see two sliders, one for Speakers and one for Microphone.
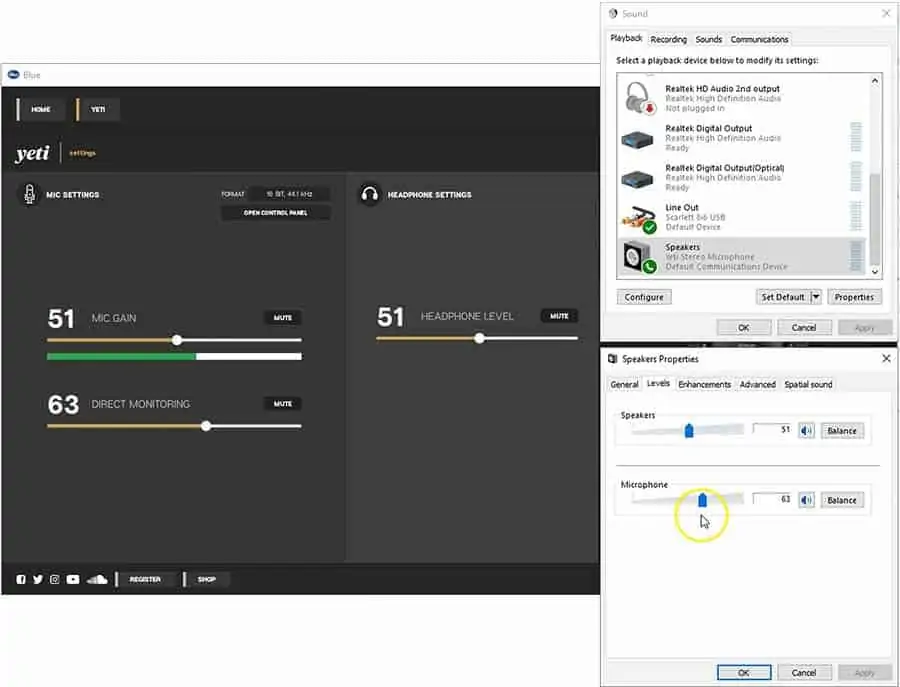
If you drag the Speakers slider you will see the Blue Sherpa’s Headphone Level slider mirrors the adjustment. That all makes sense since we have selected the Yeti to be both a microphone and speaker (the headphone socket on the base of the Yeti).
However, the Headphone volume control on the front of the Yeti also influences the level you’ll hear in your headphones.
Think of the headphone volume knob as a master control that sets the maximum level in your headphones and the Headphone level control in Blue Sherpa (and the microphone level slider in Windows Speaker Properties) can adjust the level you can hear from zero up to the maximum you have set with the headphone volume knob.
I know, it can get a little confusing. But it’s best to understand what’s going on otherwise it can lead to mistakes, especially if you are live streaming.
We’re nearly done. There’s just the issue of how the Microphone slider in the Windows Speakers Properties panel relates to the Blue Sherpa interface. And it’s not necessarily as you might imagine.
At first glance, you would think that since the lower slider in the Levels tab of the Windows Speaker Properties panel is labeled as “Microphone”, that it corresponds to the MIC GAIN slider in Blue Sherpa. Unfortunately, that’s not the case. The Microphone slider actually mirrors the DIRECT MONITORING slider.
| Blue Sherpa slider | Windows Speaker Properties slider |
| Headphone Level | Speakers |
| Direct Monitoring | Microphone |
So what does that mean? As you adjust the Microphone level in the Speaker Properties or DIRECT MONITORING in Sherpa, since they are equivalent, you adjust the level of what you hear in your headphones.
It’s important to realize that as far as our headphones are concerned, the Yeti microphone is behaving like a speaker. So as we adjust the Microphone slider in Speakers properties, we’re changing the level, or volume, from the microphone that is being sent to the headphones.
But remember, despite what you hear in your headphones, check the MIC GAIN slider and the associated meter in Sherpa, because that’s the level coming out of your Blue Yeti microphone.
How to solve Blue Sherpa not detecting Yeti mic
The Blue Sherpa Oh no! message is the screen you’ll see if you haven’t got your Yeti plugged into your computer. It’s basically saying that it appears you don’t have any Blue devices connected.
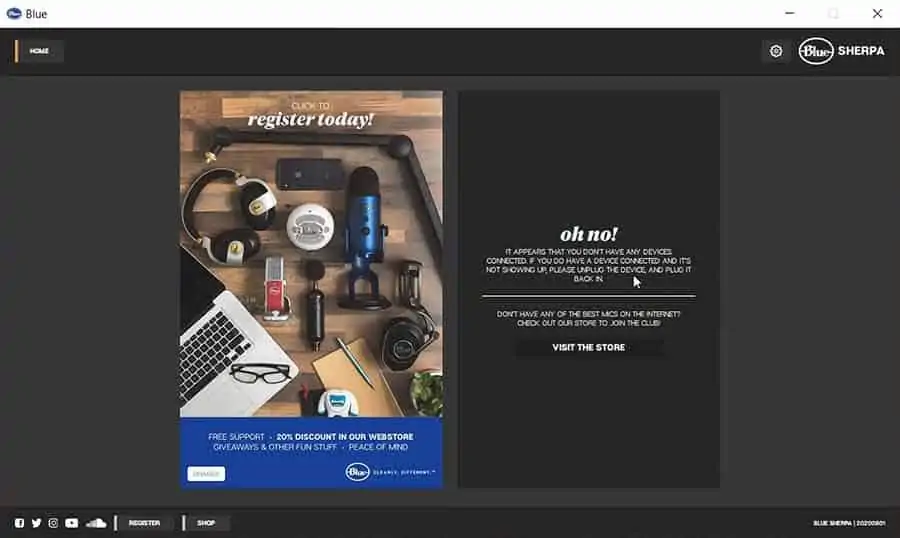
However, if your Blue Yeti is connected but it’s not showing up, the message prompts you to unplug the device, and plug it in again.
If when you plug the Yeti back in you still see the “Oh no!” message, it means “Houston, we have a problem”.
Although the Blue Sherpa app is not detecting your Yeti, if you go into the Windows 10 Sound Settings, you’ll probably see that the Yeti is available as an input device. It might even be selected and works within your recording apps.
So, what do you do when Blue Sherpa is not detecting your Yeti?
The solution isn’t very difficult. You’ll need to go into your computer’s Device Manager and delete the Blue Yeti as an audio device. So, this is what you need to do so that Blue Sherpa detects your Yeti.
Step 1: Make sure that the Blue Yeti is connected to a USB port on your computer. You should see the red LED on the mic’s mute button lit up.
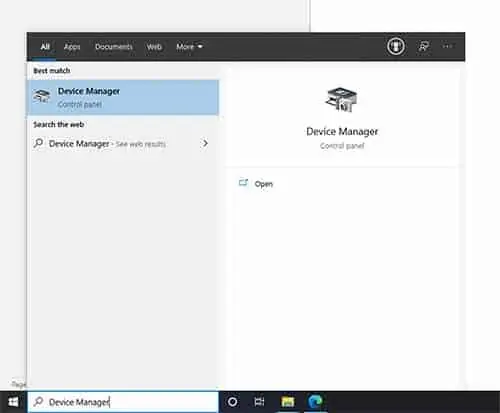
Step 2: Type “Device Manager” into the Windows search bar. You’ll see Device Manager Control Panel as the best match. Click on the entry to open your device manager.
Step 3: With the Device Manager open, expand Audio inputs and outputs. You should see Yeti Stereo Microphone listed as both a microphone and speakers.
Left click on each Blue Yeti device and choose “Uninstall”.
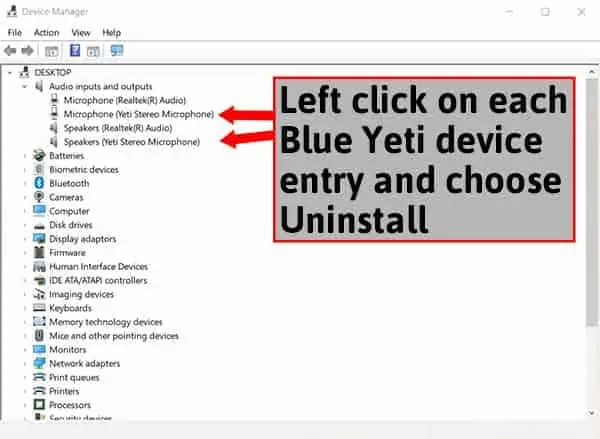
Step 4: Unplug the Yeti’s USB cable from your computer.
Step 5: Power down your computer and wait a few seconds before rebooting your PC.
Step 6: Connect the Blue Yeti microphone to the PC and wait a few seconds for Windows to install the microphone.
Step 7: Open the Blue Sherpa app. You should see the Sherpa Home screen with the Yeti detected and displayed as the connected device.
You can now go ahead and click on the Yeti tab to access the microphone’s control sliders.
You might also like…
- How to connect and use a Blue Yeti to an iPhone or iPad

- Do I need Blue Yeti drivers for Windows 10
- How to setup and use a Blue Yeti microphone
- How to stop Blue Yeti from picking up keyboard sound
- Best microphone for better Zoom calls
- Best On-Camera Mics: V-Mic D3 a good microphone for vlogging?
- Microphone Fuzzy: Make a DIY Dead Cat Windscreen
- Stop Audio Popping: How to use a microphone pop filter
Tosh Lubek runs an audio and video production business in the UK and has been using the Canon EOS R since it was released in the Autumn of 2018. He has used the camera to shoot TV commercials for Sky TV, promotional business videos, videos of events and functions, and YouTube creator content. He has also won international awards for his advertising and promotional work. You can meet him by visiting his “video booth” at HashTag business events across the country.
Recent Posts
Most people use sandbags the wrong way. Here’s how to hang them properly on a light stand for maximum stability and safety — plus what to fill them with.
You're Using the Canon RF 50mm f/1.8 WRONG! Here’s How to Fix It
If you’ve recently picked up the Canon RF 50mm f/1.8 STM—affectionately known as the Nifty Fifty—you might be confused by that strange switch on the side of the lens. It doesn’t say AF/MF...