
DIY Video Studio is supported by its readers. Please assume links on this site are affiliate links, and that I get commissions for purchases made through these links. As an Amazon Associate, I earn from qualifying purchases. Thank you if you use any of the links.
If you’ve bought a Blue Yeti condenser USB microphone it’s probably because you want to do game streaming, podcasting, voiceovers, YouTube vlogs, or even make conference calls. Fortunately, it’s quick and easy to set up your Blue Yeti condenser USB microphone.
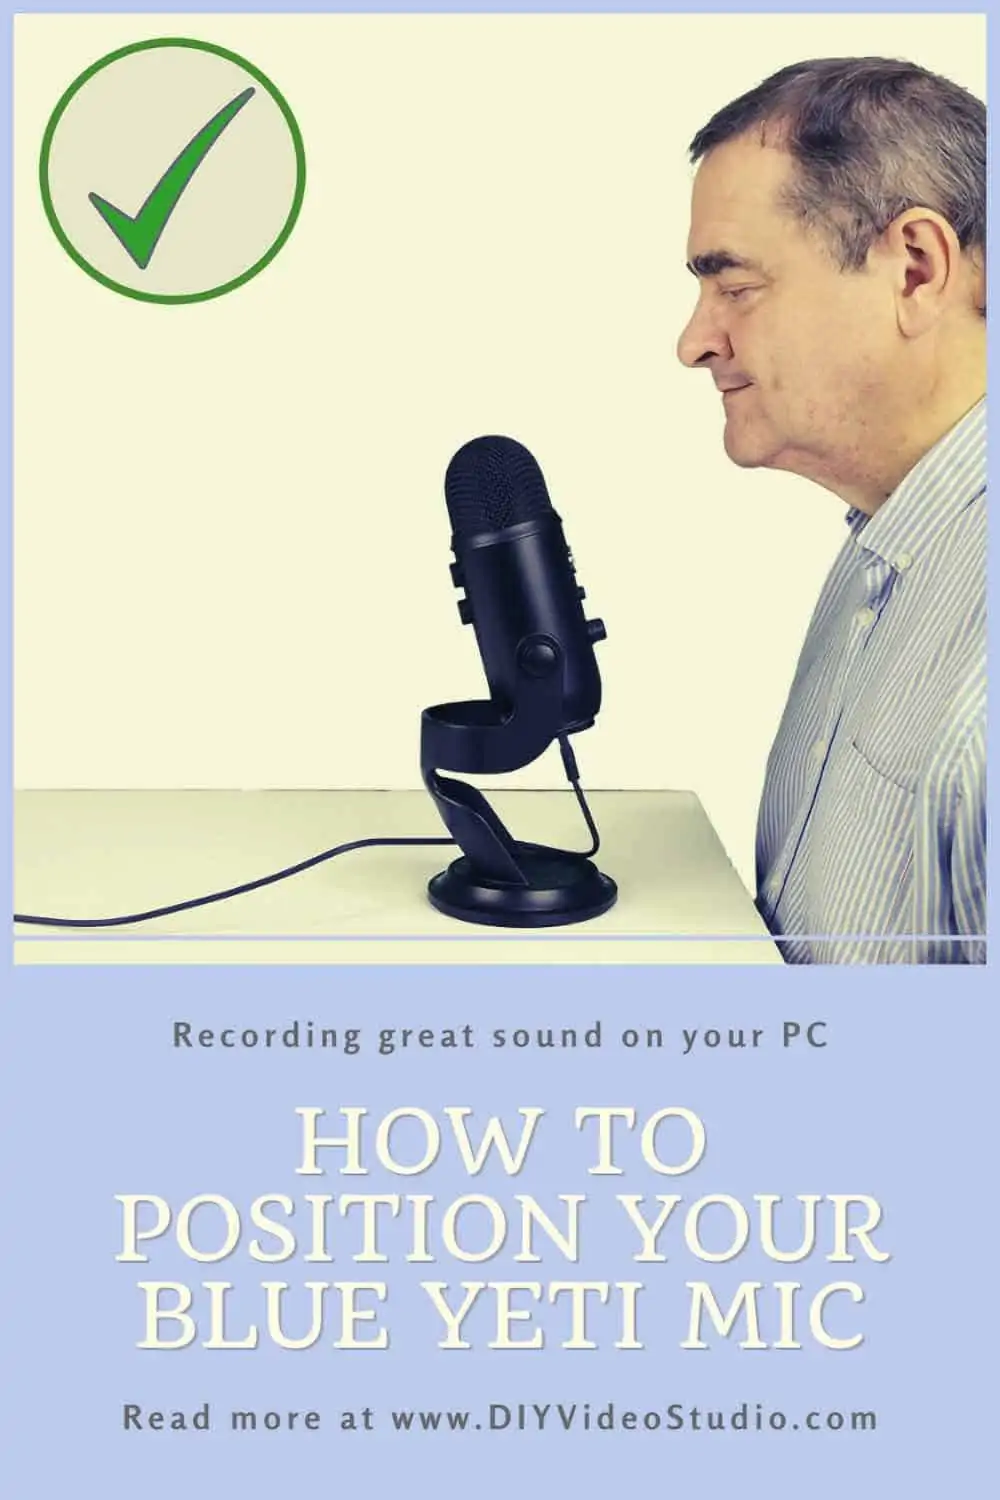
Before you start recording you should know how to position the Blue Yeti mic. This includes using a room that is noise and echo-free, positioning the Yeti in front of you, and at about 4 – 10-inches from your mouth. Ideally, your Blue Yeti should also be on a boom mic stand so it is not in direct contact with your desk.
There’s more to setting up your microphone, so I’ll go through the details of what you need to know and what you need to do. Once you’ve made the changes, you’ll be recording much better-quality audio with your Blue Yeti USB condenser microphone.


Last update on 2025-10-11 / Affiliate links / Images from Amazon Product Advertising API
Blue Yeti setup instructions
Setup your Blue Yeti on the desktop stand
When your Yeti arrives, the box will contain four items. These are…
- 1x Yeti metal desktop stand
- 1x Blue Yeti mic
- 2x Yeti set screws
- 1x USB cable
Unless you are planning to use a boom arm mic stand, or boom scissor mic stand you will want to fit the Blue Yeti to the included desktop stand.
The desktop microphone stand is all metal and heavy. It’s meant to be that way so that your Blue Yeti microphone has a good solid base to rest on and not wobble about.
The Yeti has two threaded mounting holes, one on each side of the microphone body. Linie these up with the matching holes in the “arms” of the desktop stand. Then insert and screw in each set screw while holding the mic with your other hand. If you find it awkward you may need someone to help.
Once the first screw is in, don’t tighten all the way. Move on to the set screw on the other side. When both set screws are in, tilt the Yeti to the required angle and then tighten off each of the set screws.
Connect to your Blue Yeti to a Windows PC
Use the included USB cable to connect the Yeti to your PC. The Yeti has a USB-mini socket on the base of the microphone body. Now connect the other end of the USB cable into a USB port on your PC. Since the Blue Yeti is a Plug’n’Play USB microphone your computer will automatically setup the microphone for you. However, your PC may already have other microphones installed, so you may need to select the Blue Yeti as your default audio recording and playback device.
Setup the Blue Yeti as your default audio device
You can select the Yeti as your default recording and playback device in several ways on Windows. I’ll show you just one way since it is similar in Windows 7.8.1 and 10. Although I assume most people will be using Windows 10.
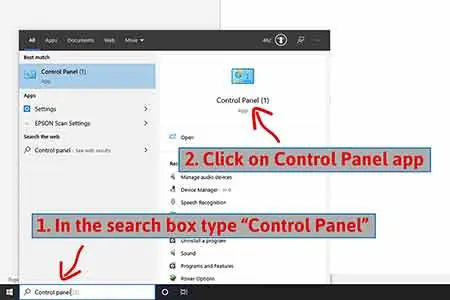
Step 1. In the Windows search bar, next to the Windows icon, type “Control Panel”. Then click on the Control Panel app entry at the top of the pop-up menu.
Step 2. When the Control Panel opens click on Hardware and Sound.

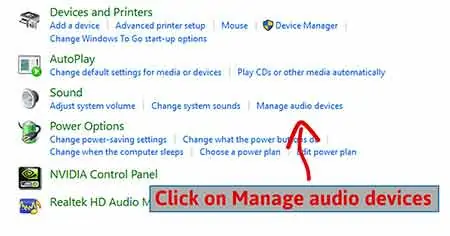
Step 3. In Hardware and sound look to the right of the speaker icon and click on Manage audio devices or just click on the speaker icon.
Step 4. When the Sound window opens click on the Recording tab, scroll down, and click on Microphone: Yeti Stereo Microphone.
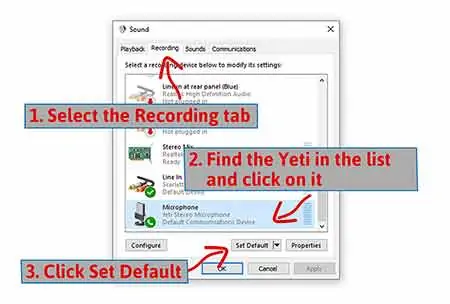
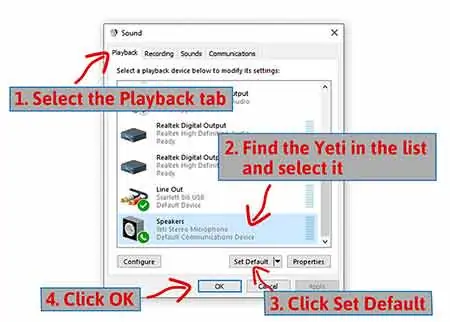
Step 5. Now click on the Playback tab, scroll down and click on Speakers: Yeti Stereo Microphone.
Setup headphones to listen
If you followed the previous steps, you Yeti will not only be your PC’s audio input but it’s also the audio output. You will have noticed in the last setup steps that Windows also sees the Yeti as speakers. This is because the Yeti is effectively a soundcard for your computer.
If you look at the bottom of the microphone, you’ll see not just the USB cable socket but also a 3.5mm headphone socket. Plug your headphones into the socket and you’ll not only hear the microphone output from the Yeti but also the sounds from your PC.
So, if you’re playing music, watching a video, or playing a game, you’ll hear the audio from those in your headphones along with the sound of your voice. That’s something I think is cool.
Where to position your Blue Yeti for good recordings
You’ve got the Yeti setup in its desktop stand and connected to your computer, so you’re ready to start recording. Unfortunately, you’re not.
Even if you had the most expensive studio microphone in the world if you use it in the wrong place your audio is going to sound like garbage. There’s more to recording good audio than just your recording equipment. You need to consider where to position your Blue Yeti, and that means thinking about the space in which you are recording.
There are two things that will influence your sound quality. 1: Background noise, and 2: Room echo or reverberation.
Background noise relates to how quiet your room is. That’s not just hearing noisy neighbors or your mom or kids from the kitchen. Also, consider sounds in your room. Can you turn off or move away from noisy fans and aircon? If you have a choice of rooms, one facing the street and one facing the backyard, go for the one that has less noise from outside.
Simple things like closing windows and doors can make a significant difference too. If you need excellent sound quality you might even consider installing soundproofing, although that can be an expensive step.
Room echoes, or reverberation, is something you’ll be more aware of in an empty room. I go into detail about room echo in my article, Why Does Sound Echo in an Empty Room![]() . However, you’ll notice the problem more in an empty room and in rooms that have wood or laminate floors. I give a full account of what you can do about the problem in your home in my article, How to reduce echoes in a room cheaply
. However, you’ll notice the problem more in an empty room and in rooms that have wood or laminate floors. I give a full account of what you can do about the problem in your home in my article, How to reduce echoes in a room cheaply![]() .
.
Under normal conditions, you may not notice background sounds like neighbors, lawnmowers, birdsong, aircon, and computer fans. However, as soon as you put on headphones it’s remarkable how loud these sounds appear.
The thing is, our brains do a fantastic job of ignoring sounds that are unimportant. Under normal conditions, we filter those out and focus on the sounds that we’re interested in. Unfortunately, microphones aren’t quite the same. They don’t discriminate and will faithfully pick up the sound in the room. So, avoid rooms with noticeable reverberation if you’re recording a voiceover. However, reverberation may be just what you want if you’re recording a vocal or instrument.
If you record audio with reverberation, it can be difficult to remove. There are some post-processing techniques and plug-ins you can use to reduce reverb, but it can be tricky, and the results can be variable.
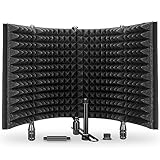
Whether you need to deal with light background noise or room reverberation you can improve your recordings a little by using a portable isolation shield.
The isolation shield is made of a perforated metal back, with the inner side filled with sound-absorbing cotton and/or high-density acoustic foam. The isolation shield goes around the back and sides of the microphone, reducing reflections and deadening background sounds.
I like the Aokeo microphone isolation shield since it is suitable for the Blue Yeti or any other similar condenser microphone. With the Yeti, the Aokeo isolation shield works whether you leave the Yeti on its desktop stand or hang the microphone from a Blue Compas boom arm stand and Radius III shock mount. It measures 12.1” x 10.8” x 5.5”.
- ♪【Eliminate Interference】♪: The inner side of the microphone isolation shield is made of...
- ♪【Flexiblity & Convenience】♪: The folding panel design features enables angle adjustments,...
- ♪【Durability】♪: Constructed out of premium steel with high-quality screws to ensure...
- ♪【Versatility】♪: The microphone isolation shield can be fixed on a countertop or tabletop,...
Last update on 2025-10-11 / Affiliate links / Images from Amazon Product Advertising API
How to position your Blue Yeti mic to minimize noise
The next thing to consider is how you position your Blue Yeti.
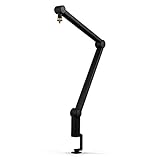
Although that heavy metal desktop stand looks nice, it’s in direct contact with your desk. So, any vibrations or bumps will be transmitted straight through to the Blue Yeti. It would be far better to get the microphone off the desk and hang it from a microphone boom arm or boom scissor arm.
The Blue Compass boom scissor stand is made for the Blue Yeti. It clamps onto the side of your desk and allows you to locate the microphone anywhere you want in front of your mouth.
However, don’t mount the Yeti directly on the boom arm. You want to isolate the mic from any sounds transmitted through the desk and arm. That’s why you fit the Radius III shock mount on the end of the boom arm and then attach the Yeti. The rubber banding in the shock mount dampens the vibrations, allowing you to record cleaner-sounding audio.
- Broadcast studio-grade design with enclosed aluminum construction and internal springs.
- Hidden channel cable management system for sophisticated on-camera looks.
- Hand-tightened friction hinges for smooth, quiet operation.
- 32-inch reach and 360-degree rotation.
Last update on 2025-10-11 / Affiliate links / Images from Amazon Product Advertising API

- Blue Compass PREMIUM MICROPHONE BOOM ARM is not included and sold separately.
- Blue Radius III custom shockmount is designed especially for Yeti and Yeti Pro Microphones,...
- Elevate your audio recordings with Radius III custom shockmount to shield your microphone from...
- This universal mic shockmount cradles the mic in style and features a new streamlined, lightweight...
Last update on 2025-10-11 / Affiliate links / Images from Amazon Product Advertising API
Choose the Cardioid Microphone polar pattern
The Blue offers a choice of four microphone patterns or modes. For more details on them, you can read my article What are the best Blue Yeti microphone patterns to use. You can use those patterns to improve the sound you’ll record. If you’re a game streamer, joining a Zoom call, or recording a voiceover, the pattern to choose is cardioid. That’s the one that looks a little like a heart.
The cardioid pattern rejects sound from the rear, picks up sound sort of OK from the sides, but records crisp and clear sound when you are in front of the microphone. With the Blue Yeti, which means speaking into the same side as the Blue logo.
Using the cardioid pattern means you can minimize background noise by keeping the noise behind the microphone, where the Yeti rejects sound.
Use your Blue Yeti sideways, not from the top
You’ve probably seen microphones being used many times on television or in the press. The singer or speaker typically holds the microphone and speaks or sings into the top of the mic. When you see a press conference or a Presidential address the podium mics work the same way, it’s the top of the microphone that you speak into. These microphones are known as front-address microphones because you “address them” from the front.
However, not all mics are the same. There’s also a type of microphone that you don’t speak into the top. These are called side-address microphones and you speak, or address them, from the side. Your Blue Yeti is such a microphone.

Since the Blue Yeti is a side-address mic you need to speak (or sing) into the side and not the top. When you speak into the side, that’s where you will sound the clearest and best.
Earlier on I mentioned that using the cardioid mic pattern will mean any sound sources behind the Blue Yeti will tend to be rejected. And that sources in front of the mic will be crisp and clear. That tells you where you should be in relation to the Yeti. Make sure you are facing the front of the microphone when using the cardioid pattern.
How close should you be to your Blue Yeti
Inexperienced people often assume they can put their Yeti off to the side, maybe beside their computer monitor, and everything will sound great. After their first recording, they start searching online because they’re concerned that their Yeti is too noisy.
The Blue Yeti is NOT a particularly noisy microphone. Nor is it too sensitive. Like any other condenser microphone, if you have it at the wrong distance from your mouth, the mic will pick up both you and any background noise.
For best results, your mouth should be about 4 – 10-inches from the Yeti.
FOR BETTER AUDIO: Get close-up and personal with your Yeti!
The closer you are to the Yeti, the lower you can turn the Mic Gain. As you turn down the gain, you’ll be making any background sounds appear quieter.
Of course, the reverse is also true. If you position your Yeti too far away, you will have to turn up the Mic Gain so that you can be heard. In doing so, yes you will make yourself louder, but you’ll also make any background noise appear louder.
So, the solution, as I said above, is to get closer to your Yeti.
Blue Yeti Manuals
If you’re looking for the Blue Yeti manuals you can access them using the links below. The manuals were posted by Blue Microphones and not me, so I cannot guarantee how long these files will be available online.
Download the Blue Yeti Quick Start Guide![]()
Download the Yeti Manual![]()
You might also like…
- How to connect and use a Blue Yeti to an iPhone or iPad
- Blue Sherpa Software: How to download, install and use with Yeti
- What are the best Blue Yeti microphone patterns to use
- Do I need Blue Yeti drivers for Windows 10
- How to setup and use a Blue Yeti microphone
- How to stop Blue Yeti from picking up keyboard sound
- Best microphone for better Zoom calls
- Stop Audio Popping: How to use a microphone pop filter

Tosh Lubek runs an audio and video production business in the UK and has been using the Canon EOS R since it was released in the Autumn of 2018. He has used the camera to shoot TV commercials for Sky TV, promotional business videos, videos of events and functions, and YouTube creator content. He has also won international awards for his advertising and promotional work. You can meet him by visiting his “video booth” at HashTag business events across the country.
Recent Posts
Most people use sandbags the wrong way. Here’s how to hang them properly on a light stand for maximum stability and safety — plus what to fill them with.
You're Using the Canon RF 50mm f/1.8 WRONG! Here’s How to Fix It
If you’ve recently picked up the Canon RF 50mm f/1.8 STM—affectionately known as the Nifty Fifty—you might be confused by that strange switch on the side of the lens. It doesn’t say AF/MF...