

DIY Video Studio is supported by its readers. Please assume links on this site are affiliate links or ads, and that I get commissions for purchases made through these links. As an Amazon Associate, I earn from qualifying purchases. Thank you if you use any of the links.
As you probably already know, Zoom is a very convenient tool that allows people to continue work or school despite the pandemic. If you have recorded a Zoom recording you probably wonder how to access the videos. Also, if you notice that your Zoom recordings are an unknown file type, it is because you have to convert them to mp4.
Thankfully, it is a fairly simple process that does not require any other programs. This article will show you how to convert Zoom recordings to mp4 files, in fact, we describe 3 methods you can use. But to record a meeting, you have to be the host or be given permission to do it.

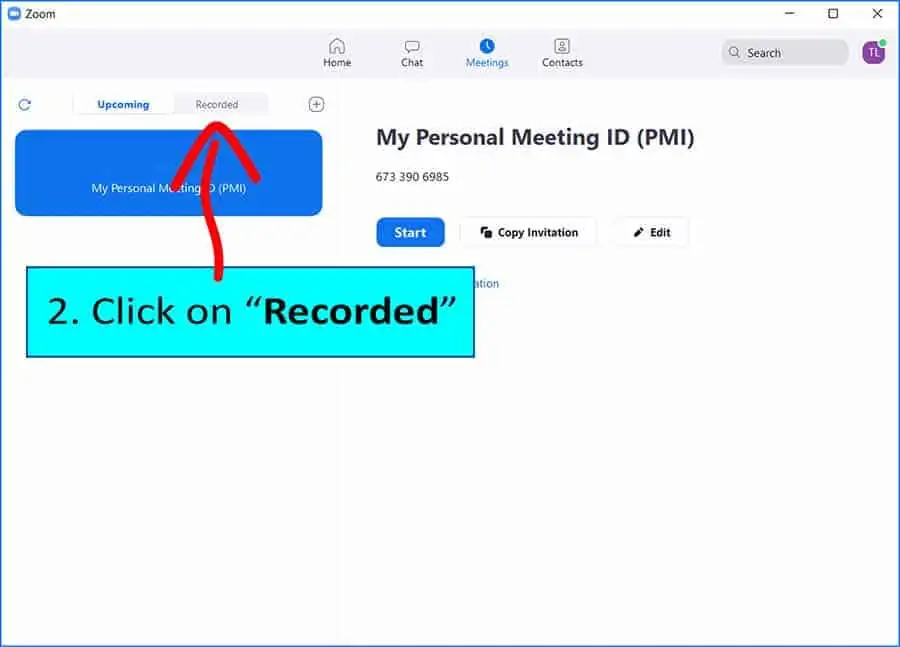
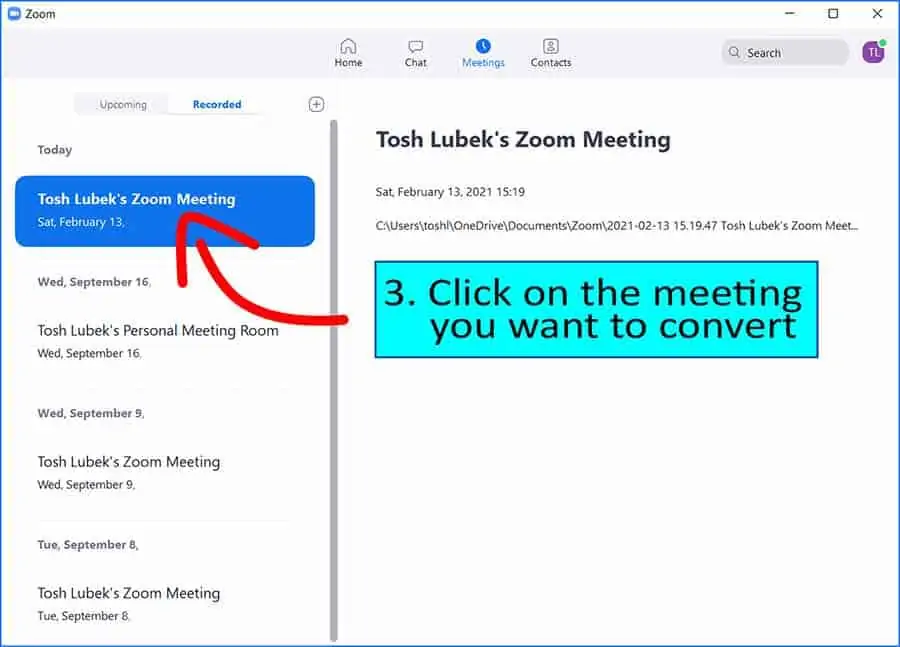
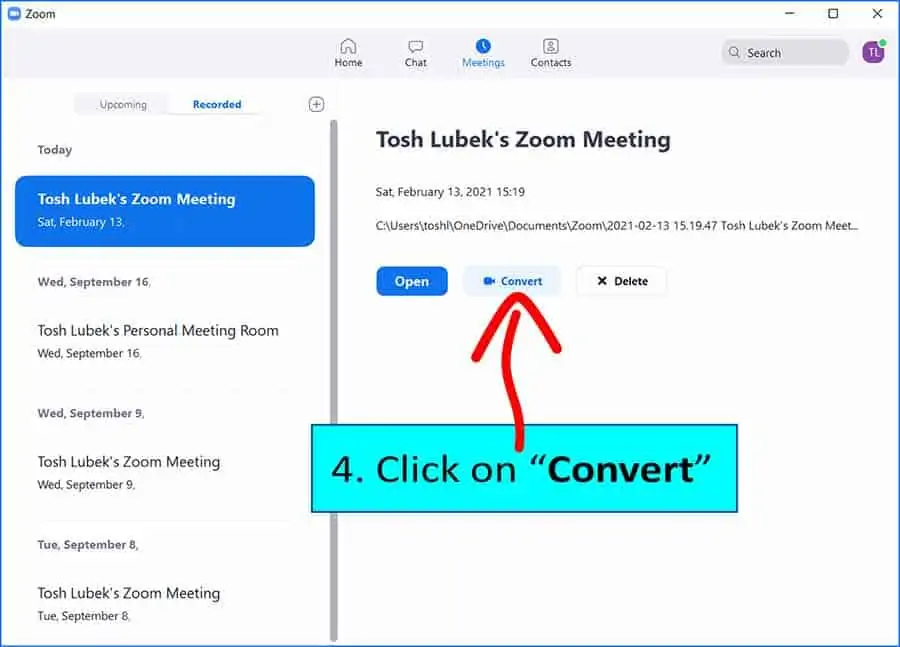
Zoom automatically converts the raw video to an mp4 file at the end of a meeting. But if the process is interrupted the video will be saved as a .zoom file. To convert a Zoom recording manually, open Zoom and click on “Meetings”, then “Recorded”, click the recording you wish to convert, finally click on ”Convert”.
Looking to upgrade your video? We recommend these webcams


Last update on 2025-10-11 / Affiliate links / Images from Amazon Product Advertising API
Create the Recording
You will first have to create the recording by going into the Zoom meeting and clicking on Record. Zoom allows you to choose whether you want to store the recordings on your computer or the cloud. Both options have some benefits and drawbacks.
If you want to store it on your computer, you want to convert the files into mp4 because they take up little space without losing quality. If you choose to go with cloud storage, you will need a Kaltura account to store the files.
Access the Recording
You can easily find your Zoom recordings by going to the Documents folder on your computer and opening the Zoom folder. Alternatively, copy and paste the following address: C:\Users\USERNAME\Documents but change the “USERNAME” into the computer username that you use.
The local Zoom folders have the date, time, and meeting name, which is pretty useful if you want to organize all your videos.
Hint: You should make a back up of all your recordings. The recordings have both the video file and the chat log in text form.
Converting the Recording
Method 1
Converting a raw Zoom recording is not difficult. This happens when a meeting gets interrupted or ended abruptly without giving Zoom time to convert the raw file to mp4. The automatic process is great and convenient most of the time. However, when you don’t have time to let the program do its job, fear not. You can always do it later and here’s how:
Step 1: Open Zoom
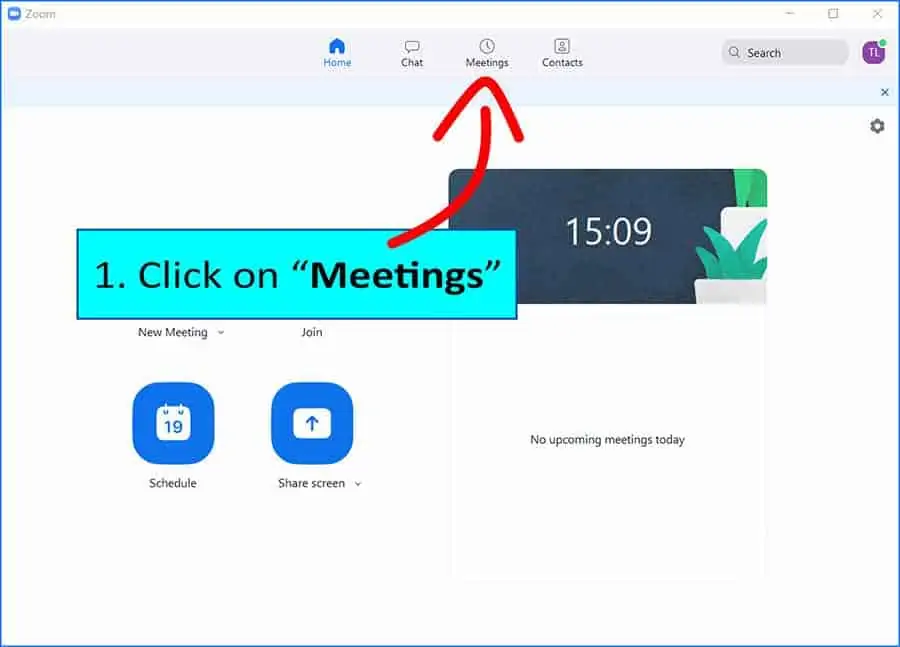
Step 2: Go to Meetings > Recorded
Step 3: Find the recording you wish to convert to mp4
Step 4: Click on Convert
Step5: If necessary you can stop the conversion
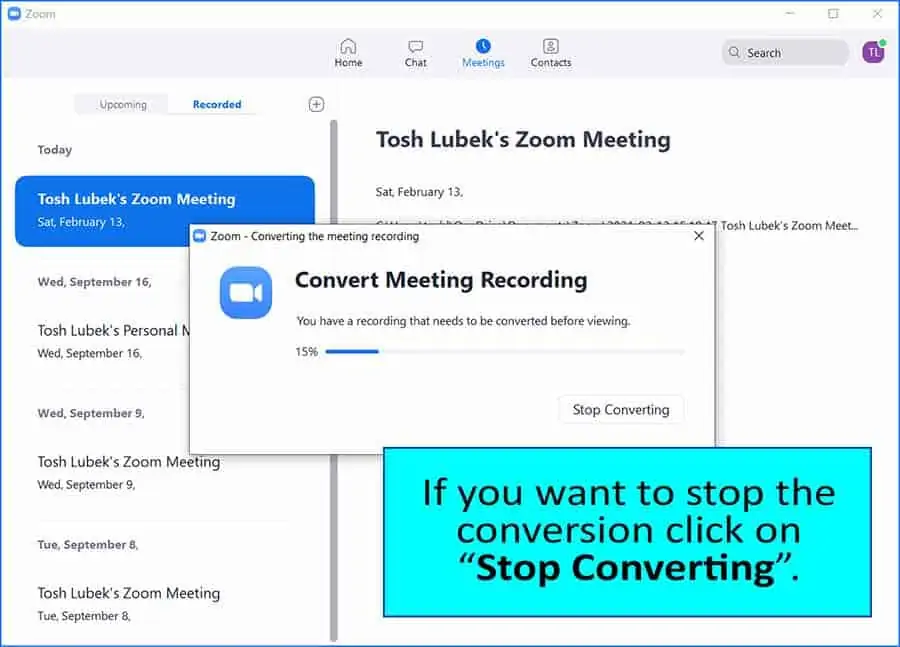
You won’t have to do this most of the time because Zoom converts all files by default even if you don’t click on it. This makes Zoom a very convenient program for teachers because they have evidence of attendance and how the class went.
Method 2
If you are having problems with Zoom, it may be because it has not been updated. Programs require regular updates because of compatibility issues and to make sure that everything works as intended. Here is a second way to convert the recording to an mp4 video:
- Find the recording on your computer in Documents
- Double click on a file that starts with “double_click”
If it doesn’t work immediately, you have to update Zoom. And if you can’t update or if the file is still determined to be cumbersome, consider reinstalling Zoom to make it work.
Method 3
Another possible way to convert it involves a slightly more complex method. Here is a step-by-step on how it’s done:
- Open Zoom
- Open the folder in which the recording you wish to convert is located in Documents
- Start a new meeting and turn on recording but do not stop or pause it.
- While recording, open the newly created folder of the ongoing meeting in a separate window
- Copy the recording that you wish to convert and paste it into the new folder of the ongoing meeting
- Stop recording and it should automatically convert the recording. Alternatively, you may have to click on convert
This is pretty much all there is to it. Zoom has made it very simple and very convenient to convert the recordings to mp4. You don’t have to and should not install any third-party apps that may harm your computer. Only do that if you have tried all the methods from above and it still doesn’t work.
In case you are still experiencing problems with converting the mp4 file, there are a few troubleshooting steps that you can follow.
Looking to upgrade your audio? We recommend these USB microphones


Last update on 2026-03-13 / Affiliate links / Images from Amazon Product Advertising API
Troubleshooting
Not Enough Storage Space
The error code for this is [Error Code 614] in the Zoom program. This happens when the disk where Zoom stores recordings is full. The standard place for storage is the C:\ disk. You can easily fix all your storage problems by either buying more space or deleting unnecessary files.
If you use Zoom regularly, you probably want to get a cheaper, slower hard disk that you can use only for Zoom recordings. If you already have another hard disk, you can change the destination folder by following these steps:
- Open Zoom
- Go to Settings (cogwheel icon in the top right)
- Go to the Recording tab
- You will see “Store my recording at:” and “Change” next to it.
- Click on “Change” and choose your destination folder. You can go to “This PC” and scroll down until you see your SSD or HDD that you want to write to. Remember to make a new folder for Zoom so that you can find it later.
When it comes to cleaning up your disk, the best and easiest method is to use Windows’ built-in Disk Cleanup tool. Avoid third-party programs and apps because they often make your computer slower. Here is a step-by-step:
- Go to Start
- Type “Disk Cleanup” and open it. Alternatively, you can find it in the Control Panel
- Choose the drive that you want to clean up
- Choose which files you want to keep and which you want to delete. You may want to clean up system files too because these can take up a lot of space on your C:\ drive and they are mostly redundant files
- Press “OK” and wait for the program to finish and you will now have more space for your Zoom recordings
Invalid Path
Another very common issue is the invalid working path or folder issue. This is tied to the first one because it happens when the folder that you selected is not a valid one or the path string to it isn’t. You just have to change the destination path to a valid folder in the Zoom application. You can find the steps to do it above.
Common Issues
There are a few more reasons why Zoom stops converting the raw file to mp4. Unfortunately, some of these result in corrupted files that can’t be converted, but some of these are reversible. For example, if you change the file name of a “double_click” file, it may get corrupted and not converted as it should.
Conversely, if you change the file name back into its original state, it can restore the file. Another issue that is similar to this one is when you turn off or close your laptop while Zoom is still converting the file, it can result in a corrupted file. Thankfully, Zoom usually stops the conversion at sudden shutdowns, so it’s not a common issue.
There may also be some errors that show up as “Internal errors”. These errors are most often caused by the mismatch of the program and your computer. These are called logic issues or invalid commands that are not your fault. Try all the possible ways as mentioned above if you get these errors if you want to save your recording.
Conclusion
Zoom is a fantastic platform that allows people to continue work and education from home. It is also great that you can record and store all Zoom calls through the app and keep the chat too. The default conversion that happens when you allow Zoom to automatically convert the raw file to .mp4 is very convenient and economic.
For example, you can upload the file to YouTube without losing too much quality. And even longer calls will only take a few minutes to upload. Unfortunately, sometimes things happen that make previous recordings inaccessible. But don’t worry, you can save the file by following the steps from the article.
Make sure that you always let Zoom finish converting the file when you end your recording. If you are in a hurry, pause it and then convert the file when you have more time. It usually won’t get corrupt, even when the computer is turned off due to a power outage or some similar issue.
The first thing that you should always do with Zoom is to update the program. If it still doesn’t work, follow all the other steps. If you are getting an unknown error code, you can always Google it and see the reason behind it.
Some of them are quite easy to fix, like the Error Code 614 for storage. You just need to make enough space for Zoom recordings because the raw files that are made temporarily during recordings can get pretty large before they get converted to mp4.
Tosh Lubek runs an audio and video production business in the UK and has been using the Canon EOS R since it was released in the Autumn of 2018. He has used the camera to shoot TV commercials for Sky TV, promotional business videos, videos of events and functions, and YouTube creator content. He has also won international awards for his advertising and promotional work. You can meet him by visiting his “video booth” at HashTag business events across the country.
Recent Posts
Most people use sandbags the wrong way. Here’s how to hang them properly on a light stand for maximum stability and safety — plus what to fill them with.
You're Using the Canon RF 50mm f/1.8 WRONG! Here’s How to Fix It
If you’ve recently picked up the Canon RF 50mm f/1.8 STM—affectionately known as the Nifty Fifty—you might be confused by that strange switch on the side of the lens. It doesn’t say AF/MF...