
DIY Video Studio is supported by its readers who use the affiliate links or ads on this site. As an Amazon Associate, I earn from qualifying purchases. Thank your support if you use any of the links.
Author: Tosh Lubek Published: 30 November 2023
If your XLR microphone recordings on a Zoom H5 are producing recordings where your voice is only on the left or right side, don’t worry. This article will show you how to record one XLR input to either a dual mono file or a true one-channel mono track.
Because most people who get the Zoom H5 recorder will initially record with the built-in XY microphones, the H5 comes set to Stereo File mode. That means that each time you press the record button, the H5 will record a stereo file, regardless of whether you use the built-in microphones or XLR Inputs 1 & 2.
That’s perfect if you’re using the built-in microphones or have two XLR microphones plugged into Inputs 1 & 2. In both cases, the audio from the left mic will be recorded to the left track, and the audio from the right mic will be recorded to the right track.
The problem occurs when you’re only using one XLR microphone, as you might do when recording your own voice or if you’re interviewing someone and sharing one handheld microphone. If the microphone is plugged into Input 1 of the Zoom H5 recorder, the audio will only appear on the left channel of a stereo file. This is demonstrated in the image below.
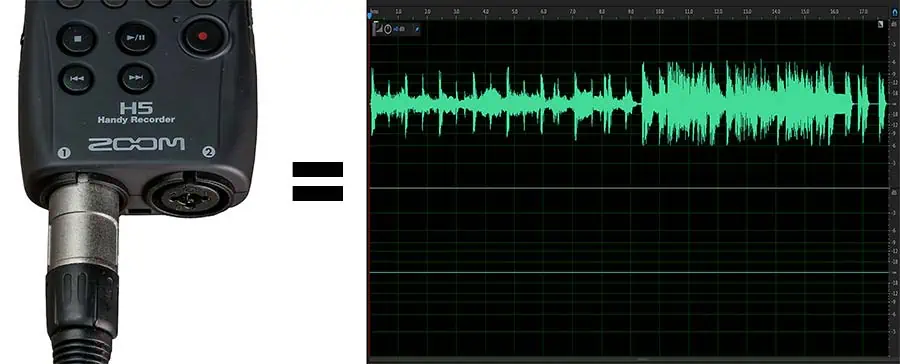
But if the microphone is plugged into Input 2, your audio will only appear on the right channel. This will result in the opposite of the images above.
Fortunately, I have three ways to ensure your voice sounds as if it’s in the middle of the recording and not off to one side.
SOLUTION 1: Use an XLR Y-Splitter cable to produce a dual mono file
If you’re uncomfortable with making changes in the menu settings of your H5 recorder, this method is for you. You will need an XLR Y-Splitter cable, but it’s not very expensive and I’ve got a link to the one I use just below. The Y-Splitter cable has a single female XLR connecter at one end, and two male XLR connectors at the other end. Plug the single XLR connector into the microphone, then plug the dual XLR connectors into Inputs 1 & 2 on the Zoom H5.

Then, with the recorder in stereo file mode, press the 1 & 2 track buttons to activate those tracks. Finally, press the record button to start recording.
You’ll end up with a stereo file with the same audio on both left and right. In other words, a dual mono file. To the listener, if listening on headphones or stereo speakers, your voice will appear as if it’s in the middle.
If you would like to use this method, I have found a suitable Y-Splitter cable on Amazon and included details below.

- 3 Pin XLR female to Dual XLR male Y Cable, This Y-cable is designed to connect an XLR output to two…
- Compatible with equipments with 3-pin XLR connectors such as shotgun microphones, studio…
- Nickel Plated Connectors With Metal Serviceable Ends, OFC spiral shields for effective EMI and RFI…
- Balanced Connection – pin 2 is connected to pin 2, pin 3 is connected to pin 3, pin 1 is connected…
Last update on 2025-10-20 / Affiliate links / Images from Amazon Product Advertising API
QUICK TIP: The length of the Y-Splitter cable is relatively short. To extend this, you can use a standard XLR cable between the microphone and the Y-Splitter.
SOLUTION 2: Let the H5 Create a Mono Mix file
The second solution uses the technology already in the H5 recorder to create a dual mono file. With this approach, there’s no need to buy any additional cables or accessories but you will need to make some changes in the menu.
Press the Menu button on the side of the H5 recorder to open the MENU screen. Then scroll down and select IN/OUT.

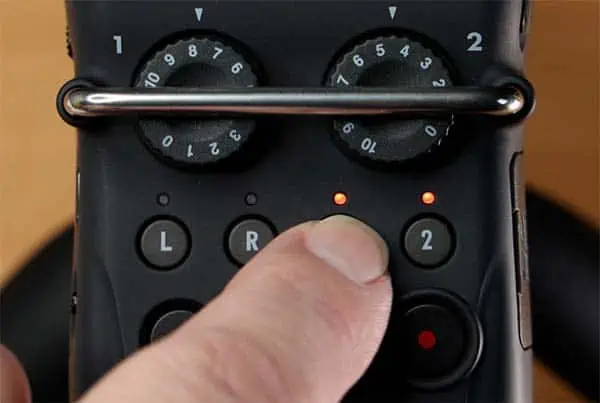
Once the INPUT/OUTPUT menu screen opens, scroll down and select In1/2 Mono Mix. Be sure to select the correct option since you will see four options that all start with “In1/2”.
When in the In1/2 MONO MIX screen select ON. You can now exit the menu system with a couple of presses of the menu button.
You’ll now be in the recording screen, but when selecting the active tracks you will only need to press one of the two-track buttons because tracks 1 and 2 are now linked. So, pressing track button 1 will also make track 2 active, as you can see in the images because both red LEDs will light up.
Finally, press the record button to start recording. The Zoom H5 will create a dual mono track, as was the case in the first solution with the Y-Splitter cable.
SOLUTION 3: Create a Mono file in Multi file Record Mode
This final method creates a true mono file with just one channel by changing from Stereo file to multi-file record mode.
Press the menu button on the side of the recorder to open the MENU screen, then scroll down and select the REC MODE option. This will open the RECORD MODE screen where you need to select MULTI FILE. After you’ve selected MULTI FILE, the Zoom H5 recorder will automatically exit the menu system and return to the recording screen.
You’ll now see that the display has changed. Instead of two recording level meters, there are four. Those labeled L and R refer to the two built-in XY microphones. The ones labeled 1 and 2 refer to Inputs 1 and 2, i.e., the two XLR inputs.
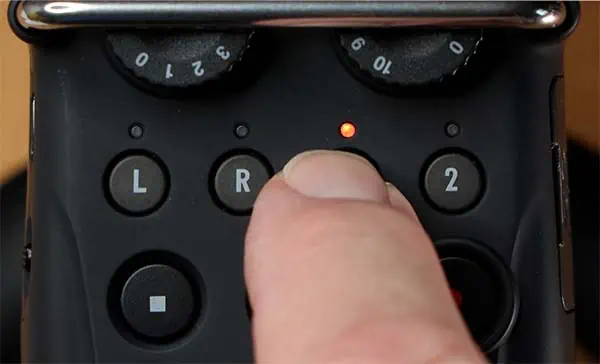
Plug an XLR microphone into Input 1 and activate Input 1 channel by pressing track button 1. You should see that the red LED above track button 1 lights up, but the other track lights should be off.
Finally, press the record button to start your recording.
With this setup, the H5 recorder will create a single file that consists of one track. In other words, a single mono file.
Assuming you started with a newly formatted SD card, and you’ve chosen to create wav format recordings, the location and name of the file will be:
MULTI > FOLDER01 > ZOOM0001 > ZOOM0001_Tr1.wav.
If you navigate to that location, you will see that only one file was recorded despite the recorder being in Multi File record mode.
Because we only made Track 1 active, the other inputs were not recorded, and no files were created for those tracks. Therefore, this method does not potentially fill up your SD card with unwanted audio files that are blank.
The other advantage of this method is that by creating a mono file with one track, the audio file size will be half that of the dual mono files created in methods 1 & 2. Therefore, this solution is potentially the best way to record with one XLR microphone onto the Zoom H5 recorder.
Watch the Video
I demonstrate these three solutions to ensure your voice isn’t only on one side of your recording in this video.
YOUTUBE VIDEO COMING SOON, CHECK BACK AT THE START OF DECEMBER
Last update on 2025-10-20 / Affiliate links / Images from Amazon Product Advertising API
Final Thoughts
In this article, I’ve presented three ways to create mono recordings with one XLR microphone and a Zoom H5 Handy recorder that are NOT one-sided. The method included using an XLR Y-Splitter cable, activating the In1/2 Mono Mix function, and using the MULTI FILE recording mode.
The first two solutions will produce audio files that are dual mono, while the third method will produce true mono files with a single track.
Once you have finished your recording using the In1/2 MONO MIX method, consider deactivating the function, otherwise, this may lead to confusion when you next record with two XLR microphones. However, if when recording with two XLR microphones you don’t want to record onto separate tracks, you can leave In1/2 MONO MIX active. This will result in both voices appearing in the middle of a stereo mix rather than extreme left and right.
In this article, I have assumed you will be using a dynamic microphone. But if you will be using a condenser microphone that requires external phantom power, you can turn on phantom power in the Zoom H5 menu.
You might also like…
- How to record with 4 mics on Zoom H4n/H4n Pro/H5
- Why You Need a Zoom H5 Recorder for Voiceovers and Video
- How to Use Back Up Record on Zoom H5 to Never Clip Audio
- Use Zoom H5 as an External Mic & Audio Interface on an Android phone
- How to Reduce Handling Noise on Your Zoom Handy Recorder
- How To Record Dual Mono or One-Track Mono Audio on Zoom H5
Social Media Request
If you found this article helpful, please share it. A few seconds of your time will make a big difference in helping this website grow. The share buttons are below the “About Author” section.
Thanks. 🙂

About the author: Tosh Lubek is a multi-award-winning broadcaster, writer, and video producer, with 40 years of experience in professional broadcasting and has been using Canon video and stills cameras since 2010. He has worked with radio and TV broadcasters, advertising agencies, and direct clients on a variety of projects including radio and television advertising, online video production, corporate videos, award ceremony motion graphics, and theme park sound design. Tosh has won numerous awards, including a Radio Academy Awards Gold Sony, a Gold, Silver, and Bronze World Medals in the New York Festivals International Advertising Awards. Since about 2007 he has been creating YouTube videos. Tosh has been a sponsor of the “video booth” at HashTag Business Events across the UK.
Recent Posts
Most people use sandbags the wrong way. Here’s how to hang them properly on a light stand for maximum stability and safety — plus what to fill them with.
You're Using the Canon RF 50mm f/1.8 WRONG! Here’s How to Fix It
If you’ve recently picked up the Canon RF 50mm f/1.8 STM—affectionately known as the Nifty Fifty—you might be confused by that strange switch on the side of the lens. It doesn’t say AF/MF...