

DIY Video Studio is supported by its readers who use the affiliate links or ads on this site. As an Amazon Associate, I earn from qualifying purchases. Thank your support if you use any of the links.
The white balance of a camera ensures that white areas in an image appear white and don’t have a yellow or blue color cast. If your camera’s white balance has always been set to AWB, or Auto White Balance, you’re probably in good company. But there are times when using the Custom White Balance setting on your camera will improve the look of your images and save you a lot of time in subsequent image processing.
To set a custom white balance place a white object beside the subject and photograph it. Choose Custom White Balance in the red camera menu and select the image you just took as the source of white balance data. Finally, choose Custom as the camera’s White Balance setting.
This Custom White Balance will now be used whether you shoot stills or video.
In this article I’ll explain when you might need to use the custom white balance settings on your EOS camera, how to use custom white balance, and show you what happens when the white balance goes wrong.
Although the instructions in this article specifically apply to the EOS R, R5, and R6, the principles will be the same for other Canon EOS cameras, and in some cases the process may be the same.
IN A HURRY? Click to go straight to Setting Canon Custom White Balance


Last update on 2025-10-20 / Affiliate links / Images from Amazon Product Advertising API
When to use Custom White Balance
Usually, it’s OK to shoot using the Auto White Balance setting on your camera, whether you’re shooting stills or video. In fact, auto white balance is pretty much my default setting when filming at a client’s premises. Most of the time I have no problems. However, using Auto White Balance can sometimes cause strange results where the colors don’t match those in the original scene.
These color changes, or casts, normally make the image look either too cool (blue) or too warm (orange/yellow). They happen when the camera’s auto white balance system misinterprets the color temperature of the lighting in the scene and misadjusts the white balance.
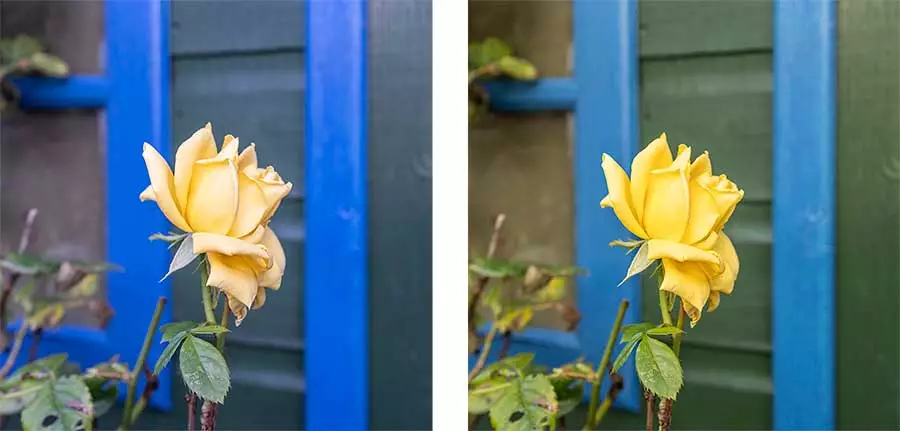
For example, here is an image of a rose. The bloom is yellow, the leaves are green, and except for some blue batons on the shed, much of the background is also green. The camera has misjudged the color temperature of the light to be “warm”, resulting in an image with a blue cast. In the second image I changed to using the custom white balance setting and the colors were rendered correctly.
So, you might want to use a custom white balance if the colors in the scene are likely to confuse the camera’s auto white balance system. Unfortunately, it’s not always easy to predict when this might occur, so you need to check for a strange color to the image in your viewfinder or on the camera’s screen.
Another situation when you would use the custom white balance is if capturing correct colors is important. This will most likely be if you are doing a product shoot where, understandably, the client wants the product’s colors to be faithfully reproduced.
Finally, the use of a Custom White Balance may be useful when filming an interview or piece-to-camera. If you are filming indoors and under artificial light the lighting conditions should remain constant. However, when you edit the footage, you may sometimes find that the color temperature has changed slightly.
This is normally happens if you have used the automatic white balance, AWB, setting. Often the change occurs near the start, as the color tone “settles”.
Setting a custom white balance or using of the camera’s white balance presets locks the color tone of the image, so there is no noticeable change when you edit the footage.
Understanding the Canon White Balance icons\symbols
Canon EOS cameras use the following standard icons or symbols to represent the different white balance modes or settings. The meaning of each is written beneath the icon.
Each white balance mode relates to the color temperature of the lighting under which you are shooting, and the camera applies this color temperature when processing the image.
| White Balance Mode | Color Tempertature (K / Kelvin) |
|---|---|
| AWB – Auto with Ambience priority | 3000-7000 |
| AWB-W Auto with White priority | 3000-7000 |
| Daylight | 5200 |
| Shade | 7000 |
| Cloudy (also twilight and sunset) | 6000 |
| Tungsten light | 3200 |
| White Fluorescent light | 4000 |
| Flash | 6000 or set automatically by speedlite |
| Custom | 2000 – 10000 |
| Color Temperature | 2500 – 10000 |
Note that there are two Auto White Balance options, AWB and AWBW.
AWB is auto white balance with ambience priority, which can boost the warm tone of the image when shooting under tungsten light. AWBW is auto white balance with white priority, where the warm color cast in the image is reduced under tungsten lighting.
So, AWB (Ambience priority) retains the warm ambient color when shooting under tungsten lighting, but AWBW (White priority) reduces the warm tones when shooting under tungsten lighting.
Depending on where you live, you may not be able to buy tungsten lights (incandescent bulbs) easily. However, you can buy “warm” LED lights that have a color temperature approaching that of incandescent tungsten bulbs. For this reason, the option of changing between the AWB and AWBW settings remains relevant, although I’m not sure how many photographers bother changing between the two auto white balance modes.
Where to find the Canon White Balance Settings
There are three ways you can access the Canon white balance settings.
Method 1
Press the Menu button and go to the red shoot or camera section. Then look for and select White Balance. You will see the icons for the various white balance settings.
Method 2
Press the Multi-function (M-fn) button to access the dial functions. White balance will be one of the settings you can change. Use the camera dials until the current white balance setting is displayed. The setting can be changed by turning the appropriate dial. Then press SET.
Method 3
Press the Q button on the back of the camera. This will display an overlay of icons at the side and bottom of the display (rear display and EVF). White balance is one of the settings icons that can be selected and changed.
How to Set a Custom White Balance on a Canon R, R5, or R6
First, you’ll need a white balance card. If you don’t require professional results, a cheap card will be fine. But if you want the colors to be accurately reproduced in your images, say because you’re doing product photography, use a professional quality white balance card.
I have a 12-inch reversible card that’s white on the front and 18% gray on the back. It’s also collapsible, making it easy to fold and pack into my kit bag. I’ve used this type since starting in video production. For photography I use a 3.5 x 5.5-inch rectangular plastic card that’s gray and white.
Here are three white balance cards that work well for both stills photography and video.
Last update on 2025-10-20 / Affiliate links / Images from Amazon Product Advertising API
You’re now ready to set the Custom White Balance on your Canon Camera, just follow these steps.
Step 1: Put your camera in stills photography mode
Whether you will be shooting stills or video you’ll first need to change to stills camera mode. On the EOS R and R5 press the MODE button and use the INFO button to change from video to camera mode. On the R6, turn the top dial selector to any position, except for Movie or Scene Intelligent Auto (A+).
Step 2: Place a white balance card in the scene
You want the white balance card to have the same lighting as your subject, so place the card just in front of or beside your subject.
Step 3: Photograph the white balance card
With the white balance card in the middle of the frame, take a photo. It’s OK to have the camera in Auto White Balance (AWB) mode.
Step 4: Find and select White Balance in the menu
Press Menu on the back of the camera and select the red camera (or Shoot) tab. Look through the menu pages until you find While balance. Now select it.
Step 5: Set White Balance to CUSTOM
You should see all the different white balance options displayed as the icons shown earlier in this article. Scroll through them select CUSTOM, that’s the icon that looks like a small white screen above two wedges. Now press SET/OK.
Step 6: Select Custom White Balance
In the same red menu page, select the Custom White Balance option.
Step 7: Choose the image of the White Balance card
An image from your memory card will be displayed on the screen. If the last photograph you took was of the White Balance card it should be shown. If you don’t see it use the camera dials to move through the images until it’s displayed. Now press SET.
Step 8: Confirm you want to use the white balance data from the image
A warning will appear on the screen that says, “Use WB data from this image for Custom WB”.
Press OK to select it
Step 9: Exit to shooting mode
Press the menu button on the back of the camera to exit the menu system and return to the selected shooting mode.
What can I use if I don’t have a White Balance Card
It is best to use a white balance card because it will be the correct white and therefore produce accurate and consistent results. But if you do not have a white balance card with you there are alternatives you could use. The results may not be perfect but will be “good enough” in most situations.
The easiest option is to use something that is already in or beside the scene you are photographing. Obviously, it should be white, but the important point is that it should be under the same illumination as the subject you want to take an image of. Take an image of the white object and then use it as the source of white balance data for your custom white balance.
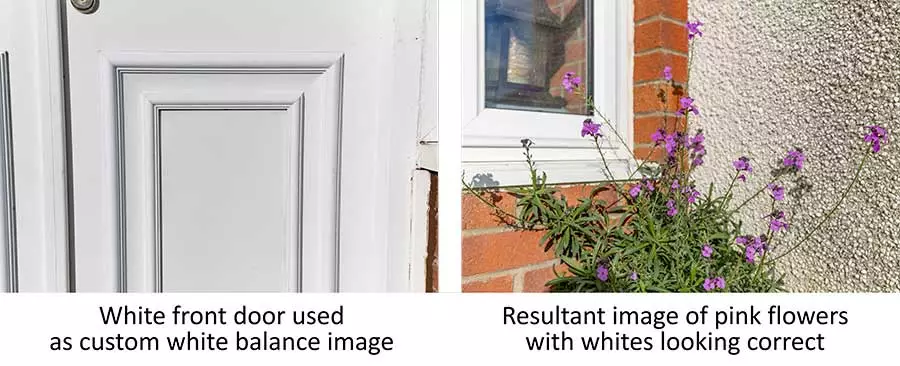
When I was taking an image of the pink flowers at the front door of a house, the door happened to be white, so I took a shot of the front door. You can see the “door” image I used to set the custom white balance and the image I then took of the flower.
If there are no white objects near to your subject, you could use a piece of paper. A sheet of printer paper will work fine but a white tissue may be better since the surface is less shiny and have more of a diffusing effect. Again, take a shot of the paper or tissue and use it as your custom white balance image.
What happens if you use the wrong white balance setting?
Your custom white balance image is the source of white balance data for all your image where you have chosen “Custom” in the white balance settings. Therefore, if you have not chosen an image of something white, that was shot under the same lighting as your subject, then your whites will not look white, and the image will have a strange color cast.
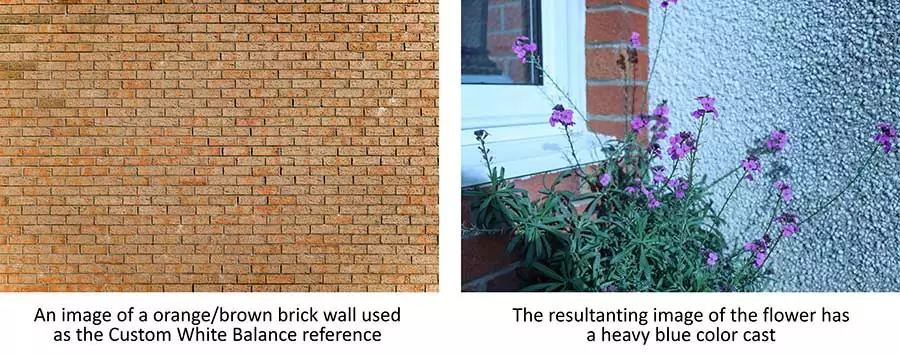
I can demonstrate this by using an image of a brick wall as the custom white balance source or reference image. The image of the pink flowers with white balance set to Custom now looks very wrong, unless you want this type of effect.
So, you will have three situations, as follows.
Natural looking results: You will produce images with the correct looking white balance when the image used as your custom white balance reference is a white card shot under the same lighting as your subject.
Cool cast to images: Your images will have a cool or blue color cast when the image used as your custom white balance reference has a “warm” tone.
Warm cast to images: Your images will have a warm or orange color cast when the image used as your custom white balance reference has a a “cool” tone.
However, using the wrong image as your custom white balance reference isn’t the only way your images could end up with a strange color cast to your photographs.
You could accidently shoot with your camera set to the wrong white balance preset. For instance, you could have been taking pictures in the open under daylight and using the Daylight White Balance preset but forget to change the preset when moving into a different environment.
So how is the image affected when you shoot with the wrong white balance preset?
The images below show how the same subject under a sunny sky looks when the different white balance settings are used.
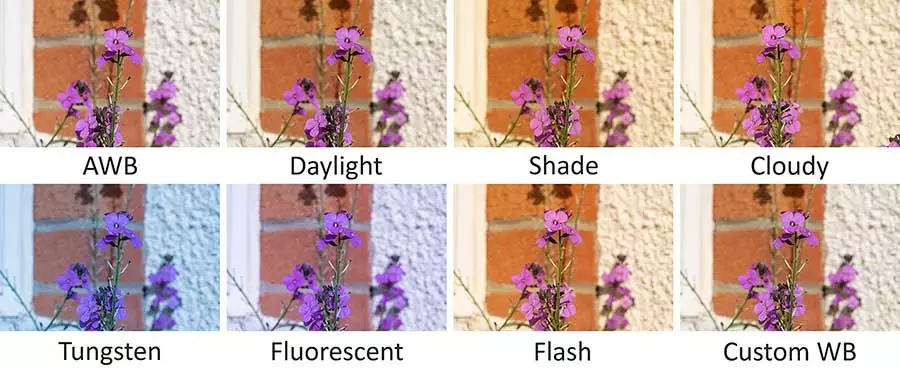
If we assume that Custom WB is the correct white balance for the flower, then it’s clear that Auto White Balance (AWB) has worked well and would be accurate enough for most situations.
The Daylight setting is also close, which is not surprising since the images were shot on a sunny day. However, the Daylight setting has produced a very slight warm tone to the image. This is because the camera understands daylight to have a color temperature of about 5200K, but the color temperature of daylight varies according to the height of the sun. At noon, when the sun is highest in the sky, daylight will have a slightly bluer color temperature. When the sun is close to setting, daylight has an obvious warm tone.
The Shade, Cloudy, and Flash white balance settings have all produced images that are much warmer than they should be. This is because the WB presets are telling the camera that the color temperature is higher (6000-7000K) than the actual color temperature, which was probably a little under 5200K. The Tungsten and Fluorescent WB settings gave the image a cool or bluest color cast. That’s because the camera has assumed the color temperature of the light is cooler than it was.
Last update on 2025-10-20 / Affiliate links / Images from Amazon Product Advertising API
Source: 1![]()
Tosh Lubek runs an audio and video production business in the UK and has been using the Canon EOS R since it was released in the Autumn of 2018 and the Canon EOS R6 in 2020. He has used both cameras to shoot TV commercials broadcast on Sky TV, promotional business videos, videos of events and functions, and YouTube creator content. He has also won several international awards for his advertising and promotional work. You can meet him by visiting his “video booth” at HashTag Business Events across the country.
Recent Posts
Most people use sandbags the wrong way. Here’s how to hang them properly on a light stand for maximum stability and safety — plus what to fill them with.
You're Using the Canon RF 50mm f/1.8 WRONG! Here’s How to Fix It
If you’ve recently picked up the Canon RF 50mm f/1.8 STM—affectionately known as the Nifty Fifty—you might be confused by that strange switch on the side of the lens. It doesn’t say AF/MF...