
DIY Video Studio is supported by its readers who use the affiliate links or ads on this site. As an Amazon Associate, I earn from qualifying purchases. Thank your support if you use any of the links.
No matter how well you organize your video editing projects, they can end up becoming bloated with unused video clips, audio files, and images that didn’t make it into the final cut. This is a problem because not only does it make the project more difficult to work with if you need to revisit it in the future, but it also costs more to keep the project long term. Whether you archive to the cloud or keep hard disks in a filing cabinet, it has a cost.
Fortunately, Premiere Pro has a feature that allows you to archive your video projects efficiently.
Premiere Pro projects and all the files used, including any LUTs, can be exported by navigating to File > Project Manager, and choosing what to export, and where it should be saved. A single folder will be created, and the files copied to it. You can then manually organize the files into sub folders.
That’s obviously an overview of the project export process, so I’ll go into more detail, providing step-by-step instructions along with screen-shot images.
How to export Premiere Pro project with all files
In this step-by-step guide I show how to export a Premiere Pro![]() project to another folder, without trans-coding the original clips and only copying over the media used in the project. The intention is to reduce the size of the project to where it equates to the finished video that has been rendered and exported. This is good if your project uses assets that are from other folders on your computer, from other video projects, or from After Effects projects.
project to another folder, without trans-coding the original clips and only copying over the media used in the project. The intention is to reduce the size of the project to where it equates to the finished video that has been rendered and exported. This is good if your project uses assets that are from other folders on your computer, from other video projects, or from After Effects projects.
Although here the intention is to consolidate all the media assets in one folder while minimizing the overall project size, some steps offer options that will enable you to change the outcome to suit your needs.
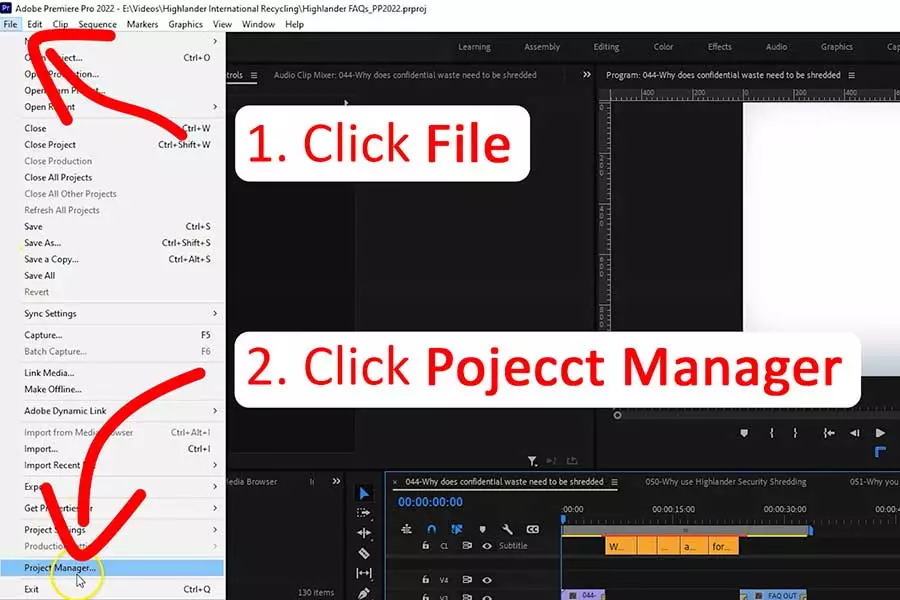
Step 1: Open the Project Manager
Click on File in the menu bar and then go down to almost the bottom of the drop down menu and and click on Project Manager.
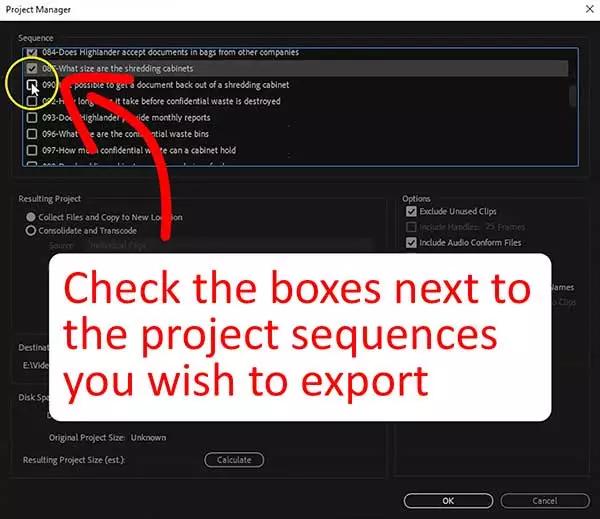
Step 2: Choose the sequences you want to export
Once the Project Manager has opened, you will see the Sequence pane at the top. It’s populated with a list of all the sequences in your Premiere Pro project. If you have enough sequences, you will be able to scroll through the list.
Click check box next to each sequence you wish to export.
Once you have selected the sequences you wish to export, I would suggest scrolling through the list to visually confirm the sequences you require have been checked.
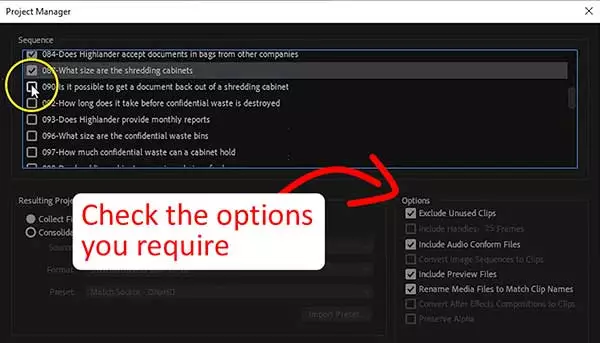
Step 3: Choose your options
There are eight option you can choose for your exported project. I’ve listed these below and marked in bold green the ones I recommend selecting.
- Exclude unused clips
- Include handles
- Include audio conform files
- Convert image sequences to clips
- Include preview files
- Rename media files to match clip names
- Preserve alpha
Step 4: Choose what happens to the files in the Resulting Project
In the Resulting Project pane, you have two basic choices. The first keeps things simple, in the second you need to make choices and understand the available options. Unless you are confident in what you need to select, I would recommend sticking with the forst option, which is…
- Collect files and copy to new location

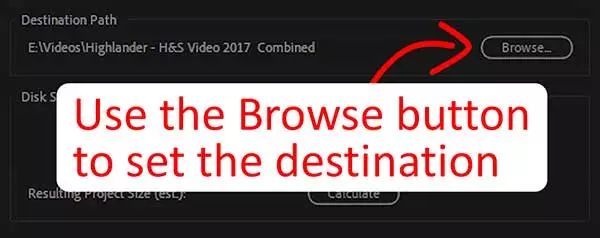
Step 5: Choose where the exported project will be saved
The Destination Path pane indicates where the project will be saved. To change this, click on the Browse button, navigate to the folder where you wish to save the project and then click the Select Folder button.
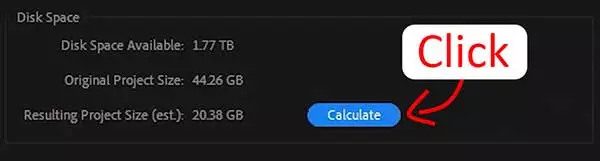
Step 6: Check the resulting project size
In the Disk Space pane
- Click on the Calculate Button
After a few seconds you should see how much available disk space there is on the disk, the size of the original project, and the estimated size of the resulting project.
This step is important. It will tell you whether you have enough space on the selected drive to accommodate the exported project.
If the space is insufficient, choose a different location with enough space, otherwise proceed.
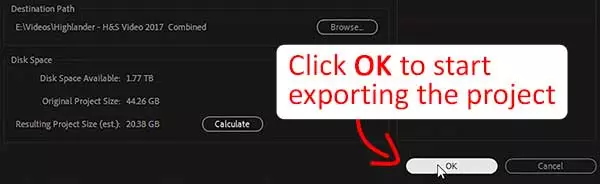
Step 7: Export the project
If you have completed all the previous steps
- Click OK
The time taken to export the project will depend upon how large the project is and the speed of your computer. In my case, with an original project size of 44.26GB and a resulting project of 20.38GB, the export took 2 minutes.
WARNING: When exporting/saving a Premiere Pro project, only the sequences you have checked in Sequences pane and the media/files used in those sequences will be exported.
Organizing the exported project folder
Premiere Pro will save your project in a folder that has the original PremPro project name but with “Copied_” at the start. For instance, Copied_EXAMPLE PROJECT, where EXAMPLE PROJECT was the original name of the Premiere Pro project.
If you followed the instructions above, you should have a folder that contains the following:
- Your media assets, consisting of audio, image, and video files, any LUT files you used, plus the Premiere Pro project file (.prproj)
- Subfolder called Adobe Premiere Pro Audio Previews
- Subfolder called Adobe Premiere Pro Video Previews
- Subfolder called Media Cache
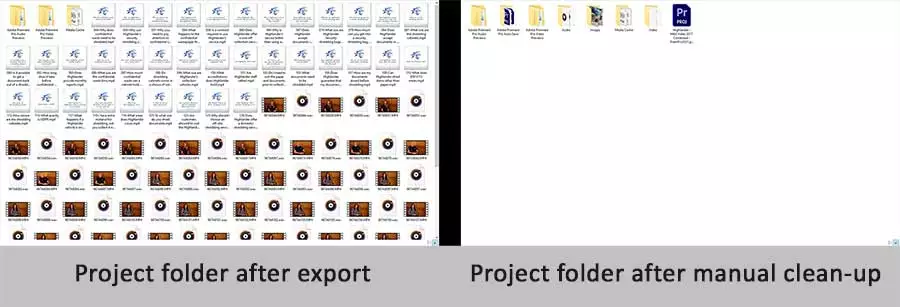
For me, this is a little untidy, especially if there are a lot of audio, image, and video assets. I prefer to keep these in separate folders.
If you want to keep a tidy project, create three folders, and name them Audio, Video, and Images. Then cut and paste or drag and drop the assets in the appropriate folders. The only remaining files should be any LUTs and the .prproj or Premiere Pro project file. Below you can see a before and after shot of the exported project folder. If your project included many media files, you can see that a manual clean-up will make it easier to work with the project if you meed to make a revision in the future.
Save Premiere Project with ALL additional files
The above step-by-step guide does not export all the clips, since the goal is to have a complete project without unused assets. However, if you also wish to archive selected unused clips, or you wish to include a copy of the finished video file, you will need to take some extra steps.
There are three ways to do this.
Option 1: Copy them over manually
This is a reasonable option if you want to add the exported video to the project. I normally export my finished videos to a folder I call FINAL MIX. So to add the video to my archive I would copy the FINAL MIX folder over to the exported project folder I had just created.
I would not recommend using this manual copying method to copy unused media assets, especially if you only want a few clips from a large collection of clips.
Option 2: Use Project Manager to include the clips
This method would be the recommended way if you want your exported project to include all the clips, whether they have been used or not.
In the Options pane of Project Manager, uncheck Exclude Unused Clips. This is ideal if you suspect you or a client will ask for a revision of the video at some time in the future.
Option 3: Create a sequence with clips you want to keep
Your unused clips may include media you have rejected and therefore will not want to keep. But your unused clips may also include alternative takes that you may want to use later on. This method allows you to keep unused clips with the exported project but leave out clips you know will never be used.
Create a new sequence in your Premiere Pro project, then drag the clips you want to keep into this sequence. When you come to export the project make sure you select this sequence for export.
Do the same for your finished and exported video file. Create a sequence and import the video into that sequence. Again, ensure the sequence is selected when you export the project.
Tosh Lubek runs an audio and video production business in the UK and has been using the Canon EOS R since it was released in the Autumn of 2018 and the Canon EOS R6 in 2020. He has used both cameras to shoot TV commercials broadcast on Sky TV, promotional business videos, videos of events and functions, and YouTube creator content. He has also won several international awards for his advertising and promotional work. You can meet him by visiting his “video booth” at HashTag Business Events across the country.
Recent Posts
Most people use sandbags the wrong way. Here’s how to hang them properly on a light stand for maximum stability and safety — plus what to fill them with.
You're Using the Canon RF 50mm f/1.8 WRONG! Here’s How to Fix It
If you’ve recently picked up the Canon RF 50mm f/1.8 STM—affectionately known as the Nifty Fifty—you might be confused by that strange switch on the side of the lens. It doesn’t say AF/MF...