

DIY Video Studio is supported by its readers who use the affiliate links or ads on this site. As an Amazon Associate, I earn from qualifying purchases. Thank your support if you use any of the links.
If you use Adobe Premiere Pro to edit videos you might come across this situation. You’re importing video clips into a project. All the clips were recorded in the same session, all of them have the same file type, and all of them have the same kind of compression. Then suddenly, and for no apparent reason, Premiere Pro throws an error message at you. And here’s what it looks like.
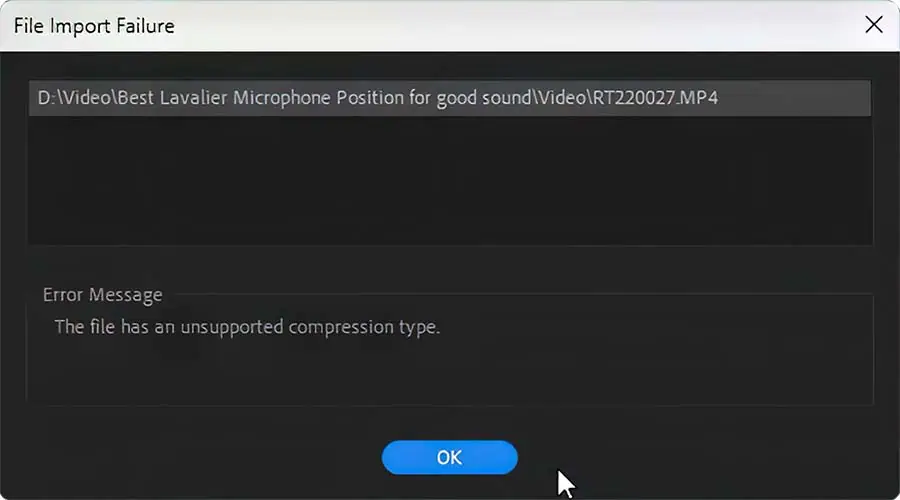
As far as Premiere Pro is concerned, the file has an unsupported compression type, so Premiere Pro can’t import the clip. This is weird, considering all the clips before and after that one clip imported simply fine.
I checked Adobe’s help
and support community
To solve the “The file has an unsupported compression type” issue in Premiere Pro try the following fixes:
- Delete or rename the media cache folder
- Move the clip to another folder
- Change the clip’s file extension
- Re-encode the video clip
Most people seem to agree that all these solutions work, but not all the time and for everyone. That has also been my experience. Three of the four fixes allowed me to import my rogue video clip. Even so, I’ll include all the fixes since what didn’t work for me might work for you.
In case you’re wondering, I encountered this file import failure message while importing 4K mp4 (h.264) video files into Adobe Premiere Pro 2023 version 23.0.0 (Build 63). However, I think this problem has been around for at least a couple of years, so you may get the same problem on earlier versions of Premiere Pro.
Unsupported Compression Type Fix #1: Delete the media cache
There are two ways to delete the media cache, from within Premiere Pro’s Preferences, and manually by using Windows File Explorer. For me, only the manual way worked, but the other way might work for you.
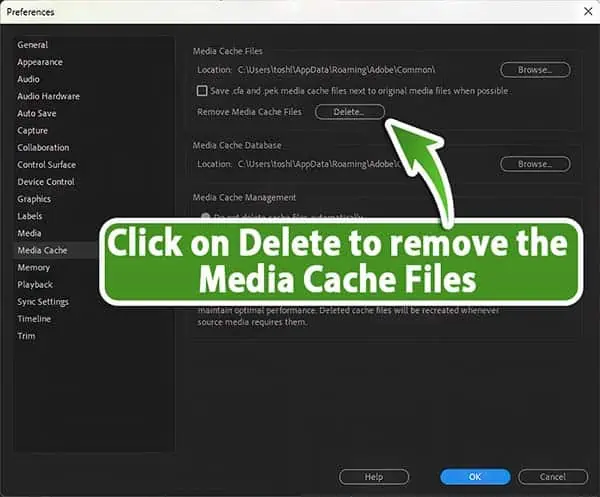
Method #1: Delete the media cache from within Premiere Pro’s Preferences
In Premiere Pro click on Edit in the menu bar. Then click on Preferences near the bottom of the drop-down menu, followed by Media Cache. Near the top and middle of the panel you will see “Remove media cache files”, and a delete button. Click Delete.
Close your project and then Premiere Pro. Re-open Premiere Pro and your project, then try importing your video clip.
Method #2: Delete the media cache manually
In Premiere Pro click on Edit in the menu bar. Then click on Preferences near the bottom of the drop-down menu, followed by Media Cache. In the top middle of the panel, you will see the location of the media cache files. Unless you changed the location, it will be something like
C:\user\YOURNAME\AppData\Roaming\Adobe\Common
take note of the location and close Premiere Pro.
Open Windows File Explorer and navigate to the location of your media cache file. Once there, either delete or rename (I prefer to rename) the Media Cache Files folder to OLD – Media Cache Files. You can also do the same with the Media Cache folder, but I have found it to be unnecessary.
Note that if you rename or delete the Media cache files and media cache folders, Premiere Pro will create new folders.
Re-open Premiere Pro and your project, then import your video clip.
Hopefully one of the ways of deleting the media cache allowed Premiere Pro to recognize the compression type and successfully import the file. If not, move on to the next fix.
Unsupported Compression Type Fix #2: Move the video file to another folder
For me, this seems a laughable solution. Why would moving the video clip to another folder suddenly change it to having a supported compression type? The thing is, this fix worked for me.
I created a new folder within my video clips folder. I performed the usual Right click -> New -> Folder, then dragged the video clip into the new folder. Finally, I launched Premiere Pro, opened my project, and tried to import the video clip. Against all my expectations, the fix worked, and the video clip was imported into the project perfectly.
Unsupported Compression Type Fix #3: Change the file extension
Again, this seems like an unlikely solution, but it worked for me.
Open the folder where you have your video clips. Right-click with your mouse, on the video clip you cannot import, then choose the rename icon. Alternatively, click on the file and hit F2 on the keyboard. Highlight the file extension and change it to MTS, AVI, or MP4. Then hit Enter on your keyboard. Windows will ask you whether you are sure you want to make the change, click on yes.
Once you have changed the file extension try importing the file into your Premiere Pro project. Hopefully, this fixed the issue.
FIX #4: Re-encode the video file
The final method involves re-encoding the video file, which can be time-consuming, depending on the duration of your clip and the speed of your computer. Again, I have two ways of doing this. The first involves using the Windows Film and TV media player, while the second requires the download and install an app called Handbrake. This is free open-source software that works on Windows, Mac, and Linux. If you regularly create videos, I recommend getting Handbrake. You can download it from the official website![]() .
.
Another option is the VLC Media Player![]() . It’s a free and open-source cross-platform multimedia player that will recognize almost any video format and be able to convert to MP4. However, I will not cover the details of using it in this article.
. It’s a free and open-source cross-platform multimedia player that will recognize almost any video format and be able to convert to MP4. However, I will not cover the details of using it in this article.
Method #1: Re-encode using Windows Film and TV media player
Right-click on your video file. Choose Open With and then Film & TV.
When Windows Film and TV media player opens, click on the pencil icon in the bottom right of the screen. When the menu opens click on Trim. A new edit player will open, and you can drag the trim head from either the top or tail of the video. Drag one of the trim heads by about half a second or more until the Save As Copy button in the top right turns blue and is active. Click on the Save As Copy button to open the Save As window. Choose where you wish to save the new version and click on Save.
Once the file has been re-encoded, import it into your Premiere Pro Project.
Since this method will lose a small amount of your media file, you save a second trimmed version of your file. This time trim footage from the other end of the clip, then save the file. You can edit the two versions together in Premiere Pro, ensuring you have a complete video clip again.
Method #2: Re-encode using Handbrake
Launch Handbrake and open your video clip either by clicking on the Open a single video file button or drag-and-drop your clip onto Handbrake.
When the clip loads click on presets in the menu bar.
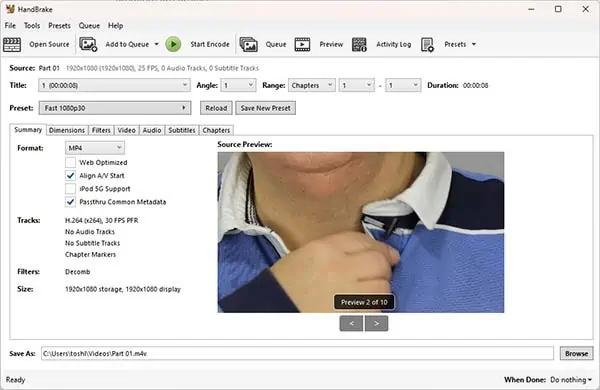
Then in the Presets list scroll down almost to the bottom and choose Production Standard. This will produce a high-quality h.264 video in an mp4 container intended as an intermediate format in video editing. However, it will also create a very large video file. But don’t worry you’ll make this smaller in the next step.
Click on the video tab and use the slider to reduce the quality to about 16, but you could go up to about 20 if necessary for a smaller file. A quality of 0 would be completely lossless and probably larger than your original file. But around 15 to 20 should be good enough.
At the bottom of the Handbrake interface, you’ll see the Save As window. Here, change where the file will be saved, and the file name, and since you’ll be saving an h.264 file you can change the file extension from .m4v to .mp4.
Next, click the Start encode button at the top of the interface so Handbrake will re-encode the file.
Finally, once the file has been re-encoded import it into your Premiere Pro project.
Conclusion
As you have seen there are a few different ways to overcome Premiere Pro’s import failure message of “The file has an unsupported compression type”. You have also seen that some of the fixes can be accomplished in several ways, so you could argue that there are more solutions than the four I have highlighted. However, I would suggest trying one of the easier and quicker solutions first. Unless your clips are short, I would leave the re-encoding option as a last resort.

About the author: Tosh Lubek is a multi-award-winning broadcaster, writer, and video producer, with 40 years of experience in professional broadcasting and has been using Canon video and stills cameras since 2010. He has worked with radio and TV broadcasters, advertising agencies, and direct clients on a variety of projects including radio and television advertising, online video production, corporate videos, award ceremony motion graphics, and theme park sound design. Tosh has won numerous awards, including a Radio Academy Awards Gold Sony, a Gold, Silver, and Bronze World Medals in the New York Festivals International Advertising Awards. Since about 2007 he has been creating YouTube videos. Tosh has been a sponsor of the “video booth” at HashTag Business Events across the UK.
Recent Posts
Most people use sandbags the wrong way. Here’s how to hang them properly on a light stand for maximum stability and safety — plus what to fill them with.
You're Using the Canon RF 50mm f/1.8 WRONG! Here’s How to Fix It
If you’ve recently picked up the Canon RF 50mm f/1.8 STM—affectionately known as the Nifty Fifty—you might be confused by that strange switch on the side of the lens. It doesn’t say AF/MF...