
DIY Video Studio is supported by its readers who use the affiliate links or ads on this site. As an Amazon Associate, I earn from qualifying purchases. Thank your support if you use any of the links.
There are a few different ways of transcribing audio for free, but if you already have an Adobe Creative Cloud subscription you don’t need any of the other free methods. That’s because Adobe Premiere Pro 2022 includes an accurate and reliable auto transcription feature.
To transcribe the audio in Premiere Pro change your Workspace to Captions and Graphics. In the menu bar of the Text panel, choose Transcript and then click the Transcription button. Next, choose your language and which audio track to transcribe. Finally, click the blue Transcribe button to start the process.
How to transcribe the audio in Adobe Premiere Pro
To transcribe the audio in the video sequence of Premiere Pro do the following steps.
STEP 1
Click Window in the main menu bar, then Workspaces in the drop-down menu, and finally Captions and Graphics in the sub-menu that opens to the side.
Alternatively, you can use the keyboard shortcut of Alt+Shift+4, which will also change your workspace to Captions and Graphics.

STEP 2
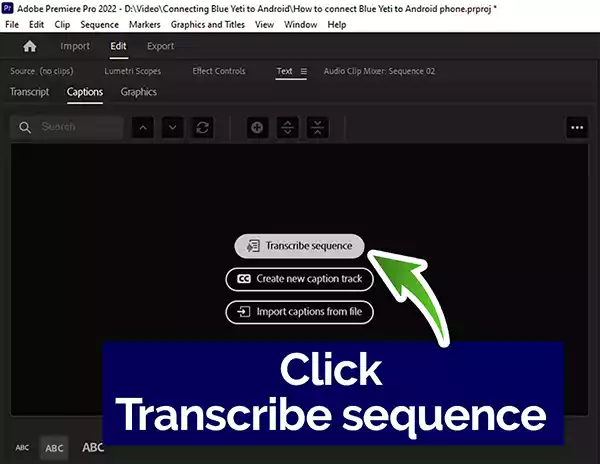
A floating panel will open with three options: Transcribe sequence, Create new caption track, and Import captions from file.
Click the Transcribe sequence button.
Note: If you wish to remain in your current workspace, click Windows and then Text to open the Transcript/Captions panel.
STEP 3
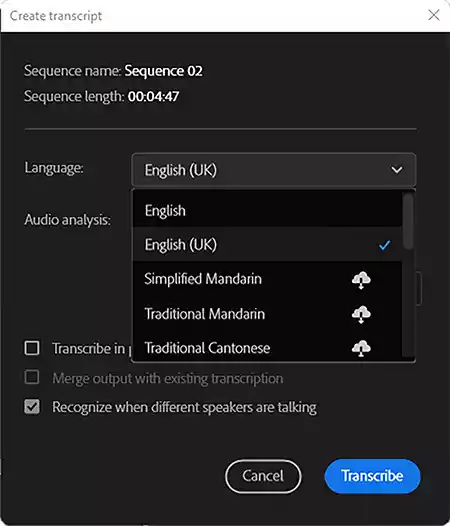
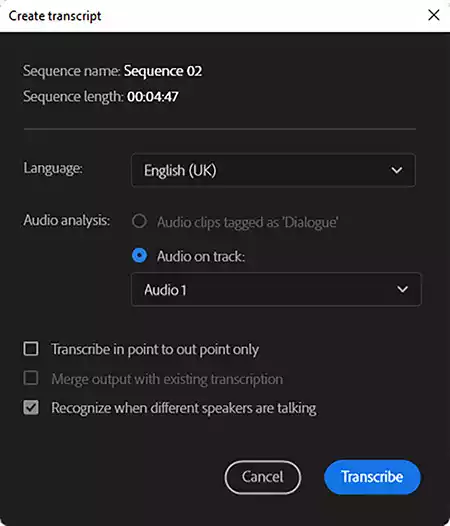
Once you have clicked the Transcribe sequence option, the Create Transcript panel will open. It will show the sequence name and length. Beneath those details, there is a drop-down menu for the language. If your language is not correctly set, click the down arrow, and choose the correct language from the selection.
STEP 4
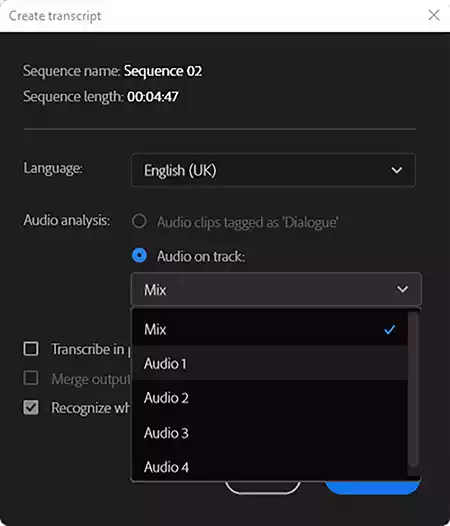
The next drop-down menu allows you to choose the audio you wish to be transcribed. This can be Mix (the total mix of the audio), or you can choose the audio on individual tracks, i.e., Audio 1, Audio 2, Audio 3, etc. You can also choose any clips in the sequence that have been tagged as Dialogue.
If only one person is speaking I choose the track with the speaker’s dialogue.
STEP 5
Next, you can choose between transcribing all the audio in the sequence, or, if you have set in and out points, only transcribe the audio between those points. You can also tell Premiere Pro to recognize when different speakers are talking. If you have already transcribed part of the project, you can tell Premiere Pro to merge the output with the existing transcription
STEP 6
Once you have chosen your options, you can go ahead and click on the blue Transcribe button. Premiere Pro will go ahead with rendering the audio, followed by transcribing it. The program will also display an estimate of the time remaining.
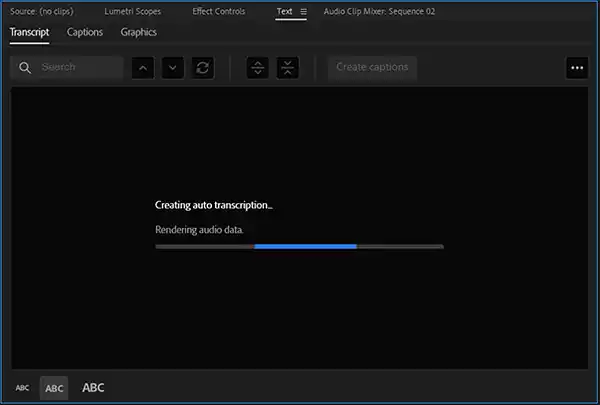
The time taken to complete the auto-transcription depends on the length of the audio and the computer’s processor. To process 5 mins of audio, my laptop with an i7-9750H processor took 1min 38sec, while my desktop with an i7-11700 processor took 43sec.
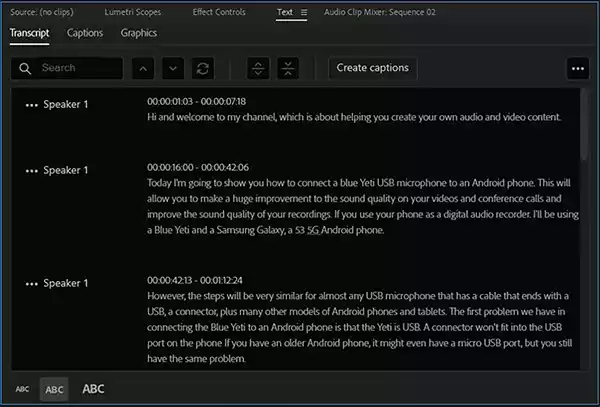
Upon completion, the transcribed audio will appear in the Transcript window, along with timestamps above each segment and an indication of who was speaking.
If there was only one person speaking, each paragraph will indicate that it is Speaker 1.
The play head and the position in the transcript are linked
It’s worth noting that the position in the transcript and the position of the play head along the sequence are linked. So, if you click on a word in the transcription panel, the word will become highlighted in blue, and at the same time, the play head will jump to the position of the word in sequence.
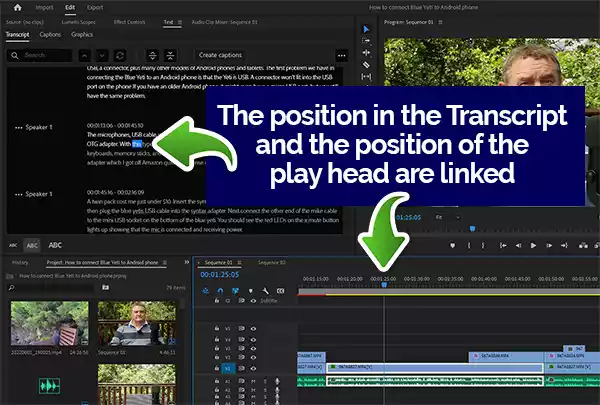
The opposite is also true. If you drag the play head along the sequence, the corresponding words in the transcription will consecutively be highlighted in blue, mirroring the speech.
What else can you do in the transcript panel?
In the top right-hand corner click on the three horizontal dots, “…”. You will reveal a drop-down menu with the following options.
- Re-transcribe sequence
- Export transcript
- Import transcript
- Display pauses as […]
- Export to text file
- Export to CSV file
- Disable auto-scrolling
- Check spelling
- Spell check settings
However, I find that Export to text file, Export to CSV file, and perhaps Export transcript are the most useful options to use.
Export transcript is probably not what you think it is. This option exports the transcript as a Premiere Pro “.prtranscript” file. So, it is only of use if you want to import the transcript into another video sequence in Premiere Pro or if you are collaborating with someone else. Unfortunately, I have found that the Import transcript option is always greyed out if the sequence already has an associated transcript.
This is unfortunate since you might be working with a colleague who has made some corrections to the transcript and has shared them with you. A workaround I have used is to copy the media blocks in the sequence, create a new sequence, then paste the media blocks into the new sequence. Since this sequence does not have an associated transcript you will be able to import a transcript file.
Export to text file and Export to CSV file are the options to use if you want to open the transcript in a word processer, text editor, or spreadsheet. These options can be genuinely useful, especially if you wish to repurpose the content or create a written log of all source footage.
The default name of your files will be the sequence name followed by .txt or .csv. So, if the sequence name was Sequence 01, your exported files would be Sequence 01.txt or Sequence 01.csv.
Check spelling seems to be on by default, with Premiere Pro auto-detecting your language. But it’s worth clicking on the Spell check settings to make sure Adobe’s software has detected your language correctly. For instance, the first time I used the auto transcription feature, although the app realized I was speaking English, it thought I was speaking Caribbean English. Not quite correct since I live in Scotland. If you have a similar experience, you can choose the correct language from the drop-down menu.
Correcting auto transcription errors in Premiere Pro
Although the auto-transcribe feature in Premiere Pro is very good, it inevitably will make mistakes. So, it is worthwhile scrolling through the transcript to check for errors.
If the voices are clear and free of heavy accents, Premiere Pro will do a pretty good job and the transcription should be reasonably accurate. Premiere Pro may get confused with unfamiliar brand names, and some punctuation, so make sure you check the transcript, especially if you are going to use it to create captions or subtitles.
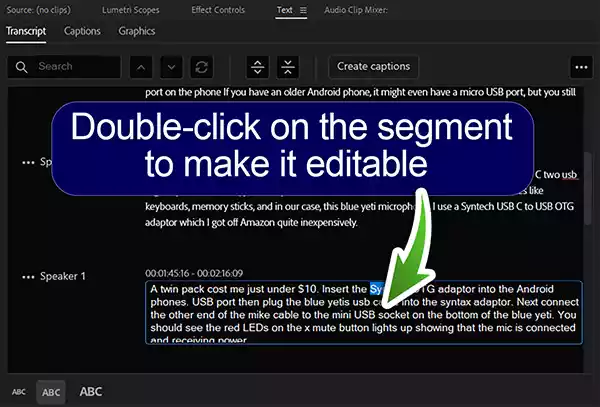
To edit the transcript, double-click on the word you wish to change. This will make the section editable, and you can make changes as you would in a text editor. Once you have finished editing the text, click off to the side of the section window to confirm and save your changes.
If you find that you are not getting a high accuracy level from Premiere Pro’s auto transcription feature, there are several things you can do to try and improve it. You can get plenty of guidance by reading my article: 10 ways to improve transcription accuracy in Premiere Pro.
Why use audio transcription in Adobe Premiere Pro
Transcription helps in creating captions
The first reason to use the auto transcription feature is that it will quickly and easily help you create closed captions or subtitles for your video. If you would like to know how to do that, reach my article: How to create subtitles or captions in Premiere Pro.

A transcript makes larger projects manageable
Whatever your project, having a transcript can be incredibly useful, especially on a longer project. A transcript can help you get to grips with your source material. If you open the transcript in a word processor you can quickly find relevant sections by searching for related words or phrases.
Editing a large project “on paper” is a much more manageable process instead of constantly looking for the clips in your video sequence. Your “paper edit” can speed up your postproduction process once you get into the editing suite because it’s a kind of plan or route map for the editor to follow.
A transcript helps you find clips in your sequence
Even if you don’t intend to create captions or print off a transcript, transcribing your video sequence can be very useful since the transcription panel is searchable. Type in a word or phrase into the search bar above the transcript and Premiere Pro will find where it occurs in the transcript.

Earlier I said earlier that the position in the transcript and the position of the play head are linked. So if you click on one of the instances where a searched word occurs in the transcript, the video play head will automatically jump to that position in the sequence. This alone will save you time when editing longer projects.
You can repurpose content from a transcript
Although you might think of using Adobe Premiere Pro to automatically transcribe your videos, it can also be used to transcribe traditional audio podcasts. It doesn’t matter to Premiere Pro what your original project is, as long as it contains audio.

So if your content contains audio, Premiere Pro can help you repurpose it.
When you make a video, the transcription feature in Adobe Premiere Pro allows you to export text that can be edited into a blog post or article. If you have an audio podcast, transcription can help you convert it into a text-only article.
Transcription in Premiere Pro improves your productivity and maximizes your time. It is one of the most underused tools available to content creators. Yet by exploiting it you can literally increase your content output and therefore your potential revenue.
Watch my YouTube video about transcription in Premiere Pro
I go through the transcription process in Adobe Premiere Pro in this YouTube video.
Summary
As we’ve seen, the auto transcribe feature in Adobe Premiere Pro has a few different uses. It can help in creating captions, make large projects more manageable, speed up the editing of media, and help you repurpose your content.
But auto transcription isn’t just useful for those creating medium or long-form content. If you are a YouTuber you can help improve your SEO by using auto transcription to create closed captions. Instead of leaving YouTube to auto transcribe your video, let Premiere Pro do it, then correct any errors. You can then create accurate subtitles that can be added to your video upload workflow. The result is that your captions are correct right from the start and YouTube/Google has instant access to your content.
Auto transcription in Premiere Pro is underused, which means that savvy content producers have an opportunity to get ahead of their competition.
You might also like…
- How to Create Subtitles or Captions in Premiere Pro
- 10 ways to improve transcription accuracy in Premiere Pro
- How to make your video captions look good in Premiere Pro
- Auto Transcribe Video to Text Free of Charge: 7 methods tested
- How to export subtitles or captions in Premiere Pro
- How to repurpose videos into audio & text content with Premiere Pro
Tosh Lubek runs an audio and video production business in the UK and has been using the Canon EOS R since it was released in the Autumn of 2018 and the Canon EOS R6 in 2020. He has used both cameras to shoot TV commercials broadcast on Sky TV, promotional business videos, videos of events and functions, and YouTube creator content. He has also won several international awards for his advertising and promotional work. You can meet him by visiting his “video booth” at HashTag Business Events across the country.
Recent Posts
Most people use sandbags the wrong way. Here’s how to hang them properly on a light stand for maximum stability and safety — plus what to fill them with.
You're Using the Canon RF 50mm f/1.8 WRONG! Here’s How to Fix It
If you’ve recently picked up the Canon RF 50mm f/1.8 STM—affectionately known as the Nifty Fifty—you might be confused by that strange switch on the side of the lens. It doesn’t say AF/MF...