
DIY Video Studio is supported by its readers who use the affiliate links or ads on this site. As an Amazon Associate, I earn from qualifying purchases. Thank your support if you use any of the links.
Creating captions in Premiere Pro is a two-step process. First, you need a transcript of the video and then you can create the captions from the transcript. Strictly speaking, this is not absolutely true. You could laboriously listen to the video and manually input your captions, but I assume you value your time.
To transcribe your audio or video content you can use services like rev.com![]() that promise accuracy of 99% with a human doing the transcription, but it will cost you about $1.50 per minute of video.
that promise accuracy of 99% with a human doing the transcription, but it will cost you about $1.50 per minute of video.
There are also various free online auto-transcription services, but some have certain limitations. However, the best “free” option that I have found is to let Premiere Pro 2022 (version 22.0+) to auto-transcribe the video for you.
The auto-transcription in Adobe Premiere Pro can be remarkably accurate. However, brand names can be tricky, and some punctuation may require checking. Of course, the quality of the recording and the accent of the speakers can also impact the accuracy of the transcription.
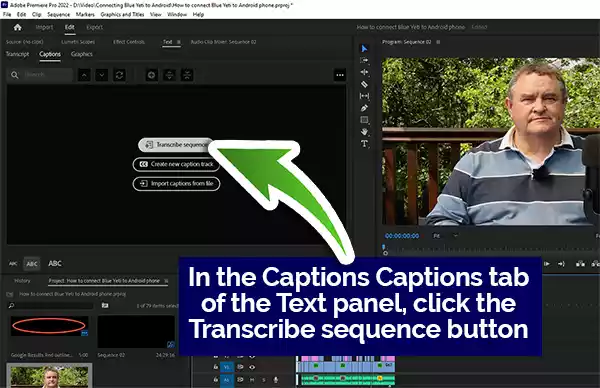
Auto Transcribe the audio in Premiere Pro
For a detailed step-by-step explanation of how to use Premiere Pro’s auto-transcription feature see my article: How to Transcribe Audio in Adobe Premiere Pro.
However, as a brief overview, you should change to the Captions and Graphics workspace. Then in the Captions panel, click on the Transcribe sequence button. In the menu window that opens choose the setting you require, and finally, click the blue Transcribe button in the bottom right corner.
Creating Captions from your transcript in Premiere Pro
Step 1
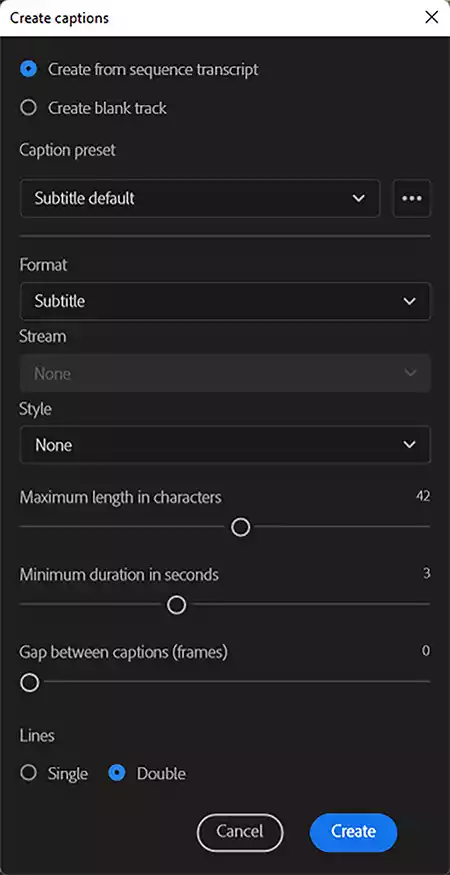
Just above the Transcription, you will see a search bar and a few clickable buttons, the one on the right is the Create captions button. Click on it to open the Create captions settings menu.
Step 2
In the settings menu leave Create from sequence transcript selected.
Also, leave the Caption Preset as Subtitle Default. Format should also be left as Subtitle, and since you won’t have previously saved any caption styles, leave Style as None.
Unless you wish to change the maximum length of your captions, the minimum duration, or the gap between captions, leave those sliders at their default values.
The last setting is the number of lines of captions. You can choose between Single or Double, with the default being Double. If you are going to publish the video on social media, you may want to choose Single for the number of lines. However, if the destination is YouTube, a TV screen, or a computer monitor, choose double-line captions.
Finally, click the blue Create button.
The captions will be created and will populate the Captions panel. They include the caption number, starting with 1, and the start and end times for each caption.
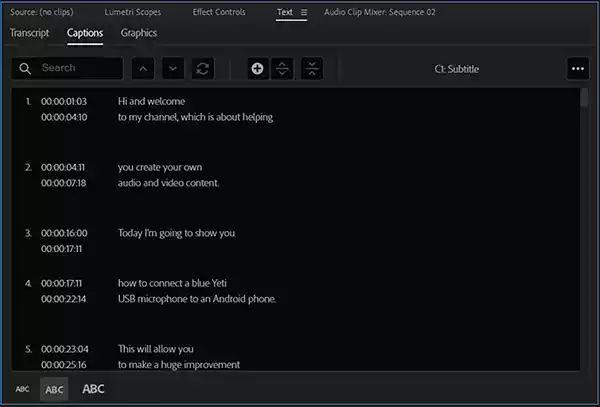
When the captions were created, so was a caption track, located above the video tracks in the sequence.
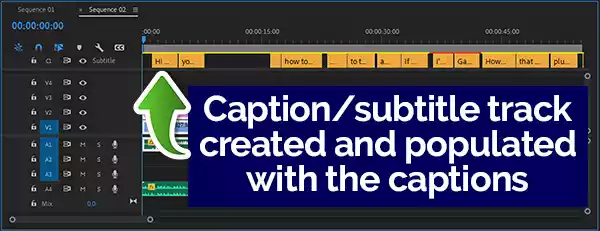
Each caption will have been placed on the caption track as a separate block and synced to the audio in the sequence. The start and end points of each caption will correspond to the times shown in the Captions panel.
If necessary, you can move the captions around on the caption track, just like you would with any other piece of media in the sequence.
Dealing with pauses in the dialogue
Premiere Pro creates gaps between captions where there is a pause in the dialogue. Although this is correct, you might want the caption to remain on screen for a little longer to help the viewer keep up with the dialogue. To do this you can drag either the start or end points of each caption to make the caption longer (or shorter).
To change the length of the caption, left click and hold on either the start or end of the caption block. Then drag the start/end of the caption to the required length.
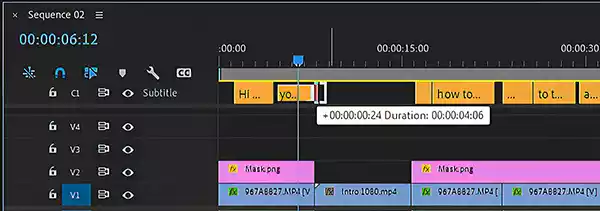
A white box will open beneath the caption which you have hold of the start/end of the caption. It shows the timing change (+ or -), followed by the overall duration of the caption.
Finding captions in the video sequence
As you will have seen, each caption in the caption panel includes the time code of where it appears in the sequence. You could use this knowledge to locate the caption block in the sequence, but there is no need, Premiere Pro does it for you.
The position of the play head along the timeline of the sequence mirrors the position in the panel, the two are linked.
As you drag the play head along the timeline, the window in the caption panel will scroll up or down, so that the caption the play head is currently on appears next to the blue position bar in the caption panel.
It also works the other way around. If you click on a caption in the caption window, the play head will jump to that caption in the sequence.
This is a great feature in Premiere Pro that will save you a lot of time if you need to adjust or edit any of your captions.
Improving the appearance of your subtitles or captions
If you are happy with the way the captions look, you’re almost done. But if you want to add a bit of polish to your captions, you can use the tools that are available in the edit tab of the Essential Graphics panel in Premiere Pro. You can change the font, font size, etc. to make the captions more attractive.
I explain how to improve upon the default look of the captions in Premiere Pro in my article: How to make your video captions look good in Premiere Pro
Exporting your subtitles or captions
Once you have finished styling your captions or subtitles, the last step is to export them.
You can burn subtitles into your video so that they are a permanent part of the video. Or, you can export the captions as a separate SubRip, or SRT subtitle file, that can be uploaded to YouTube for the Closed Captions.
I explain how to do both in my article: How to export subtitles or captions in Premiere Pro
Why you need to add captions to your videos
The American Press Institute![]() reported around 85% of the video content on Facebook is watched muted. While LinkedIn says about 80% of videos on its platform are watched without sound, and 70% of videos are deliberately created so they can be understood if muted.
reported around 85% of the video content on Facebook is watched muted. While LinkedIn says about 80% of videos on its platform are watched without sound, and 70% of videos are deliberately created so they can be understood if muted.
A Verizon survey![]() of 5,616 Americans found that as more consumers watch social media videos on their mobiles in public, the audio on videos is becoming less important.
of 5,616 Americans found that as more consumers watch social media videos on their mobiles in public, the audio on videos is becoming less important.
The poll revealed that:
- 69% watch without sound in public places
- 25% watch with sound off at home
- 50% say captions are important so they can watch muted
- 80% are more likely to watch to the end of a video if English captions are available
Clearly, most viewers like social media video content to be accessible with or without sound. If subtitles or captions are important to viewers, publishers need to take note.
But what about video platforms like YouTube? Surely, viewers watch YouTube with sound. Desktop YouTube viewers do watch with the sound on, but it’s interesting when you open the mobile app the videos in the playlist are muted and play with captions until you tap on one.
Captions are also important to YouTube, and Google, because they, along with other on-page SEO, help the search giants decide where the videos should appear in search results.
I hope the last few paragraphs have convinced you that videos will potentially reach more viewers if they are captioned.
You might also like…
- 10 ways to improve transcription accuracy in Premiere Pro
- How to Transcribe Audio in Adobe Premiere Pro
- How to make your video captions look good in Premiere Pro
- Auto Transcribe Video to Text Free of Charge: 7 methods tested
- How to export subtitles or captions in Premiere Pro
- How to repurpose videos into audio & text content with Premiere Pro
Tosh Lubek runs an audio and video production business in the UK and has been using the Canon EOS R since it was released in the Autumn of 2018 and the Canon EOS R6 in 2020. He has used both cameras to shoot TV commercials broadcast on Sky TV, promotional business videos, videos of events and functions, and YouTube creator content. He has also won several international awards for his advertising and promotional work. You can meet him by visiting his “video booth” at HashTag Business Events across the country.
Recent Posts
Most people use sandbags the wrong way. Here’s how to hang them properly on a light stand for maximum stability and safety — plus what to fill them with.
You're Using the Canon RF 50mm f/1.8 WRONG! Here’s How to Fix It
If you’ve recently picked up the Canon RF 50mm f/1.8 STM—affectionately known as the Nifty Fifty—you might be confused by that strange switch on the side of the lens. It doesn’t say AF/MF...