
DIY Video Studio is supported by its readers who use the affiliate links or ads on this site. As an Amazon Associate, I earn from qualifying purchases. Thank your support if you use any of the links.
If you’re a video creator who uses the latest version of Adobe Premiere Pro, you can do a great deal more than just create videos. In fact. Premiere Pro can help you fast-track a variety of content from a single video.
You can use Premiere Pro to export the audio in your videos to become a podcast or audiobook. But you can go further and use Premiere Pro to automatically transcribe the audio. Once you have a transcript of your video you can repurpose it into a related blog post, eBook, and even a printed book.
Why you should repurpose your video content
The main reason for repurposing your video content is that it will your audience and therefore your earning potential. Although you might have a growing audience on YouTube, there are plenty of people who either don’t watch on YouTube or can’t consume video content at certain times of the day.
Although the pandemic made working from home a thing, many people have gone back to the office. That means a daily commute for many, time that is increasingly being filled with listening to podcasts and audiobooks. Clearly, if you can convert your video into audio, your content can be consumed even when the audience cannot watch.
The popularity of text for conveying thoughts and ideas has a long history. Today we think of books, magazines, newspapers, and websites as ways of using text to communicate. But before any of those became commonplace, leaflets would be printed and passed from person to person. You could argue that ancient graffiti was a form of content creation. Graffiti had the power to convey ideas in one or two sentences. Therefore, transcribing video content, and repurposing it into a written form, has the potential to widen your audience.
But you don’t need to transform video into audio or text to repurpose it. If you make videos primarily for YouTube, repurposing might mean changing the format to make full use of screen space when uploading to vertical video platforms like TikTok, Instagram, or Facebook.
What content can you repurpose in Premiere Pro
In terms of repurposing content, video offers the maximum potential for creating new content with little extra effort. Video can easily be repurposed into other videos, audio, and text content.
Audio comes next in terms of repurposing potential. It can be easily repurposed into other audio and text content.
Finally, we have text. It can only be repurposed into other text formats, which obviously cannot be done in Premiere Pro.
Although this article is about repurposing your content from video to audio or text, with minimal effort. You could use Premiere Pro to go in the reverse direction, although it will involve extra time and effort.
For instance, if you have an audio podcast, you could relatively easily add graphics, stock photos, and video to create a good video. With a little more effort, you could take a blog post or article and record it as a video, and then repurpose the audio as a podcast or audiobook.
So whether you create YouTube videos, podcasts, or blog posts, you have the potential to create a lot more content from the original content. And as you already know, more content means a larger potential audience, and therefore, more revenue.
Repurposing Video
So video is the preferred type of content to start with. This is especially true if you don’t use a written script. Many YouTubers just have a running order of sub-topics to keep them right. It might be a written list, or they might have just worked it out in their heads.
Although some YouTubers just look you in the eye throughout their monologue, it is common to use b-roll footage and/or images and graphics to help illustrate the points they are making. So, when you repurpose your video, you potentially have four or five elements you can export.
- Audio
- Transcript
- Images/stills
- Animated gifs
- Video clips
You can instantly see from this list that video is a media-rich format, and if you’re working with your original projects, it’s relatively easy to pick those media elements apart. Without much effort, you’ll have almost all you need to create an audio podcast or blog post.
If your original video was long-form, or you have two or three videos on the same topic, you probably have enough content to create an audiobook, eBook, or printed book.
Later in this article, I’ll go into detail about exporting all those media elements from an Adobe Premiere Pro video project. If you don’t have the original project, you can still do a lot by importing a finished video into a Premiere Pro sequence.
Repurposing Audio
You might wonder why I’m mentioning audio when using Premiere Pro. The thing is, you can use Premiere Pro to work with audio, even if your project does not include any video.
I can remember in the mid-1990s reading about a couple of guys who used Adobe Premiere![]() to record and edit a weekly radio show for their church. In 2003 Adobe Premiere was replaced by Adobe Premiere Pro
to record and edit a weekly radio show for their church. In 2003 Adobe Premiere was replaced by Adobe Premiere Pro![]() , but Adobe’s main video editor has always been good for working with audio
, but Adobe’s main video editor has always been good for working with audio![]() .
.
Now, I’m not recommending Premiere Pro as your primary audio editor, but what I think you’ll find useful is the auto-transcription feature in the app. Even if your original project is a radio interview, podcast, recording of a seminar, or audiobook, you can import the audio file into Adobe Premiere Pro, just like any other media asset. You can then let Premiere Pro transcribe the dialogue, something it does well.
The transcription can be exported and edited in any word processor. What you repurpose the text into is up to you, but it could just be a blog post, an eBook, or a printed book.
Exporting your media elements
You can now appreciate that your video project can be the source of many media elements for other related content. I’ll explain how to export each one from within Premiere Pro. Since it is obviously a visual app, it seems logical to start with the visual elements you can reuse, namely, video clips, animated GIFS, and images. I’ll then move on to exporting audio and transcribing the dialogue.
Exporting and Repurposing video clips
Why would you want to repurpose your video as another video? One example is that you want to create a YouTube short. These are up to 60sec long and typically in the vertical video format. So how do you repurpose your video as a YouTube short?
First, create a new sequence using the keyboard shortcut of Ctrl + N. Then choose the Digital SLR 1080p preset. But before clicking on OK, click on the Settings tab and reverse the Frame Size in the video section. Now click OK to create your new vertical video sequence.
Copy and paste your original video sequence into your new vertical video sequence. You will now notice a problem, the top and bottom of the vertical frame are empty. You can either fill these areas in some way or scale and reframe your video clips. Finally, export the video. Choose H.264 as the format and under Basic Video Settings choose Match Source.
Depending on the length and content of your original video sequence, you might be able to export more than one YouTube Short.

Another reason for exporting a video clip from your original video sequence might be to create a video background for a website. In this case, you’ll need to check any size requirements and ensure the audio is not exported by turning it off on the export screen.
Exporting Animated GIFS in Adobe Premiere Pro
An animated GIF can be useful, not only to illustrate a process in a blog post but also to apparently include video in your marketing emails.
Normally, videos cannot be embedded in emails, it’s just the way the technology works. However, you can include images in emails, and GIFs are images, even the animated kind.
To create and export an animated GIF from your original video create a new sequence, at this stage do not worry about making it an animated GIF sequence or changing the frame rate. For the time being keep all the sequence settings the same as your original video sequence.
For instance, create a new sequence with the keyboard shortcut of Ctrl + N, and choose the Digital SLR 1080p preset. Now click OK to create your new video sequence. Copy and paste the part of the original video you want to repurpose into the new video sequence. Make any necessary cuts and, if necessary, add text annotations (remember, animated GIFs do not contain sound). I recommend keeping the duration of the animated GIF to less than 10-15sec.
When you are ready, go to the Export screen. Give the new video a name and choose the location where you wish the file to be saved. Choose the Format to be an Animated GIF. Then open the Video section to make some changes to the Basic Video Settings.
Uncheck Frame Size and click the down arrow of the Frame Size bar. In the drop-down menu click on Custom. This will let you change the Width and Horizontal frame sizes. Unless you are happy with large file sizes, reduce the frame size. One-quarter of the original HD size (480 x 270px) seems to work well, but you can change the frame size to whatever you require.
Next uncheck the Frame Rate box, and from the drop-down menu choose the frame rate of your animated GIF. It can be as low as 1fps, but 5 or 10fps normally results in smooth enough motion, while keeping the overall file size to a minimum.
If you wish to reduce the file size further, you can open the animated GIF in Photoshop and reexport it after changing the settings, however, the visual quality will suffer.
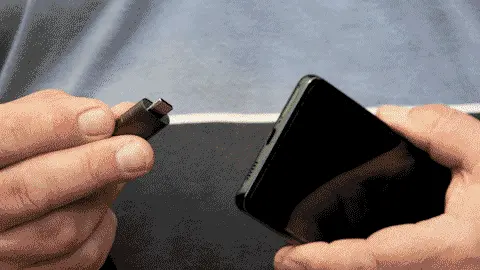
In this example, I’ve exported a 480 x 270px animated GIF that runs at 10fps. It’s 10sec long and is from my YouTube video How to connect a Blue Yeti USB Mic to a Samsung Android Phone![]() . You can see how it can help a reader of my blog more easily understand what I am writing about.
. You can see how it can help a reader of my blog more easily understand what I am writing about.
Exporting Images from your Video Content
You can export stills from your video sequence in a variety of formats from the Export screen in Adobe Premiere Pro. These include BMP, DPX, GIF, JPEG, OpenEXR, PNG, Targa, and TIF. However, if you do this from the Export screen you will get an image sequence, or each frame of the video in your sequence work area saved as separate images. Sometimes this can be useful, but it’s not what you want if you want a single still from the video to help illustrate what you are saying in a blog post.
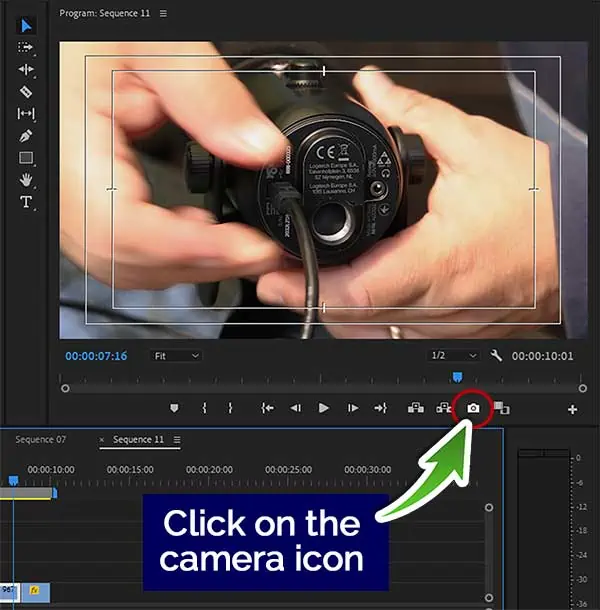
Instead, in the Edit screen, move the play head to the frame in the video that you wish to export as a still. To export that frame, click on the camera icon in the button bar below the program monitor. Alternatively, use the keyboard shortcut of Ctrl + Shift + E.
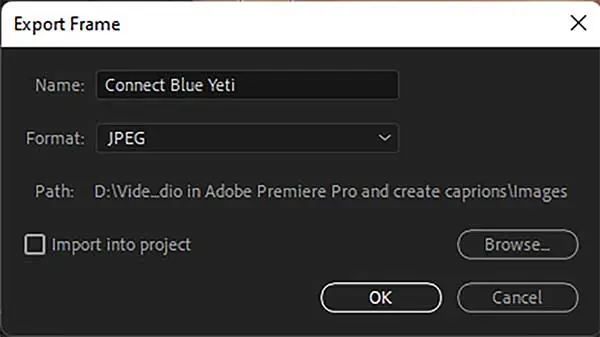
In the window that opens, give the file a name. Choose the file format. Use the Browse button to select where you wish to save the still. Finally, click the OK button to export the frame.
Exporting Audio from your Video in Premiere Pro
In principle, exporting audio from your Premiere Pro video sequence is easy. But before you start, consider whether the audio would work on its own and be completely understood by a listener. If you have used a visual element to make or clarify a point, you might need to record and insert a short voiceover to make the same point.
If the audio will work without the need for any additional audio, go ahead and export the soundtrack as is.
However, if you need to add a few sections of voiceover, consider exporting just the dialogue from your video. Having the audio without background music and sound effects will make editing your new audio much easier to do and not have it sound poorly edited. Once you have edited the dialogue and voiceover together, add the music and sound effects back in for a seamless mix.
So how do you export the dialogue from your video?
Step 1
Make sure you mute any audio you do not require in the export. To do this, click the M on any audio track you wish to mute.
Step 2
Switch from the Edit screen to the Export screen by clicking on the Export tab.
Step 3
Give the audio file you are going to export a name and choose the location where the file will be saved.
Step 4
From the Format drop-down box choose your preferred file type. You can choose from AAC Audio, AIFF, MP3, Waveform Audio (wav), and Windows Media (wma). I do all my audio production using the Waveform Audio format, so that’s what I would choose, but you can choose the format that you prefer.
Step 5
Depending on the format you chose will determine your next choice. Because I chose Waveform Audio, I now need to choose the Audio codec, but if you chose the mp3 format you would move straight to the next step. Although I might output my final file as an mp3 file, during the production phase I don’t want to lose any audio information, so for the codec, I would choose Uncompressed.
Step 6
We now move on to the Basic Audio Settings, the first of which is Sample Rate. In video production the standard sample rate is 40,000Hz, but in Audio production, 44100Hz is commonly used. However, you could use a higher sample rate, such as 96,000Hz, or go down to around 8,000Hz. The idea is that the higher the sample rate the better the audio quality (more detail) and the lower the sample rate the lower the audio quality (less detail). But in general. You cannot take low-quality audio and turn it into high-quality audio just by increasing the sample rate. Stick with the sample rate of your original audio or slightly lower. So, if you recorded your audio at 48000Hz for a video project but now wish to export the audio for an audio-only project, I would recommend using a sample rate of 44100Hz.
Step 7
Next, we choose the channels for the audio, which will be Mono or Stereo. Your choice will depend on the type of project you have. Usually, you should choose Mono, unless your audio has “width”, with some audio deliberately shifted off-center. If your project is just dialogue, and especially if it is just a single person speaking, choose Mono. A stereo file of a person speaking in the middle of the stereo image will sound like a mono file, but by choosing mono, the file will be half of the equivalent stereo file. Generally, set Channels to Mono.
Step 8
Sample Size is the next option you need to set. Like Sample Rate, the higher the value, the greater the potential detail. However, just like Sample Rate, you cannot create detail that is not already in the audio. If you are going to do a lot of production on your audio, you could choose up to up to 32-bit float for the sample size. But if you will do relatively little production on your audio choose 16-bit for the sample size.
Step 9
Disable Effects and Metadata by clicking on the relevant radio buttons, so they are gray instead of blue.
Step 10
You’re now ready to export your audio file. If you are going to be exporting audio from several video projects, you might want to send the export to Media Encoder and create a queue of jobs. But if you are working on just one project, click the blue Export button in the bottom right corner of the screen.
Once Premiere Pro has finished exporting the audio file, you’ll find it in the folder you set in Step 3 of these instructions.
You can now import the file into your favorite audio editor for any final audio production, perhaps.
Exporting the Transcript of your Video in Premiere Pro
I assume you have already created a transcript or captions for your video. If you haven’t, I recommend that you read my article, How to Transcribe Audio in Adobe Premiere Pro, before proceeding.
If you are in the Captions and Graphics workspace, click on the Text tab to open the Text panel. Otherwise, click in Window in the man menu bar and then click Text in the menu. This will open the Text panel as a floating panel.
Step 1
In the Text panel’s menu bar click on Transcript to open the panel’s transcript window. Assuming you have previously created a transcript or captions of the video’s audio, you should see the transcript in the window.
Step 2
Next, correct any transcription errors. Let the video sequence play while you keep an eye on the transcript. Notice that in the transcription window, the word currently being spoken is highlighted in blue. The reason you should correct the transcript while the video plays is that when Premiere Pro does get the transcription wrong, guessing what the correct phrase was can be difficult if you are just working with the transcript as a guide. However, if you can hear what is being said, correcting the transcription is easy.
Step 3
You can now export the transcript. Click on the three horizontal dots in the top right corner of the panel. In the drop-down menu, you will see the second option is Export Transcript. DO NOT use this, since this exports a file type that only Adobe Premiere Pro can work with. Instead, choose either Export to text file or Export to CSV file. Click on the option you want. If you are unsure whether you need a text file or CSV file, I’ll explain in the next section of this article: Choosing the File Format when Exporting the Video Transcript.
Step 4
In the window that opens, navigate to where you want to save the transcript file, give the file a name, and finally click the Save button.
Choosing Which File Format to Use When Exporting the Video Transcript
The two file formats that you will find useful when repurposing your video content are Text file or CSV file.
Each file type has its advantages, depending on what you want to do next.
If you export to a text file, then open the file in Word, the text will be split into paragraph sections, each equivalent to about 30-40sec of speech. Each section starts with a timecode stamp, then who is speaking is shown, and finally, we have the paragraph of text.
Here is a typical section from one of my videos.
00:00:42:13 – 00:01:12:24
Speaker 1
However, the steps will be very similar for almost any USB microphone that has a cable that ends with a USB, a connector, plus many other models of Android phones and tablets. The first problem we have in connecting the Blue Yeti to an Android phone is that the Yeti is USB. A connector won’t fit into the USB port on the phone If you have an older Android phone, it might even have a micro USB port, but you still have the same problem.
If you export to a CSV file, you’re exporting to a spreadsheet file that is organized a little differently to the text file we’ve just talked about. The data is separated by commas, hence the name, comma-separated values, or CSV file.
The data on each line of the CSV is separated by commas and then each line is separated by multiple commas. In the case of Premiere Pro’s transcript CSV files, the data format is as follows:
Speaker Name,Start Time,End Time,Transcript
,,,
The group of three commas effectively represents a blank line or new line for the data.
Here is the same section of the transcript that I previously showed, but copied from a CSV file opened with a text editor. I have made each data field a different color for clarity, looks like this:
Speaker 1,00:00:42:13,00:01:12:24,”However, the steps will be very similar for almost any USB microphone that has a cable that ends with a USB, a connector, plus many other models of Android phones and tablets. The first problem we have in connecting the Blue Yeti to an Android phone is that the Yeti is USB. A connector won’t fit into the USB port on the phone If you have an older Android phone, it might even have a micro USB port, but you still have the same problem.”
,,,
So, which of these two file types should you choose to export? Basically, it is up to you because of what you need to do next with the transcript. But here’s a clue. If you export a text (.txt) file, when you open it in Word, you will have to go through the transcript deleting the timestamp and speaker info that is saved just before each paragraph. That can be a time-consuming process. However, if the video included multiple speakers, knowing who is speaking will probably be useful as you edit the transcript.
But I’m guessing that if you are a typical content creator, only you will be speaking in the video. If that’s the case, export the transcript to a CSV file, especially if your video is about ten minutes or longer.
Initially, this might seem an odd thing to do, after all, no one writes or edits articles or posts in Microsoft Excel (or Google Sheets). However, Excel handles blocks of data in a better way than MS Word. In Excel, you can manipulate all the data in one column (or row). That is useful because the Speaker, Start, End, and Transcript data are all in separate columns. So, we can copy just the text of the transcript without any of the timecode or speaker information.
So, here’s how to speed up the editing of your transcript.
Open the CSV file in Excel. Now only highlight and copy the column that contains the transcript. Then paste the transcript as plain text (not formatted text) into a blank Word document.
In just a few seconds you have avoided the tedious task of going through the transcript and deleting the unnecessary information that you would have had to do if you had exported the transcript to a text file.
Summary
As you can see, Adobe Premiere Pro isn’t just a video creation tool, it can also be used to help you repurpose your existing video and audio content. If you start with your existing video projects, you can quickly export audio and text that can be crafted into fresh content for a wider audience. That’s important, since not everyone can watch a video, but they might be in a position where they can listen or read. If you’re not offering your content in more than one form, you are potentially leaving money on the table, since each type of content can be monetized.
You might also like…
- How to export subtitles or captions in Premiere Pro
- How to Transcribe Audio in Adobe Premiere Pro
- 10 Ways to Improve Transcription Accuracy in Premiere Pro
- How to Create Subtitles or Captions in Premiere Pro
- How to make your video captions look good in Premiere Pro
- Premiere Pro: The File Has an Unsupported Compression Type: Fix
Tosh Lubek runs an audio and video production business in the UK and has been using the Canon EOS R since it was released in the Autumn of 2018 and the Canon EOS R6 in 2020. He has used both cameras to shoot TV commercials broadcast on Sky TV, promotional business videos, videos of events and functions, and YouTube creator content. He has also won several international awards for his advertising and promotional work. You can meet him by visiting his “video booth” at HashTag Business Events across the country.
Recent Posts
Most people use sandbags the wrong way. Here’s how to hang them properly on a light stand for maximum stability and safety — plus what to fill them with.
You're Using the Canon RF 50mm f/1.8 WRONG! Here’s How to Fix It
If you’ve recently picked up the Canon RF 50mm f/1.8 STM—affectionately known as the Nifty Fifty—you might be confused by that strange switch on the side of the lens. It doesn’t say AF/MF...