

DIY Video Studio is supported by its readers who use the affiliate links or ads on this site. As an Amazon Associate, I earn from qualifying purchases. Thank your support if you use any of the links.
Congratulations. I assume you’ve successfully created captions for your video in Premiere Pro and now you want to export them.
You have two options, you can “burn” the captions into the video so they are always visible, or you can export the captions as a separate sidecar file. That means when you export your video, Premiere Pro will create a normal video file plus an SRT file that contains the caption text along with the timings when they should appear.
Your choice depends on where you plan to publish your video.
If you intend to upload your video to most social media platforms, where around 80% of viewers watch with the sound turned down, it’s better to burn the subtitles into the video. However, for YouTube, you’ll want to export the captions to a SubRip or SRT file. I’ll demonstrate both options in this article.
This article assumes you are using Premiere Pro 2022 or later since the exact process is slightly different in earlier versions of the app.
How to burn subtitles into a video in Adobe Premiere Pro
To export a video using previous versions of Premiere Pro, you would click File > Export > Media. Technically you can still do that in the new 2022 version of Premiere Pro, but there is no point since that opens the same screen that now a single click achieves. So, let’s get into it.
STEP 1
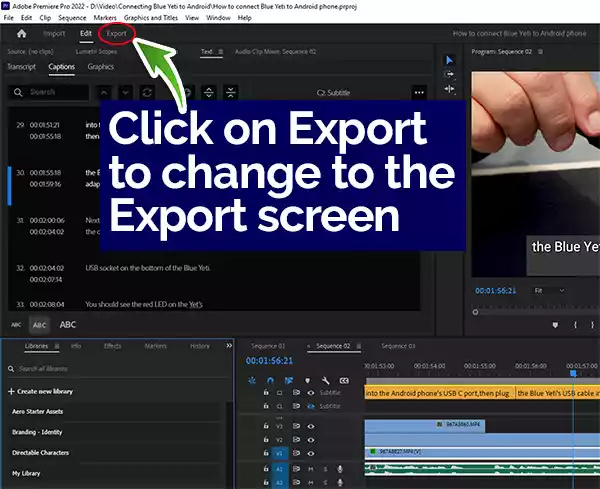
Below the main menu bar, you now have a bar with four options, Home, Import, Edit, and Export. If you’ve been working on your video and created the captions you will be in the Edit screen. The first thing to do is to click on Export to change to the export screen.
STEP 2
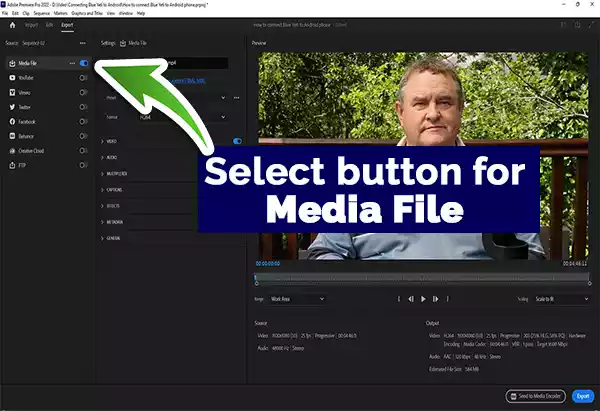
The screen that opens is basically split into three. The left side allows you to choose whether you wish to export to a media file on your computer or another destination, such as a social media platform, Creative Cloud, etc.
For the purpose of this article, I will assume you wish to save the video to your device, therefore select the button next to Media File.
STEP 3
Next, you will concentrate on the settings section.
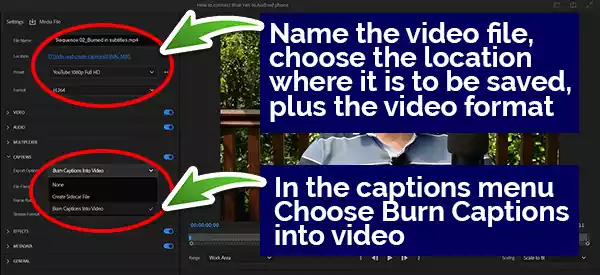
- Give the video file a name.
- Choose the location where the video is to be saved.
- Make any necessary adjustments to the video format settings.
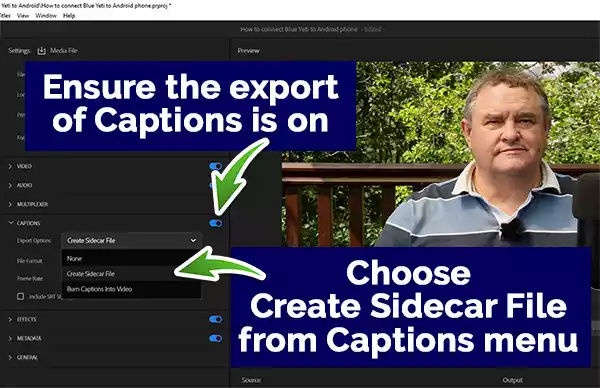
- Turn on captions by clicking on the button in the Captions section.
- Open the Captions section and from the drop-down menu choose Burn Captions Into Video.
STEP 4
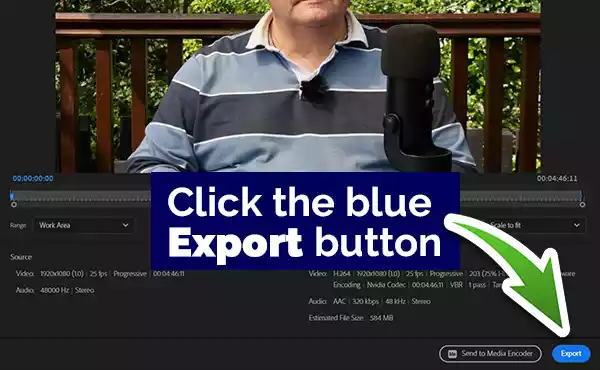
You are now ready to export the video with the captions burned into the video. Click the blue Export button in the bottom right of the screen.

STEP 5
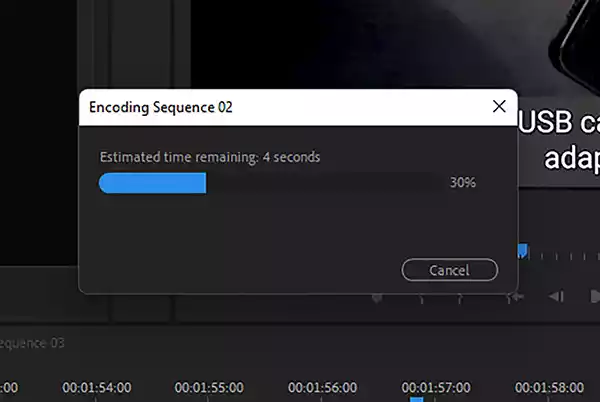
Your project will now be encoded. The length of time taken will depend on your project and the speed of your computer.
STEP 6
To check that the captions were burned into the video, go to the folder where you told Premiere Pro to save the video, and double-click on the video file to play it in your default media player. If the subtitles appear in the video as you intended, you’re done.
Exporting Subtitles to an SRT file in Premiere Pro
A subtitle SRT file can be created in two ways. When you export your video, enable captions in the export settings and choose Create Sidecar File. Alternatively, you can just export captions to an SRT from the Captions panel in the Captions and Graphics workspace.
Let’s jump into the two methods.
Exporting captions from the Captions panel
STEP 1
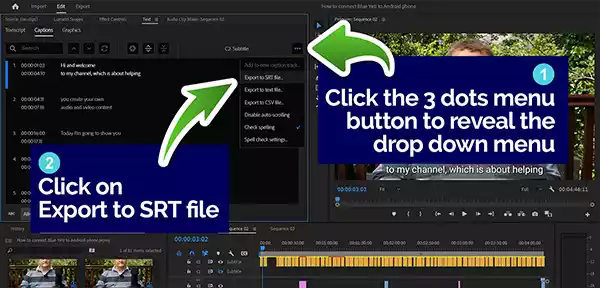
In the top right of the Captions panel, click on the three dots menu button to reveal the drop-down menu. Choose the second option in the list, Export to SRT file…
STEP 2
A file explorer window will open enabling you to save the SRT file with a name of your choice and in your preferred location.
I prefer to keep the SRT file with the exported video file in a folder called FINAL MIX, which helps to keep everything tidy. You of course can use your preferred name and location.
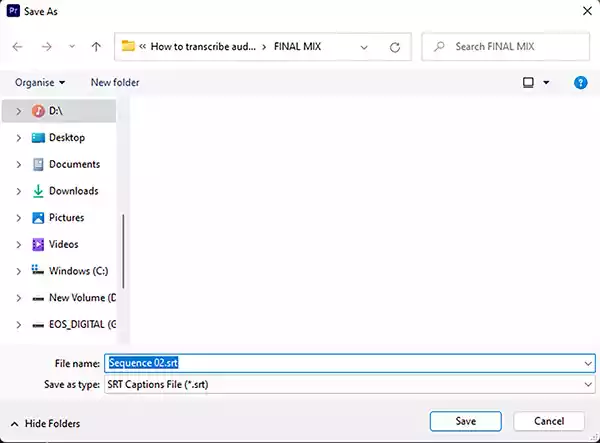
By default, the file name for the SRT file is the same as the sequence name, but you might want to use a more meaningful name. Now click the Save button.
STEP 3
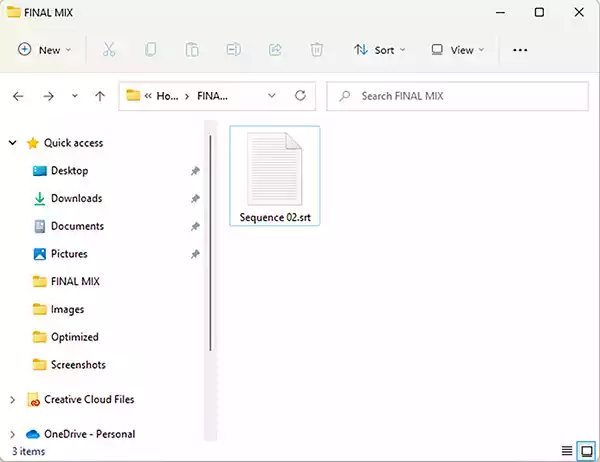
The SRT caption file should now be in your chosen folder. Navigate to the folder to double-check that it was created.
Exporting Video with a Sidecar Captions file
This method of exporting your captions is very similar to that of burning the subtitles into the video. The process only differs in your caption settings choices, however, visual differences are quite apparent in your exported video. This time there are no visible subtitles in the video, they are contained in the SRT file that is created alongside the video file.
So, let’s see how it’s done.
STEP 1
Below the main menu bar, there is another menu bar that has four options, Home, Import, Edit, and Export. You are probably in the Edit screen, so the first thing to do is to click on Export to change to the export screen.

STEP 2
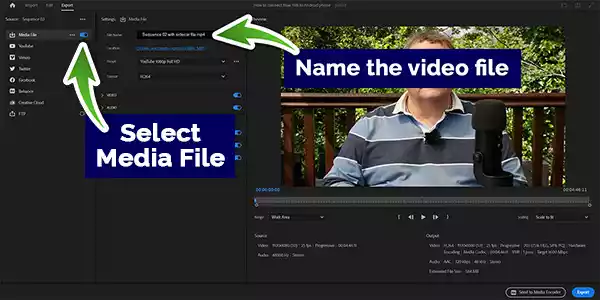
When the Export screen opens, ensure the radio button next to Media File is activated and showing blue. If it is gray, click on it to make it blue. Next, in the File Name box enter a name for your video.
STEP 3
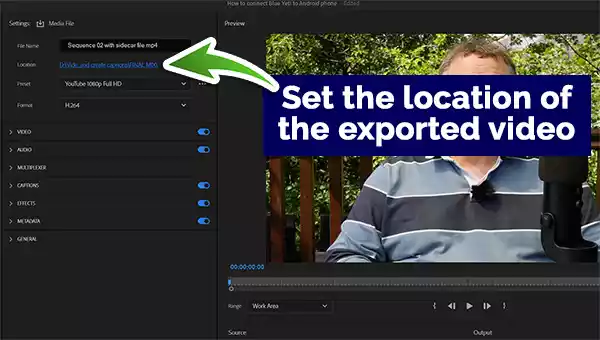
Set the location destination of the exported video and captions. Click on the blue link to make any necessary changes in File Explorer.
STEP 4
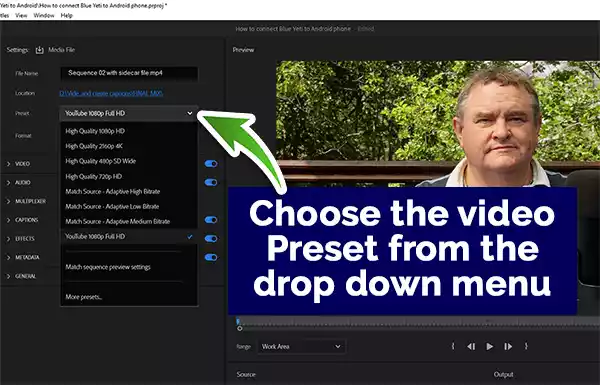
Click the down-arrow of the video Presets menu bar and choose the required preset. My video is full HD and would be published on YouTube, so the preset I chose was YouTube 1080p Full HD.
STEP 5
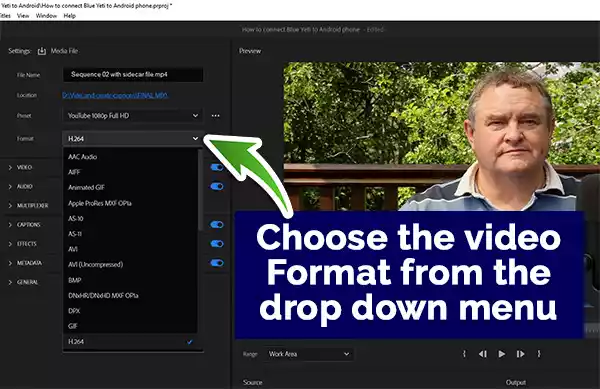
Click the down-arrow of the video Format menu bar and choose the required preset. Because I will be uploading to YouTube I’ve chosen the H.264 format. This is the most popular codec for YouTube and the internet because it produces relatively small file sizes without badly affecting the video quality.
STEP 6
In the Captions settings section ensure that the export of caption is enabled by clicking on the radio button to make it blue. Next, click on the Captions bar to open the settings. From the settings menu select, Create Sidecar File.
You can see from the details in the Captions settings section that the file type of the exported captions will be the SubRip Subtitle Format, or .srt, and the Stream Format will be Open Captions.
You are now ready to export your video with sidecar captions.
You have two options. If you are working on a few different video sequences, you can send them to a queue in Media Encoder, where they can be processed while you get on with other video projects in Premiere Pro. To do that click on the Send To Media Encoder button in the bottom right corner of the screen.
STEP 7
If you are only exporting one sequence and don’t need to carry on with more editing, you can do the encoding right inside Premiere Pro. To do that, click the blue Export button that’s in the bottom right of the screen.
Your video project and sidecar subtitle file will now be encoded. The length of time taken will depend on your project and the speed of your computer.
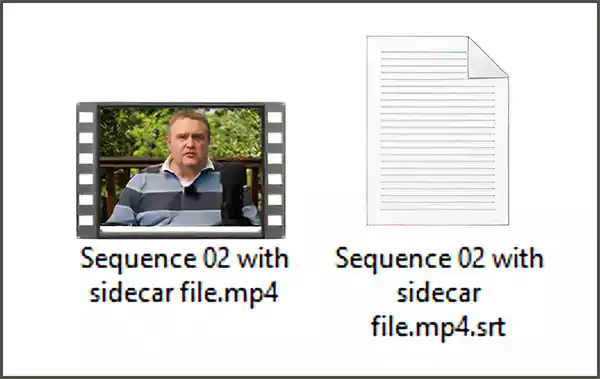
Once encoding has been completed, open the destination location of the encoded files. In the folder, you should see the video file (the .mp4 file) and the SubRip caption file (the .srt file).
Checking your captions before uploading to YouTube
If you try opening the video file you just encoded by using the Media player that comes with Windows, you probably won’t see any subtitles as the video content plays. We know the captions were created because we could see that the SRT subtitle file had been created along with the video file, so what’s gone wrong?
Actually, nothing’s gone wrong.
The media Player in Windows just doesn’t support captions, so they will never appear over the video unless you install a new codec. If you want to see your subtitles you need to do is to install a better media player, like VLC Media Player![]() .
.
VLC Media Player is a free and open-source cross-platform multimedia player. It will display the subtitles, and you can toggle them on and off if you so wish. Either way, VLC Media Player is worth installing if you wish to check your captions before uploading to YouTube.
How to Import SRT Captions into Premiere Pro
Using the features built into Premiere Pro isn’t the only way to create captions for your videos. Plenty of people use third-party services since traditionally this has been a way to save time and money. But when you get the subtitle SRT files sent back to you, how do you import them into your video project?
There are at least a couple of ways. You could import the caption file into your project, just like any other media file. But you’ll then need to synchronize the subtitles with the audio. That’s not a huge problem, for instance, select all the captions and then drag the first caption so it starts where the dialogue begins. However, if your sequence is long, you will need to check that everything is still in synchronization as you get further along the sequence.
However, the easier and more accurate way is to let Premiere Pro do the work for you. Because your SRT subtle file contains the timecode for each caption Premiere Pro will know where each caption is meant to go.
This is how to import an SRT file into a Premiere Pro project.
STEP 1
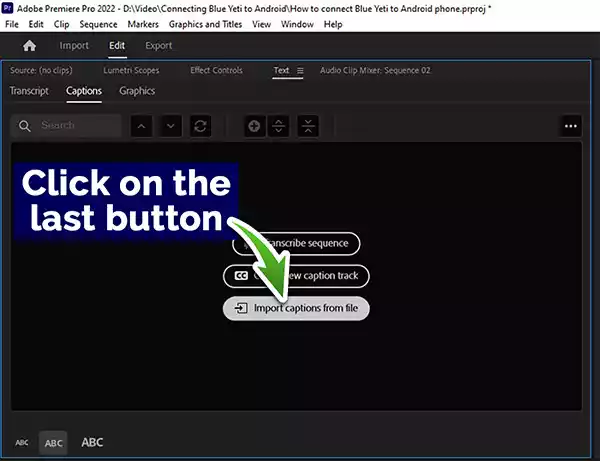
In the Captions and Graphics Workspace, open the Captions panel. You will see three options,
- Transcribe sequence
- Create new caption track
- Import captions from file
Click on Import captions from file. This will open a File Explorer window.
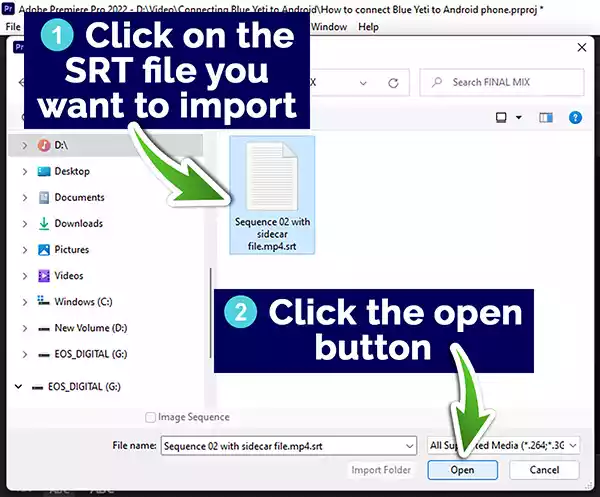
STEP 2
Use the File Explorer window to navigate to the folder where you have saved the SRT subtitle file you wish to import. Click on the SRT file and then click the Open button.
STEP 3
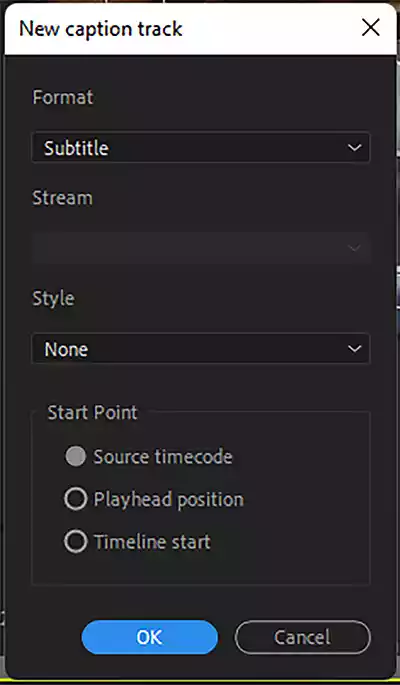
A New Caption Track window will open.
Leave the format as Subtitle. Leave the subtitle Style as None, unless you have a saved style you normally use, in which case go ahead and select it from the style drop-down menu box.
Leave the start point as Source Timecode, and finally, click OK.
STEP 4
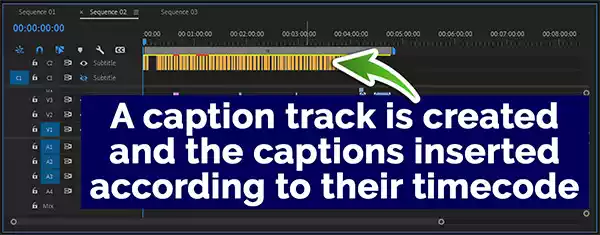
The captions will be imported and appear on the subtitle track.
What is an SRT video caption file?
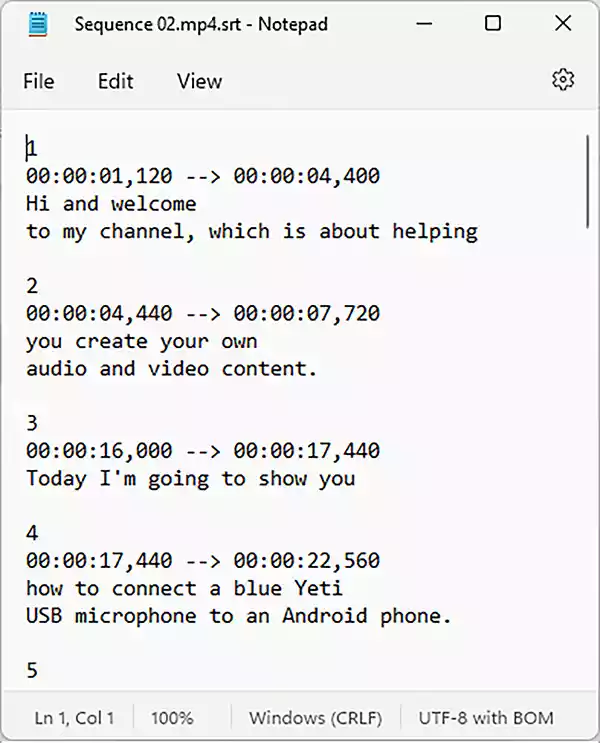
An SRT file is a simple text file and is known as a SubRip Subtitle file. Each caption has a separate entry that includes its caption number, the start to end timecode when the caption is visible, and the caption text. The text appears on one or two lines, as it will be displayed over the video.
Here is the start of the SRT file that was exported with the video I’ve been using as an example for this article.
Each caption has its own section and is numbered.
Notice that according to the SRT subtitle file the first caption starts at 00:00:01,120.
However, notice in Premiere Pro, with the play head at the start of the caption, the app shows a time code of 00:00:01:03.
So why the difference?
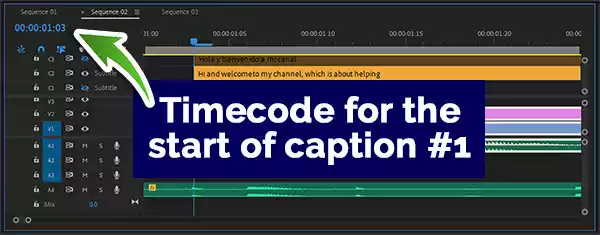
In the SRT file the fraction of a second at the end of the timecode, the last three digits, is in milliseconds. Therefore 120 means 120 milliseconds.
But the fraction of a second shown at the end of the timecode in Premiere Pro, the last two digits, is in frames. Therefore the 03 means 3 frames.
Because this is a PAL sequence there are 25 frames to one second. So, 3 frames equal 3/25 seconds, or 0.12 seconds, or 120 milliseconds. So, you can see the two timecodes mean exactly the same, you just need to realize they are using two different systems.
Note that if you are in North America your timeline is likely to have 30 frames per second unless you are after a cinematic look. In that case, you will have 24 frames per second.
You might also like…
- 10 Ways to Improve Transcription Accuracy in Premiere Pro
- How to Transcribe Audio in Adobe Premiere Pro
- How to Create Subtitles or Captions in Premiere Pro
- How to make your video captions look good in Premiere Pro
- How to repurpose videos into audio & text content with Premiere Pro
- Premiere Pro: The File Has an Unsupported Compression Type: Fix
Tosh Lubek runs an audio and video production business in the UK and has been using the Canon EOS R since it was released in the Autumn of 2018 and the Canon EOS R6 in 2020. He has used both cameras to shoot TV commercials broadcast on Sky TV, promotional business videos, videos of events and functions, and YouTube creator content. He has also won several international awards for his advertising and promotional work. You can meet him by visiting his “video booth” at HashTag Business Events across the country.
Recent Posts
Most people use sandbags the wrong way. Here’s how to hang them properly on a light stand for maximum stability and safety — plus what to fill them with.
You're Using the Canon RF 50mm f/1.8 WRONG! Here’s How to Fix It
If you’ve recently picked up the Canon RF 50mm f/1.8 STM—affectionately known as the Nifty Fifty—you might be confused by that strange switch on the side of the lens. It doesn’t say AF/MF...