

Author: Tosh Lubek Published: 16th June 2023
DIY Video Studio is supported by its readers who use the affiliate links or ads on this site. As an Amazon Associate, I earn from qualifying purchases. Thank your support if you use any of the links.
Including the sun in your image can change the emotional impact of the scene. The rising or setting sun can look awesome, while sun rays piercing clouds, a forest canopy, or through trees can add drama to the shot. But the sun can look even more impressive by using sunburst photography techniques. The technique is not particularly difficult, but you must pay attention to the detail to make the most of the effect.
Sunburst photography lets you get sun rays in your photos by using a short focal length and a small aperture of about f/16. The smaller the apertures produce more defined sun rays, but other factors also determine the best f-stop to use and allow you to create a sunburst at longer focal lengths.
In this article, I’ll explain what sunbursts are, and what it takes to create them with your digital camera.
What is a sunburst in photography and what causes the effect?
A sunburst is an image of the Sun where the sun is a small dot, with star-like rays or spikes emanating from the center. However, a sunburst can be thought of as a starburst that features the Sun. Starbursts can also appear in images of bright stars and lights. The sunburst, or starburst, effect is due to diffraction. That’s the bending of light around the edges. The rays are diffraction spikes caused by the lens’ aperture blades, and they become longer and more defined with smaller apertures. However, image sharpness can soften at higher f-stops.
When you’ve finished reading this article make sure you watch my YouTube video
Photography tips for creating sunbursts or Sun Rays
Creating a sunburst isn’t rocket science, but to leverage the technique’s full potential you should work through the details. If you do, you’ll get much better results in your landscape photography. Creating good sun rays isn’t just about photography settings.
So, without further ado, let’s dive into the detail.
Use a small aperture or high f-stop

To create a sunburst, use a small aperture to maximize the diffraction effect around the aperture blades. This will require a high f-stop, somewhere between f/11 and f/22. However, if your lens permits it, you can go even higher. But beware about going too high with the f-number, since the increased diffraction can cause a softening of the sharpness. Also, if the sunburst becomes very pronounced, it could become the dominant feature and a distraction in your composition.
As a rule of thumb, I stick to around f/11 to f/16, which produces attractive sunbursts. Although there are times when I might go to f/22.
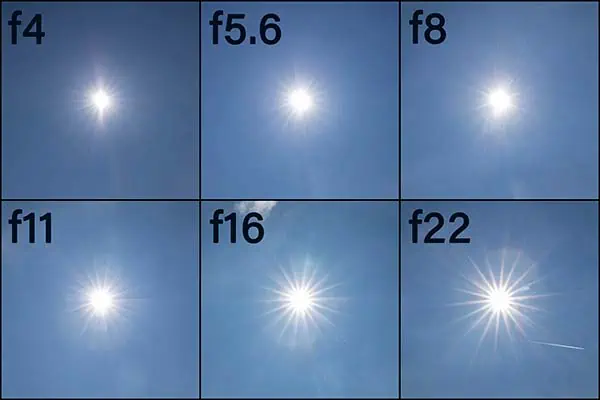
The following set of images demonstrates that the size and definition of a sunburst increase with higher and higher f-numbers. Each image was shot with the sun reasonably high above the horizon, demonstrating that it is possible to create a sunburst even when the sun was in a clear blue sky.
In this set of six exposures, each image was shot at a focal length of 24mm using my Canon RF24-105mm f/4 L IS USM lens. You’ll notice that the sunburst is visible even at f-4, but the effect gradually becomes more defined as the aperture is reduced (f-stop increases).
Shoot at the best time of day
I’ve created sunbursts in my shots when the sun is high in the sky and completely unblocked by clouds or a forest canopy. However, there’s no doubt that the Golden Hour is one of the finest times to include a sunburst in your shot. The light is softer around the rising or setting of the sun and can suit the inclusion of a subtle sunburst.
Use a shorter focal length
An ideal lens to create a sunburst would be something like 16-35mm. But why is that?
I’ve already mentioned that those sun rays or star-like spikes are the results of diffraction caused by a small lens aperture, specifically by the edges of the aperture blades.
For this next bit, you need to know that the f-stop = focal length/aperture diameter.
Let’s assume you’re using a 16mm lens at f/16 to capture a great sunburst. That would produce an aperture diameter of 1mm. Since we know that a wide-angle lens at f/16 can produce stunning sunbursts, presumably an aperture diameter close to 1mm is what we need.
So, what happens if you use a 100mm focal length lens? We know that we need a small aperture of about 1mm in diameter. Plugging this and a focal length of 100mm into the formula, we get an f-stop of f/100.
Now that’s not going to happen. The highest f-stop on a commercial lens is f/45, on the Sigma 105mm f/2.8 EX DG Macro lens. But most commercial lenses have a minimum aperture of f/22 or f/32. So, when using a longer focal length, you can’t make the aperture small enough to get a lot of diffraction. Furthermore, longer focal lengths produce more magnification, so the sun is no longer point-like and will appear as a disk.
Block part of the sun’s disk
Although we need the light source to be as point-like as possible, the sun has a disk that’s about half a degree across. But we can cheat a little bit and make the sun’s disk appear smaller by blocking part of it.
I’ve done exactly that in these two images. As you would expect, I’ve got a sunburst with a 16mm lens at f/16. But I’ve also got a good sunburst at a focal length of 100mm and f/16.
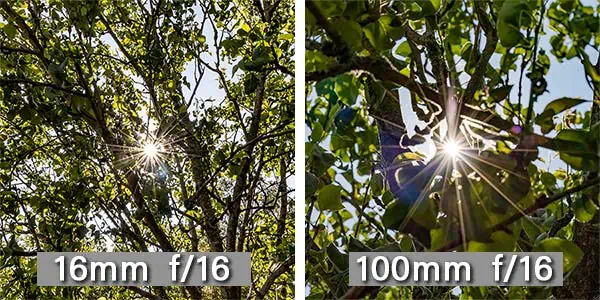
The leaves and branches of the tree block part of the sun’s disk, making the sun appear more point-like. The result is a fabulous sunburst at both a focal length of 16mm and 100mm.
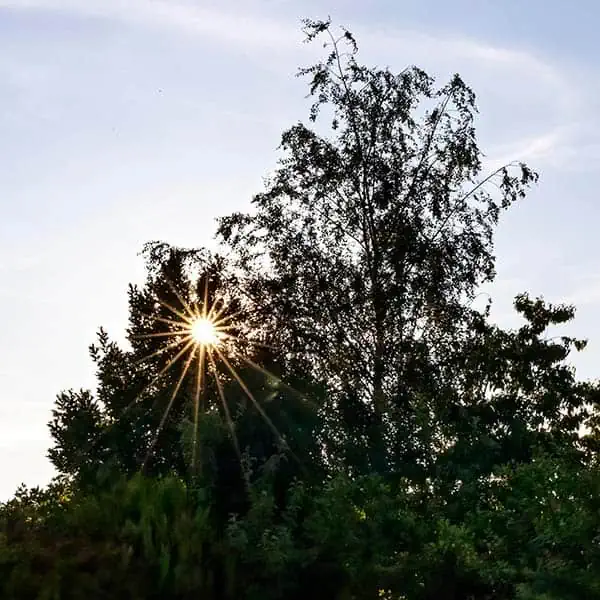
You can use this blocking technique to reduce the apparent size of the sun (and reduce lens flares) in other situations as well. The blocking object could be the ridge of a mountain, the edge of a building, a cloud, and, as we’ve already demonstrated, the leaves, branches, or the trunk of a tree.
In this sunburst example, both the mountain ridge and a cloud edge are used to intensify the sunburst effect.
Also, if the background is darker, the sun rays appear more apparent. In this case, both the mountain and cloud provide a high-contrast background, which allows the sunburst to “pop”.

To get the effect looking right you’ll probably need to move the camera around a little until everything lines up correctly.
Look for a clear piece of sky
For the maximum effect, you want the air between the sun and your camera to be clear. But this doesn’t necessarily mean a cloudless sky. A clear gap in the clouds is enough and will create a more dramatic shot than effect than a totally clear blue sky.
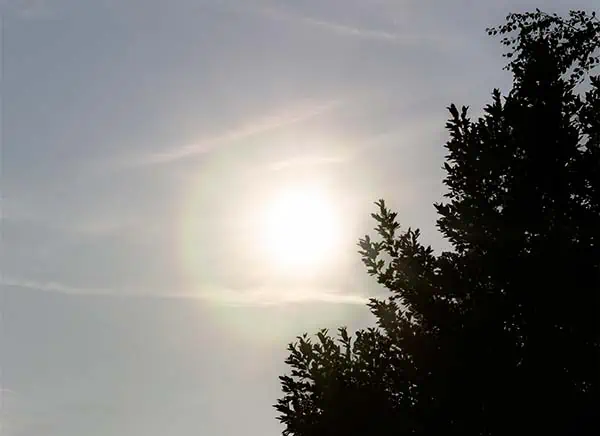
However, if where the sun is you have haze, mist, or even smoke, this will have a negative impact on your ability to create a sunburst. The sun’s light passing through the thin cloud or mist will be dispersed. The thin cloud layer close to the sun will be illuminated, making the apparent size of the sun much larger. The light source is no longer like a point of light, so the sunburst will be diminished.
The opposite image of the sun was shot at f/16, which would normally be a small enough aperture to produce a good sunburst. However, the hazy cloud, along with a focal length of 105mm, prevented the appearance of sun rays.
Choose the right lens
When it comes to sunbursts, not all lenses are made equal. Avoid using a lens that is prone to flaring, since it can result in a messy sunburst that will require fixing in post-processing.


Last update on 2025-10-20 / Affiliate links / Images from Amazon Product Advertising API
Another aspect to consider is the number of sunburst rays, spikes, or points. This is related to the number of aperture blades in the lens and whether it is an even or odd number.
If the lens has an even number of aperture blades, the sunburst will have the same number of spikes as the number of blades.
But if there are an odd number of aperture blades, there will be twice as make sunburst spikes as blades.
For instance, if I use my RF24-105mm f/4 L IS USM lens, which has 9 aperture blades, the starbursts will have 18 diffraction spikes or rays.
Avoid reflections and dust motes
If you have a UV filter fitted on your lens, remove it. That’s because the extra glass can cause unwanted reflections and flares in your image. Remember, you’re shooting toward the sun, something we often avoid.
If you do need to use a filter, at least make sure it is clean. When I have a UV filter on my RF24-105mm f/4 L IS USM lens and shoot at 24mm, any dust, dirt, or the finest water drop is easily visible if there is any stray light.
You should also clean your lens and your camera sensor. I’m not advocating some extreme form of camera gear hygiene. The need to keep everything dust free is a consequence of using a high f-number, shooting into the sun, and potentially including a lot of sky in your shot. These are ideal conditions for dust motes to become visible in your images.
Getting rid of the visible artifacts caused by dust in post-production can be challenging. However, the new Remove and Generative Fill tools in Photoshop can make the process a lot easier and less time-consuming.
Manage your exposure
The sun is amazingly bright, and even at f/16, you’re going to have to watch your exposure.
First, set your ISO to 100 so that there is going to be as little noise in your image as possible. Then adjust the shutter speed while keeping an eye on the histogram. You want to avoid clipping the shadows while underexposing the shot by one or two stops.
Don’t worry about those shadows, you will be able to lift those dark areas in post-processing in software like Lightroom or Photoshop.
Can any lens be used for sunburst photography?
As I already mentioned, if you want well-defined sun rays in your sunburst photography it’s best to use shorter focal length lenses. So, if you want a really good sunburst, you can’t just use any lens. Short focal lengths and small apertures produce the best results. However, this is a generalization.
I’ve shown in this article that it is possible to create good sunbursts with 16mm, 24mm, and 105mm focal lengths. It just requires a little knowledge and experience. You don’t even need to use a modern camera lens.
Here is an example of a sunburst taken with a forty-year-old Olympus OM Zuiko 28mm lens with the aperture set to f22.
So, within limits, you don’t need a specific lens to produce the sunburst effect. Generally, you want to use an f-stop of about f/16 with a focal length that is in the wide-angle to short telephoto range.
Conclusion
I’ve shown you that using a lens with a shorter focal length and using a small aperture will help you create sunbursts in your photographs. Choosing an f-stop of about f/16 is usually a good starting point. But other factors are also important, such as making sure the sun appears as small a point as possible, despite having an angular size of half a degree. Although the Golden hour is one of the best times to create a sunburst in your composition, there are plenty of other times when you might also wish to include one. For instance, when shooting in a woodland a sunburst between the tree trunks or leaf canopy can add power and drama to the image. But don’t wait for special moments. Get out your camera and practice when the sun is high in a clear sky. Provided you choose an f-stop like f/16 or higher, you’re almost guaranteed to capture a sunburst.
Here’s a big ask from me: If you liked this article, please share it.
It will mean a great deal to me if you share this post because a few seconds of your time will seriously help my blog grow. The share buttons are below the “About Author” section.
Thanks. 🙂
Sources: 1![]()

About the author: Tosh Lubek is a multi-award-winning broadcaster, writer, and video producer, with 40 years of experience in professional broadcasting and has been using Canon video and stills cameras since 2010. He has worked with radio and TV broadcasters, advertising agencies, and direct clients on a variety of projects including radio and television advertising, online video production, corporate videos, award ceremony motion graphics, and theme park sound design. Tosh has won numerous awards, including a Radio Academy Awards Gold Sony, a Gold, Silver, and Bronze World Medals in the New York Festivals International Advertising Awards. Since about 2007 he has been creating YouTube videos. Tosh has been a sponsor of the “video booth” at HashTag Business Events across the UK.
Recent Posts
Most people use sandbags the wrong way. Here’s how to hang them properly on a light stand for maximum stability and safety — plus what to fill them with.
You're Using the Canon RF 50mm f/1.8 WRONG! Here’s How to Fix It
If you’ve recently picked up the Canon RF 50mm f/1.8 STM—affectionately known as the Nifty Fifty—you might be confused by that strange switch on the side of the lens. It doesn’t say AF/MF...